Page 241 of 260

Fuses and light bulbs
240
Note
For vehicles with a 2.0 litre/85 kW engine, we recommend that you have
the light bulbs for the main beam lights, low beam lights and parking lights
changed by a Skoda dealer.
Main beam
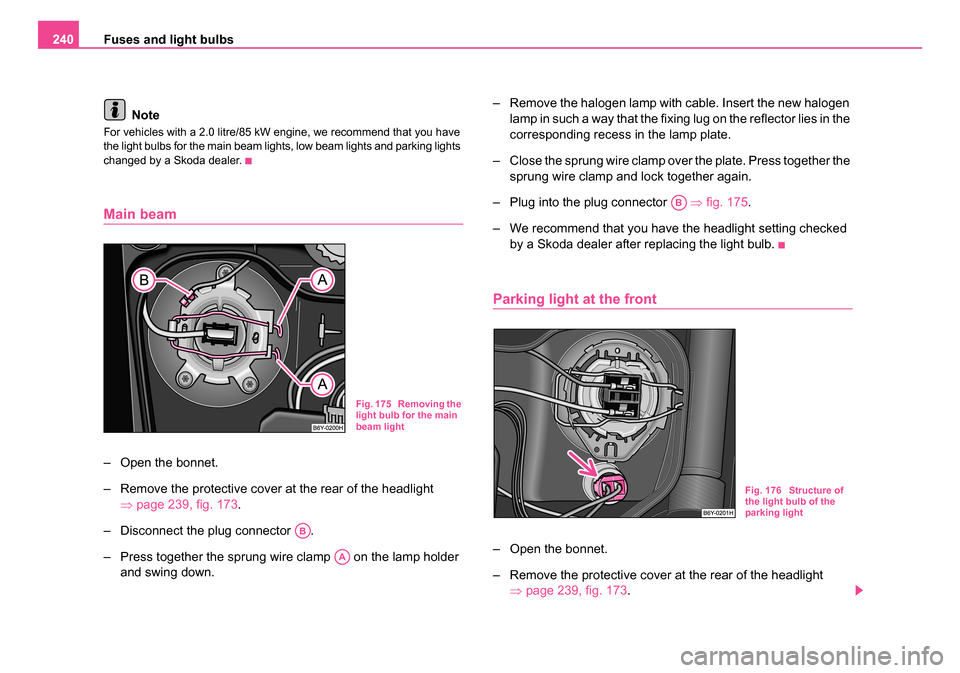
– Open the bonnet.
– Remove the protective cover at the rear of the headlight ⇒page 239, fig. 173 .
– Disconnect the plug connector .
– Press together the sprung wire clamp on the lamp holder and swing down. – Remove the halogen lamp with cable. Insert the new halogen
lamp in such a way that the fixing lug on the reflector lies in the
corresponding recess in the lamp plate.
– Close the sprung wire clamp over the plate. Press together the sprung wire clamp and lock together again.
– Plug into the plug connector ⇒fig. 175 .
– We recommend that you have the headlight setting checked by a Skoda dealer after replacing the light bulb.
Parking light at the front
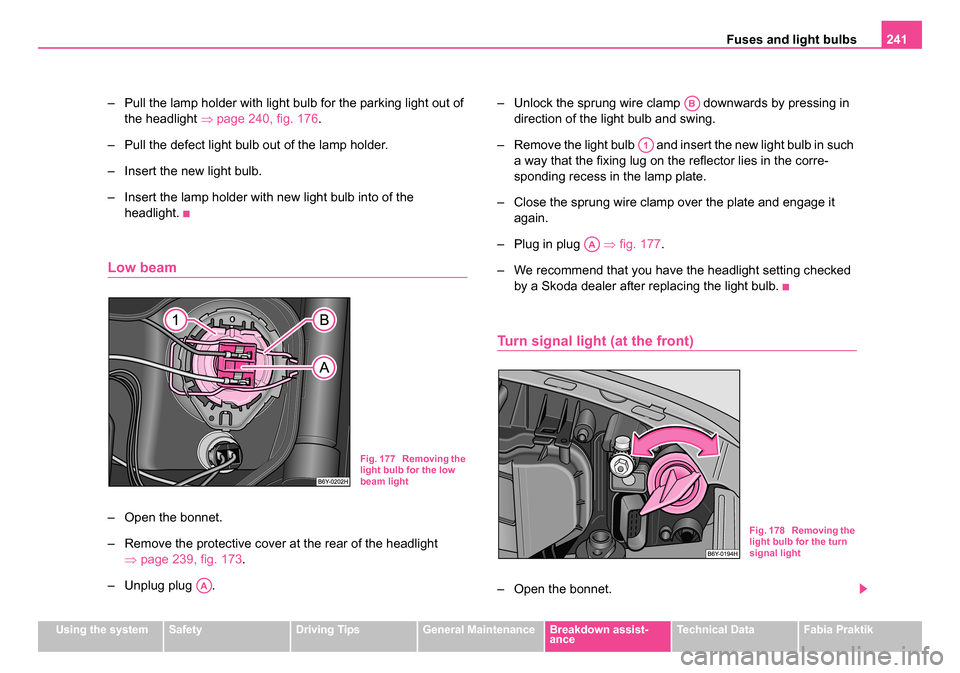
– Open the bonnet.
– Remove the protective cover at the rear of the headlight ⇒page 239, fig. 173 .
Fig. 175 Removing the
light bulb for the main
beam light
AB
AA
AB
Fig. 176 Structure of
the light bulb of the
parking light
sqc.1.book Seite 240 Mittwoch, 13. April 2005 1:09 13
Page 242 of 260

Fuses and light bulbs241
Using the systemSafetyDriving TipsGeneral MaintenanceBreakdown assist-
anceTechnical DataFabia Praktik
– Pull the lamp holder with light bulb for the parking light out of
the headlight ⇒page 240, fig. 176.
– Pull the defect light bulb out of the lamp holder.
– Insert the new light bulb.
– Insert the lamp holder with new light bulb into of the headlight.
Low beam
– Open the bonnet.
– Remove the protective cover at the rear of the headlight ⇒page 239, fig. 173 .
– Unplug plug . – Unlock the sprung wire clamp downwards by pressing in
direction of the light bulb and swing.
– Remove the light bulb and insert the new light bulb in such a way that the fixing lug on the reflector lies in the corre-
sponding recess in the lamp plate.
– Close the sprung wire clamp over the plate and engage it again.
– Plug in plug ⇒fig. 177.
– We recommend that you have the headlight setting checked by a Skoda dealer after replacing the light bulb.
Turn signal light (at the front)
– Open the bonnet.
Fig. 177 Removing the
light bulb for the low
beam light
AA
AB
A1
AA
Fig. 178 Removing the
light bulb for the turn
signal light
sqc.1.book Seite 241 Mittwoch, 13. April 2005 1:09 13
Page 243 of 260

Fuses and light bulbs
242
– Screw out the lamp holder and light bulb by turning it anti-clockwise ⇒page 241, fig. 178 .
– Press the defective light bulb into the socket, turn to the left and remove.
– Insert the new light bulb and turn it fully to the right.
– Insert the lamp holder with new light bulb into the headlight. Secure the lamp holder by turning it to the right.
Lighting in storage compar tment on front passenger
side*
We recommend having the light bulb replaced by a Škoda dealer. – Push in a knife or similar from the side between the light and
the glove compartment ⇒fig. 179. Lever out the light care-
fully.
– Disconnect the plug by pressing the catch from the side.
– Replace the defect light bulb.
– Recreate the plug connection.
– Press the light into the glove compartment from below.
Interior light and the reading light*
– Pull the diffusion disk (see arrow) downwards from the
housing ⇒fig. 180.
Fig. 179 Remove
lighting in storage
compartment on front
passenger side
Fig. 180 Remove inte-
rior light
sqc.1.book Seite 242 Mittwoch, 13. April 2005 1:09 13
Page 244 of 260

Fuses and light bulbs243
Using the systemSafetyDriving TipsGeneral MaintenanceBreakdown assist-
anceTechnical DataFabia Praktik
– Take the faulty light bulb out of the interior light and insert a
new one.
– Pull the light bulb out of its holder and insert the new one.
– Press the diffusion disk back into the housing until it clicks into place (ensure that it is in the right position).
Licence plate light
– Open the tailgate and screw off the light glass.
– Take the faulty bulb out of the fixture and insert a new one.
– Re-insert the light glass. Press the light glass in up to the stop - check for correct seating of the sealing rubber.
– Screw on the light glass but not too tightly.
Front door warning light*
We recommend having the light bulb replaced by a Škoda dealer.
– Push in a knife or similar from the side between the light and the door panel ⇒fig. 182. Lever out the light carefully.
– Disconnect the plug connector.
– Replace the defect light bulb.
– Recreate the plug connection.
– Insert the door warning light into the door panel from the plug side and press in.
Fig. 181 Remove the
licence plate light
Fig. 182 Remove the
front door warning light
sqc.1.book Seite 243 Mittwoch, 13. April 2005 1:09 13
Page 245 of 260

Fuses and light bulbs
244
Rear light unit
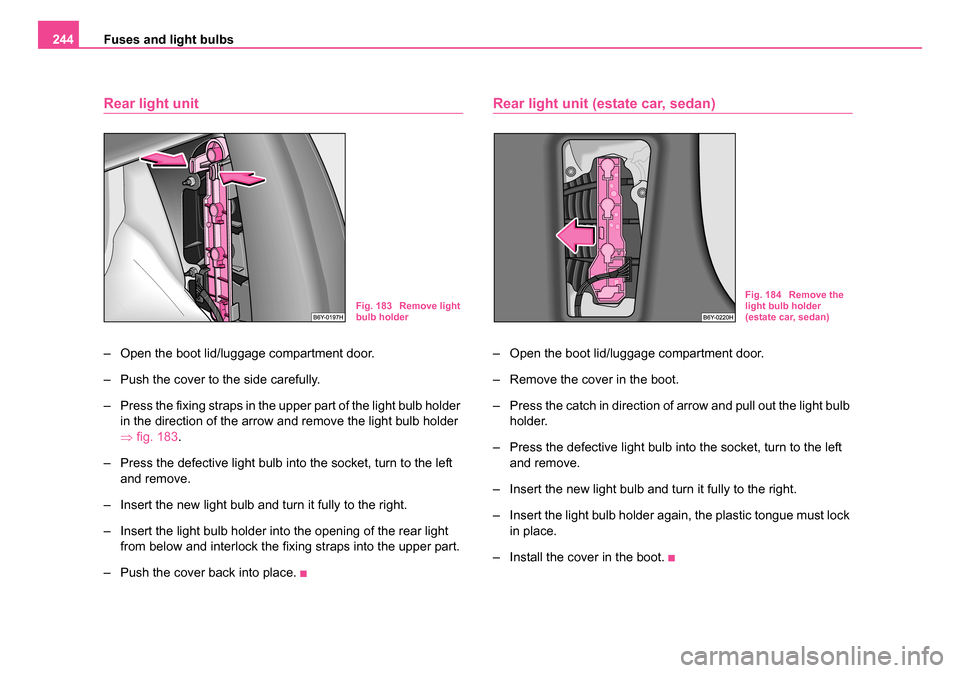
– Open the boot lid/luggage compartment door.
– Push the cover to the side carefully.
– Press the fixing straps in the upper part of the light bulb holder
in the direction of the arrow and remove the light bulb holder
⇒fig. 183.
– Press the defective light bulb into the socket, turn to the left and remove.
– Insert the new light bulb and turn it fully to the right.
– Insert the light bulb holder into the opening of the rear light from below and interlock the fixing straps into the upper part.
– Push the cover back into place.
Rear light unit (estate car, sedan)
– Open the boot lid/luggage compartment door.
– Remove the cover in the boot.
– Press the catch in direction of arrow and pull out the light bulb
holder.
– Press the defective light bulb into the socket, turn to the left and remove.
– Insert the new light bulb and turn it fully to the right.
– Insert the light bulb holder again, the plastic tongue must lock in place.
– Install the cover in the boot.
Fig. 183 Remove light
bulb holderFig. 184 Remove the
light bulb holder
(estate car, sedan)
sqc.1.book Seite 244 Mittwoch, 13. April 2005 1:09 13
Page 246 of 260

Fuses and light bulbs245
Using the systemSafetyDriving TipsGeneral MaintenanceBreakdown assist-
anceTechnical DataFabia Praktik
Luggage compartment light
– Open the tailgate and remove the luggage compartment
cover.
– Insert a screwdriver into the slot next to the light ⇒fig. 185 .
Lever out the light carefully.
– Disconnect the plug connector.
– Replace the defect light bulb.
– Recreate the plug connection.
– Insert the light from the rear and press it forwards up to the stop.
Boot light (sedan)
– Insert a screwdriver into the slot under the light ⇒fig. 186.
Lever out the light carefully.
– Unlock the lug then pull out the plug.
– Push away the spring clip on the cover and remove the cover.
– Replace the defect light bulb.
– Insert the cover again and secure it by locking it in place.
– Recreate the plug connection.
– Insert the light from the rear and press it forwards up to the stop.
Fig. 185 Remove the
luggage compartment
lightFig. 186 Remove the
boot light (sedan)
A1
A2
sqc.1.book Seite 245 Mittwoch, 13. April 2005 1:09 13
Page 247 of 260
Fuses and light bulbs
246
sqc.1.book Seite 246 Mittwoch, 13. April 2005 1:09 13
Page 248 of 260

General247
Using the systemSafetyDriving TipsGeneral MaintenanceBreakdown assist-
anceTechnical DataFabia Praktik
Technical Data
General
Identification data
Vehicle data sticker
The vehicle data sticker ⇒fig. 187 is located on the floor of the luggage
compartment and is also stated in the Service schedule.
The vehicle data sticker contains the following data:
Vehicle identification number (VIN)
Vehicle type
Gearbox code, paint number, interior equipment number, engine
output, engine code
partial description of the vehicle Vehicle identification number (VIN)
The vehicle identification number - VIN (vehicle body number) is stamped
into the engine compartment on the right hand shock absorber dome. This
number is also located on a sign on the lower left hand edge below the
windscreen (together with a VIN bar code).
Engine number
The engine number is stamped into the engine block.
Type plate (production plate)
The type plate is located in the engine compartment at the front on the left
hand shock absorber dome.
Homologation sign
The homologation sign is located on the lock carrier. Vehicles for certain
countries do not have an homologation sign.
Sticker on inside of fuel filler flap
The sticker is affixed to the inside of the fuel filler flap. The sticker contains
the following data:
•The prescribed types of fuel,
•Tyre size,
•Tyre pressure.
Note
•You will find the technical data of your vehicle in the separate brochure
"Technical Data".
Fig. 187 Vehicle data
sticker
A1
A2
A3
A4
sqc.1.book Seite 247 Mittwoch, 13. April 2005 1:09 13