Page 152 of 250
Downloaded from www.Manualslib.com manuals search engine
12 613 12 11
NU761_2_G3-FRA.qxd 4/11/05 10:51 Page 3.14
3.14
CLIMATE CONTROL (continued)
This function rapidly demists/de-
ices the windscreen, the front side
windows and the door mirrors
(depending on the vehicle).
It imposes automatic operation of
the air conditioning, inhibits
recirculation and activates heating of
the rear screen (indicator light 13).
Press button 12if you do not want
rear screen heating to be activated,
indicator light 13goes out.
“Clear view” Function
Press button 1, operating indicator 2
lights up.
The AUTO button indicator light
(on the display) switches off. Note.:
if you wish to reduce the air
flow (which may produce a certain
amount of noise in the passenger
compartment), press button 11.
To exit this function , press either:
- button 1again,
- button 6 (the AUTO warning light
on the display illuminates).
NU761_2_G3-ENG.qxp 1/5/2006 5:28 PM Page 3.14 (Black plate)
Page 178 of 250

Downloaded from www.Manualslib.com manuals search engine
23532
23507
NU761_2_G4-FRA.qxd 14/11/05 10:10 Page 4.04
4.04
ENGINE OIL LEVEL
It is normal for an engine to use oil
for lubrication and cooling of
moving parts and it is normal to top
up the level between oil changes.
However, contact your RENAULT
Dealer if more than 0.5 litres is being
consumed every 600 miles (1,000
km) after the running in period.
Oil change frequency: check the oil
level from time to time and
certainly before any long journey to
avoid the risk of damaging your
engine.
Reading the oil level
The vehicle must be parked on level
ground and the engine should have
been switched off for some time
beforehand to obtain an accurate
reading.
To be able to read the exact oil level
and make sure that the maximum
level has not been exceeded (risk of
engine damage), the dipstick must
be used.
In the following pages, see Engine
oil level: topping up/filling.
The instrument panel display only
shows a warning when the
minimum oil level has been reached.Minimum oil level warning on the
instrument panel
When ignition has been switched on
for approximately 30 seconds:
-
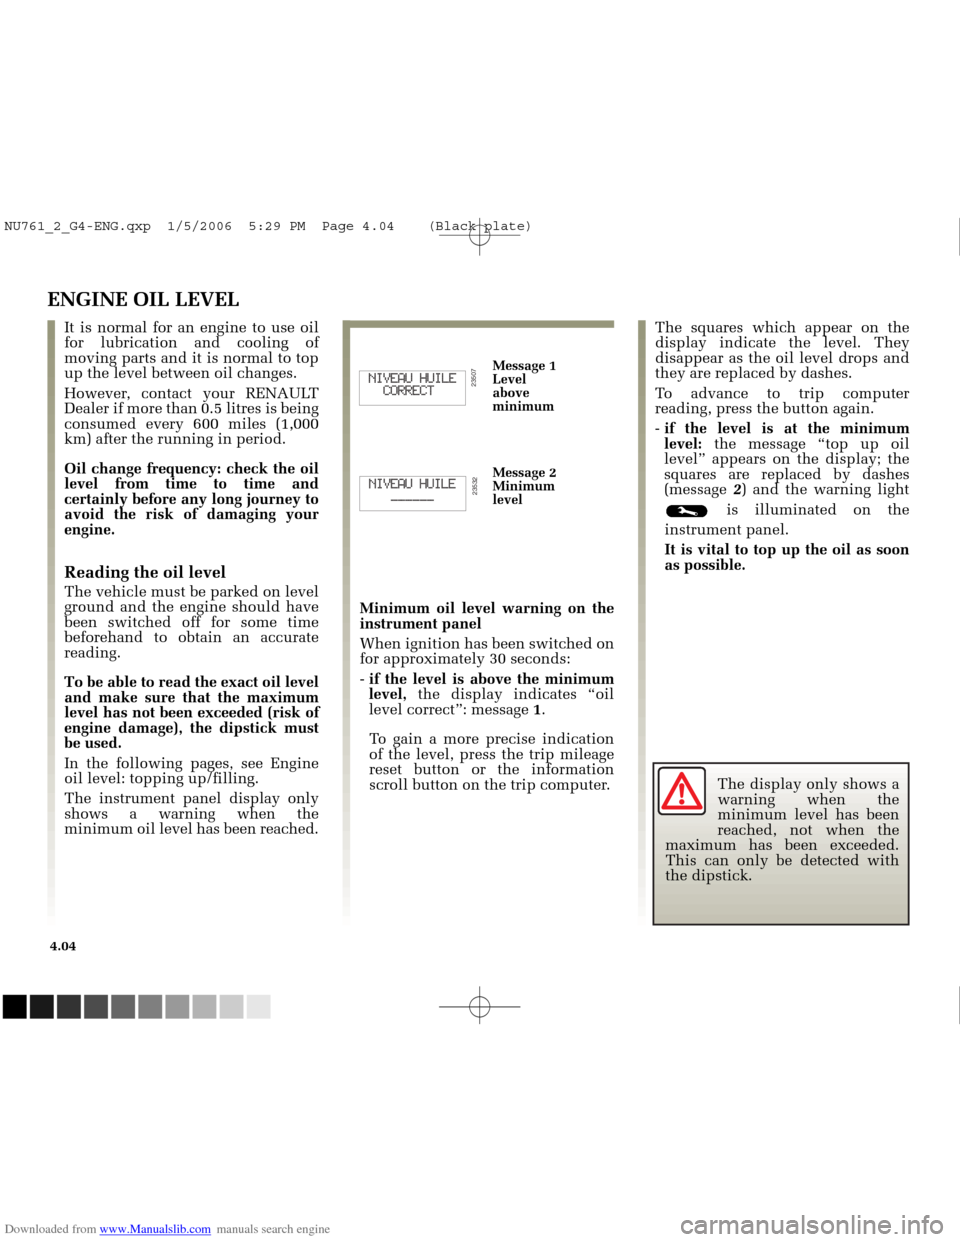
if the level is above the minimum
level, the display indicates “oil
level correct”: message 1.
To gain a more precise indication
of the level, press the trip mileage
reset button or the information
scroll button on the trip computer. The squares which appear on the
display indicate the level. They
disappear as the oil level drops and
they are replaced by dashes.
To advance to trip computer
reading, press the button again.
-
if the level is at the minimum
level: the message “top up oil
level” appears on the display; the
squares are replaced by dashes
(message 2) and the warning light
is illuminated on the
instrument panel.
It is vital to top up the oil as soon
as possible.
Message 1
Level
above
minimum
Message 2
Minimum
level
The display only shows a
warning when the
minimum level has been
reached, not when the
maximum has been exceeded.
This can only be detected with
the dipstick.
NU761_2_G4-ENG.qxp 1/5/2006 5:29 PM Page 4.04 (Black plate)
Page 183 of 250

Downloaded from www.Manualslib.com manuals search engine
1
NU761_2_G4-FRA.qxd 14/11/05 10:11 Page 4.09
4.09
LEVELS (continued)
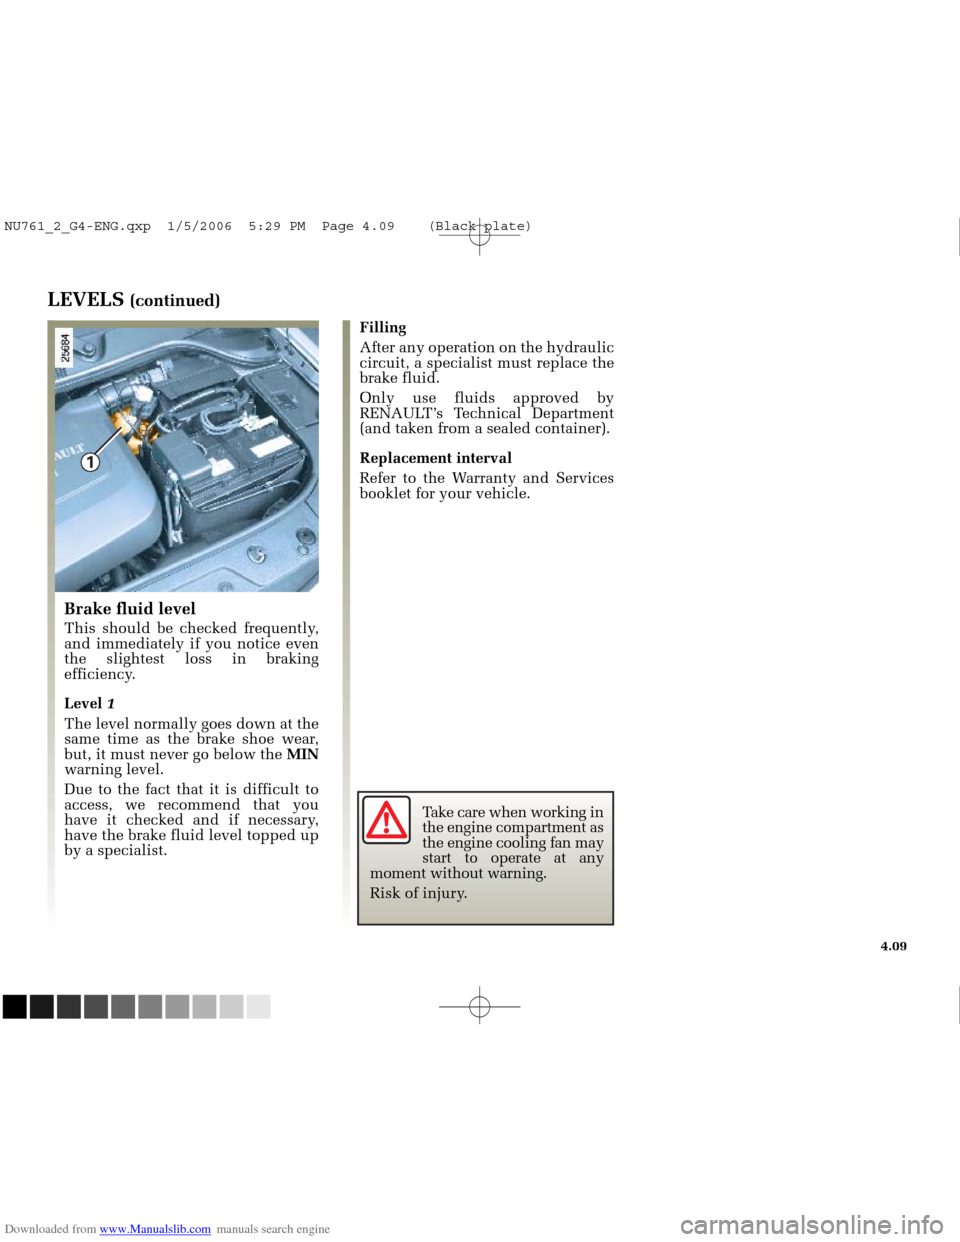
Brake fluid level
This should be checked frequently,
and immediately if you notice even
the slightest loss in braking
efficiency.
Level 1
The level normally goes down at the
same time as the brake shoe wear,
but, it must never go below the MIN
warning level.
Due to the fact that it is difficult to
access, we recommend that you
have it checked and if necessary,
have the brake fluid level topped up
by a specialist. Filling
After any operation on the hydraulic
circuit, a specialist must replace the
brake fluid.
Only use fluids approved by
RENAULT’s Technical Department
(and taken from a sealed container).
Replacement interval
Refer to the Warranty and Services
booklet for your vehicle.
Take care when working in
the engine compartment as
the engine cooling fan may
start to operate at any
moment without warning.
Risk of injury.
NU761_2_G4-ENG.qxp 1/5/2006 5:29 PM Page 4.09 (Black plate)
Page 184 of 250
Downloaded from www.Manualslib.com manuals search engine
1
NU761_2_G4-FRA.qxd 14/11/05 10:11 Page 4.10
4.10
LEVELS (continued)FILTERS
The replacement of filter elements
(air filter, passenger compartment
filter, diesel filter, etc.) is scheduled
in the servicing and maintenance
operations for your vehicle.
Frequency for replacing filter
elements: refer to the Warranty and
Services booklet for your vehicle.
Windscreen/headlight washer
reservoir
Filling
Open cap 1, fill until you see the
liquid, then refit the cap.
Liquid
Screen wash product (product with
anti-freeze in winter). Jets
Use a tool such as a needle to adjust
the height of the windscreen washer
jets.
NOTE
Depending on the vehicle, to find
out the fluid level, open cap 1,
take out the gauge and read the
level.
Take care when working in
the engine compartment as
the engine cooling fan may
start to operate at any
moment without warning.
Risk of injury.
NU761_2_G4-ENG.qxp 1/5/2006 5:29 PM Page 4.10 (Black plate)
Page 193 of 250

Downloaded from www.Manualslib.com manuals search engine
3
4
2
1
NU761_2_G5-FRA.qxd 4/11/05 11:09 Page 5.05
5.05
CHANGING A WHEEL
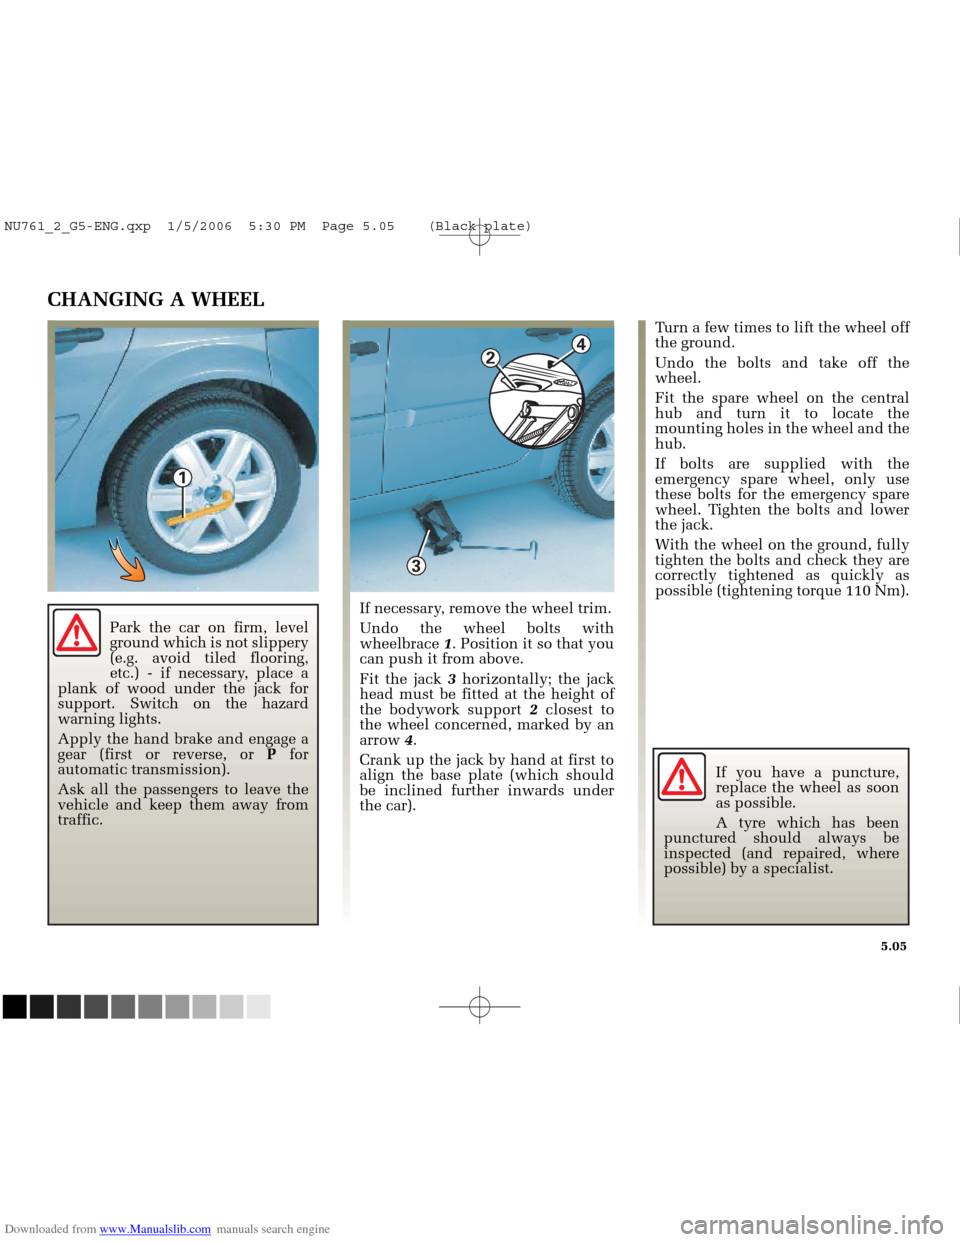
If necessary, remove the wheel trim.
Undo the wheel bolts with
wheelbrace 1. Position it so that you
can push it from above.
Fit the jack 3horizontally; the jack
head must be fitted at the height of
the bodywork support 2closest to
the wheel concerned, marked by an
arrow 4.
Crank up the jack by hand at first to
align the base plate (which should
be inclined further inwards under
the car). Turn a few times to lift the wheel off
the ground.
Undo the bolts and take off the
wheel.
Fit the spare wheel on the central
hub and turn it to locate the
mounting holes in the wheel and the
hub.
If bolts are supplied with the
emergency spare wheel, only use
these bolts for the emergency spare
wheel. Tighten the bolts and lower
the jack.
With the wheel on the ground, fully
tighten the bolts and check they are
correctly tightened as quickly as
possible (tightening torque 110 Nm).
If you have a puncture,
replace the wheel as soon
as possible.
A tyre which has been
punctured should always be
inspected (and repaired, where
possible) by a specialist.
Park the car on firm, level
ground which is not slippery
(e.g. avoid tiled flooring,
etc.) - if necessary, place a
plank of wood under the jack for
support. Switch on the hazard
warning lights.
Apply the hand brake and engage a
gear (first or reverse, or Pfor
automatic transmission).
Ask all the passengers to leave the
vehicle and keep them away from
traffic.
NU761_2_G5-ENG.qxp 1/5/2006 5:30 PM Page 5.05 (Black plate)
Page 197 of 250
Downloaded from www.Manualslib.com manuals search engine
2
1
NU761_2_G5-FRA.qxd 4/11/05 11:09 Page 5.09
5.09
HALOGEN HEADLIGHTS: ACCESS
Access to the left-hand
headlight unit
With the engine switched off
Turn cover 1by one quarter of a turn
(in an anti-clockwise direction).
Access to the right-hand
headlight unit
With the engine switched off
Unclip cover 2.
In both cases, once the bulb has
been changed, ensure that covers 1
and 2 are correctly refitted.
The bulbs can be accessed by
removing blanking covers
1and 2
located in the wheel arches.
However, due to their reduced
accessibility (sometimes requiring
the removal of bodywork or
mechanical components), we advise
you to have your bulbs replaced by
your Renault Dealer .
Take care when working in
the engine compartment as
the engine cooling fan may
start to operate at any
moment without warning.
Risk of injury.
NU761_2_G5-ENG.qxp 1/5/2006 5:30 PM Page 5.09 (Black plate)
Page 208 of 250

Downloaded from www.Manualslib.com manuals search engine
NU761_2_G5-FRA.qxd 4/11/05 11:09 Page 5.20
5.20
BATTERY: troubleshooting
To avoid all risk of sparks:
- Ensure that any consumers(courtesy lights etc.) are switched
off before disconnecting or
reconnecting the battery.
- When charging, stop the charger before connecting or disconnecting
the battery.
- Do not place metal objects on the battery to avoid creating a short
circuit between the terminals.
- Never disconnect a battery less than twenty seconds after the
engine has been switched off.
- Make sure that you reconnect the battery terminals after refitting. Handle the battery with care
as it contains sulphuric acid
which must not come into
contact with the eyes or
skin. If it does, wash the affected
area with plenty of cold water.
Ensure that naked flames, red hot
objects and sparks do not come into
contact with the battery as there is a
risk of explosion.
Take care when working in the
engine compartment as the engine
cooling fan may start to operate at
any moment without warning.
Risk of injury.
NU761_2_G5-ENG.qxp 1/5/2006 5:30 PM Page 5.20 (Black plate)
Page 220 of 250
Downloaded from www.Manualslib.com manuals search engine
NU761_2_G5-FRA.qxd 4/11/05 11:10 Page 5.32
OPERATING FAULTS (continued)
When the starter is activated CAUSES REMEDIAL ACTION
There is no response, the indicator lights fail to light up and the starter
does not turn. Battery lead disconnected or terminals
oxidised.
Check battery terminals: scrape and
clean if oxidised and re-tighten.
Discharged battery. Connect another battery to the faulty battery.
Battery unserviceable. Replace battery. Do not push the vehicle if the steering
column is locked.
Warning light bulbs go dim and starter turns very slowly. Battery terminals not tight, battery
terminals oxidised. Check battery terminals: scrape and
clean if oxidised and re-tighten.
Discharged battery. Connect another battery to the faulty battery.
5.32
NU761_2_G5-ENG.qxp 1/5/2006 5:30 PM Page 5.32 (Black plate)