2005 PONTIAC BONNEVILLE service reset
[x] Cancel search: service resetPage 154 of 438
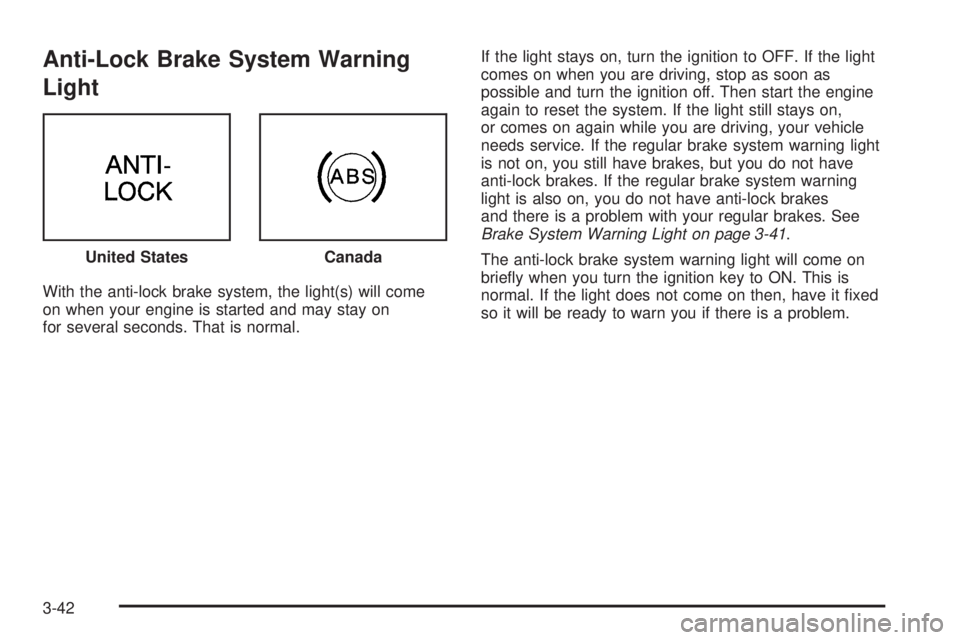
Anti-Lock Brake System Warning
Light
With the anti-lock brake system, the light(s) will come
on when your engine is started and may stay on
for several seconds. That is normal.If the light stays on, turn the ignition to OFF. If the light
comes on when you are driving, stop as soon as
possible and turn the ignition off. Then start the engine
again to reset the system. If the light still stays on,
or comes on again while you are driving, your vehicle
needs service. If the regular brake system warning light
is not on, you still have brakes, but you do not have
anti-lock brakes. If the regular brake system warning
light is also on, you do not have anti-lock brakes
and there is a problem with your regular brakes. See
Brake System Warning Light on page 3-41.
The anti-lock brake system warning light will come on
brie�y when you turn the ignition key to ON. This is
normal. If the light does not come on then, have it �xed
so it will be ready to warn you if there is a problem. United States
Canada
3-42
Page 159 of 438
If your coolant level is low, the message LOW ENGINE
COOLANT will appear on the DIC. This means that
you should check your coolant level as soon as possible.
SeeEngine Coolant (3.8L V6 Engine) on page 5-31
orEngine Coolant (4.6L V8 Engine) on page 5-34
for more information.
Tire Pressure Light
The check tire pressure system can alert you to a large
change in the pressure of one tire.
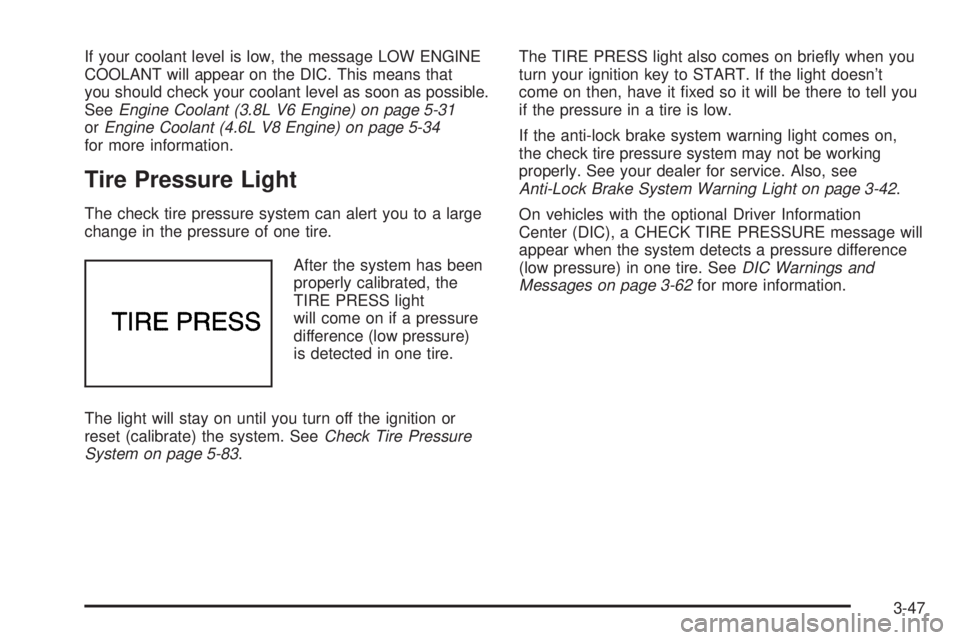
After the system has been
properly calibrated, the
TIRE PRESS light
will come on if a pressure
difference (low pressure)
is detected in one tire.
The light will stay on until you turn off the ignition or
reset (calibrate) the system. SeeCheck Tire Pressure
System on page 5-83.The TIRE PRESS light also comes on brie�y when you
turn your ignition key to START. If the light doesn’t
come on then, have it �xed so it will be there to tell you
if the pressure in a tire is low.
If the anti-lock brake system warning light comes on,
the check tire pressure system may not be working
properly. See your dealer for service. Also, see
Anti-Lock Brake System Warning Light on page 3-42.
On vehicles with the optional Driver Information
Center (DIC), a CHECK TIRE PRESSURE message will
appear when the system detects a pressure difference
(low pressure) in one tire. SeeDIC Warnings and
Messages on page 3-62for more information.
3-47
Page 173 of 438
MODE:This button allows you to toggle through the
DIC modes (Vehicle Data, Personalization Programming,
Compass Calibration).
SELECT:This button allows you to select a DIC mode.
RESET:This button, when used along with other
buttons, will allow you to reset system functions.
Vehicle Data
Average Fuel Economy:Press the SELECT button
until the display shows AVG FUEL ECONOMY. Average
fuel economy is viewed as a long term approximation
of your overall driving conditions. To learn the average
fuel economy from a new starting point, press the
RESET button for �ve seconds while the average fuel
economy is displayed on the DIC.
Instantaneous Fuel Economy:Press the SELECT
button until the display shows INST FUEL ECONOMY.
Instantaneous fuel economy varies with your driving
conditions, such as acceleration, braking and the grade
of the road being traveled. The RESET button does
not function in this mode.
Fuel Range:Press the SELECT button until the display
shows FUEL RANGE. The fuel range will calculate
the remaining distance you can drive without refueling.
This calculation is based on the average fuel economy
for the last 25 miles (40.25 km) driven and the fuelremaining in the fuel tank. If the fuel range drops below
40 miles (64.4 km), the display will show FUEL
RANGE LOW. The RESET button does not function in
this mode.
Fuel Used:Press the SELECT button until the display
shows FUEL USED. The value indicates how much
fuel has been used since the last reset. Do not confuse
fuel used with the amount of fuel in your tank. To
learn how much fuel will be used from a speci�c starting
point, press the RESET button for �ve seconds while
the fuel used is displayed on the DIC.
Engine Oil Life System:Press the SELECT button
until OIL LIFE appears in the display. The OIL LIFE
NORMAL display will show an estimate of the oil’s
remaining useful life. When the oil life index is less than
10%, an ENGINE OIL CHANGE SOON message will
be displayed and the oil life display will show OIL LIFE
CHANGE. When the ENGINE OIL CHANGE SOON
message is displayed, it means that service is required
for your vehicle. See your GM dealer.
In addition to the engine oil life system monitoring the
oil life, additional maintenance is recommended in
the Maintenance Schedule in this manual. SeePart A:
Scheduled Maintenance Services on page 6-4and
Engine Oil on page 5-16for more information.
3-61
Page 174 of 438
When you have the oil changed according to the
maintenance schedule, you will have to reset the engine
oil life system. To reset the engine oil life system, see
“How to Reset the Engine Oil Life System” underEngine
Oil Life System on page 5-20.
Tire Pressure Status:Press the SELECT button until
TIRE PRESSURE appears in the display. TIRE
PRESSURE NORMAL is displayed when the Check
Tire Pressure System believes your vehicle’s tire
pressures are normal. If a potential problem is detected,
the display will show CHECK TIRE PRESSURE and
the tire pressure status will show TIRE PRESSURE
LOW. If you see the CHECK TIRE PRESSURE
message, you should stop as soon as you can and
check all your tires for damage. If a tire is �at, seeIf a
Tire Goes Flat on page 5-92. Also check the tire
pressure in all four tires as soon as you can. See
In�ation - Tire Pressure on page 5-80andCheck Tire
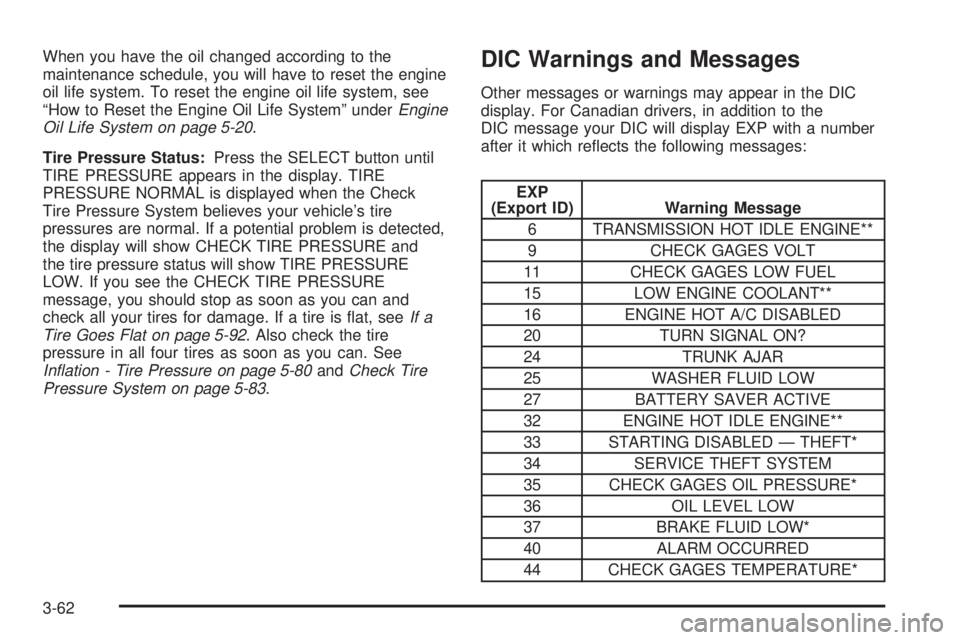
Pressure System on page 5-83.DIC Warnings and Messages
Other messages or warnings may appear in the DIC
display. For Canadian drivers, in addition to the
DIC message your DIC will display EXP with a number
after it which re�ects the following messages:
EXP
(Export ID) Warning Message
6 TRANSMISSION HOT IDLE ENGINE**
9 CHECK GAGES VOLT
11 CHECK GAGES LOW FUEL
15 LOW ENGINE COOLANT**
16 ENGINE HOT A/C DISABLED
20 TURN SIGNAL ON?
24 TRUNK AJAR
25 WASHER FLUID LOW
27 BATTERY SAVER ACTIVE
32 ENGINE HOT IDLE ENGINE**
33 STARTING DISABLED — THEFT*
34 SERVICE THEFT SYSTEM
35 CHECK GAGES OIL PRESSURE*
36 OIL LEVEL LOW
37 BRAKE FLUID LOW*
40 ALARM OCCURRED
44 CHECK GAGES TEMPERATURE*
3-62
Page 175 of 438
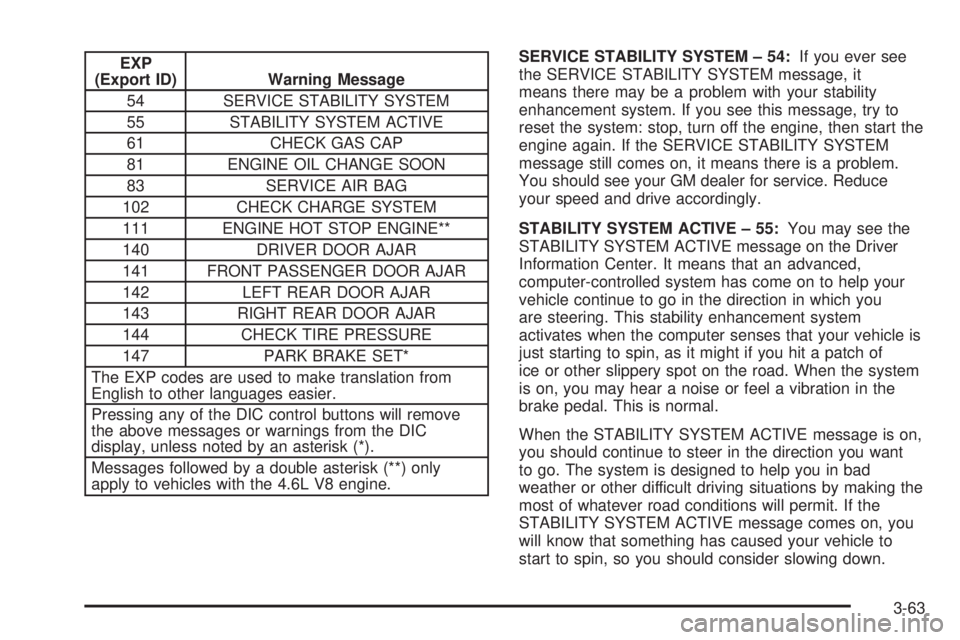
EXP
(Export ID) Warning Message
54 SERVICE STABILITY SYSTEM
55 STABILITY SYSTEM ACTIVE
61 CHECK GAS CAP
81 ENGINE OIL CHANGE SOON
83 SERVICE AIR BAG
102 CHECK CHARGE SYSTEM
111 ENGINE HOT STOP ENGINE**
140 DRIVER DOOR AJAR
141 FRONT PASSENGER DOOR AJAR
142 LEFT REAR DOOR AJAR
143 RIGHT REAR DOOR AJAR
144 CHECK TIRE PRESSURE
147 PARK BRAKE SET*
The EXP codes are used to make translation from
English to other languages easier.
Pressing any of the DIC control buttons will remove
the above messages or warnings from the DIC
display, unless noted by an asterisk (*).
Messages followed by a double asterisk (**) only
apply to vehicles with the 4.6L V8 engine.SERVICE STABILITY SYSTEM – 54:If you ever see
the SERVICE STABILITY SYSTEM message, it
means there may be a problem with your stability
enhancement system. If you see this message, try to
reset the system: stop, turn off the engine, then start the
engine again. If the SERVICE STABILITY SYSTEM
message still comes on, it means there is a problem.
You should see your GM dealer for service. Reduce
your speed and drive accordingly.
STABILITY SYSTEM ACTIVE – 55:You may see the
STABILITY SYSTEM ACTIVE message on the Driver
Information Center. It means that an advanced,
computer-controlled system has come on to help your
vehicle continue to go in the direction in which you
are steering. This stability enhancement system
activates when the computer senses that your vehicle is
just starting to spin, as it might if you hit a patch of
ice or other slippery spot on the road. When the system
is on, you may hear a noise or feel a vibration in the
brake pedal. This is normal.
When the STABILITY SYSTEM ACTIVE message is on,
you should continue to steer in the direction you want
to go. The system is designed to help you in bad
weather or other difficult driving situations by making the
most of whatever road conditions will permit. If the
STABILITY SYSTEM ACTIVE message comes on, you
will know that something has caused your vehicle to
start to spin, so you should consider slowing down.
3-63
Page 189 of 438
BAND (Alternate Frequency):Alternate frequency
allows the radio to switch to a stronger station with the
same program type. To turn alternate frequency on,
press and hold BAND for two seconds. AF ON will
appear on the display. The radio may switch to stations
with a stronger frequency.
To turn alternate frequency off, press and hold BAND
again for two seconds. AF OFF will appear on the
display. The radio will not switch to other stations.
This function does not apply for XM™ Satellite Radio
Service.
Setting Preset PTYs (RDS Only)
These pushbuttons have factory PTY presets. Up to
12 PTYs (six FM1 and six FM2), can be programmed on
the six numbered pushbuttons, by performing the
following steps:
1. Press BAND to select FM1 or FM2.
2. Press PROG TYPE to activate program type select
mode. The PTY symbol will appear on the display.
3. Turn the SELECT knob to select a PTY.
4. Press and hold one of the six numbered pushbuttons
until you hear a beep. Whenever that numbered
pushbutton is pressed, the PTY that was set will
return, if program type select mode is on.
5. Repeat the steps for each pushbutton.
RDS Messages
ALERT!:Alert warns of local or national emergencies.
When an alert announcement comes on the current
radio station, ALERT! will appear on the display. You will
hear the announcement, even if the volume is low or
a CD is playing. If a CD is playing, play will stop during
the announcement. Alert announcements cannot be
turned off.
ALERT! will not be affected by tests of the emergency
broadcast system. This feature is not supported by
all RDS stations.
INFO (Information):If the current station has a
message, INFO will appear on the display. Press this
button to see the message. The message may display
the artist, song title, call in phone numbers, etc.
If the entire message is not displayed, parts of the
message will appear every three seconds. To scroll
through the message, press and release the INFO
button. A new group of words will appear on the display
after every press of the button. Once the complete
message has been displayed, INFO will disappear from
the display until another new message is received.
The last message can be displayed by pressing
the INFO button. You can view the last message until a
new message is received or a different station is
tuned to.
3-77
Page 191 of 438
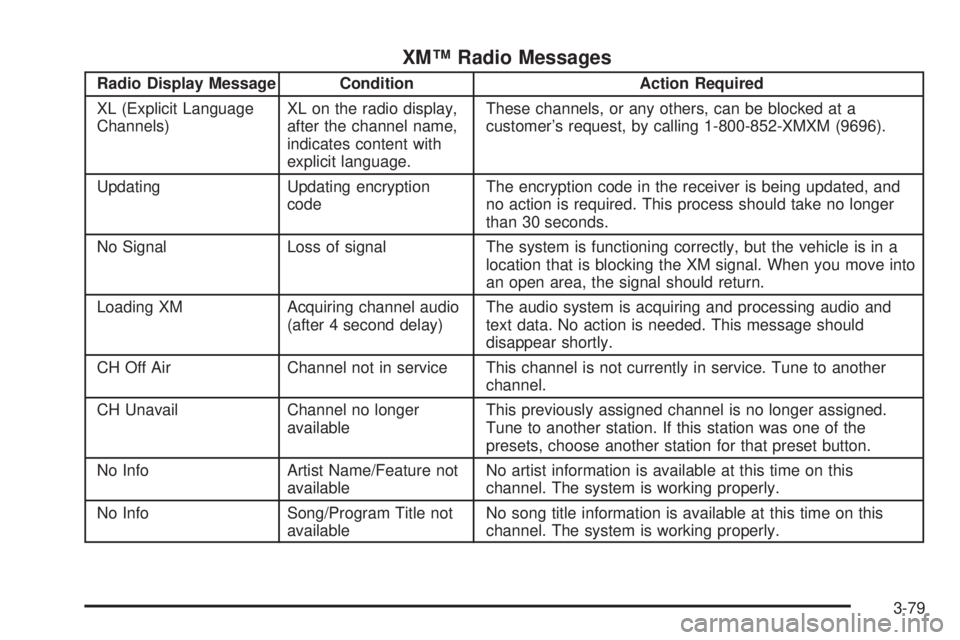
XM™ Radio Messages
Radio Display Message Condition Action Required
XL (Explicit Language
Channels)XL on the radio display,
after the channel name,
indicates content with
explicit language.These channels, or any others, can be blocked at a
customer’s request, by calling 1-800-852-XMXM (9696).
Updating Updating encryption
codeThe encryption code in the receiver is being updated, and
no action is required. This process should take no longer
than 30 seconds.
No Signal Loss of signal The system is functioning correctly, but the vehicle is in a
location that is blocking the XM signal. When you move into
an open area, the signal should return.
Loading XM Acquiring channel audio
(after 4 second delay)The audio system is acquiring and processing audio and
text data. No action is needed. This message should
disappear shortly.
CH Off Air Channel not in service This channel is not currently in service. Tune to another
channel.
CH Unavail Channel no longer
availableThis previously assigned channel is no longer assigned.
Tune to another station. If this station was one of the
presets, choose another station for that preset button.
No Info Artist Name/Feature not
availableNo artist information is available at this time on this
channel. The system is working properly.
No Info Song/Program Title not
availableNo song title information is available at this time on this
channel. The system is working properly.
3-79
Page 199 of 438
BAND (Alternate Frequency):Alternate frequency
allows the radio to switch to a stronger station with the
same program type. To turn alternate frequency on,
press and hold BAND for two seconds. AF ON will
appear on the display. The radio may switch to stations
with a stronger frequency.
To turn alternate frequency off, press and hold BAND
again for two seconds. AF OFF will appear on the
display. The radio will not switch to other stations.
This function does not apply for XM™ Satellite Radio
Service.
Setting Preset PTYs (RDS Only)
These buttons have factory PTY presets. Up to 12 PTYs
(six FM1 and six FM2), can be programmed on the
six numbered pushbuttons, by performing the
following steps:
1. Press BAND to select FM1 or FM2.
2. Press the PROG TYPE button to activate program
type select mode. The PTY symbol will appear on
the display.3. Turn the SELECT knob to select a PTY.
4. Press and hold one of the six numbered
pushbuttons until you hear a beep. Whenever that
numbered pushbutton is pressed, the PTY that
was set will return.
5. Repeat the steps for each pushbutton.
RDS Messages
ALERT!:Alert warns of local or national emergencies.
When an alert announcement comes on the current
radio station, ALERT! will appear on the display. You will
hear the announcement, even if the volume is low or
a cassette tape or a CD is playing. If a cassette tape or
CD is playing, play will stop during the announcement.
Alert announcements cannot be turned off.
ALERT! will not be affected by tests of the emergency
broadcast system. This feature is not supported by
all RDS stations.
INFO (Information):If the current station has a
message, INFO will appear on the display. Press this
button to see the message. The message may display
the artist, song title, call in phone numbers, etc.
3-87