2005 PONTIAC BONNEVILLE clock
[x] Cancel search: clockPage 72 of 438
Battery Replacement
Under normal use, the battery in your remote keyless
entry transmitter should last about four years.
You can tell the battery is weak if the transmitter will not
work at the normal range in any location. If you have
to get close to your vehicle before the transmitter works,
it is probably time to change the battery.
Notice:When replacing the battery, use care not to
touch any of the circuitry. Static from your body
transferred to these surfaces may damage the
transmitter.
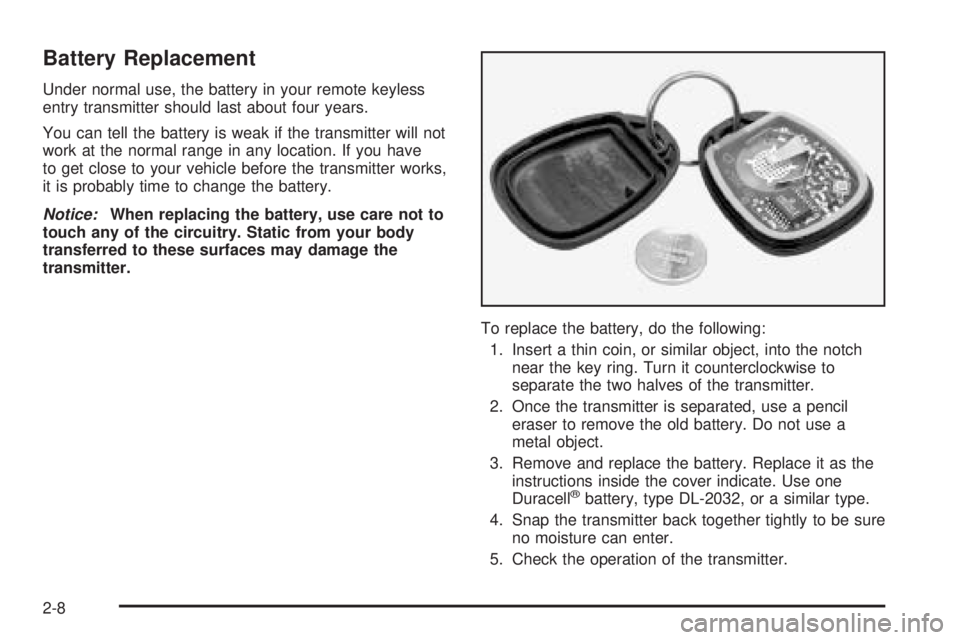
To replace the battery, do the following:
1. Insert a thin coin, or similar object, into the notch
near the key ring. Turn it counterclockwise to
separate the two halves of the transmitter.
2. Once the transmitter is separated, use a pencil
eraser to remove the old battery. Do not use a
metal object.
3. Remove and replace the battery. Replace it as the
instructions inside the cover indicate. Use one
Duracell
®battery, type DL-2032, or a similar type.
4. Snap the transmitter back together tightly to be sure
no moisture can enter.
5. Check the operation of the transmitter.
2-8
Page 127 of 438

Headlamps on Reminder
If you open the driver’s door while leaving the
headlamps or parking lamps on and the key is in OFF,
you will hear a warning chime.
Daytime Running Lamps (DRL)
Daytime Running Lamps (DRL) can make it easier for
others to see the front of your vehicle during the
day. DRL can be helpful in many different driving
conditions, but they can be especially helpful in the short
periods after dawn and before sunset. Fully functional
daytime running lamps are required on all vehicles
�rst sold in Canada.
A light sensor on top of the instrument panel monitors
the exterior light level for the operation of DRL and
Twilight Sentinel
®, so be sure it is not covered. The DRL
system will make your low-beam headlamps come on
at a reduced brightness. In order for the DRL system to
be activated, the following conditions must be met:
The ignition is on.
The exterior lamp control is off.
The transaxle is not in PARK (P).When the DRL are on, only your low-beam headlamps
will be on at reduced intensity. The taillamps,
sidemarker and other lamps will not be on. Your
instrument panel will not be lit either.
When it is dark enough outside, your regular intensity
headlamps will come on at full brightness and the
DRL lighting will turn off. The parking lamps that
normally come on with your headlamps will also come
on. When it is bright enough outside, the regular
intensity headlamps and parking lamps will turn back
off, and the reduced brightness DRL lighting will
turn back on.
To idle your vehicle during the day with the DRL off,
shift the transaxle into PARK (P). The DRL will stay off
until you shift out of PARK (P).
At night, you can turn off all exterior lamps when you
are in PARK (P) by turning the Twilight Sentinel
®knob
all the way to OFF.
If the knob was already in OFF, it must be cycled to ON
and back to OFF. Turn the knob clockwise to turn the
exterior lighting back on. The lamps will come back
on automatically when you put the transaxle in gear.
As with any vehicle, you should turn on the regular
headlamp system when you need it.
3-15
Page 128 of 438
Fog Lamps
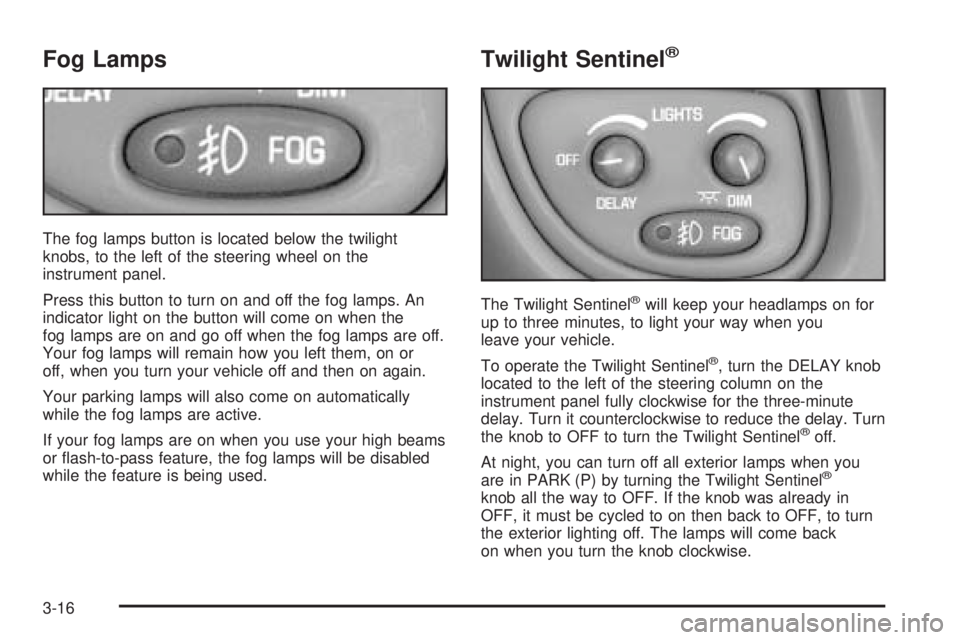
The fog lamps button is located below the twilight
knobs, to the left of the steering wheel on the
instrument panel.
Press this button to turn on and off the fog lamps. An
indicator light on the button will come on when the
fog lamps are on and go off when the fog lamps are off.
Your fog lamps will remain how you left them, on or
off, when you turn your vehicle off and then on again.
Your parking lamps will also come on automatically
while the fog lamps are active.
If your fog lamps are on when you use your high beams
or �ash-to-pass feature, the fog lamps will be disabled
while the feature is being used.
Twilight Sentinel®
The Twilight Sentinel®will keep your headlamps on for
up to three minutes, to light your way when you
leave your vehicle.
To operate the Twilight Sentinel
®, turn the DELAY knob
located to the left of the steering column on the
instrument panel fully clockwise for the three-minute
delay. Turn it counterclockwise to reduce the delay. Turn
the knob to OFF to turn the Twilight Sentinel
®off.
At night, you can turn off all exterior lamps when you
are in PARK (P) by turning the Twilight Sentinel
®
knob all the way to OFF. If the knob was already in
OFF, it must be cycled to on then back to OFF, to turn
the exterior lighting off. The lamps will come back
on when you turn the knob clockwise.
3-16
Page 129 of 438
If the Twilight Sentinel®lighting is active, it can be
disabled by turning on the manual parking lamps. This
lighting will be disabled until the key is turned from
ON or until the manual parking lamps are turned off.
Also, it is possible that your headlamps may go
out if you drive from a dark area into a bright area like a
lighted parking lot. If this happens, turn on your
headlamps with the exterior lamp control.
Exterior Lighting Battery Saver
If the exterior lamp control has been left on, the exterior
lamps will turn off about 10 minutes after the ignition
is turned to OFF and a door has been opened.
This protects against draining the battery in case you
have accidentally left the headlamps or parking
lamps on. If you need to leave the lamps on for more
than 10 minutes, use the exterior lamp control to turn the
lamps back on after turning the ignition to OFF and
opening a door. To delay the lamps from turning off, see
“Twilight Sentinel
®,” listed previously.
Instrument Panel Brightness
When it is dark outside, you can brighten or dim your
instrument panel cluster lights using the DIM knob,
located to the left of the steering wheel on the
instrument panel.
Turn the knob clockwise to brighten the instrument
panel cluster lights and displays. Turn the knob
clockwise all the way to turn on the interior courtesy
lamps. Turn the knob counterclockwise to dim the
instrument panel cluster lights and displays and to turn
off the courtesy lamps.
Courtesy Lamps
If it is dark enough outside, when any door is opened,
several lamps will come on. They make it easier for you
to enter and leave the vehicle. Turn the DIM knob all
the way clockwise to turn the interior courtesy lamps on.
3-17
Page 134 of 438
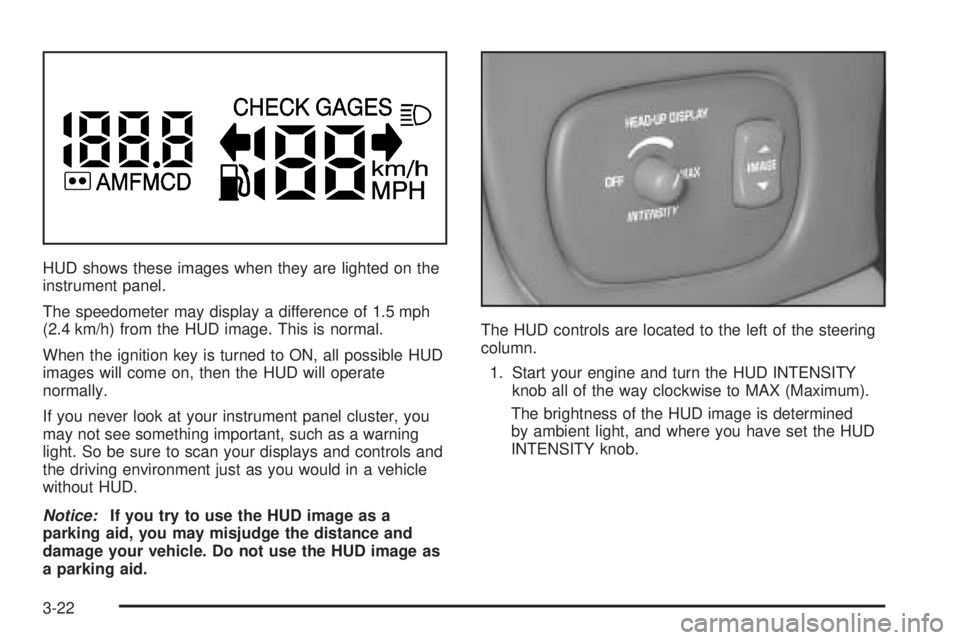
HUD shows these images when they are lighted on the
instrument panel.
The speedometer may display a difference of 1.5 mph
(2.4 km/h) from the HUD image. This is normal.
When the ignition key is turned to ON, all possible HUD
images will come on, then the HUD will operate
normally.
If you never look at your instrument panel cluster, you
may not see something important, such as a warning
light. So be sure to scan your displays and controls and
the driving environment just as you would in a vehicle
without HUD.
Notice:If you try to use the HUD image as a
parking aid, you may misjudge the distance and
damage your vehicle. Do not use the HUD image as
a parking aid.The HUD controls are located to the left of the steering
column.
1. Start your engine and turn the HUD INTENSITY
knob all of the way clockwise to MAX (Maximum).
The brightness of the HUD image is determined
by ambient light, and where you have set the HUD
INTENSITY knob.
3-22
Page 135 of 438

2. Adjust the seat, if necessary, before setting the
height using the IMAGE switch.
Press and hold the top of the IMAGE switch, raising
the HUD image as far as possible. Then press on
the bottom of the HUD IMAGE switch to move
the image down, so the image is as low as possible,
but in full view.
3. Turn the INTENSITY knob counterclockwise until
the HUD image is no brighter than necessary. To
turn the HUD off, turn the HUD INTENSITY knob all
the way counterclockwise.
If the sun comes out, or it becomes cloudy, or if you
turn on your headlamps, you may need to adjust
the HUD brightness using the HUD INTENSITY knob.
Polarized sunglasses could make the HUD image
harder to see.
Clean the inside of the windshield as needed to remove
any dirt or �lm that reduces the sharpness or clarity
of the HUD image.Spray household glass cleaner on a soft, clean cloth.
Wipe the HUD lens gently, then dry it. Do not spray
cleaner directly on the lens, because the cleaner �uid
could leak inside the unit.
If you cannot see the HUD image when the ignition is
on, check to see if:
The HUD unit is covered.
The HUD INTENSITY knob is adjusted correctly.
The HUD image is adjusted to the proper height.
A fuse in the fuse panel may have blown. See
Fuses and Circuit Breakers on page 5-111.
If the HUD image is not clear, it could be too bright.
Move the HUD INTENSITY knob counterclockwise. You
may need to clean the windshield and HUD lens.
Your windshield is part of the HUD system. If you ever
have to have a new windshield, be sure to get one
designed for HUD. If you do not, the HUD image may
look blurred and out of focus.
3-23
Page 137 of 438
To open a rear ashtray, lift the cover.
Notice:If you put papers or other �ammable items
in the ashtray, hot cigarettes or other smoking
materials could ignite them and possibly damage
your vehicle. Never put �ammable items in the
ashtray.
The cigarette lighter is located next to the storage tray.
To use a lighter, just push the center in all the way
and let it go. When it is ready, the center will pop back
out by itself. Pull out the entire unit to use it.
Notice:Holding a cigarette lighter in while it is
heating will not allow the lighter to back away from
the heating element when it is hot. Damage from
overheating may occur to the lighter or heating
element, or a fuse could be blown. Do not hold a
cigarette lighter in while it is heating. Do not
use anything other than the cigarette lighter in the
heating element.Climate Controls
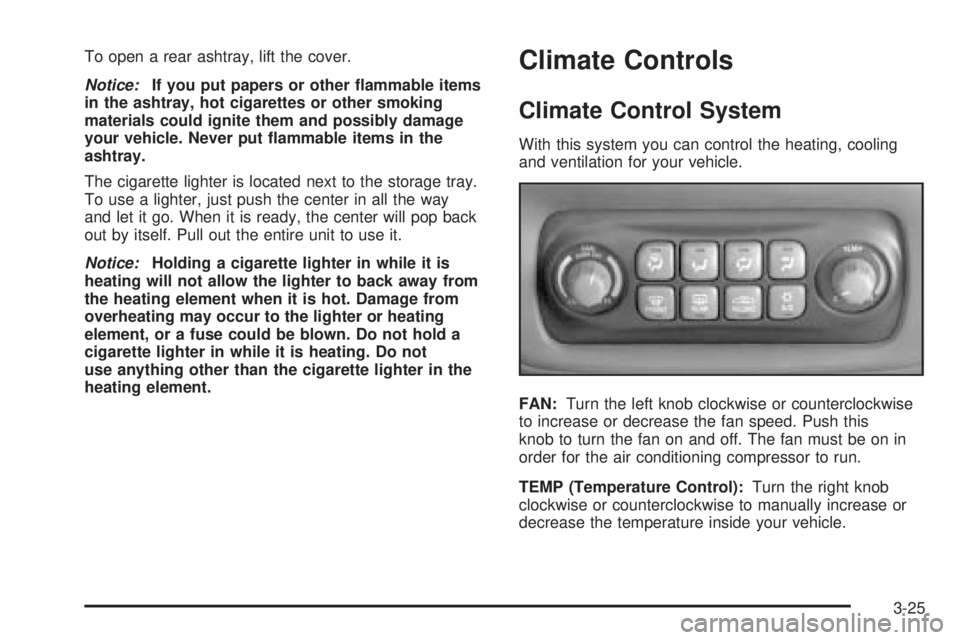
Climate Control System
With this system you can control the heating, cooling
and ventilation for your vehicle.
FAN:Turn the left knob clockwise or counterclockwise
to increase or decrease the fan speed. Push this
knob to turn the fan on and off. The fan must be on in
order for the air conditioning compressor to run.
TEMP (Temperature Control):Turn the right knob
clockwise or counterclockwise to manually increase or
decrease the temperature inside your vehicle.
3-25
Page 184 of 438

The rear defog system can affect accuracy, and the
compass corrects for the rear defog. However, if the rear
defog is turned on while making sharp turns, the
accuracy may be off. When you turn the rear defog off
again, the accuracy returns to normal.
Be aware that metal objects are sometimes buried in
the ground. They can affect accuracy and you may not
know they are there. As an example, many concrete
roads have metal reinforcements inside.
Also, if you drive with the trunk open, this could affect
accuracy and could decalibrate the compass.
Audio System(s)
Notice:Before adding any sound equipment to
your vehicle, like a tape player, CB radio, mobile
telephone, or two-way radio, make sure that it can
be added by checking with your dealer. Also,
check federal rules covering mobile radio and
telephone units. If sound equipment can be added,
it is very important to do it properly. Added
sound equipment may interfere with the operation
of your vehicle’s engine, radio, or other systems,
and even damage them. Your vehicle’s systems may
interfere with the operation of sound equipment
that has been added improperly.Figure out which audio system is in your vehicle, �nd
out what your audio system can do, and how to operate
all of its controls.
Your vehicle has a feature called Retained Accessory
Power (RAP). With RAP, the audio system can be
played even after the ignition is turned off. SeeRetained
Accessory Power (RAP) on page 2-24for more
information.
Setting the Time
Press and hold HR or MIN for two seconds. Then press
and hold HR until the correct hour appears on the
display. AM will appear for morning hours. Press and
hold MIN until the correct minute appears on the display.
The time can be set with the ignition on or off.
To synchronize the time with an FM station broadcasting
Radio Data System (RDS) information, press and
hold HR and MIN at the same time until UPDATED and
the clock symbol appear on the display. If the time is
not available from the station, NO UPDATE will appear
on the display.
RDS time is broadcast once a minute. After tuning to an
RDS broadcast station, it may take a few minutes for
the time to update.
3-72