2005 PONTIAC BONNEVILLE turn signal
[x] Cancel search: turn signalPage 121 of 438
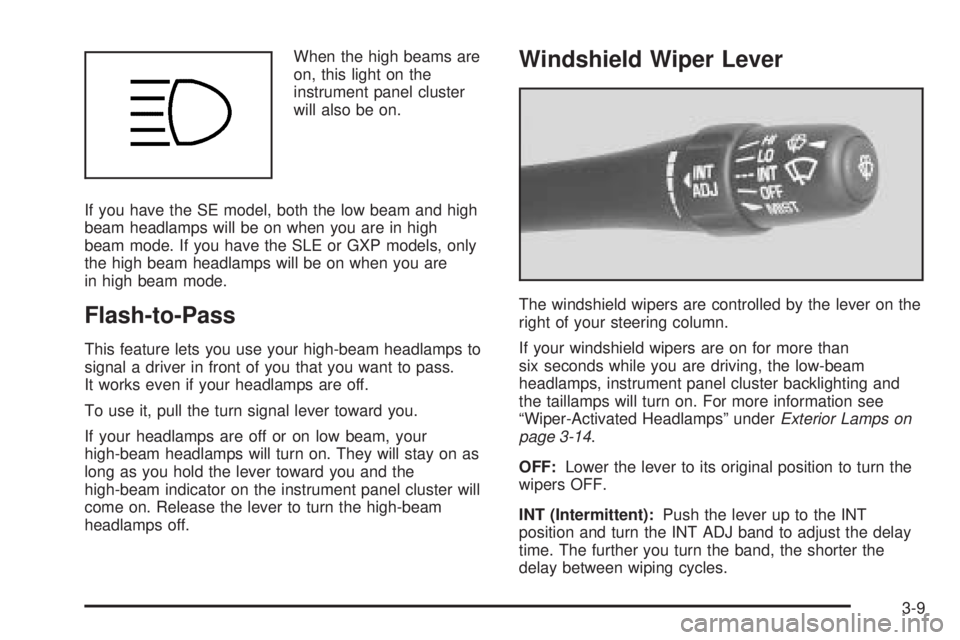
When the high beams are
on, this light on the
instrument panel cluster
will also be on.
If you have the SE model, both the low beam and high
beam headlamps will be on when you are in high
beam mode. If you have the SLE or GXP models, only
the high beam headlamps will be on when you are
in high beam mode.
Flash-to-Pass
This feature lets you use your high-beam headlamps to
signal a driver in front of you that you want to pass.
It works even if your headlamps are off.
To use it, pull the turn signal lever toward you.
If your headlamps are off or on low beam, your
high-beam headlamps will turn on. They will stay on as
long as you hold the lever toward you and the
high-beam indicator on the instrument panel cluster will
come on. Release the lever to turn the high-beam
headlamps off.
Windshield Wiper Lever
The windshield wipers are controlled by the lever on the
right of your steering column.
If your windshield wipers are on for more than
six seconds while you are driving, the low-beam
headlamps, instrument panel cluster backlighting and
the taillamps will turn on. For more information see
“Wiper-Activated Headlamps” underExterior Lamps on
page 3-14.
OFF:Lower the lever to its original position to turn the
wipers OFF.
INT (Intermittent):Push the lever up to the INT
position and turn the INT ADJ band to adjust the delay
time. The further you turn the band, the shorter the
delay between wiping cycles.
3-9
Page 133 of 438
Inadvertent Power Battery Saver
This feature is designed to protect your vehicle’s battery
against drainage from the interior lamps, trunk lamp
or glove box lamp. When the ignition is turned off, the
power to these features will automatically turn off
after 10 minutes. Power will be restored for an additional
10 minutes if any door is opened, the trunk is opened
or the courtesy lamps are turned on.
Head-Up Display (HUD)
{CAUTION:
If the HUD image is too bright, or too high in
your �eld of view, it may take you more time to
see things you need to see when it is dark
outside. Be sure to keep the HUD image dim
and placed low in your �eld of view.
If you have the optional Head-Up Display (HUD), you
can see some of the driver information also available on
your instrument panel cluster. The information maybe displayed in English or metric units and appears as
an image focused out toward the front of your vehicle.
The HUD shows the following:
Speedometer Reading
Turn Signal Indicators
High-beam Indicator Symbol
CHECK GAGES Message (for low oil pressure,
high coolant temperature, low oil level, high/low
battery, brake, ABS and air bag)
Low Fuel Warning Symbol
Radio Frequency and Playback Mode (with the
exception of the XM™ radio)
3-21
Page 174 of 438
When you have the oil changed according to the
maintenance schedule, you will have to reset the engine
oil life system. To reset the engine oil life system, see
“How to Reset the Engine Oil Life System” underEngine
Oil Life System on page 5-20.
Tire Pressure Status:Press the SELECT button until
TIRE PRESSURE appears in the display. TIRE
PRESSURE NORMAL is displayed when the Check
Tire Pressure System believes your vehicle’s tire
pressures are normal. If a potential problem is detected,
the display will show CHECK TIRE PRESSURE and
the tire pressure status will show TIRE PRESSURE
LOW. If you see the CHECK TIRE PRESSURE
message, you should stop as soon as you can and
check all your tires for damage. If a tire is �at, seeIf a
Tire Goes Flat on page 5-92. Also check the tire
pressure in all four tires as soon as you can. See
In�ation - Tire Pressure on page 5-80andCheck Tire
Pressure System on page 5-83.DIC Warnings and Messages
Other messages or warnings may appear in the DIC
display. For Canadian drivers, in addition to the
DIC message your DIC will display EXP with a number
after it which re�ects the following messages:
EXP
(Export ID) Warning Message
6 TRANSMISSION HOT IDLE ENGINE**
9 CHECK GAGES VOLT
11 CHECK GAGES LOW FUEL
15 LOW ENGINE COOLANT**
16 ENGINE HOT A/C DISABLED
20 TURN SIGNAL ON?
24 TRUNK AJAR
25 WASHER FLUID LOW
27 BATTERY SAVER ACTIVE
32 ENGINE HOT IDLE ENGINE**
33 STARTING DISABLED — THEFT*
34 SERVICE THEFT SYSTEM
35 CHECK GAGES OIL PRESSURE*
36 OIL LEVEL LOW
37 BRAKE FLUID LOW*
40 ALARM OCCURRED
44 CHECK GAGES TEMPERATURE*
3-62
Page 186 of 438
RCL (Recall):Push this knob to switch the display
between the radio station frequency and the time. Push
this knob to display the time with the ignition off.
For RDS, push the RCL knob to change what appears
on the display while using RDS. The display options
are station, RDS station frequency, PTY, and the name
of the program (if available).
For XM™ (if equipped), push the RCL knob while in XM™
mode to retrieve four different categories of information
related to the current song or channel: Artist, Song Title,
Category or PTY, Channel Number/Channel Name.
To change the default on the display, push the RCL knob
until you see the display you want, then hold the knob
until the display �ashes. The selected display will now be
the default.
SCV (Speed-Compensated Volume):With SCV, the
audio system adjusts automatically to make up for
road and wind noise as you drive.
Set the volume at the desired level. Press this button to
select MIN, MED, or MAX. Each higher setting allows for
more volume compensation at faster vehicle speeds.
Then, as you drive, SCV automatically increases the
volume, as necessary, to overcome noise at any speed.
The volume level should always sound the same to you
as you drive. If you do not want to use SCV, select OFF.Finding a Station
BAND:Press this button to switch between FM1, FM2,
AM, or XM1 or XM2 (if equipped). The display will
show the selection.
TUNE:Turn this knob to select radio stations.
wSEEKx:Press the up or the down arrow to go to
the next or to the previous station and stay there.
The radio will only seek stations with a strong signal
that are in the selected band.
wSCANx:Press and hold either SCAN arrow for
two seconds until SCAN appears on the display and you
hear a beep. The radio will go to a station, play for a
few seconds, then go on to the next station. Press either
SCAN arrow again to stop scanning.
To scan preset stations, press and hold either SCAN
arrow for more than four seconds until PSCAN and the
preset number appear on the display. You will hear
a double beep. The radio will go to the �rst preset
station stored on your pushbuttons, play for a few
seconds, then go on to the next preset station. Press
either SCAN arrow again to stop scanning presets.
The radio will only scan stations with a strong signal that
are in the selected band.
3-74
Page 191 of 438
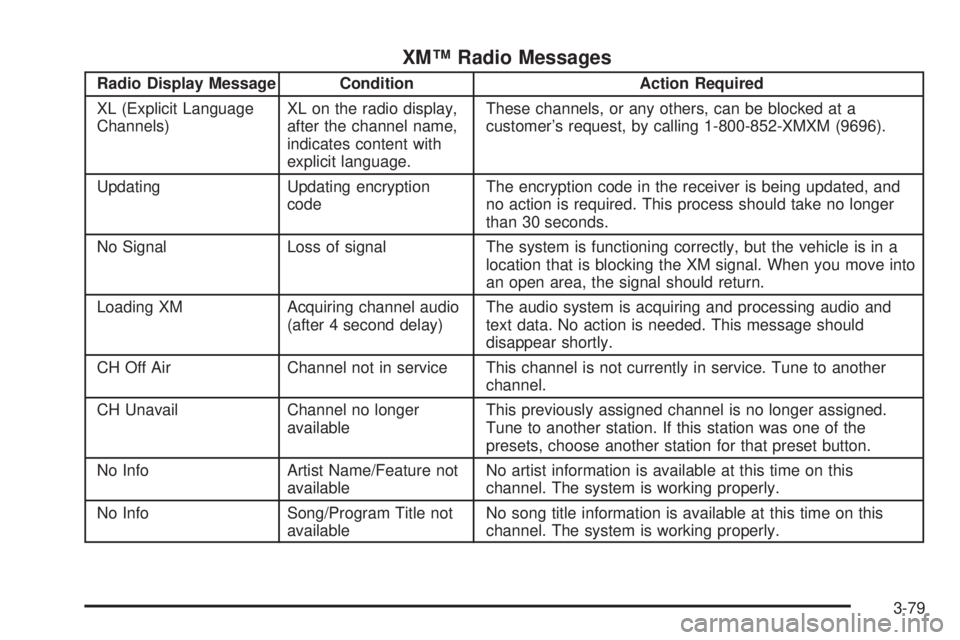
XM™ Radio Messages
Radio Display Message Condition Action Required
XL (Explicit Language
Channels)XL on the radio display,
after the channel name,
indicates content with
explicit language.These channels, or any others, can be blocked at a
customer’s request, by calling 1-800-852-XMXM (9696).
Updating Updating encryption
codeThe encryption code in the receiver is being updated, and
no action is required. This process should take no longer
than 30 seconds.
No Signal Loss of signal The system is functioning correctly, but the vehicle is in a
location that is blocking the XM signal. When you move into
an open area, the signal should return.
Loading XM Acquiring channel audio
(after 4 second delay)The audio system is acquiring and processing audio and
text data. No action is needed. This message should
disappear shortly.
CH Off Air Channel not in service This channel is not currently in service. Tune to another
channel.
CH Unavail Channel no longer
availableThis previously assigned channel is no longer assigned.
Tune to another station. If this station was one of the
presets, choose another station for that preset button.
No Info Artist Name/Feature not
availableNo artist information is available at this time on this
channel. The system is working properly.
No Info Song/Program Title not
availableNo song title information is available at this time on this
channel. The system is working properly.
3-79
Page 196 of 438
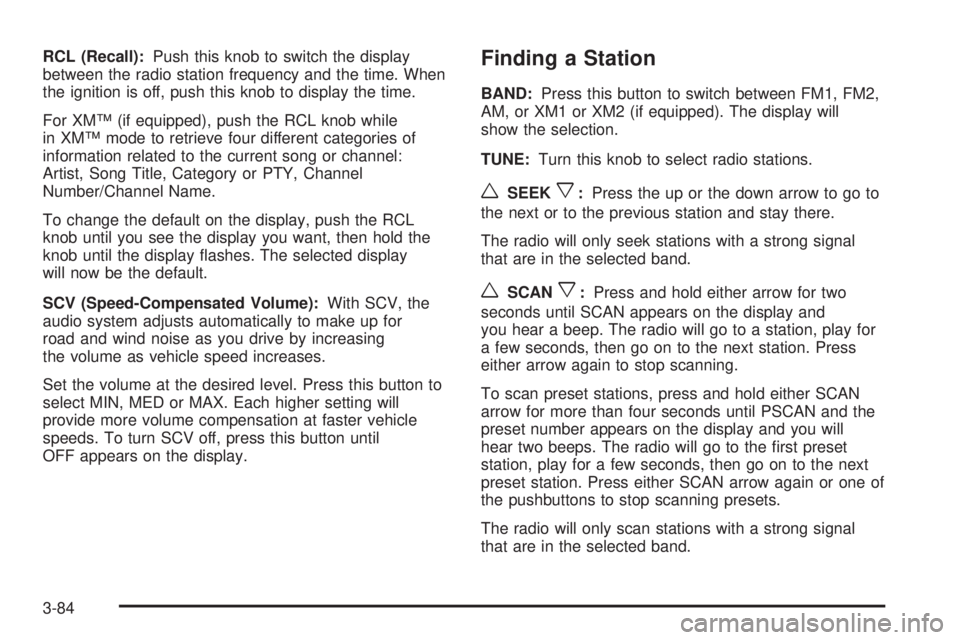
RCL (Recall):Push this knob to switch the display
between the radio station frequency and the time. When
the ignition is off, push this knob to display the time.
For XM™ (if equipped), push the RCL knob while
in XM™ mode to retrieve four different categories of
information related to the current song or channel:
Artist, Song Title, Category or PTY, Channel
Number/Channel Name.
To change the default on the display, push the RCL
knob until you see the display you want, then hold the
knob until the display �ashes. The selected display
will now be the default.
SCV (Speed-Compensated Volume):With SCV, the
audio system adjusts automatically to make up for
road and wind noise as you drive by increasing
the volume as vehicle speed increases.
Set the volume at the desired level. Press this button to
select MIN, MED or MAX. Each higher setting will
provide more volume compensation at faster vehicle
speeds. To turn SCV off, press this button until
OFF appears on the display.Finding a Station
BAND:Press this button to switch between FM1, FM2,
AM, or XM1 or XM2 (if equipped). The display will
show the selection.
TUNE:Turn this knob to select radio stations.
wSEEKx:Press the up or the down arrow to go to
the next or to the previous station and stay there.
The radio will only seek stations with a strong signal
that are in the selected band.
wSCANx:Press and hold either arrow for two
seconds until SCAN appears on the display and
you hear a beep. The radio will go to a station, play for
a few seconds, then go on to the next station. Press
either arrow again to stop scanning.
To scan preset stations, press and hold either SCAN
arrow for more than four seconds until PSCAN and the
preset number appears on the display and you will
hear two beeps. The radio will go to the �rst preset
station, play for a few seconds, then go on to the next
preset station. Press either SCAN arrow again or one of
the pushbuttons to stop scanning presets.
The radio will only scan stations with a strong signal
that are in the selected band.
3-84
Page 201 of 438
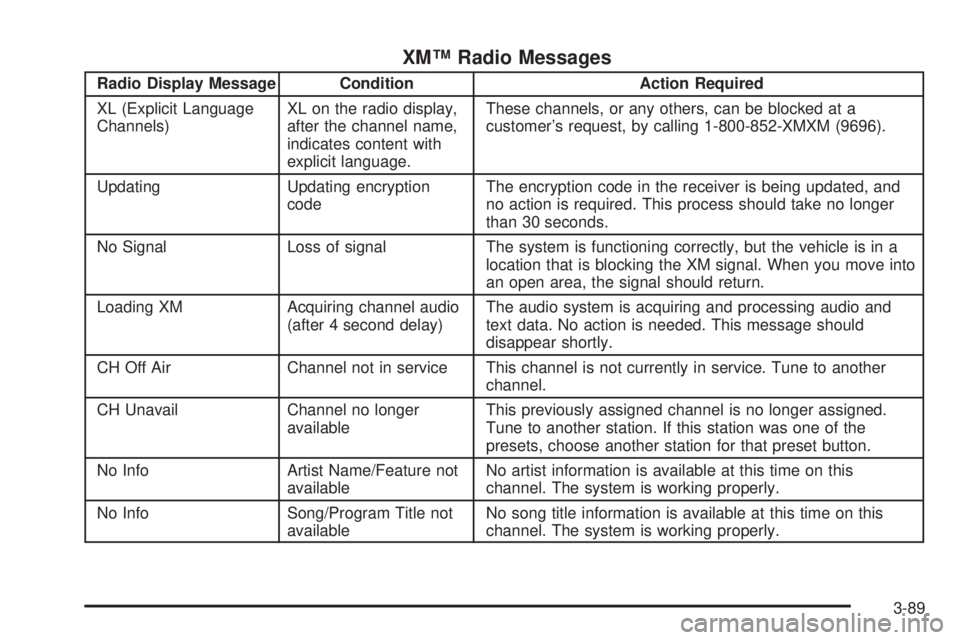
XM™ Radio Messages
Radio Display Message Condition Action Required
XL (Explicit Language
Channels)XL on the radio display,
after the channel name,
indicates content with
explicit language.These channels, or any others, can be blocked at a
customer’s request, by calling 1-800-852-XMXM (9696).
Updating Updating encryption
codeThe encryption code in the receiver is being updated, and
no action is required. This process should take no longer
than 30 seconds.
No Signal Loss of signal The system is functioning correctly, but the vehicle is in a
location that is blocking the XM signal. When you move into
an open area, the signal should return.
Loading XM Acquiring channel audio
(after 4 second delay)The audio system is acquiring and processing audio and
text data. No action is needed. This message should
disappear shortly.
CH Off Air Channel not in service This channel is not currently in service. Tune to another
channel.
CH Unavail Channel no longer
availableThis previously assigned channel is no longer assigned.
Tune to another station. If this station was one of the
presets, choose another station for that preset button.
No Info Artist Name/Feature not
availableNo artist information is available at this time on this
channel. The system is working properly.
No Info Song/Program Title not
availableNo song title information is available at this time on this
channel. The system is working properly.
3-89
Page 212 of 438
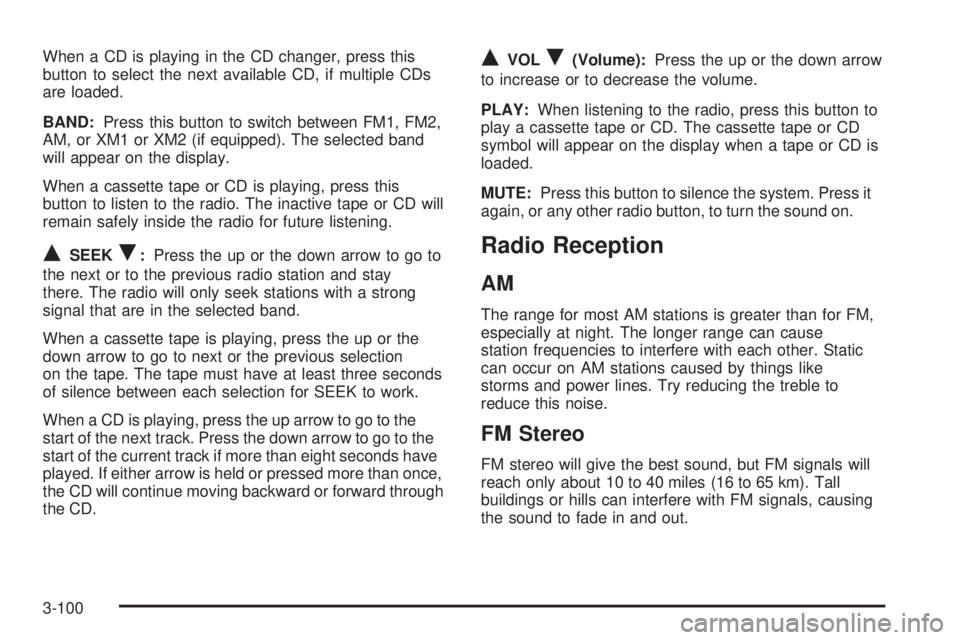
When a CD is playing in the CD changer, press this
button to select the next available CD, if multiple CDs
are loaded.
BAND:Press this button to switch between FM1, FM2,
AM, or XM1 or XM2 (if equipped). The selected band
will appear on the display.
When a cassette tape or CD is playing, press this
button to listen to the radio. The inactive tape or CD will
remain safely inside the radio for future listening.
QSEEKR:Press the up or the down arrow to go to
the next or to the previous radio station and stay
there. The radio will only seek stations with a strong
signal that are in the selected band.
When a cassette tape is playing, press the up or the
down arrow to go to next or the previous selection
on the tape. The tape must have at least three seconds
of silence between each selection for SEEK to work.
When a CD is playing, press the up arrow to go to the
start of the next track. Press the down arrow to go to the
start of the current track if more than eight seconds have
played. If either arrow is held or pressed more than once,
the CD will continue moving backward or forward through
the CD.
QVOLR(Volume):Press the up or the down arrow
to increase or to decrease the volume.
PLAY:When listening to the radio, press this button to
play a cassette tape or CD. The cassette tape or CD
symbol will appear on the display when a tape or CD is
loaded.
MUTE:Press this button to silence the system. Press it
again, or any other radio button, to turn the sound on.
Radio Reception
AM
The range for most AM stations is greater than for FM,
especially at night. The longer range can cause
station frequencies to interfere with each other. Static
can occur on AM stations caused by things like
storms and power lines. Try reducing the treble to
reduce this noise.
FM Stereo
FM stereo will give the best sound, but FM signals will
reach only about 10 to 40 miles (16 to 65 km). Tall
buildings or hills can interfere with FM signals, causing
the sound to fade in and out.
3-100