Page 2190 of 4555
MT-34
TRANSAXLE ASSEMBLY
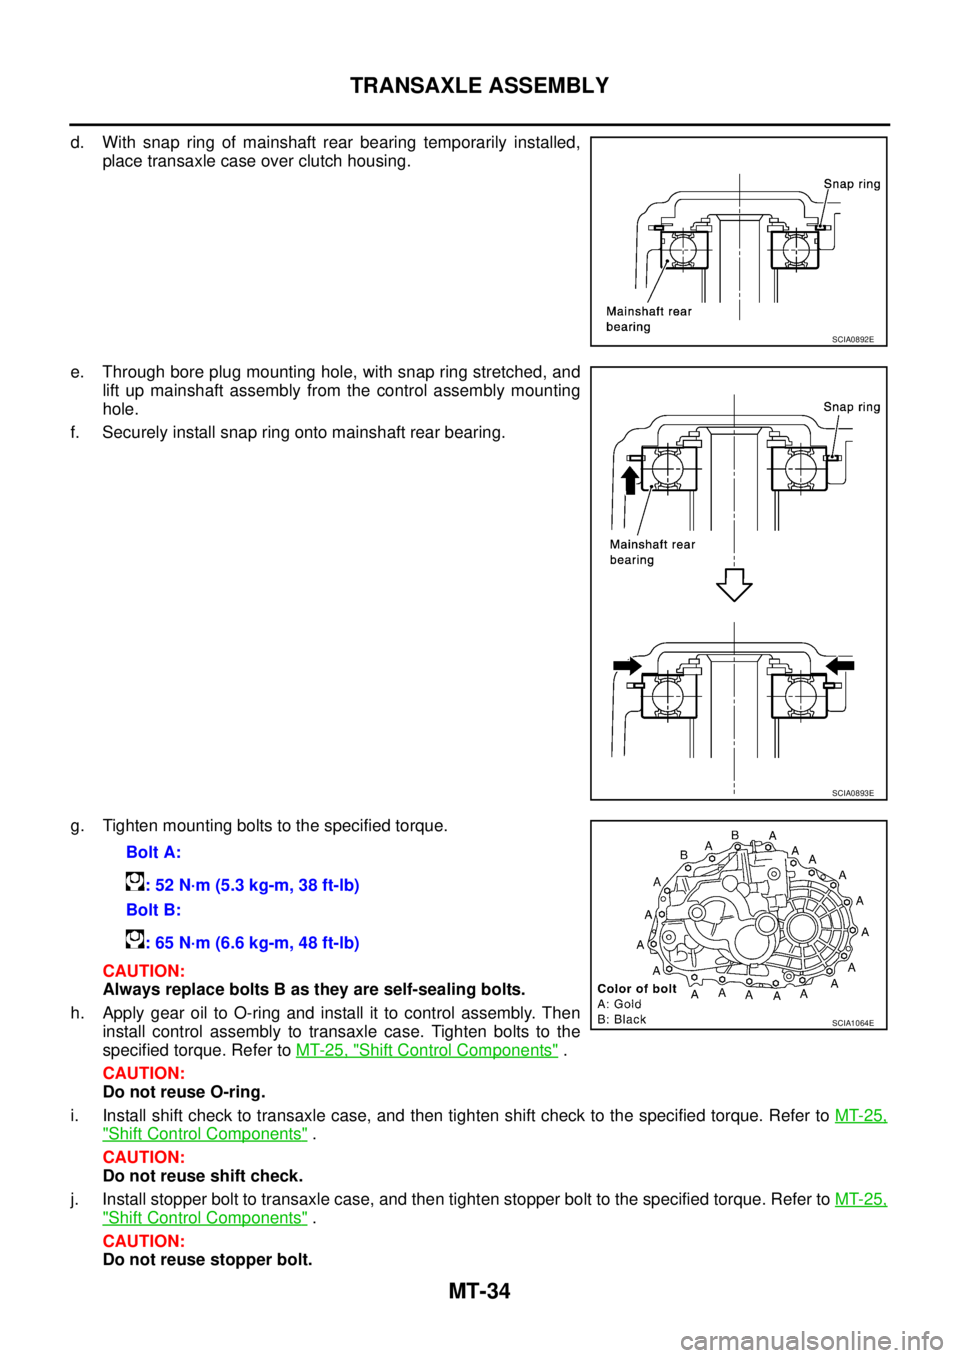
d. With snap ring of mainshaft rear bearing temporarily installed,
place transaxle case over clutch housing.
e. Through bore plug mounting hole, with snap ring stretched, and
lift up mainshaft assembly from the control assembly mounting
hole.
f. Securely install snap ring onto mainshaft rear bearing.
g. Tighten mounting bolts to the specified torque.
CAUTION:
Always replace bolts B as they are self-sealing bolts.
h. Apply gear oil to O-ring and install it to control assembly. Then
install control assembly to transaxle case. Tighten bolts to the
specified torque. Refer to MT-25, "
Shift Control Components" .
CAUTION:
Do not reuse O-ring.
i. Install shift check to transaxle case, and then tighten shift check to the specified torque. Refer to MT-25,
"Shift Control Components" .
CAUTION:
Do not reuse shift check.
j. Install stopper bolt to transaxle case, and then tighten stopper bolt to the specified torque. Refer to MT-25,
"Shift Control Components" .
CAUTION:
Do not reuse stopper bolt.
SCIA0892E
SCIA0893E
Bolt A:
: 52 N·m (5.3 kg-m, 38 ft-lb)
Bolt B:
: 65 N·m (6.6 kg-m, 48 ft-lb)
SCIA1064E
Page 2191 of 4555
TRANSAXLE ASSEMBLY
MT-35
D
E
F
G
H
I
J
K
L
MA
B
MT
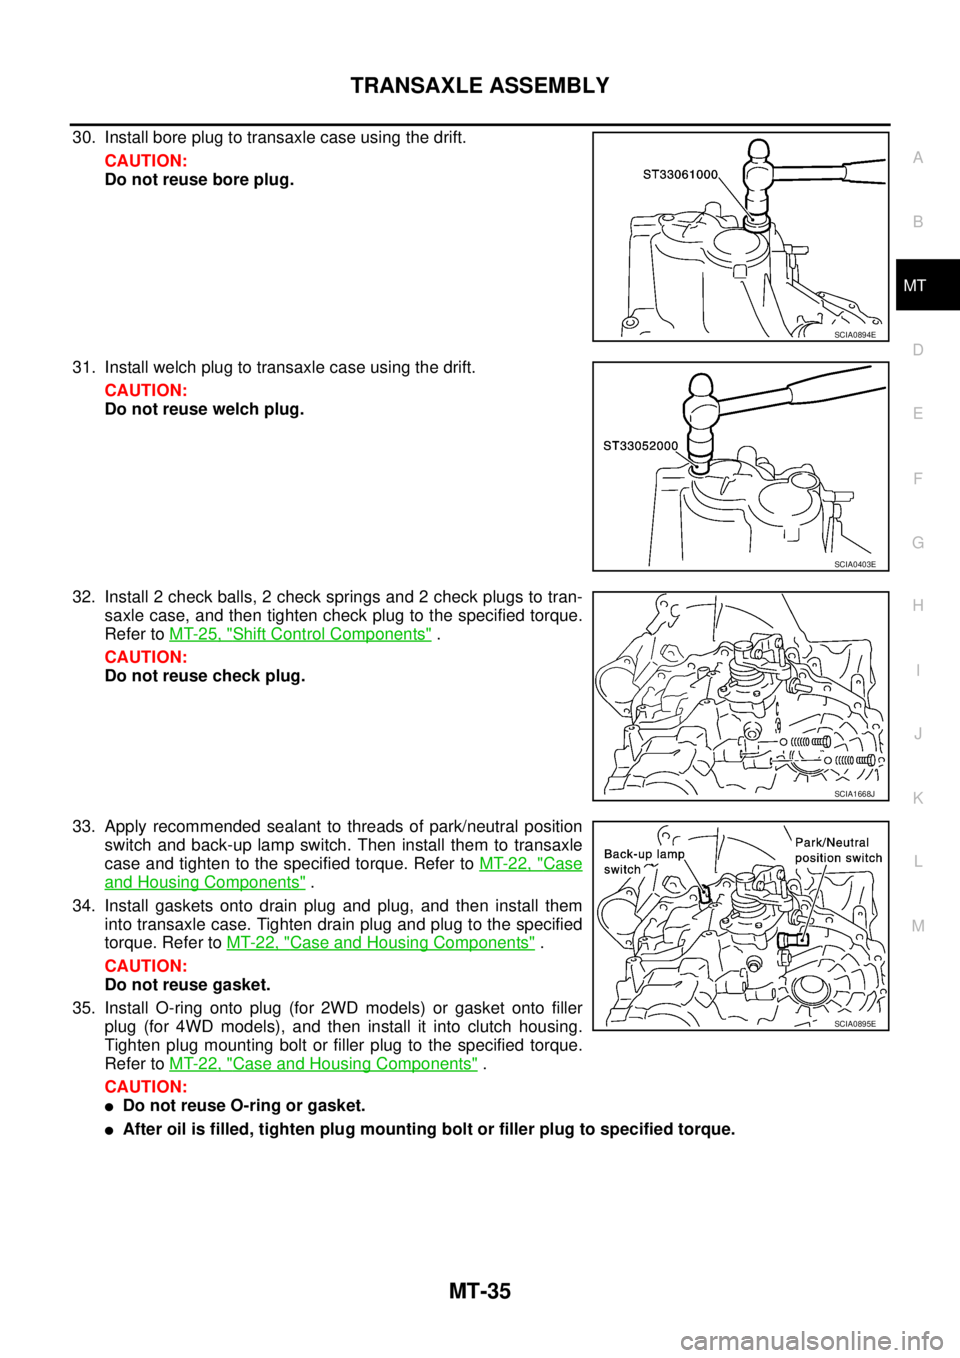
30. Install bore plug to transaxle case using the drift.
CAUTION:
Do not reuse bore plug.
31. Install welch plug to transaxle case using the drift.
CAUTION:
Do not reuse welch plug.
32. Install 2 check balls, 2 check springs and 2 check plugs to tran-
saxle case, and then tighten check plug to the specified torque.
Refer to MT-25, "
Shift Control Components" .
CAUTION:
Do not reuse check plug.
33. Apply recommended sealant to threads of park/neutral position
switch and back-up lamp switch. Then install them to transaxle
case and tighten to the specified torque. Refer to MT-22, "
Case
and Housing Components" .
34. Install gaskets onto drain plug and plug, and then install them
into transaxle case. Tighten drain plug and plug to the specified
torque. Refer to MT-22, "
Case and Housing Components" .
CAUTION:
Do not reuse gasket.
35. Install O-ring onto plug (for 2WD models) or gasket onto filler
plug (for 4WD models), and then install it into clutch housing.
Tighten plug mounting bolt or filler plug to the specified torque.
Refer to MT-22, "
Case and Housing Components" .
CAUTION:
�Do not reuse O-ring or gasket.
�After oil is filled, tighten plug mounting bolt or filler plug to specified torque.
SCIA0894E
SCIA0403E
SCIA1668J
SCIA0895E
Page 2192 of 4555
MT-36
TRANSAXLE ASSEMBLY
ADJUSTMENT
Differential Side Bearing Preload
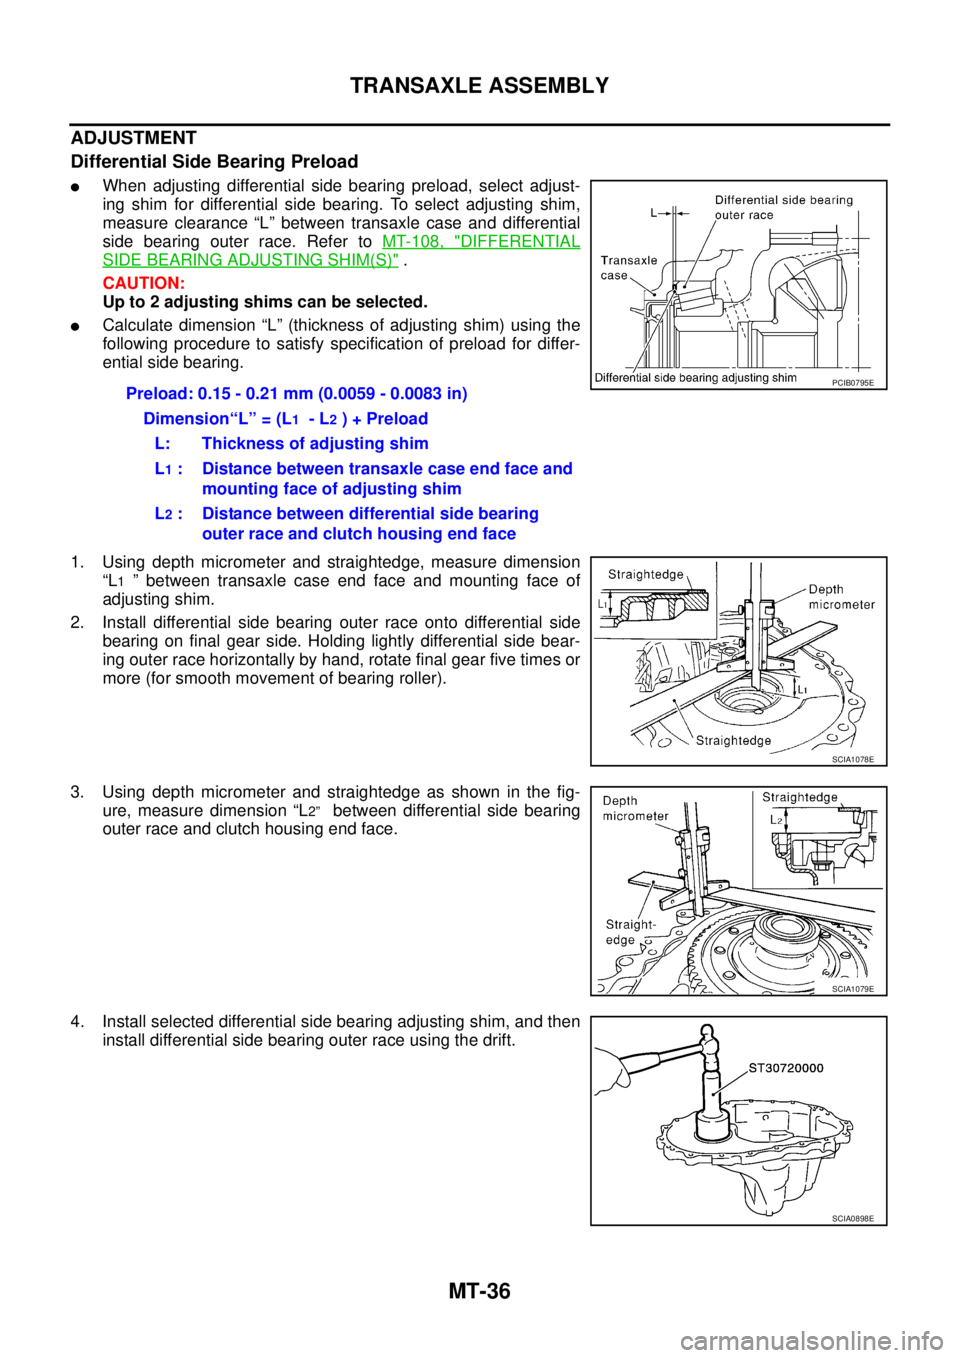
�When adjusting differential side bearing preload, select adjust-
ing shim for differential side bearing. To select adjusting shim,
measure clearance “L” between transaxle case and differential
side bearing outer race. Refer to MT-108, "
DIFFERENTIAL
SIDE BEARING ADJUSTING SHIM(S)" .
CAUTION:
Up to 2 adjusting shims can be selected.
�Calculate dimension “L” (thickness of adjusting shim) using the
following procedure to satisfy specification of preload for differ-
ential side bearing.
1. Using depth micrometer and straightedge, measure dimension
“L
1 ” between transaxle case end face and mounting face of
adjusting shim.
2. Install differential side bearing outer race onto differential side
bearing on final gear side. Holding lightly differential side bear-
ing outer race horizontally by hand, rotate final gear five times or
more (for smooth movement of bearing roller).
3. Using depth micrometer and straightedge as shown in the fig-
ure, measure dimension “L
2” between differential side bearing
outer race and clutch housing end face.
4. Install selected differential side bearing adjusting shim, and then
install differential side bearing outer race using the drift.Preload: 0.15 - 0.21 mm (0.0059 - 0.0083 in)
Dimension“L” = (L
1 - L2 ) + Preload
L: Thickness of adjusting shim
L
1 : Distance between transaxle case end face and
mounting face of adjusting shim
L
2 : Distance between differential side bearing
outer race and clutch housing end face
PCIB0795E
SCIA1078E
SCIA1079E
SCIA0898E
Page 2193 of 4555
TRANSAXLE ASSEMBLY
MT-37
D
E
F
G
H
I
J
K
L
MA
B
MT
Reverse Idler Gear End Play
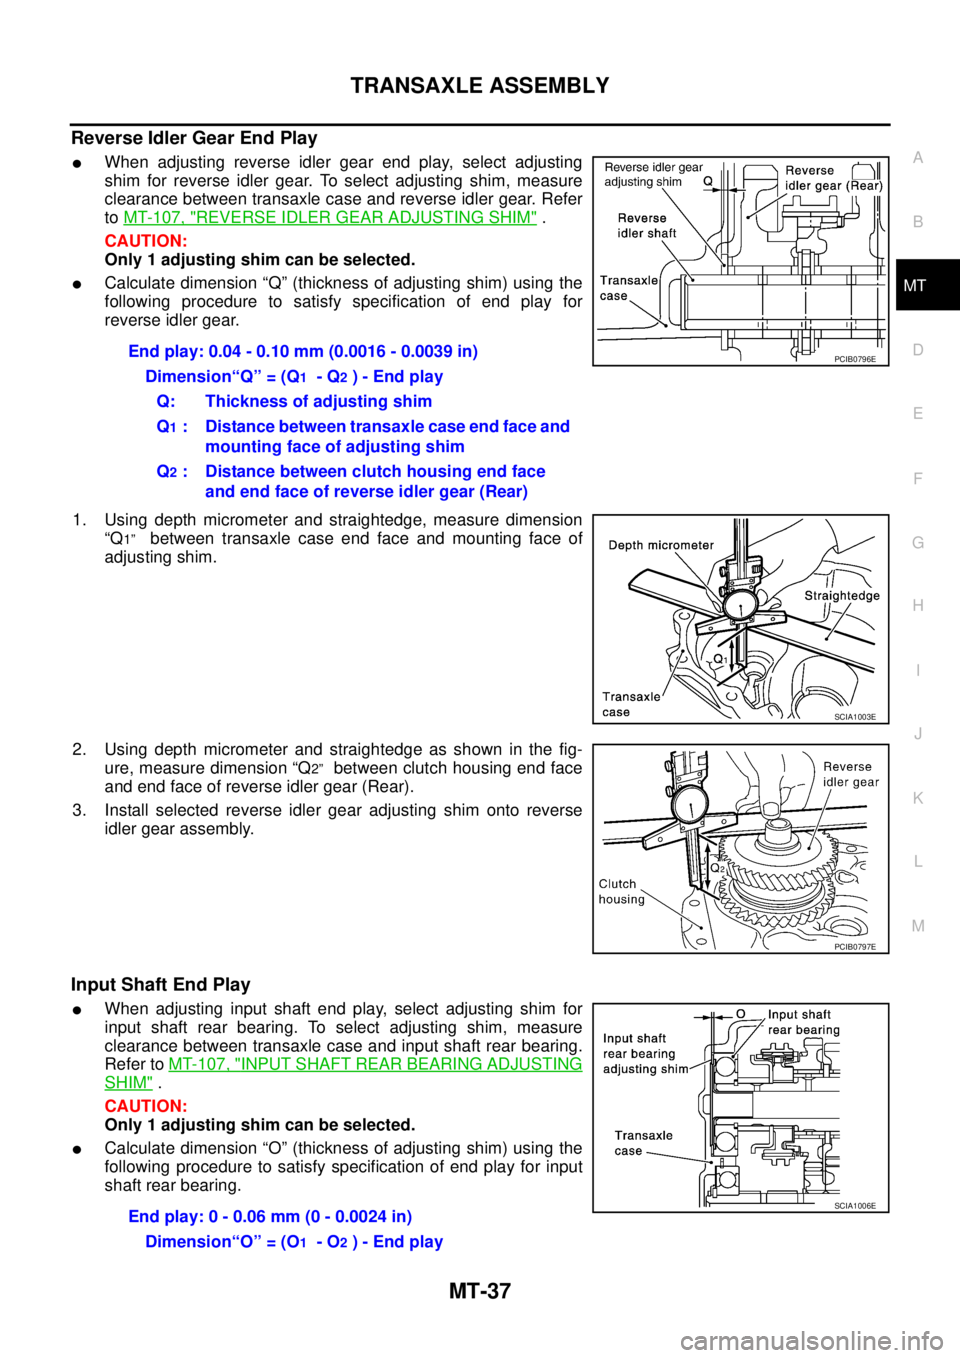
�When adjusting reverse idler gear end play, select adjusting
shim for reverse idler gear. To select adjusting shim, measure
clearance between transaxle case and reverse idler gear. Refer
to MT-107, "
REVERSE IDLER GEAR ADJUSTING SHIM" .
CAUTION:
Only 1 adjusting shim can be selected.
�Calculate dimension “Q” (thickness of adjusting shim) using the
following procedure to satisfy specification of end play for
reverse idler gear.
1. Using depth micrometer and straightedge, measure dimension
“Q
1” between transaxle case end face and mounting face of
adjusting shim.
2. Using depth micrometer and straightedge as shown in the fig-
ure, measure dimension “Q
2” between clutch housing end face
and end face of reverse idler gear (Rear).
3. Install selected reverse idler gear adjusting shim onto reverse
idler gear assembly.
Input Shaft End Play
�When adjusting input shaft end play, select adjusting shim for
input shaft rear bearing. To select adjusting shim, measure
clearance between transaxle case and input shaft rear bearing.
Refer to MT-107, "
INPUT SHAFT REAR BEARING ADJUSTING
SHIM" .
CAUTION:
Only 1 adjusting shim can be selected.
�Calculate dimension “O” (thickness of adjusting shim) using the
following procedure to satisfy specification of end play for input
shaft rear bearing.End play: 0.04 - 0.10 mm (0.0016 - 0.0039 in)
Dimension“Q” = (Q
1 - Q2 ) - End play
Q: Thickness of adjusting shim
Q
1 : Distance between transaxle case end face and
mounting face of adjusting shim
Q
2 : Distance between clutch housing end face
and end face of reverse idler gear (Rear)
PCIB0796E
SCIA1003E
PCIB0797E
End play: 0 - 0.06 mm (0 - 0.0024 in)
Dimension“O” = (O
1 - O2 ) - End play
SCIA1006E
Page 2194 of 4555
MT-38
TRANSAXLE ASSEMBLY
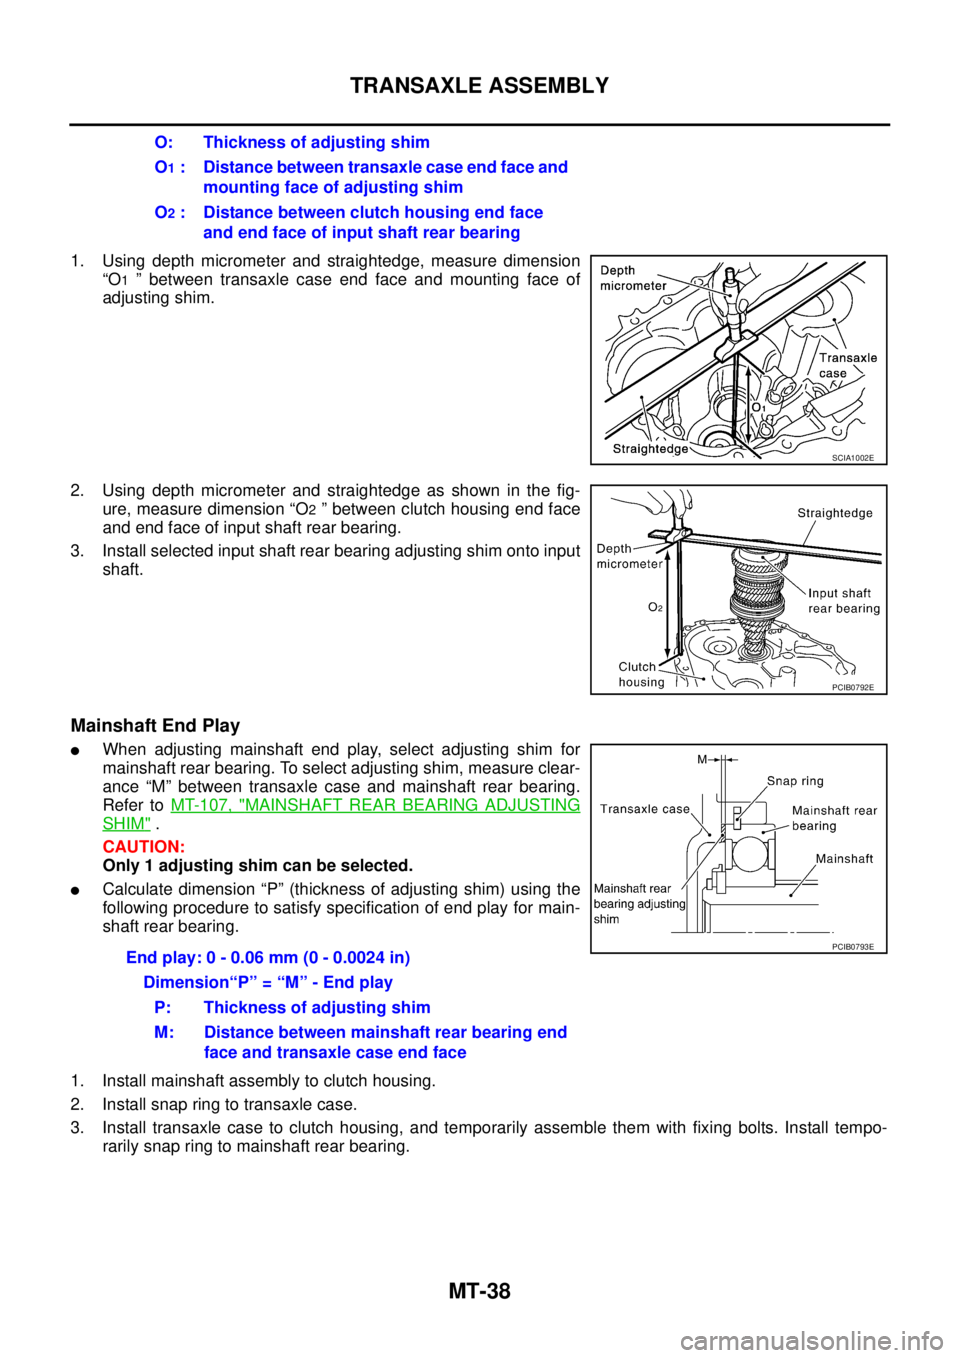
1. Using depth micrometer and straightedge, measure dimension
“O
1 ” between transaxle case end face and mounting face of
adjusting shim.
2. Using depth micrometer and straightedge as shown in the fig-
ure, measure dimension “O
2 ” between clutch housing end face
and end face of input shaft rear bearing.
3. Install selected input shaft rear bearing adjusting shim onto input
shaft.
Mainshaft End Play
�When adjusting mainshaft end play, select adjusting shim for
mainshaft rear bearing. To select adjusting shim, measure clear-
ance “M” between transaxle case and mainshaft rear bearing.
Refer to MT-107, "
MAINSHAFT REAR BEARING ADJUSTING
SHIM" .
CAUTION:
Only 1 adjusting shim can be selected.
�Calculate dimension “P” (thickness of adjusting shim) using the
following procedure to satisfy specification of end play for main-
shaft rear bearing.
1. Install mainshaft assembly to clutch housing.
2. Install snap ring to transaxle case.
3. Install transaxle case to clutch housing, and temporarily assemble them with fixing bolts. Install tempo-
rarily snap ring to mainshaft rear bearing.O: Thickness of adjusting shim
O
1 : Distance between transaxle case end face and
mounting face of adjusting shim
O
2 : Distance between clutch housing end face
and end face of input shaft rear bearing
SCIA1002E
PCIB0792E
End play: 0 - 0.06 mm (0 - 0.0024 in)
Dimension“P” = “M” - End play
P: Thickness of adjusting shim
M: Distance between mainshaft rear bearing end
face and transaxle case end facePCIB0793E
Page 2195 of 4555
TRANSAXLE ASSEMBLY
MT-39
D
E
F
G
H
I
J
K
L
MA
B
MT
4. Install dial indicator to bore plug mounting hole, and expand
snap ring. Lift mainshaft assembly through control assembly
installation hole, and push it against transaxle case. This state
shall be defined as base. Moving distance of mainshaft assem-
bly, with snap ring fit on main rear bearing, becomes “M”.
PCIB0874E
Page 2196 of 4555
MT-40
TRANSAXLE ASSEMBLY
Disassembly and Assembly (RS6F51A)ECS008C1
COMPONENTS
Case and Housing Components
1. Clutch housing 2. Differential side oil seal 3. Ball pin
4. Washer 5. Input shaft oil seal 6. Oil channel
7. Magnet 8. Gasket 9. Filler plug
10. O-ring 11. Plug 12. Air breather tube
13. Back-up lamp switch 14. Oil gutter 15. Baffle plate
16. Transaxle case 17. Plug 18. Welch plug
19. Bore plug 20. Drain plug 21. Differential side oil seal
22. Park/Neutral position (PNP) switch
PCIB1457E
Page 2197 of 4555
TRANSAXLE ASSEMBLY
MT-41
D
E
F
G
H
I
J
K
L
MA
B
MT
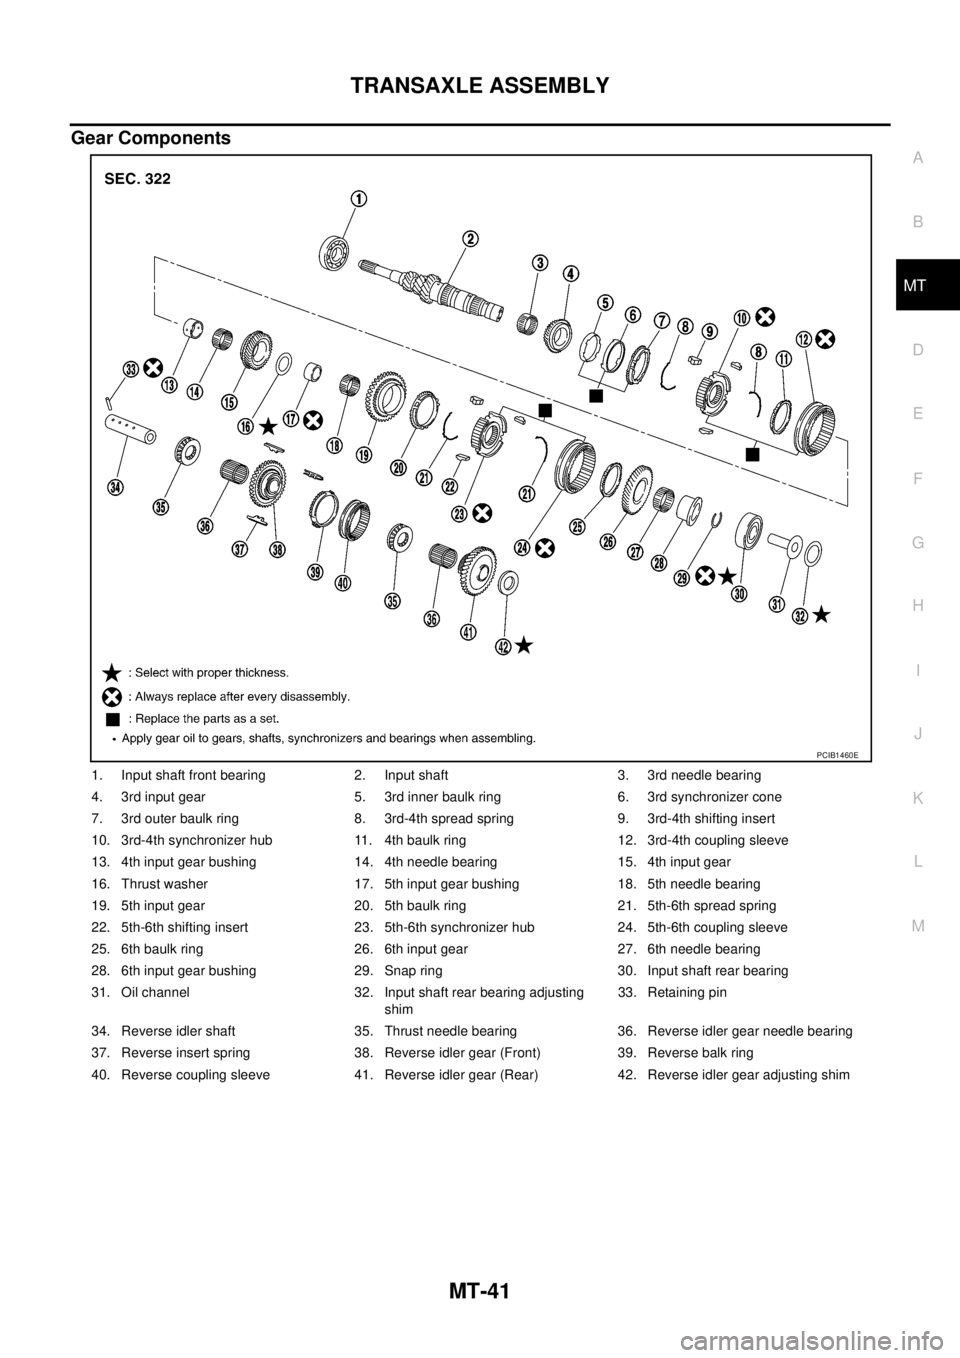
Gear Components
1. Input shaft front bearing 2. Input shaft 3. 3rd needle bearing
4. 3rd input gear 5. 3rd inner baulk ring 6. 3rd synchronizer cone
7. 3rd outer baulk ring 8. 3rd-4th spread spring 9. 3rd-4th shifting insert
10. 3rd-4th synchronizer hub 11. 4th baulk ring 12. 3rd-4th coupling sleeve
13. 4th input gear bushing 14. 4th needle bearing 15. 4th input gear
16. Thrust washer 17. 5th input gear bushing 18. 5th needle bearing
19. 5th input gear 20. 5th baulk ring 21. 5th-6th spread spring
22. 5th-6th shifting insert 23. 5th-6th synchronizer hub 24. 5th-6th coupling sleeve
25. 6th baulk ring 26. 6th input gear 27. 6th needle bearing
28. 6th input gear bushing 29. Snap ring 30. Input shaft rear bearing
31. Oil channel 32. Input shaft rear bearing adjusting
shim33. Retaining pin
34. Reverse idler shaft 35. Thrust needle bearing 36. Reverse idler gear needle bearing
37. Reverse insert spring 38. Reverse idler gear (Front) 39. Reverse balk ring
40. Reverse coupling sleeve 41. Reverse idler gear (Rear) 42. Reverse idler gear adjusting shim
PCIB1460E