Page 2953 of 4555
WHEEL HUB (2WD)
RAX-9
C
E
F
G
H
I
J
K
L
MA
B
RAX
NOTE:
If a load of 49,030 N (5,000 kg 11,025 lb) cannot be applied, carry out the following actions.
�Install to drive shaft and tighten wheel hub lock nut to specified torque. Rotate in forward and reverse
direction 10 times each to ensure a good fit.
�At a rotating speed of 8 - 12 rpm, place a spring balance on hub bolt and measure rotating torque.Rotation torque : 1.96 N·m (0.20 kg-m, 17 in-lb) or less
Spring balance reading : 12.8 N (1.30 kg, 2.87 lb) or less
Rotating torque : 1.126 N·m (0.11 kg-m, 10 in-lb)
Spring balance reading : 19.70 N (2.01 kg, 4.43 lb)
Page 2955 of 4555

WHEEL HUB (4WD)
RAX-11
C
E
F
G
H
I
J
K
L
MA
B
RAX
REMOVAL
1. Remove tyre.
2. Remove wheel hub lock nut.
CAUTION:
Discard the old hub lock nut; replace with new one.
3. Remove brake caliper from axle housing and hang it up some-
where.
CAUTION:
Avoid depressing the brake pedal while the brake caliper is
removed.
4. Remove disc rotor and parking brake assembly from back plate
and axle housing.
5. Remove wheel sensor from axle housing.
6. Remove axle housing from strut.
7. Remove nut and bolt from axle housing side of radius rod.
8. Remove nuts and bolts from axle housing side of front and rear parallel link. Remove axle housing from
vehicle.
INSTALLATION
�Refer to component parts drawing for tightening torque. For installation, follow removal procedure in
reverse order.
Disassembly and AssemblyEDS00067
DISASSEMBLY
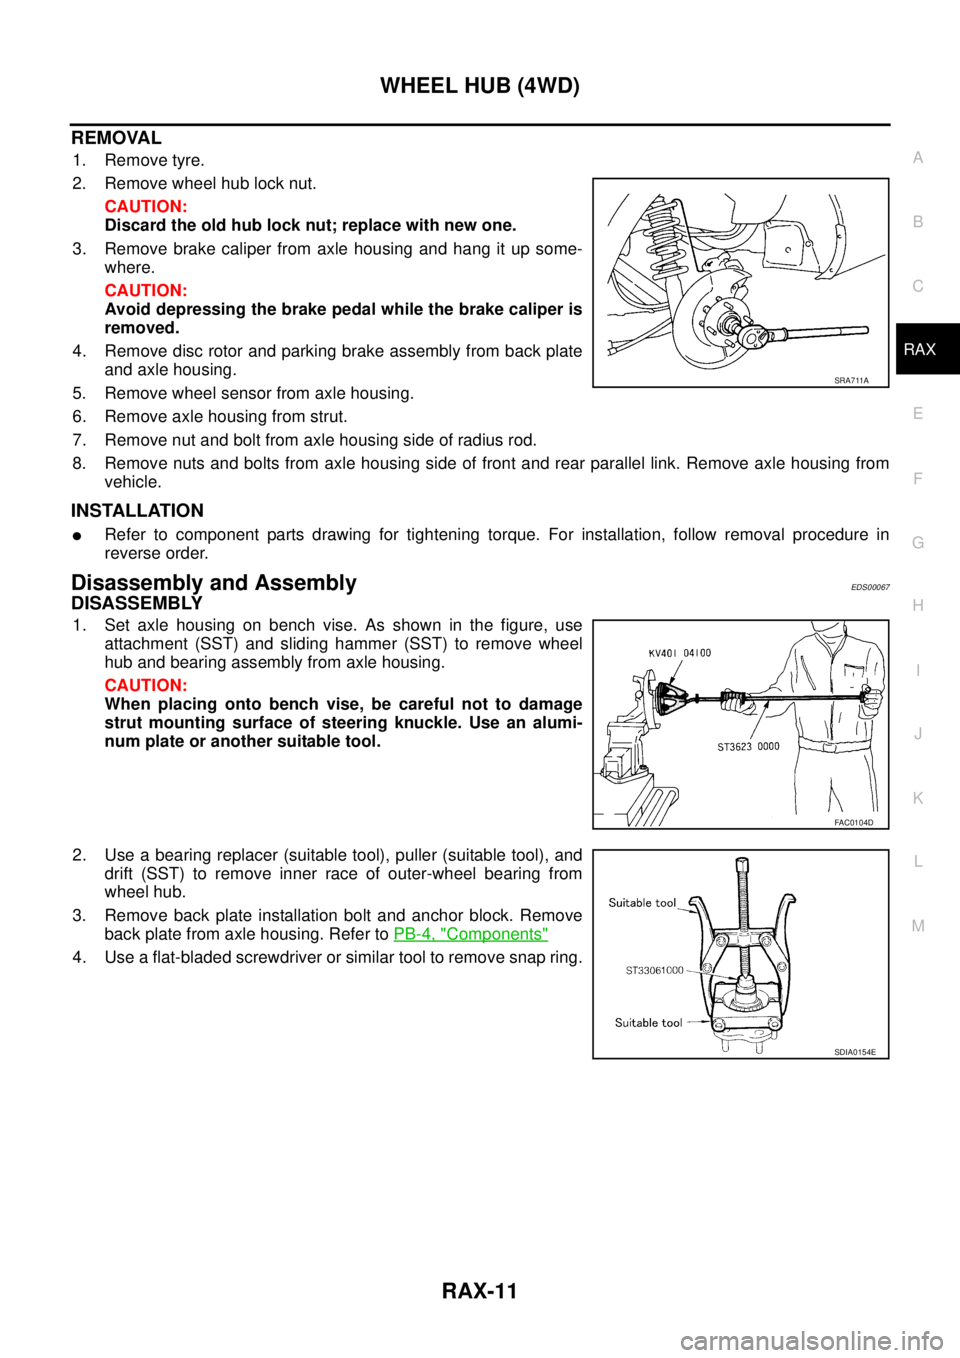
1. Set axle housing on bench vise. As shown in the figure, use
attachment (SST) and sliding hammer (SST) to remove wheel
hub and bearing assembly from axle housing.
CAUTION:
When placing onto bench vise, be careful not to damage
strut mounting surface of steering knuckle. Use an alumi-
num plate or another suitable tool.
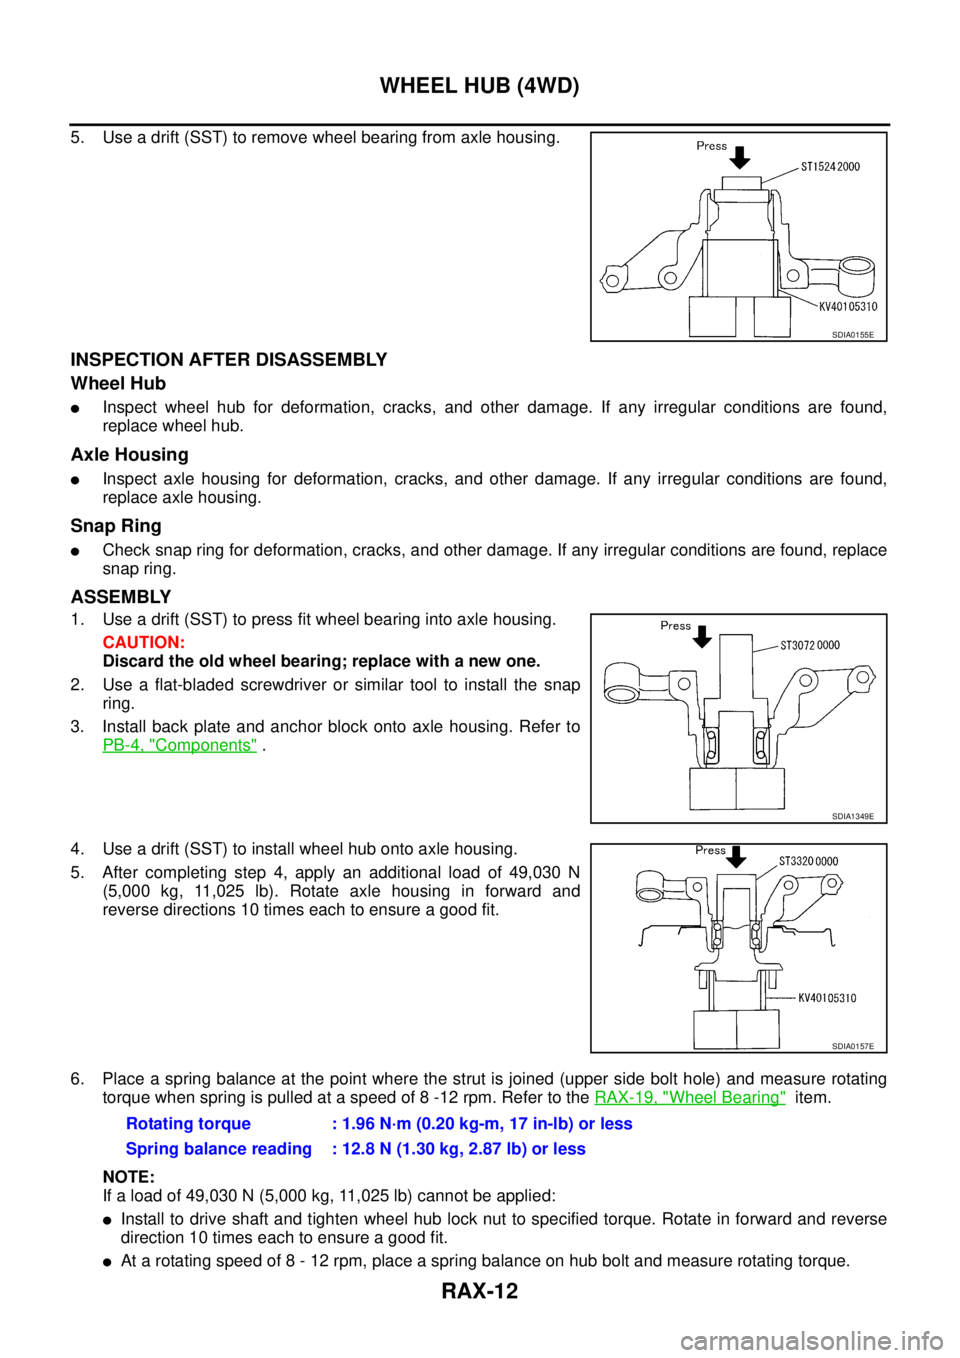
2. Use a bearing replacer (suitable tool), puller (suitable tool), and
drift (SST) to remove inner race of outer-wheel bearing from
wheel hub.
3. Remove back plate installation bolt and anchor block. Remove
back plate from axle housing. Refer to PB-4, "
Components"
4. Use a flat-bladed screwdriver or similar tool to remove snap ring.
SRA711A
FAC0104D
SDIA0154E
Page 2956 of 4555

RAX-12
WHEEL HUB (4WD)
5. Use a drift (SST) to remove wheel bearing from axle housing.
INSPECTION AFTER DISASSEMBLY
Wheel Hub
�Inspect wheel hub for deformation, cracks, and other damage. If any irregular conditions are found,
replace wheel hub.
Axle Housing
�Inspect axle housing for deformation, cracks, and other damage. If any irregular conditions are found,
replace axle housing.
Snap Ring
�Check snap ring for deformation, cracks, and other damage. If any irregular conditions are found, replace
snap ring.
ASSEMBLY
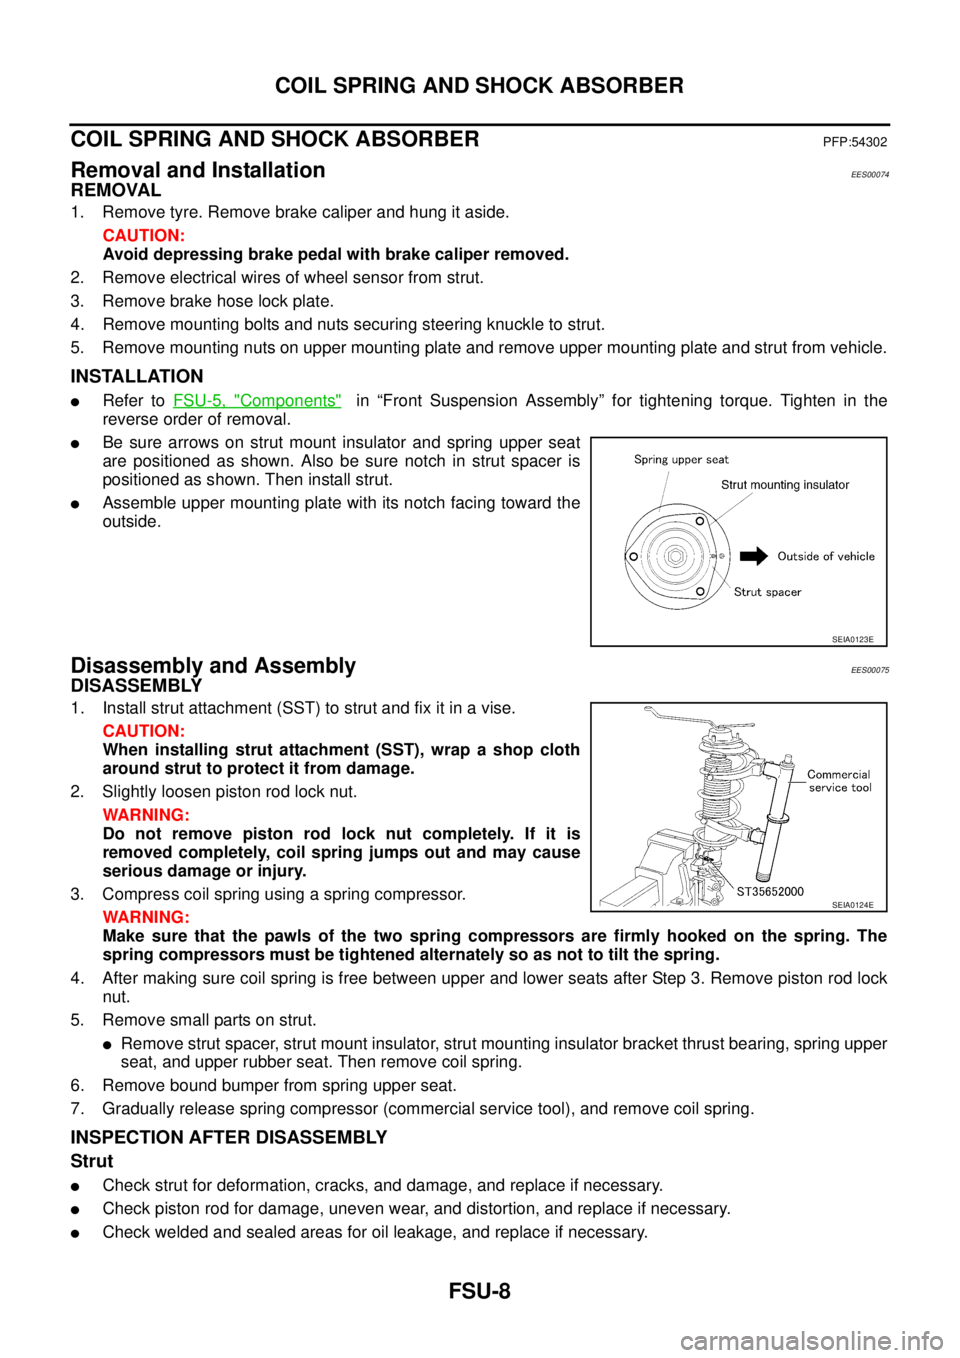
1. Use a drift (SST) to press fit wheel bearing into axle housing.
CAUTION:
Discard the old wheel bearing; replace with a new one.
2. Use a flat-bladed screwdriver or similar tool to install the snap
ring.
3. Install back plate and anchor block onto axle housing. Refer to
PB-4, "
Components" .
4. Use a drift (SST) to install wheel hub onto axle housing.
5. After completing step 4, apply an additional load of 49,030 N
(5,000 kg, 11,025 lb). Rotate axle housing in forward and
reverse directions 10 times each to ensure a good fit.
6. Place a spring balance at the point where the strut is joined (upper side bolt hole) and measure rotating
torque when spring is pulled at a speed of 8 -12 rpm. Refer to the RAX-19, "
Wheel Bearing" item.
NOTE:
If a load of 49,030 N (5,000 kg, 11,025 lb) cannot be applied:
�Install to drive shaft and tighten wheel hub lock nut to specified torque. Rotate in forward and reverse
direction 10 times each to ensure a good fit.
�At a rotating speed of 8 - 12 rpm, place a spring balance on hub bolt and measure rotating torque.
SDIA0155E
SDIA1349E
SDIA0157E
Rotating torque : 1.96 N·m (0.20 kg-m, 17 in-lb) or less
Spring balance reading : 12.8 N (1.30 kg, 2.87 lb) or less
Page 2957 of 4555
WHEEL HUB (4WD)
RAX-13
C
E
F
G
H
I
J
K
L
MA
B
RAX
Rotating torque : 1.126 N·m (0.11 kg-m, 10 in-lb)
Spring balance reading : 19.70 N (2.01 kg, 4.43 lb)
Page 2963 of 4555
SERVICE DATA AND SPECIFICATIONS (SDS)
RAX-19
C
E
F
G
H
I
J
K
L
MA
B
RAX
SERVICE DATA AND SPECIFICATIONS (SDS)PFP:00030
Wheel BearingEDS000ID
Drive ShaftEDS000IE
Rotation torque 1.96 N·m (0.20 kg-m, 17 in-lb) or less
Spring balance reading 12.8 N (1.30 kg) or less
Installation location of spring balance mm (in)
Axial end play 0.05 mm (0.0020 in) or less
SDIA0148E
Specified amount of greaseFinal drive side 40 - 50 g (1.41 - 1.77 oz)
Wheel side 35 - 45 g (1.23 - 1.59 oz)
Boot lengthFinal drive side (L
2 ) 78.6 - 80.6 mm (3.094 - 3.173 in)
Wheel side (L
1 ) 66.7 - 68.7 mm (2.626 - 2.705 in)
SDIA0618E
Page 2967 of 4555
PREPARATION
FSU-3
C
D
F
G
H
I
J
K
L
MA
B
FSU
PREPARATIONPFP:00002
Special Service Tools (SST)EES00070
Commercial Service ToolsEES000JC
Tool number
Tool nameDescription
HT7252000
Ball joint removerRemoving tie-rod outer and lower ball
joint
ST3127S000
Preload gaugeMeasuring ball joint sliding torque
KV991040S1
CCK gauge attachment
1. KV99104020 Adapter A
2. KV99104030 Adapter B
3. KV99104040 Adapter C
4. KV99104050 Adapter D
5. KV99104060 Plate
6. KV99104070 Guide bolt
7. KV99104080 Spring
8. KV99104090 Center plateMeasuring wheel alignment
ST35652000
Strut attachmentDisassembling and assembling strut
S-NT146
ZZA0806D
ZZA1167D
ZZA0807D
Tool nameDescription
Attachment wheel alignment
a: screw M24 x 1.5 pitch
b: 35 mm (1.38 in) dia.
c: 65 mm (2.56 in) dia.
d: 56 mm (2.20 in) dia.
e: 12 mm (0.47 in) dia.Measure wheel alignment
S-NT148
Page 2972 of 4555

FSU-8
COIL SPRING AND SHOCK ABSORBER
COIL SPRING AND SHOCK ABSORBERPFP:54302
Removal and InstallationEES00074
REMOVAL
1. Remove tyre. Remove brake caliper and hung it aside.
CAUTION:
Avoid depressing brake pedal with brake caliper removed.
2. Remove electrical wires of wheel sensor from strut.
3. Remove brake hose lock plate.
4. Remove mounting bolts and nuts securing steering knuckle to strut.
5. Remove mounting nuts on upper mounting plate and remove upper mounting plate and strut from vehicle.
INSTALLATION
�Refer to FSU-5, "Components" in “Front Suspension Assembly” for tightening torque. Tighten in the
reverse order of removal.
�Be sure arrows on strut mount insulator and spring upper seat
are positioned as shown. Also be sure notch in strut spacer is
positioned as shown. Then install strut.
�Assemble upper mounting plate with its notch facing toward the
outside.
Disassembly and AssemblyEES00075
DISASSEMBLY
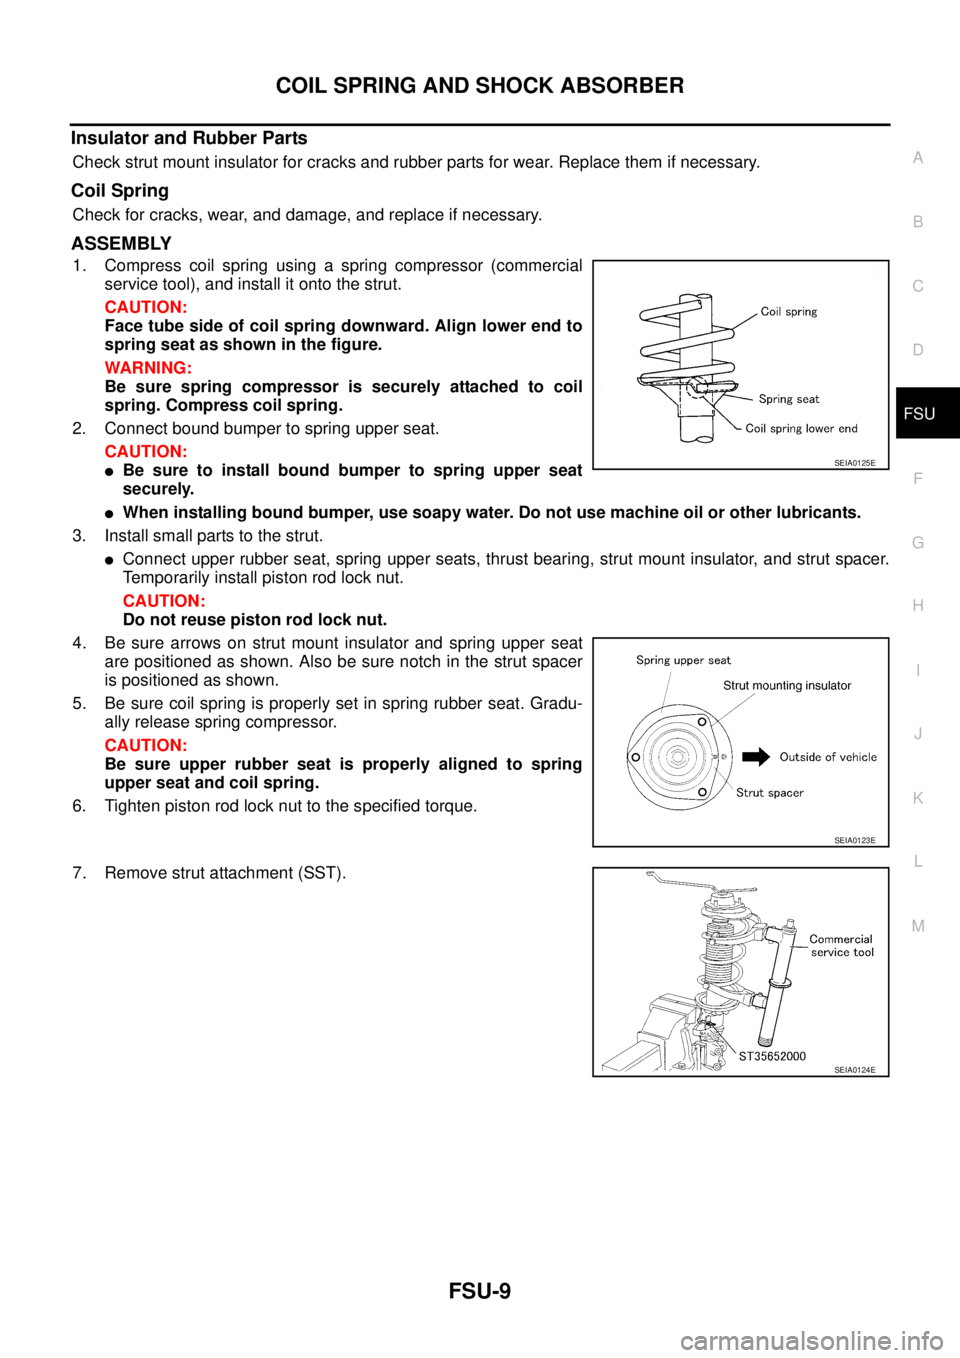
1. Install strut attachment (SST) to strut and fix it in a vise.
CAUTION:
When installing strut attachment (SST), wrap a shop cloth
around strut to protect it from damage.
2. Slightly loosen piston rod lock nut.
WARNING:
Do not remove piston rod lock nut completely. If it is
removed completely, coil spring jumps out and may cause
serious damage or injury.
3. Compress coil spring using a spring compressor.
WARNING:
Make sure that the pawls of the two spring compressors are firmly hooked on the spring. The
spring compressors must be tightened alternately so as not to tilt the spring.
4. After making sure coil spring is free between upper and lower seats after Step 3. Remove piston rod lock
nut.
5. Remove small parts on strut.
�Remove strut spacer, strut mount insulator, strut mounting insulator bracket thrust bearing, spring upper
seat, and upper rubber seat. Then remove coil spring.
6. Remove bound bumper from spring upper seat.
7. Gradually release spring compressor (commercial service tool), and remove coil spring.
INSPECTION AFTER DISASSEMBLY
Strut
�Check strut for deformation, cracks, and damage, and replace if necessary.
�Check piston rod for damage, uneven wear, and distortion, and replace if necessary.
�Check welded and sealed areas for oil leakage, and replace if necessary.
SEIA0123E
SEIA0124E
Page 2973 of 4555

COIL SPRING AND SHOCK ABSORBER
FSU-9
C
D
F
G
H
I
J
K
L
MA
B
FSU
Insulator and Rubber Parts
Check strut mount insulator for cracks and rubber parts for wear. Replace them if necessary.
Coil Spring
Check for cracks, wear, and damage, and replace if necessary.
ASSEMBLY
1. Compress coil spring using a spring compressor (commercial
service tool), and install it onto the strut.
CAUTION:
Face tube side of coil spring downward. Align lower end to
spring seat as shown in the figure.
WARNING:
Be sure spring compressor is securely attached to coil
spring. Compress coil spring.
2. Connect bound bumper to spring upper seat.
CAUTION:
�Be sure to install bound bumper to spring upper seat
securely.
�When installing bound bumper, use soapy water. Do not use machine oil or other lubricants.
3. Install small parts to the strut.
�Connect upper rubber seat, spring upper seats, thrust bearing, strut mount insulator, and strut spacer.
Temporarily install piston rod lock nut.
CAUTION:
Do not reuse piston rod lock nut.
4. Be sure arrows on strut mount insulator and spring upper seat
are positioned as shown. Also be sure notch in the strut spacer
is positioned as shown.
5. Be sure coil spring is properly set in spring rubber seat. Gradu-
ally release spring compressor.
CAUTION:
Be sure upper rubber seat is properly aligned to spring
upper seat and coil spring.
6. Tighten piston rod lock nut to the specified torque.
7. Remove strut attachment (SST).
SEIA0125E
SEIA0123E
SEIA0124E