Page 4016 of 4555

LT-20
HEADLAMP - XENON TYPE -
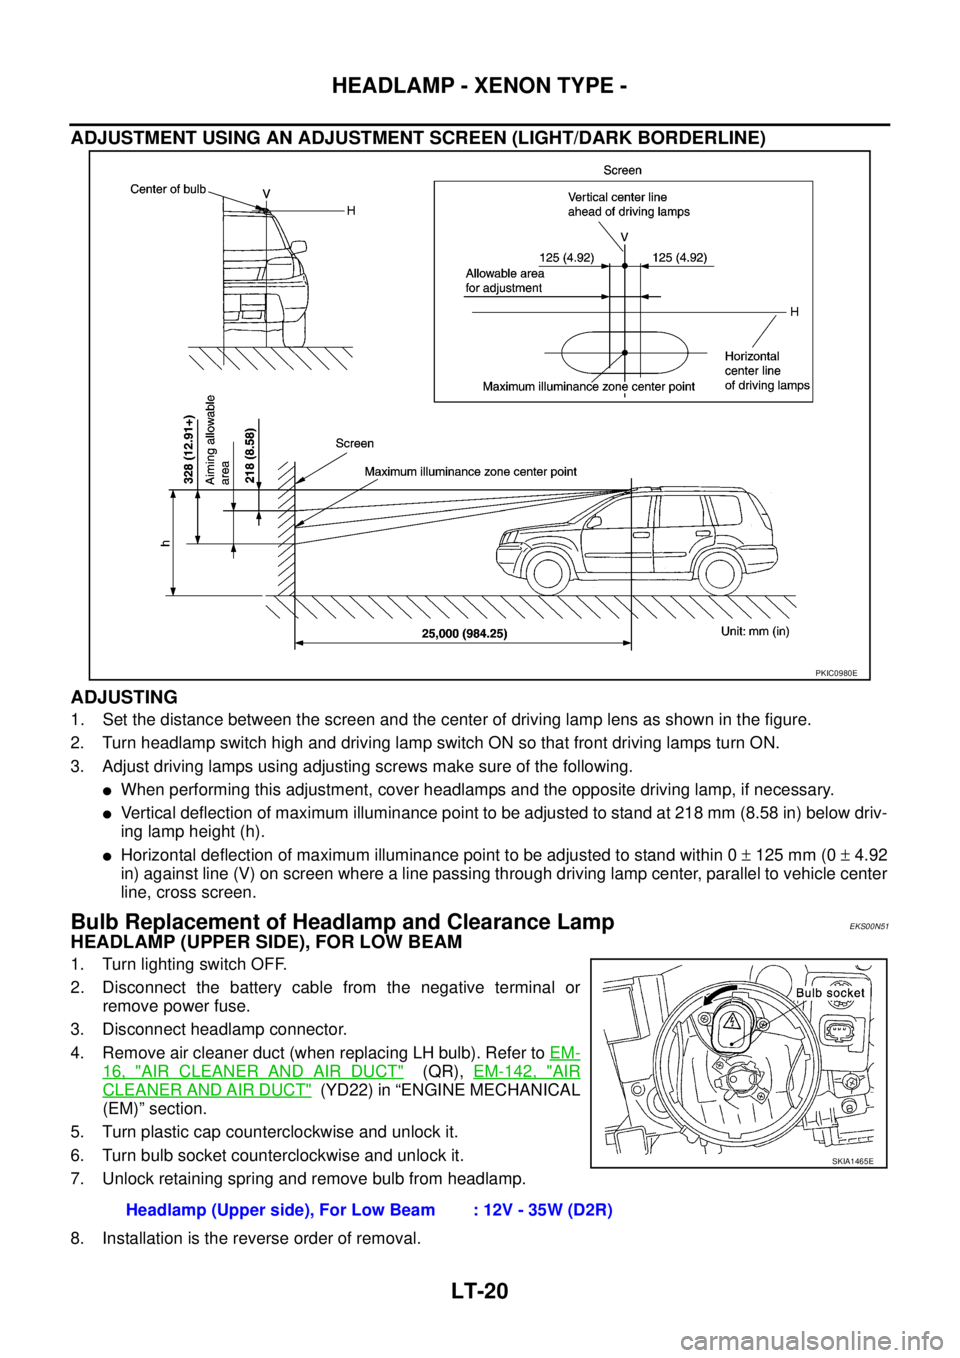
ADJUSTMENT USING AN ADJUSTMENT SCREEN (LIGHT/DARK BORDERLINE)
ADJUSTING
1. Set the distance between the screen and the center of driving lamp lens as shown in the figure.
2. Turn headlamp switch high and driving lamp switch ON so that front driving lamps turn ON.
3. Adjust driving lamps using adjusting screws make sure of the following.
�When performing this adjustment, cover headlamps and the opposite driving lamp, if necessary.
�Vertical deflection of maximum illuminance point to be adjusted to stand at 218 mm (8.58 in) below driv-
ing lamp height (h).
�Horizontal deflection of maximum illuminance point to be adjusted to stand within 0 ± 125 mm (0 ± 4.92
in) against line (V) on screen where a line passing through driving lamp center, parallel to vehicle center
line, cross screen.
Bulb Replacement of Headlamp and Clearance LampEKS00N51
HEADLAMP (UPPER SIDE), FOR LOW BEAM
1. Turn lighting switch OFF.
2. Disconnect the battery cable from the negative terminal or
remove power fuse.
3. Disconnect headlamp connector.
4. Remove air cleaner duct (when replacing LH bulb). Refer to EM-
16, "AIR CLEANER AND AIR DUCT" (QR), EM-142, "AIR
CLEANER AND AIR DUCT" (YD22) in “ENGINE MECHANICAL
(EM)” section.
5. Turn plastic cap counterclockwise and unlock it.
6. Turn bulb socket counterclockwise and unlock it.
7. Unlock retaining spring and remove bulb from headlamp.
8. Installation is the reverse order of removal.
PKIC0980E
Headlamp (Upper side), For Low Beam : 12V - 35W (D2R)
SKIA1465E
Page 4033 of 4555

HEADLAMP - CONVENTIONAL TYPE -
LT-37
C
D
E
F
G
H
I
J
L
MA
B
LT
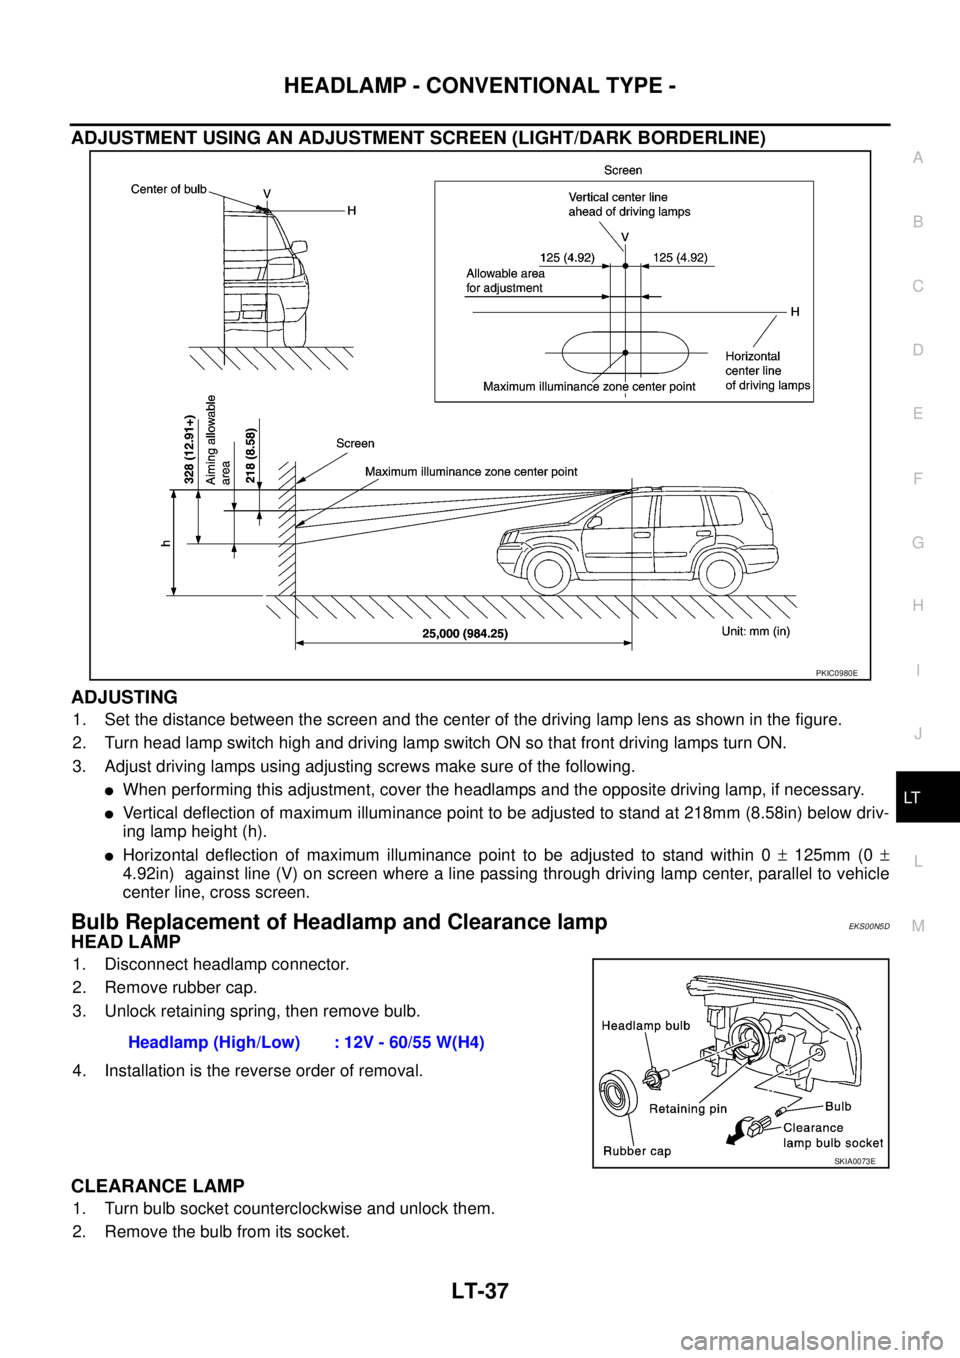
ADJUSTMENT USING AN ADJUSTMENT SCREEN (LIGHT/DARK BORDERLINE)
ADJUSTING
1. Set the distance between the screen and the center of the driving lamp lens as shown in the figure.
2. Turn head lamp switch high and driving lamp switch ON so that front driving lamps turn ON.
3. Adjust driving lamps using adjusting screws make sure of the following.
�When performing this adjustment, cover the headlamps and the opposite driving lamp, if necessary.
�Vertical deflection of maximum illuminance point to be adjusted to stand at 218mm (8.58in) below driv-
ing lamp height (h).
�Horizontal deflection of maximum illuminance point to be adjusted to stand within 0 ± 125mm (0 ±
4.92in) against line (V) on screen where a line passing through driving lamp center, parallel to vehicle
center line, cross screen.
Bulb Replacement of Headlamp and Clearance lampEKS00N5D
HEAD LAMP
1. Disconnect headlamp connector.
2. Remove rubber cap.
3. Unlock retaining spring, then remove bulb.
4. Installation is the reverse order of removal.
CLEARANCE LAMP
1. Turn bulb socket counterclockwise and unlock them.
2. Remove the bulb from its socket.
PKIC0980E
Headlamp (High/Low) : 12V - 60/55 W(H4)
SKIA0073E
Page 4500 of 4555

MA-4
DESCRIPTION
DESCRIPTIONPFP:00000
Pre-Delivery Inspection ItemsELS000Y5
Shown below are Pre-delivery Inspection Items required for the new vehicle. It is recommended that
necessary items other than those listed here be added, paying due regard to the conditions in each
country.
Perform applicable items on each model. Consult text of this section for specifications.
Install vehicle protection kit
Fit all accessories ordered (if applicable) (e.g. towbar, audio, navigation, air conditioner, styling kit)
UNDER HOOD — engine off
Check coolant level and cooling system for leaks
Charge battery and check terminals for condition
Check drive belts tension (diesel only)
Check fuel filter for water or dust (diesel only) and fuel system for leaks
Check engine oil level and for oil leaks
Check brake and clutch fluid levels and fluid lines for leaks
Check and top up washer reservoirs
Check power steering fluid level and fluid lines for leaks (if applicable)
Check air conditioning system for gas leaks (if applicable)
ON INSIDE AND OUTSIDE
Install transit fuse if removed for vehicle storage
Check instruments, gauges, lamps, horn and accessories for operation
Check wipers and washers for operation and adjustment
Check interior and door mirrors and sun visors for operation
Set radio code and set clock
Check parking brake adjustment
Check clutch pedal adjustment
Check steering lock operation
Check seat adjusters and seat belts for operation
Check all windows for operation and alignment
Check mouldings, trim and fittings for fit and alignment
Check weatherstrips for fit and adhesion
Check hood, trunk lid, door panels and fuel lid for fit and alignment
Check latches, keys, remote key, door locks and remote trunk lid and fuel lid release for operation
Check wheel nut torques
Check tyre pressure (incl. spare tyre)
Check tool kit and jack for operation
Check automatic transmission/transaxle starter inhibitor (if applicable)
Check sunroof for operation and alignment (if applicable)
UNDER BODY
Check manual transmission/transaxle, differential and transfer box for oil level and oil leaks
Tighten bolts and nuts steering linkage and gear box, axle/suspension parts, propeller and exhaust system
Check brake and clutch lines, and oil/fluid reservoirs for leaks
Remove front suspension spacer blocks (if applicable)
Check body mounting torque (if applicable)
Page:
< prev 1-8 9-16 17-24