Page 260 of 788

POWER STEERING GEAR BOX AND LINKAGE
POWER STEERING37-26
INSTALLATION SERVICE POINT
>>A<< JOINT COVER GROMMET
INSTALLATION
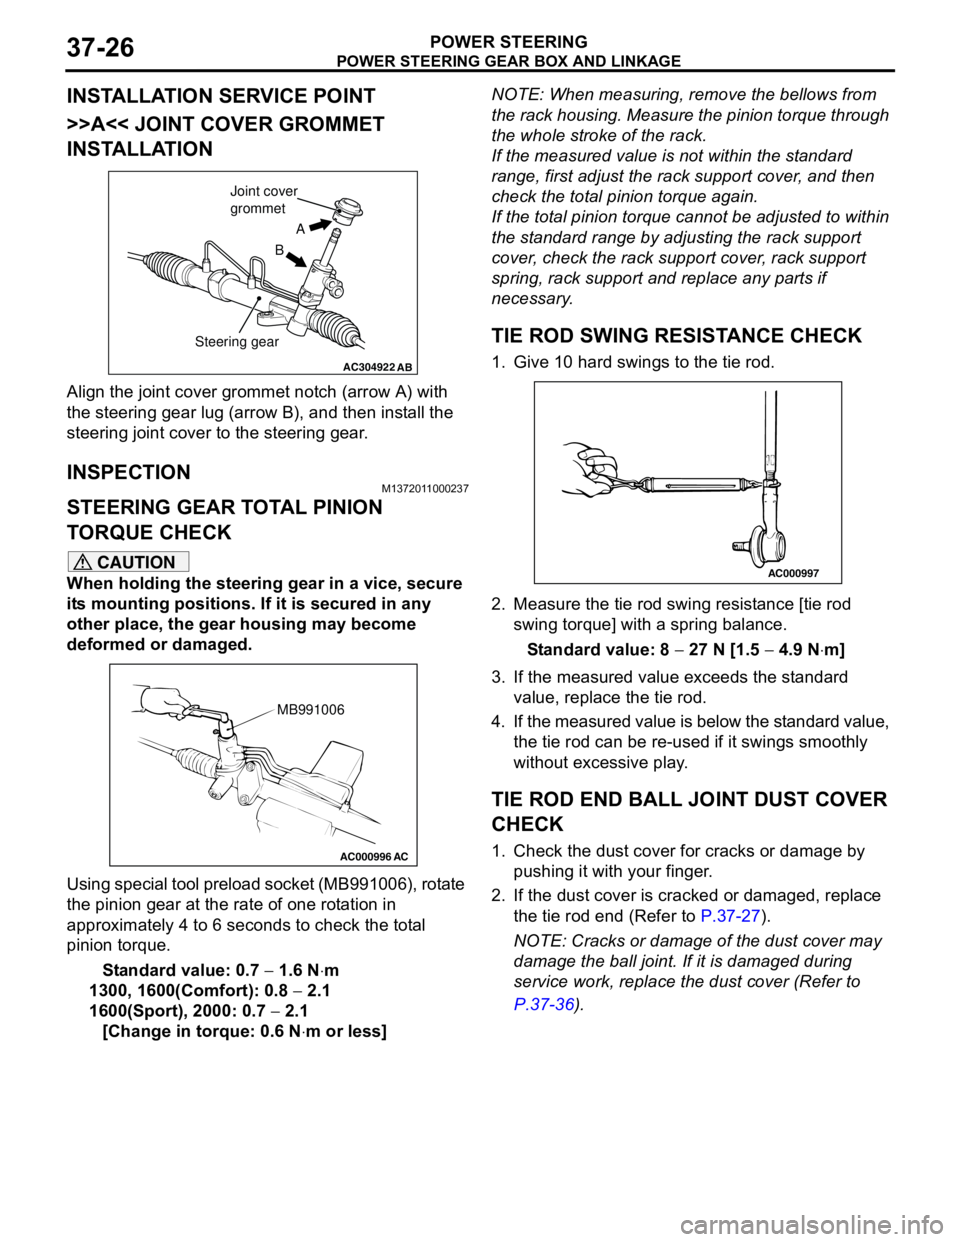
Align the joint cover grommet notch (arrow A) with
the steering gear lug (arrow B), and then install the
steering joint cover to the steering gear.
INSPECTIONM1372011000237
STEERING GEAR TOTAL PINION
TORQUE CHECK
CAUTION
When holding the steering gear in a vice, secure
its mounting positions. If it is secured in any
other place, the gear housing may become
deformed or damaged.
Using special tool preload socket (MB991006), rotate
the pinion gear at the rate of one rotation in
approximately 4 to 6 seconds to check the total
pinion torque.
Standard value: 0.7 − 1.6 N⋅m
1300, 1600(Comfort): 0.8 − 2.1
1600(Sport), 2000: 0.7 − 2.1
[Change in torque: 0.6 N⋅m or less]NOTE: When measuring, remove the bellows from
the rack housing. Measure the pinion torque through
the whole stroke of the rack.
If the measured value is not within the standard
range, first adjust the rack support cover, and then
check the total pinion torque again.
If the total pinion torque cannot be adjusted to within
the standard range by adjusting the rack support
cover, check the rack support cover, rack support
spring, rack support and replace any parts if
necessary.
TIE ROD SWING RESISTANCE CHECK
1. Give 10 hard swings to the tie rod.
2. Measure the tie rod swing resistance [tie rod
swing torque] with a spring balance.
Standard value: 8 − 27 N [1.5 − 4.9 N⋅m]
3. If the measured value exceeds the standard
value, replace the tie rod.
4. If the measured value is below the standard value,
the tie rod can be re-used if it swings smoothly
without excessive play.
TIE ROD END BALL JOINT DUST COVER
CHECK
1. Check the dust cover for cracks or damage by
pushing it with your finger.
2. If the dust cover is cracked or damaged, replace
the tie rod end (Refer to P.37-27).
NOTE: Cracks or damage of the dust cover may
damage the ball joint. If it is damaged during
service work, replace the dust cover (Refer to
P.37-36).
AC304922AB
A
B Joint cover
grommet
Steering gear
AC000996 AC
MB991006
AC000997
Page 266 of 788

POWER STEERING GEAR BOX AND LINKAGE
POWER STEERING37-32
REASSEMBLY SERVICE POINTS
>>A<< OIL SEAL INSTALLATION
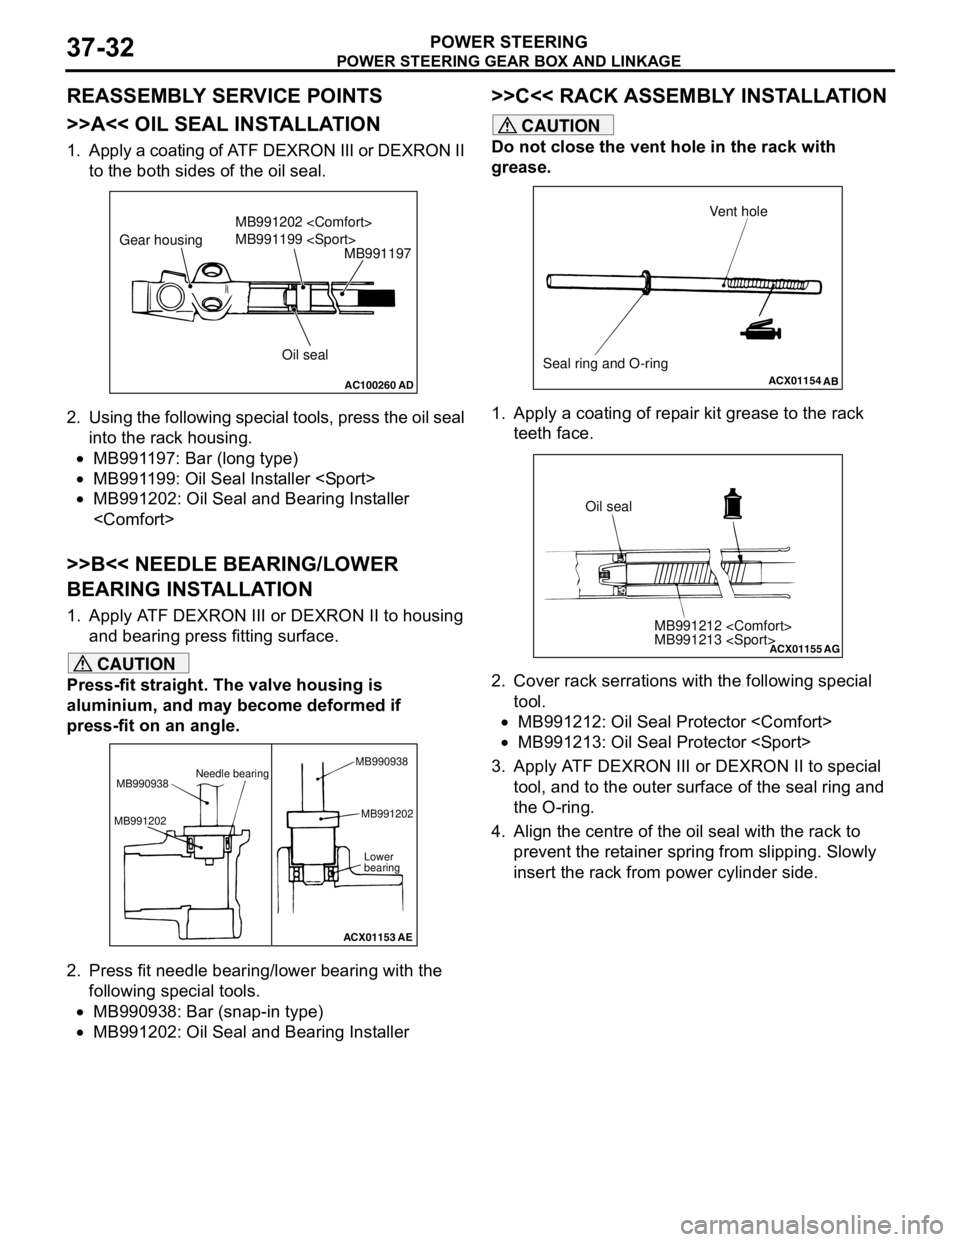
1. Apply a coating of ATF DEXRON III or DEXRON II
to the both sides of the oil seal.
2. Using the following special tools, press the oil seal
into the rack housing.
•MB991197: Bar (long type)
•MB991199: Oil Seal Installer
•MB991202: Oil Seal and Bearing Installer
>>B<< NEEDLE BEARING/LOWER
BEARING INSTALLATION
1. Apply ATF DEXRON III or DEXRON II to housing
and bearing press fitting surface.
CAUTION
Press-fit straight. The valve housing is
aluminium, and may become deformed if
press-fit on an angle.
2. Press fit needle bearing/lower bearing with the
following special tools.
•MB990938: Bar (snap-in type)
•MB991202: Oil Seal and Bearing Installer
>>C<< RACK ASSEMBLY INSTALLATION
CAUTION
Do not close the vent hole in the rack with
grease.
1. Apply a coating of repair kit grease to the rack
teeth face.
2. Cover rack serrations with the following special
tool.
•MB991212: Oil Seal Protector
•MB991213: Oil Seal Protector
3. Apply ATF DEXRON III or DEXRON II to special
tool, and to the outer surface of the seal ring and
the O-ring.
4. Align the centre of the oil seal with the rack to
prevent the retainer spring from slipping. Slowly
insert the rack from power cylinder side.
AC100260AD
MB991197
Oil seal MB991202
MB991199
Gear housing
ACX01153
Needle bearing
MB990938
MB991202MB991202
Lower
bearing
AE MB990938
ACX01154
AB
Seal ring and O-ringVent hole
ACX01155
MB991212
MB991213
AG
Oil seal
Page 268 of 788

POWER STEERING GEAR BOX AND LINKAGE
POWER STEERING37-34
>>H<< LOWER OIL SEAL INSTALLATION
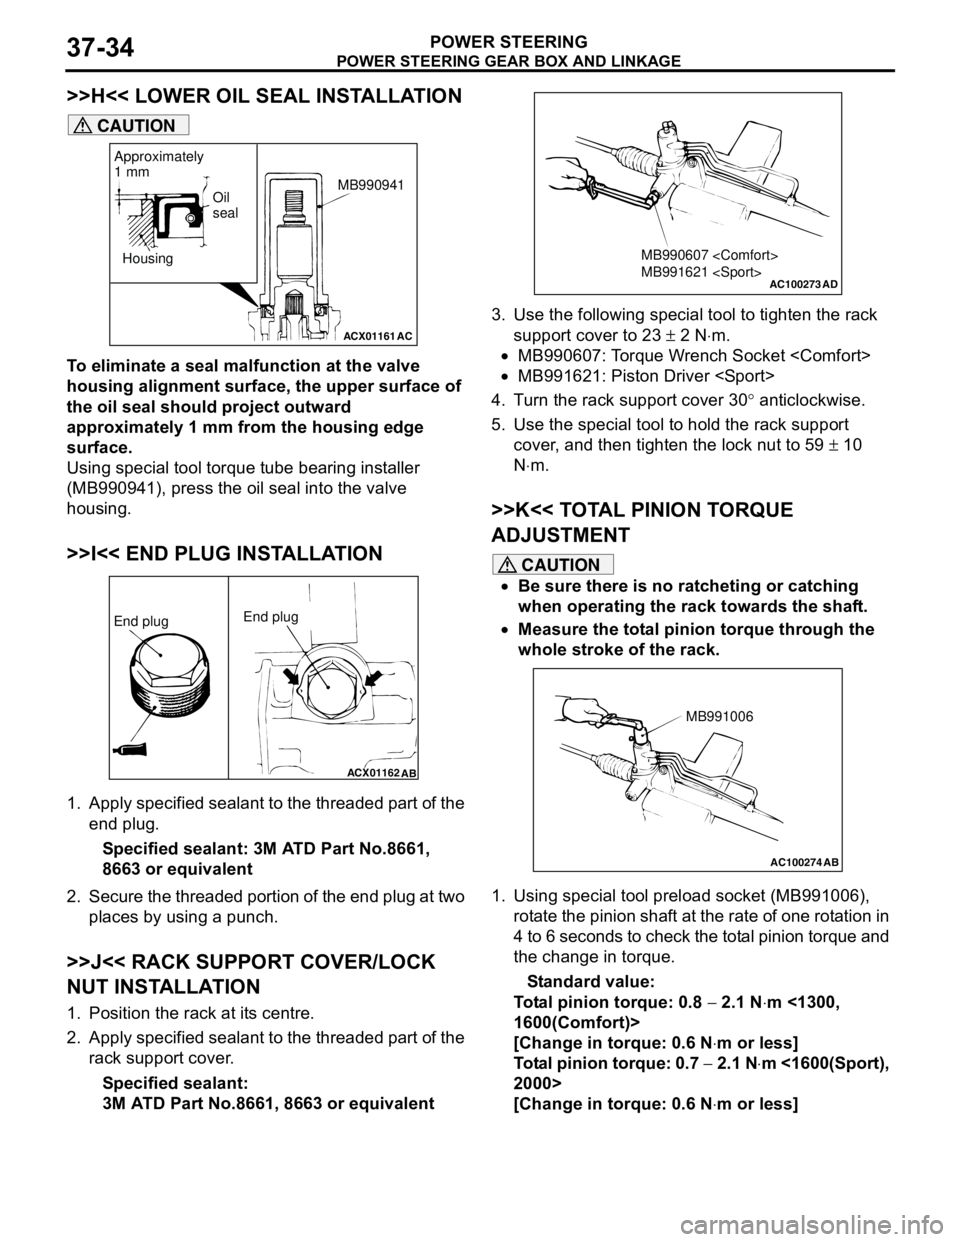
CAUTION
To eliminate a seal malfunction at the valve
housing alignment surface, the upper surface of
the oil seal should project outward
approximately 1 mm from the housing edge
surface.
Using special tool torque tube bearing installer
(MB990941), press the oil seal into the valve
housing.
>>I<< END PLUG INSTALLATION
1. Apply specified sealant to the threaded part of the
end plug.
Specified sealant: 3M ATD Part No.8661,
8663 or equivalent
2. Secure the threaded portion of the end plug at two
places by using a punch.
>>J<< RACK SUPPORT COVER/LOCK
NUT INSTALLATION
1. Position the rack at its centre.
2. Apply specified sealant to the threaded part of the
rack support cover.
Specified sealant:
3M ATD Part No.8661, 8663 or equivalent3. Use the following special tool to tighten the rack
support cover to 23 ± 2 N⋅m.
•MB990607: Torque Wrench Socket
•MB991621: Piston Driver
4. Turn the rack support cover 30° anticlockwise.
5. Use the special tool to hold the rack support
cover, and then tighten the lock nut to 59 ± 10
N⋅m.
>>K<< TOTAL PINION TORQUE
ADJUSTMENT
CAUTION
•Be sure there is no ratcheting or catching
when operating the rack towards the shaft.
•Measure the total pinion torque through the
whole stroke of the rack.
1. Using special tool preload socket (MB991006),
rotate the pinion shaft at the rate of one rotation in
4 to 6 seconds to check the total pinion torque and
the change in torque.
Standard value:
Total pinion torque: 0.8 − 2.1 N⋅m <1300,
1600(Comfort)>
[Change in torque: 0.6 N⋅m or less]
Total pinion torque: 0.7 − 2.1 N⋅m <1600(Sport),
2000>
[Change in torque: 0.6 N⋅m or less]
ACX01161
Housing
AC
Oil
seal
Approximately
1 mm
MB990941
ACX01162
AB
End plugEnd plug
AC100273
MB990607
MB991621
AD
AC100274 AB
MB991006
Page 271 of 788
POWER STEERING OIL PUMP ASSEMBLY
POWER STEERING37-37
POWER STEERING OIL PUMP ASSEMBLY
REMOVAL AND INSTALLATIONM1372005200298
<1300, 1600>
Pre-removal Operation
•Power Steering Fluid Draining (Refer to P.37-13).Post-installation Operation
•Power Steering Fluid Supplying and Bleeding (Refer to
P.37-13).
•Drive Belt Tension Check (1300, 1600: refer to GROUP
11A, On-vehicle Service − Drive Belt Tension Check
P.11A-7/2000: refer to GROUP 11C, On-vehicle Service −
Drive Belt Tension Check P.11C-7).
AC209708
87
12 34
5
6
57 ± 7 N·m
40 ± 4 N·m 22 ± 4 N·m
N
9
40 ± 5 N·m
AC
Removal steps
1. Pressure switch connector
2. A/C compressor harness connector
bracket
3. Drive belt
4. Suction hose5. Eye bolt
6. O-ring
7. Pressure hose
8. Oil pump assembly
9. Oil pump braceRemoval steps (Continued)
Page 272 of 788
Page 274 of 788
POWER STEERING OIL PUMP ASSEMBLY
POWER STEERING37-40
<2000>
>>A<<15. O-ring
16. Flow control springDisassembly steps (Continued)
17. Suction connector
>>A<<18. O-ringDisassembly steps (Continued)
AC100143AF
411
12
13
28 ± 2 N·m
102
9
8
6
5
7
3
1
28 ± 1 N·m
15
16
14
59 ± 9 N·m 9.9 ± 2.1 N·m
12 ± 1 N·m
18
17
5
7
3
98
6 3 13
10
2 13
10 15 18 114
3
Oil pump seal kit Oil pump cartridge kit Oil pump pulley and shaft kit
: ATF DEXRON III or DEXRON II
Disassembly steps
1. Pump cover
2. O-ring
3. Snap ring
4. Pulley and shaft
5. Vanes
>>C<<6. Cam ring
7. Rotor
8. Pin
9. Side plate
>>A<<10. O-ring
>>B<<11 . O i l s e a l
12. Terminal assembly
>>A<<13. O-ring
14. Plug assembly
>>A<<15. O-ring
16. Flow control spring
17. Suction connector
>>A<<18. O-ringDisassembly steps (Continued)
Page 275 of 788
POWER STEERING OIL PUMP ASSEMBLY
POWER STEERING37-41
REASSEMBLY SERVICE POINTS
>>A<< O-RING INSTALLATION>>B<< OIL SEAL INSTALLATION
Use following special tool to install the oil seal.
•MB990938: Bar (Snap-in type)
•MB991203: Oil Seal and Bearing Installer
>>C<< CAM RING INSTALLATION
CAUTION
Be sure to install the cam ring in the correct
direction as shown.
Install the cam ring as shown in the illustration.
INSPECTIONM1372005500200
•Check the flow control valve of the pump body for
clogging.
•Check the pulley and shaft for wear or damage.
•Check the rotor and vane groove for "stepped"
wear.
•Check the contact surface of cam ring and vanes
for "stepped" wear.
•Check the vanes for damage. No. ID × Width mm
1 15.8 × 2.4
2 21.0 × 1.9
3 14.8 × 2.4
43.8 × 1.9
5 14.8 × 1.9
AC100170
AB
Suction connectorPlug assembly
Terminal assembly Side plate
1
2
3
4
5
AC000752
MB990938
AB
MB991203
AC100171AB
Side plate side
Pump cover side
Page 277 of 788