Page 69 of 364

13A-29MPI – TROUBLESHOOTING, ON-VEHICLE SERVICING
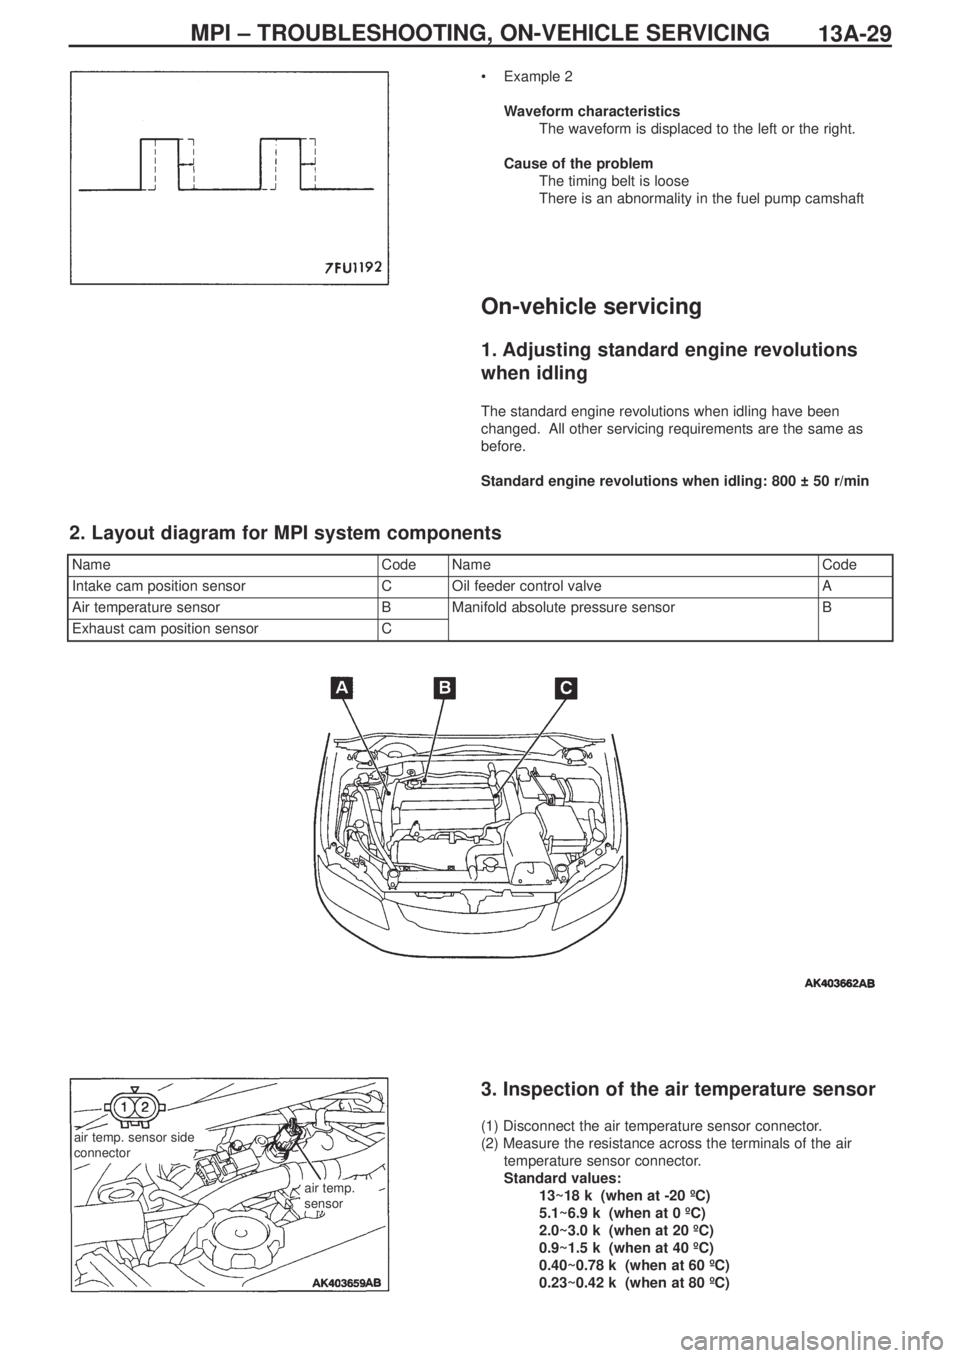
•Example 2
Waveform characteristics
The waveform is displaced to the left or the right.
Cause of the problem
The timing belt is loose
There is an abnormality in the fuel pump camshaft
On-vehicle servicing
1. Adjusting standard engine revolutions
when idling
The standard engine revolutions when idling have been
changed. All other servicing requirements are the same as
before.
Standard engine revolutions when idling: 800 ± 50 r/min
NameCodeNameCode
Intake cam position sensorCOil feeder control valveA
Air temperature sensorBManifold absolute pressure sensorB
Exhaust cam position sensorC
2. Layout diagram for MPI system components
air temp. sensor side
connector
air temp.
sensor
3. Inspection of the air temperature sensor
(1) Disconnect the air temperature sensor connector.
(2) Measure the resistance across the terminals of the air
temperature sensor connector.
Standard values:
13~18 kΩ (when at -20 ºC)
5.1~6.9 kΩ (when at 0 ºC)
2.0~3.0 kΩ (when at 20 ºC)
0.9~1.5 kΩ (when at 40 ºC)
0.40~0.78 kΩ (when at 60 ºC)
0.23~0.42 kΩ (when at 80 ºC)
Page 77 of 364
INTAKE & EXHAUST INTER-COOLER WATER SPRAY
15-3
Fitting guidelines
� �
A� �
Fitting the water spray hose ASSY and fixing tape (for securing the water spray hose ASSY)
1. After fitting the water spray hose, the three-way joint and the washer valve, affix pads, clips and tape at the positions
shown in the water spray hose diagram.
2. Fit the water spray hose ASSY to the front bumper using the water spray hose ASSY clip.
3. Affix tape as shown in the diagram, so that the water spray hose ASSY does not slip.
View of the inside of the front bumper
tape
three-way joint
pads
tape
washer
valve
clip
tapeclip
three-way joint
padclip
washer valve
tape
clip
tape
clipclip
water spray hose ASSY
water spray
nozzle brackets
tape
Page 79 of 364
INTAKE & EXHAUST – SECONDARY AIR CONTROL SYSTEM, INLET MANIFOLD15-5
Fitting guidelines
� �
A� �
Fitting the gasket
Fit the gasket so that the protruding part points in the direction
shown in the diagram.
Inlet manifold
Removal and fitting
Jobs to be completed before removal and
after fitting
•Take measures to prevent fuel leaking (only
before removal)
•Removal and refitting of the valence (Ref
Section 15: Front bumper)
•Draining and refilling the coolant
•Removal and refitting of the air duct•Removal and refitting of the strut tower bar
•Removal and refitting of the throttle body
•Removal and refitting of the secondary air
control valve (Ref P15-4)
•Removal and refitting of the cross member bar
•Removal and refitting of the front exhaust pipe
protruding
part
(engine oil)
(engine oil)
Page 84 of 364
INTAKE & EXHAUST – EXHAUST MANIFOLD15-10
� �
B� �
Fitting the air outlet fitting gasket
Fit the gasket so that the protruding part is in the position located in
the diagram.
� �
C� �
Fitting the oil return pipe gasket (oil pan side)
Fit so that the printed side of the gasket is on the oil pan side.
� �
D� �
Fitting the oil return pipe gasket (turbocharger side)
Fit so that the printed side of the gasket is on the turbocharger side.turbocharger
protruding part
view “A”
view “A”
print
print
gasket
gasket
3. Apply some fresh engine oil via the fitting hole for the oil feed
pipe in the turbocharger ASSY.
Page 109 of 364

2HOW TO USE THIS MANUAL
How to Use this Manual
Range of description
This manual explains the service procedure for the engine after it has been removed from the vehicle. For information on
removing the engine from the vehicle, or "on-vehicle" servicing of the engine, please refer to the separate service manual for
the relevant vehicle model.
Understanding the description
Inspection
The manual only indicates inspection points where special tools or measuring devices are required. It does not mention general
visual checks, part cleaning requirements, and so on, but these must also be carried out as part of the actual service work.
Service sequence
(1) A component diagram is provided at the beginning of each section in order to give the reader a clear
understanding of where the various parts are installed.
(2) The numbers in the component diagram indicate the sequence of the service procedure. Tightening torques
are shown and non-reusable parts are indicated where appropriate
Removal sequence:The part numbers correspond to the numbers in the component diagram and indicate
the removal sequence.
Installation sequence:This is only shown if the parts cannot be installed in the reverse order to the removal
sequence.
Disassembly sequence: The numbers of the part names correspond to the symbols in the component
diagram and indicate the disassembly sequence.
Assembly sequence:This is only shown if the parts cannot be re-assembled in the reverse order to the
disassembly sequence.
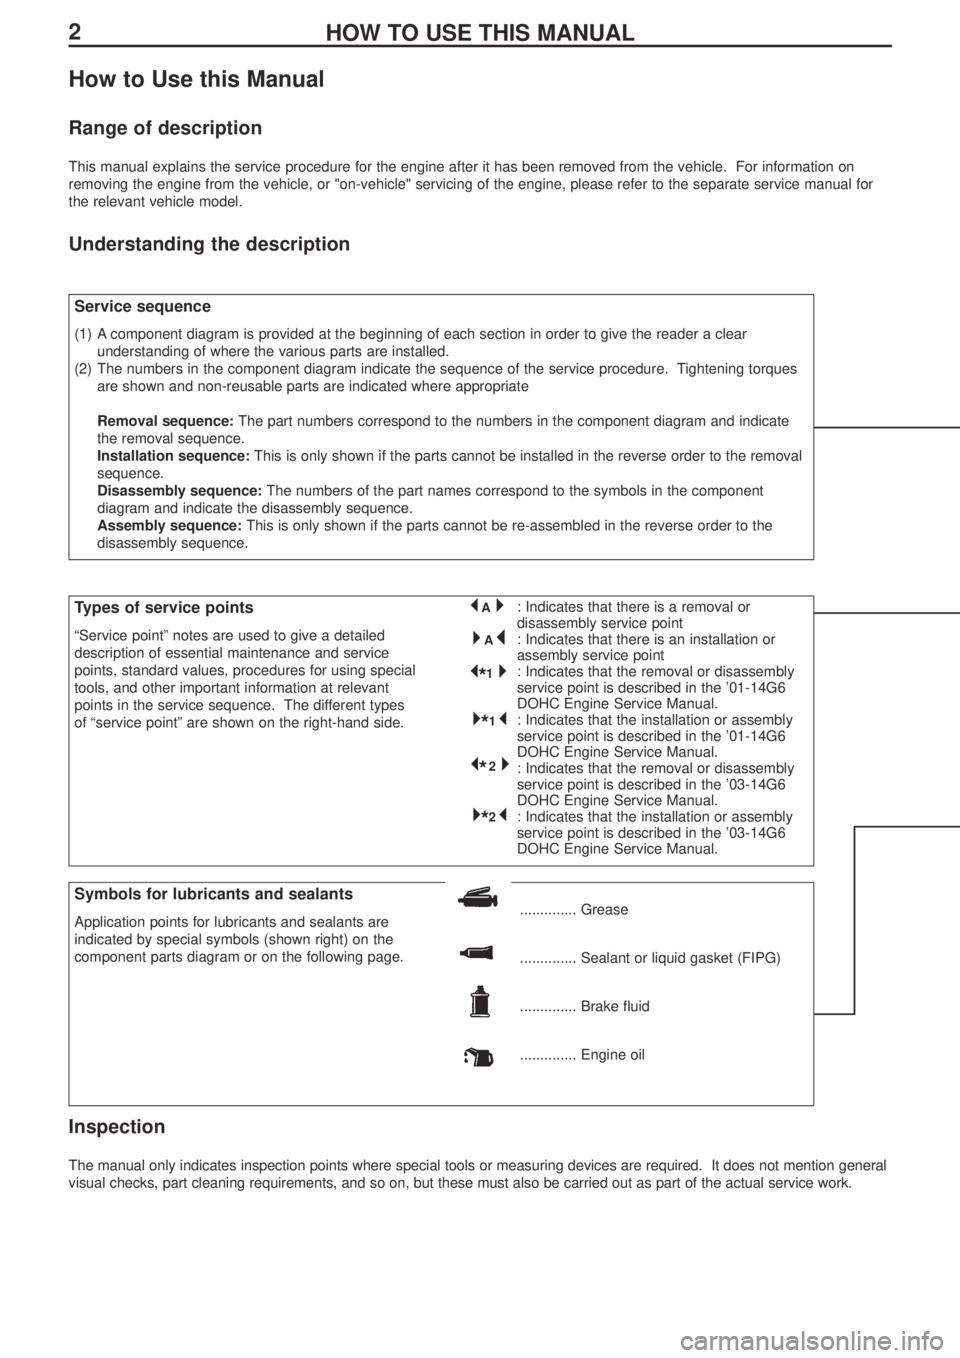
Symbols for lubricants and sealants
Application points for lubricants and sealants are
indicated by special symbols (shown right) on the
component parts diagram or on the following page............... Grease
.............. Sealant or liquid gasket (FIPG)
.............. Brake fluid
.............. Engine oil
Types of service points
“Service point” notes are used to give a detailed
description of essential maintenance and service
points, standard values, procedures for using special
tools, and other important information at relevant
points in the service sequence. The different types
of “service point” are shown on the right-hand side.: Indicates that there is a removal or
disassembly service point
: Indicates that there is an installation or
assembly service point
: Indicates that the removal or disassembly
service point is described in the ’01-14G6
DOHC Engine Service Manual.
: Indicates that the installation or assembly
service point is described in the ’01-14G6
DOHC Engine Service Manual.
: Indicates that the removal or disassembly
service point is described in the ’03-14G6
DOHC Engine Service Manual.
: Indicates that the installation or assembly
service point is described in the ’03-14G6
DOHC Engine Service Manual.
�* * 1�
�
* * 2� �
*
1�*
�
* 2�*
�A� �*
�* A�
Page 116 of 364

94G6 – ALTERNATOR, IGNITION SYSTEM
Removal Service Point
Removal of ignition coil boot
Note :
• If the ignition coil boot is not installed according to the
specifications, then this can lead to various problems, such
as malfunction of the ignition coil, damage to the ignition coil,
leaking of high voltage to external parts, infiltration of water
into the hole, etc.
• The spark plug coupling section of the ignition coil boot is
coated with a white powder. This coating helps to prevent the
boot from welding to the spark plug, and must not be touched
or wiped away.
1. Please check that a spring is fitted inside the new ignition coil
boot.
2. Press the new ignition coil boot firmly onto the ignition coil,
and turn the coupling section 2 or 3 times to seat it correctly
in position, ensuring that there are no gaps.
3. After installation, turn the boot until the air blow hole is
positioned as shown in the diagram.
Coupling
section
Air blow hole
White powder coating on
interior part. Do not touchAir blow hole
Upper face�A� �*
Page 126 of 364

194G6 – ROCKER ARM / CAMSHAFT
Installation Service Point
Installation of OCV filter
Note :
Before fitting the filter, check that it is clean and is not damaged
or deformed in any way.
Installation of eye bolt
Note :
The oil pump may be damaged if the oil pipe joint turns with the
eye bolt when it is fitted.
Hold the oil pipe joint in place with a spanner, etc., and then tighten
the eye bolt to the specified torque 42 ±2 N-m.
Installation of cam position sensor
support
1. Wipe away all traces of the old liquid gasket left on the cam
position sensor support and the cylinder head.
2. Apply a 3 mm-thick coat of the liquid gasket to the parts of the
cam position sensor support indicated on the diagram.
Liquid Gasket
Product name : MZ100191 or equivalent
Installation of cam position sensing
cylinder
1. Set the camshaft to the top dead centre for No.1.
2. Install the various vanes of the cam position sensing cylinder at
the positions indicated on the diagram.
Installation of cover / gasket
1. Before installing the cover and gasket, put the camshaft to the
No.1 top dead centre position, and check that the vanes of the
respective sensing cylinders are located in the positions shown in
the diagram.
Eye bolt
Hold with
spanner, etc.
Oil pipe joint
Exhaust sideIntake side
Exhaust side
Exhaust sideIntake side
Intake sideVane
Vane
Vane
Vane VaneVane
Vane Vane
Vane
(large) Vane
(large) Vane
(small)
Vane
(small)
�A�*
�B� �*
�C�
�*
�D�
�*
�E�
�*
Page 127 of 364
204G6 – ROCKER ARM / CAMSHAFT
2. Ensure that the cutaways in the intake side cover and the tabs on the
gasket are aligned with the positions shown in the diagram, and
tighten at the specified torque of 14 ±1 N-m. The exhaust side cover
and gasket do not have a specified installation direction.
Comment :
The cover and gasket do not have distinct front and rear sides.
No cutawayNo installation direction Exhaust side
Intake side
Ta b Ta b
Cutaway
Cutaway
�
*� �
*�
�
A�
�
*�
�
*�
�
*�
�
*�
�
*�
�
*�
�
*� �
*�