2005 MITSUBISHI 380 Maintenance
[x] Cancel search: MaintenancePage 843 of 1500

ON-VEHICLE SERVICE
HEATER, AIR CONDITIONING AND VENTILATION55-142
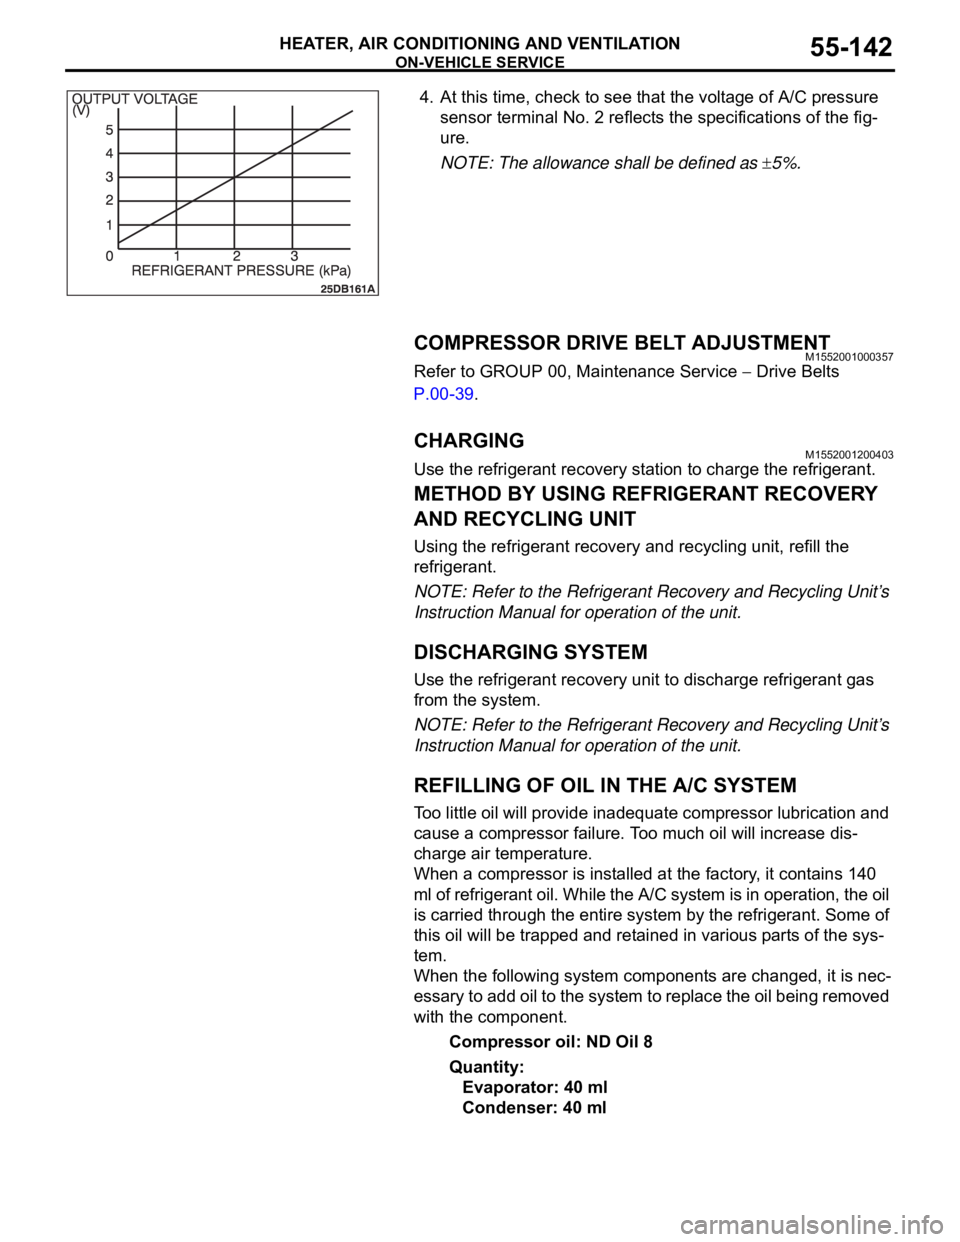
4. At this time, check to see that the voltage of A/C pressure
sensor terminal No. 2 reflects the specifications of the fig-
ure.
NOTE: The allowance shall be defined as
5%.
COMPRESSOR DRIVE BELT ADJUSTMENTM1552001000357
Refer to GROUP 00, Maintenance Service Drive Belts
P.00-39.
CHARGING M1552001200403
Use the refrigerant recovery station to charge the refrigerant.
METHOD BY USING REFRIGERANT RECOVERY
AND RECYCLING UNIT
Using the refrigerant recovery and recycling unit, refill the
refrigerant.
NOTE: Refer to the Refrigerant Recovery and Recycling Unit’s
Instruction Manual for operation of the unit.
DISCHARGING SYSTEM
Use the refrigerant recovery unit to discharge refrigerant gas
from the system.
NOTE: Refer to the Refrigerant Recovery and Recycling Unit’s
Instruction Manual for operation of the unit.
REFILLING OF OIL IN THE A/C SYSTEM
Too little oil will provide inadequate compressor lubrication and
cause a compressor failure. Too much oil will increase dis-
charge air temperature.
When a compressor is installed at the factory, it contains 140
ml of refrigerant oil. While the A/C system is in operation, the oil
is carried through the entire system by the refrigerant. Some of
this oil will be trapped and retained in various parts of the sys-
tem.
When the following system components are changed, it is nec-
essary to add oil to the system to replace the oil being removed
with the component.
Compressor oil: ND Oil 8
Quantity:
Evaporator: 40 ml
Condenser: 40 ml
Page 865 of 1500

COMPRESSOR ASSEMBLY AND DRIVE BELT
HEATER, AIR CONDITIONING AND VENTILATION55-164
COMPRESSOR ASSEMBLY AND DRIVE BELT
REMOVAL AND INSTALLATIONM1552004100289
Pre-removal Operation
Refrigerant Discharging (Refer to P.55-142).
Front Bumper Under Cover (Refer to GROUP 51, FRONT
BUMPERP.51-2).
Front Under Cover RH (Refer to GROUP 51, UNDER
COVER P.51-13).Post-installation Operation
Drive Belt Tension Adjustment (Refer to GROUP 00,
Maintenance Service
Drive Belt P.00-39).
Refrigerant Charging (Refer to P.55-142).
Front Bumper Under Cover (Refer to GROUP 51, FRONT
BUMPERP.51-2).
Front Under Cover RH (Refer to GROUP 51, UNDER
COVER P.51-13).
REMOVAL STEPS
<>>>A<<1. FLEXIBLE SUCTION HOSE
CONNECTION
<>2. FLEXIBLE DISCHARGE HOSE
CONNECTION
3. O-RING4. DRIVE BELT
<> >>B<<5. A/C COMPRESSOR
6. ALTERNATOR
7. A/C COMPRESSOR BRACKETREMOVAL STEPS (Continued)
Page 919 of 1500

ENGINE COOLING DIAGNOSIS
ENGINE COOLING14-4
INSPECTION PROCEDURE 2: Engine Overheating
DIAGNOSIS
STEP 1. Remove the radiator cap and check for coolant
contamination.
Q: Is the coolant contaminated with rust and oil?
YES : Replace it. Refer to P.14-27.
NO : There is no action to be taken. Go to Step 2.
STEP 2. Check the radiator cap valve opening pressure.
NOTE: Be sure that the cap is clean before testing. Rust or
other foreign material on the cap seal will cause an improper
reading.
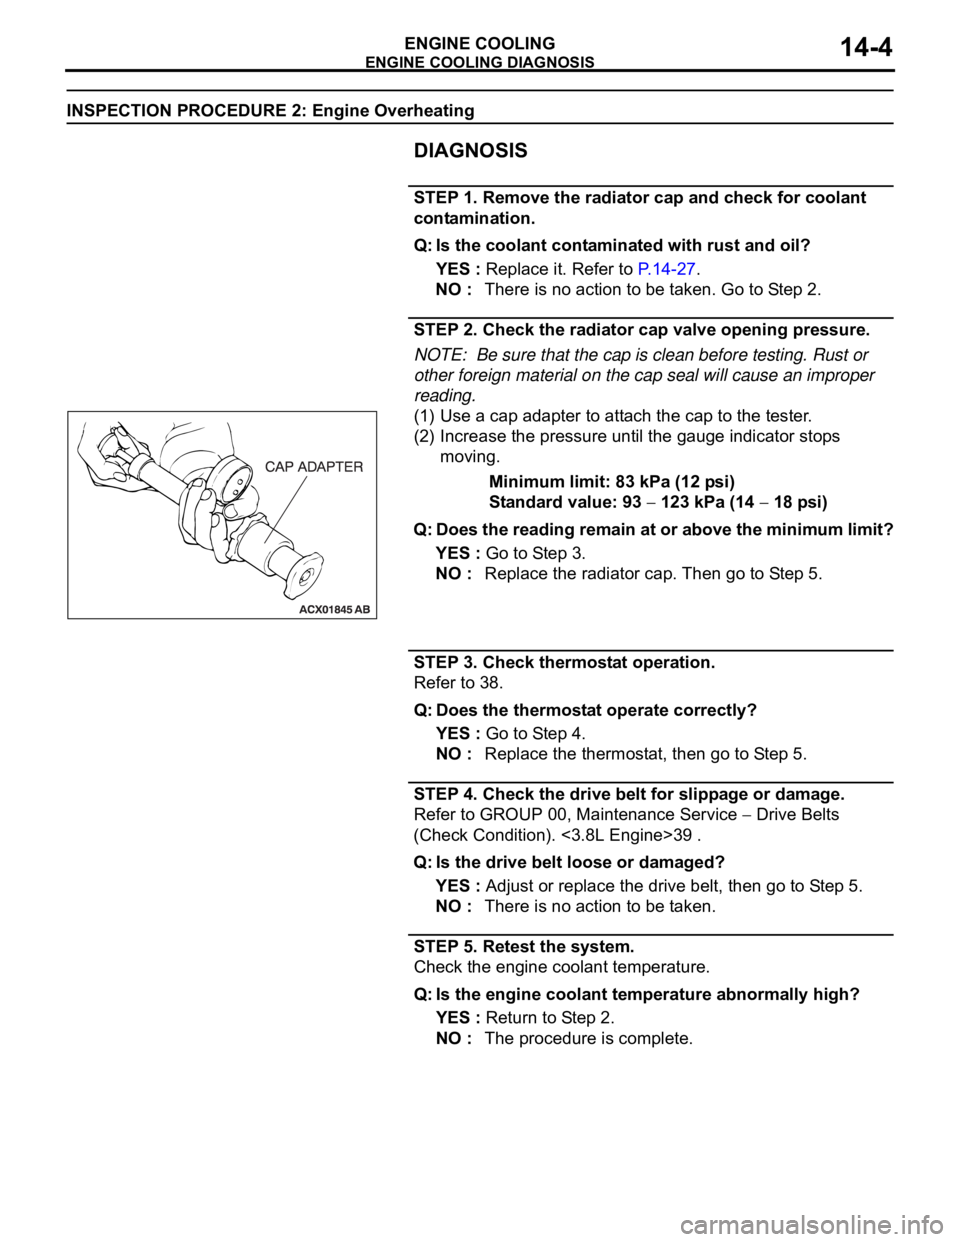
(1) Use a cap adapter to attach the cap to the tester.
(2) Increase the pressure until the gauge indicator stops
moving.
Minimum limit: 83 kPa (12 psi)
Standard value: 93
123 kPa (14 18 psi)
Q: Does the reading remain at or above the minimum limit?
YES : Go to Step 3.
NO : Replace the radiator cap. Then go to Step 5.
STEP 3. Check thermostat operation.
Refer to 38.
Q: Does the thermostat operate correctly?
YES : Go to Step 4.
NO : Replace the thermostat, then go to Step 5.
STEP 4. Check the drive belt for slippage or damage.
Refer to GROUP 00, Maintenance Service
Drive Belts
(Check Condition). <3.8L Engine>39 .
Q: Is the drive belt loose or damaged?
YES : Adjust or replace the drive belt, then go to Step 5.
NO : There is no action to be taken.
STEP 5. Retest the system.
Check the engine coolant temperature.
Q: Is the engine coolant temperature abnormally high?
YES : Return to Step 2.
NO : The procedure is complete.
Page 947 of 1500

RADIATOR
ENGINE COOLING14-32
RADIATOR
REMOVAL AND INSTALLATIONM1141001500521
Pre-removal Operation
Engine Coolant Draining (Refer to 27).
Air Cleaner Removal (Refer to GROUP 15, Air Cleaner 4).Post-installation Operation
Air Cleaner Installation (Refer to GROUP 15 4).
Engine Coolant Refilling and Level Check (Refer to 27).
A/T Fluid Refilling and Level Check (Refer to GROUP 00,
Maintenance Service 45).
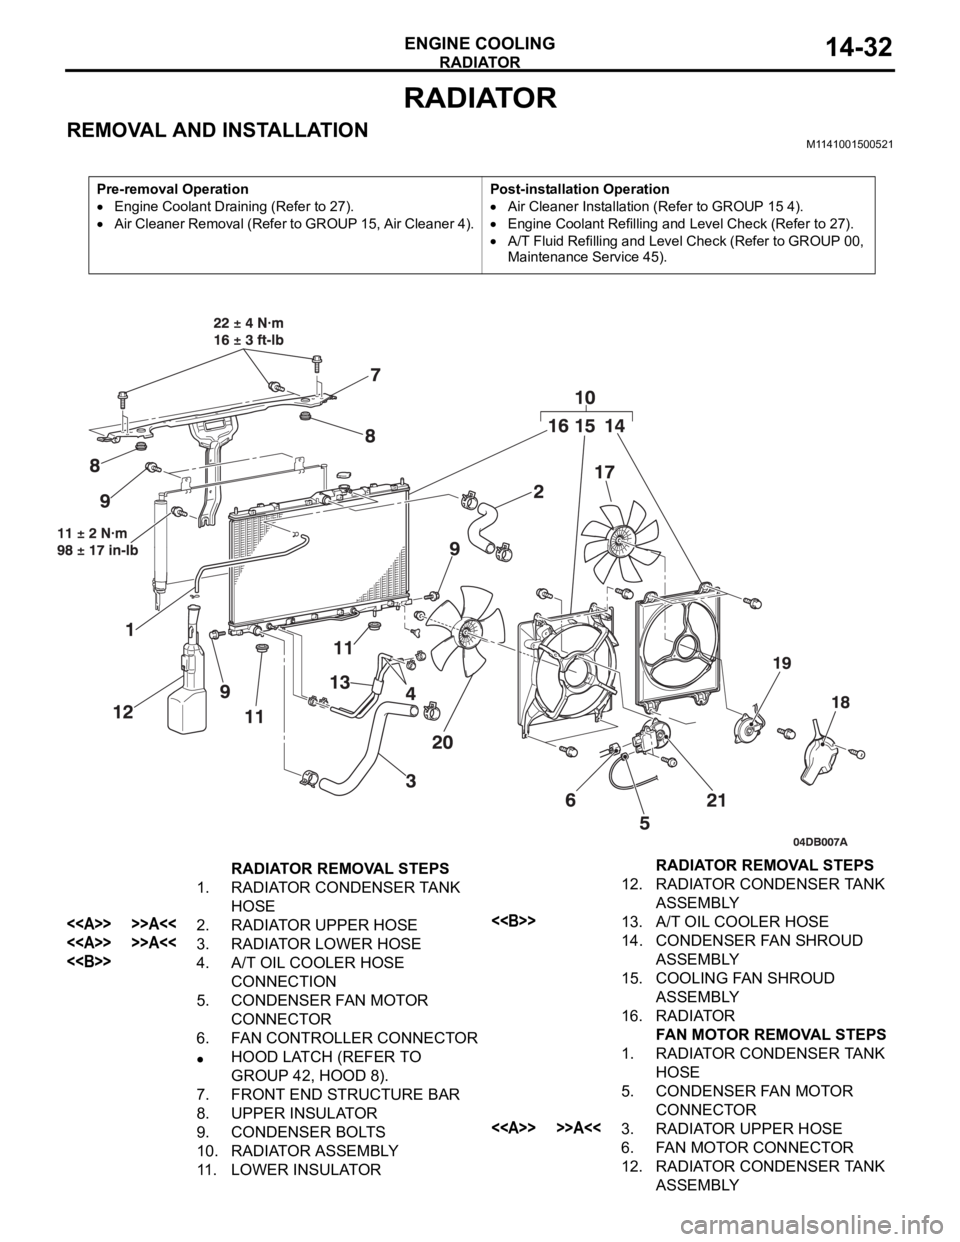
RADIATOR REMOVAL STEPS
1. RADIATOR CONDENSER TANK
HOSE
<> >>A<<2. RADIATOR UPPER HOSE
<> >>A<<3. RADIATOR LOWER HOSE
<>4. A/T OIL COOLER HOSE
CONNECTION
5. CONDENSER FAN MOTOR
CONNECTOR
6. FAN CONTROLLER CONNECTOR
HOOD LATCH (REFER TO
GROUP 42, HOOD 8).
7. FRONT END STRUCTURE BAR
8. UPPER INSULATOR
9. CONDENSER BOLTS
10. RADIATOR ASSEMBLY
11. LOWER INSULATOR12. RADIATOR CONDENSER TANK
ASSEMBLY
<>13. A/T OIL COOLER HOSE
14. CONDENSER FAN SHROUD
ASSEMBLY
15. COOLING FAN SHROUD
ASSEMBLY
16. RADIATOR
FAN MOTOR REMOVAL STEPS
1. RADIATOR CONDENSER TANK
HOSE
5. CONDENSER FAN MOTOR
CONNECTOR
<> >>A<<3. RADIATOR UPPER HOSE
6. FAN MOTOR CONNECTOR
12. RADIATOR CONDENSER TANK
ASSEMBLY RADIATOR REMOVAL STEPS
Page 980 of 1500

CHARGING SYSTEM
ENGINE ELECTRICAL16-3
CHARGING SYSTEM DIAGNOSISM1161000700427
TROUBLESHOOTING HINTS
Alternator malfunction light dose not go on when the ignition
switch is turned to ON, before the engine starts.
Check the bulb.
Alternator malfunction light dose not switch off after the engine
starts.
Check the IC voltage regulator inside the
alternatoralternator.
Discharged or overcharged battery.
Check the IC voltage regulator inside the alternator.
The alternator malfunction light illuminates dimly.
Check the diode (inside the combination meter) for a
short-circuit.
TROUBLESHOOTING GUIDE
The charging system troubleshooting guide is shown in the fol-
lowing steps.
STEP 1.
Q: Is the battery in good condition? (Refer to GROUP 54A,
Chassis Electrical
Battery On-vehicle Service
Battery Check P.54A-5.)
YES : Go to Step 2.
NO : Charge or replace the battery.
STEP 2.
Q: Is the alternator drive belt in good condition? (Refer to
GROUP 00, General
Maintenance Service Drive Belts
(For Alternator, Power Steering Pump and Air
Conditioning) (Check) P.00-39.)
YES : Go to Step 3.
NO : Adjust the belt tension or replace the belt.
STEP 3.
Q: Does the alternator malfunction light come on when the
ignition switch is turned on?
YES : Go to Step 4.
NO :
Check the ignition switch. (Refer to GROUP 54A,
Chassis Electrical
Ignition Switch Ignition
Switch
Inspection P.54A-44.)
Check for burnt-out alternator malfunction light.
Check the alternator. (Refer to Charging System
Alternator Assembly
Inspection P.16-17.)
Check the alternator malfunction light-related
circuits.
Page 984 of 1500

CHARGING SYSTEM
ENGINE ELECTRICAL16-7
ON-VEHICLE SERVICE
ALTERNATOR OUTPUT WIRE VOLTAGE DROP TESTM1161000900669
Required Special Tool:
: Diagnostic Tool (MUT-III)
MB991824: V.C.I.
MB991827: MUT-III USB Cable
MB991910: MUT-III Main Harness A
This test determines whether the wiring from the
alternator "B" terminal to the positive battery terminal
(including the fusible link) is in good condition or not:
Battery posts, terminals and related acces-
sories contain lead and lead compounds.
WASH HANDS AFTER HANDLING.
1. Always be sure to check the following before the
test.
Alternator installation
Alternator drive belt tension (Refer to GROUP 00,
General
Maintenance Service Drive Belts
(For Alternator, Power Steering Pump and Air
Conditioning) (Check) P.00-39.)
Fusible link
Abnormal noise from the alternator while the
engine is running.2. Turn the ignition switch to the "LOCK" (OFF)
position.
3. Disconnect the negative battery cable.
4. Connect a clamp-type DC test ammeter with a
range of 0
100 A to the alternator "B" terminal
output wire.
NOTE: The way of disconnecting the alternator
output wire and of connecting the ammeter is pos-
sibly not found the problem that the output current
is dropping due to the insufficient connection
between terminal "B" and the output wire.
5. Connect a digital-type voltmeter between the
alternator "B" terminal and the positive battery
terminal. (Connect the positive lead of the
voltmeter to the "B" terminal, and then connect the
negative lead of the voltmeter to the positive
battery cable.)
6. Reconnect the negative battery cable.
7. Connect an engine tachometer or diagnostic tool.
8. Leave the hood open.
9. Start the engine.
Page 986 of 1500

CHARGING SYSTEM
ENGINE ELECTRICAL16-9
Required Special Tool:
: Diagnostic Tool (MUT-III)
MB991824: V.C.I.
MB991827: MUT-III USB Cable
MB991910: MUT-III Main Harness A
This test determines whether the alternator outputs
normal current. For best results, use a charging sys-
tem tester. If not available, follow the steps below.
Battery posts, terminals and related acces-
sories contain lead and lead compounds.
WASH HANDS AFTER HANDLING.
1. Before the test, always be sure to check the
following.
Alternator installation
Battery (Refer to GROUP 54A, Chassis Electrical
Battery On-vehicle Service Battery Check
P.54A-5.)
NOTE: The battery to be used should be slightly
discharged. The load in a fully-charged battery
will be insufficient and the test may not be able to
be carried out correctly.
Alternator drive belt tension (Refer to GROUP 00,
General
Maintenance Service Drive Belts
(For Alternator, Power Steering Pump and Air
Conditioning) (Check) P.00-39.)
Fusible link
Abnormal noise from the alternator while the
engine is running.
2. Turn the ignition switch to the "LOCK" (OFF)
position.
3. Disconnect the negative battery cable.
Never use clips to connect the wire. Loose
connections (for example, using clips) will
lead to a serious accident because of high
current.
4. Connect a clamp-type DC test ammeter with a
range of 0
120 A to the alternator "B" terminal
output wire.
5. Connect a voltmeter with a range of 0
20 V
between the alternator "B" terminal and ground.
(Connect the positive lead of the voltmeter to the
"B" terminal, and then connect the negative lead
of the voltmeter to ground.)
6. Connect the negative battery cable.
7. Connect an engine tachometer or diagnostic tool.
8. Leave the hood open.9. Check to be sure that the reading on the voltmeter
is equal to the battery positive voltage.
NOTE: If the voltage is 0 V, the cause is probably
an open circuit in the wire or fusible link between
the alternator "B" terminal and the battery positive
terminal or malfunctioning voltmeter.
10.After turning on the headlights, start the engine.
NOTE: Because the current from the battery will
soon drop after the engine is started, step 11
should be carried out as quickly as possible in
order to obtain the maximum current output value.
11.Immediately after setting the headlights to high
beam and turning the heater blower switch to the
highest position, increase the engine speed to
2,500 r/min and read the maximum current output
value displayed on the ammeter.
Limit value: 70 % of nominal current output
NOTE: For the nominal current output, refer to the
Alternator Specifications.
NOTE: The current output value will depend on
the electrical load and the temperature of the
alternator body.
NOTE: If the electrical load is small while testing,
the specified level of current may not be output
even though the alternator is normal. In such
cases, increase the electrical load by leaving the
headlights turned on for some time to discharge
the battery or by using the lighting system in
another vehicle, and then test again.
NOTE: The specified level of current also may not
be output if the temperature of the alternator body
or the ambient temperature is too high. In such
cases, cool the alternator and then test again.
12.The reading on the ammeter should be above the
limit value. If the reading is below the limit value
and the alternator output wire is normal, remove
the alternator from the engine and check the
alternator.
13.Run the engine at idle speed after the test.
14.Turn the ignition switch to the "LOCK" (OFF)
position.
15.Disconnect the engine tachometer or diagnostic
tool.
16.Disconnect the negative battery cable.
17.Disconnect the ammeter and voltmeter .
18.Connect the negative battery cable.
19.Run the engine for 10 minutes at an idle.
Page 987 of 1500

CHARGING SYSTEM
ENGINE ELECTRICAL16-10
REGULATED VOLTAGE TESTM1161001100666
Required Special Tools:
: Diagnostic Tool (MUT-III)
MB991824: V.C.I.
MB991827: MUT-III USB Cable
MB991910: MUT-III Main Harness A
MB998467: Alternator Harness Connector
This test determines whether the voltage regulator is
correctly controlling the alternator output voltage.
Battery posts, terminals and related acces-
sories contain lead and lead compounds.
WASH HANDS AFTER HANDLING.
1. Always be sure to check the following before the
test:
Alternator installation
Check to be sure that the battery installed in the
vehicle is fully charged. (Refer to GROUP 54A,
Chassis Electrical
Battery On-vehicle Service
Battery Check P.54A-5.)
Alternator drive belt tension (Refer to GROUP 00,
General
Maintenance Service Drive Belts
(For Alternator, Power Steering Pump and Air
Conditioning) (Check) P.00-39.)
Fusible link
Abnormal noise from the alternator while the
engine is running.2. Turn the ignition switch to the "LOCK" (OFF)
position.
3. Disconnect the negative battery cable.
4. Use the special tool (Alternator harness
connector: MB998467) to connect a digital-type
voltmeter between the alternator "S" terminal and
ground. (Connect the positive lead of the
voltmeter to the "S" terminal, and then connect the
negative lead of the voltmeter to a secure ground
or to the negative battery terminal.)
5. Connect a clamp-type DC test ammeter with a
range of 0
120 A to the alternator "B" terminal
output wire.
6. Reconnect the negative battery cable.
7. Connect an engine tachometer, or diagnostic tool.
8. Turn the ignition switch to the "ON" position and
check that the reading on the voltmeter is equal to
the battery positive voltage.
NOTE: If the voltage is 0 V, the cause is probably
an open circuit in the wire or fusible link between
the alternator "S" terminal and the battery positive
terminal or malfunctioning voltmeter.
9. Check to be sure that all lights and accessories
are off.
10.Start the engine.