Page 1181 of 1500
ON-VEHICLE SERVICE
BASIC BRAKE SYSTEM35A-16
BLEEDINGM1351001400455
Use only brake fluid DOT 3 or DOT 4. Never mix the speci-
fied brake fluid with other fluid as it will influence the brak-
ing performance significantly.
.
MASTER CYLINDER BLEEDING
The master cylinder used has no check valve, so if bleeding is
carried out by the following procedure, bleeding of air from the
brake pipeline will become easier. (When brake fluid is not con-
tained in the master cylinder).
1. Fill the reserve tank with brake fluid.
2. Keep the brake pedal depressed.
3. Have another person cover the master cylinder outlet with a
finger.
4. With the outlet still closed, release the brake pedal.
5. Repeat steps 2
4 three or four times to fill the inside of the
master cylinder with brake fluid.
.
BRAKE LINE BLEEDING
Start the engine and bleed the air in the sequence shown in the
figure.
Page 1182 of 1500
ON-VEHICLE SERVICE
BASIC BRAKE SYSTEM35A-17
BRAKE FLUID LEVEL SENSOR CHECKM1351009100403
The brake fluid level sensor is in good condition if there is no
continuity when the float surface is above "MIN" and if there is
continuity when the float surface is below "MIN".
DISC BRAKE PAD CHECK AND REPLACEMENTM1351002300398
NOTE: Uneven wearor tapering of brake pad may be caused
by either caliper piston not operating correctly .
Whenever a pad must be replaced, replace both LH and
RH wheel pads as a set to prevent the vehicle from pull-
ing to one side when braking.
If there is a significant difference in the thicknesses of
the pads on the left and right sides, check the sliding
condition of the piston and slide pins.
1. Check the brake pad thickness through the caliper body
check port.(Rear). Front pad check can be viewed from rotor
side.
Standard value: 10.0 mm (0.39 inch)
Minimum limit: 2.0 mm (0.08 inch)
Page 1188 of 1500

ON-VEHICLE SERVICE
BASIC BRAKE SYSTEM35A-23
After a new brake disc is installed, always grind the
brake disc with an on-the-car type brake lathe. If this
step is not carried out, the brake disc run-out exceeds
the specified value, resulting in judder.
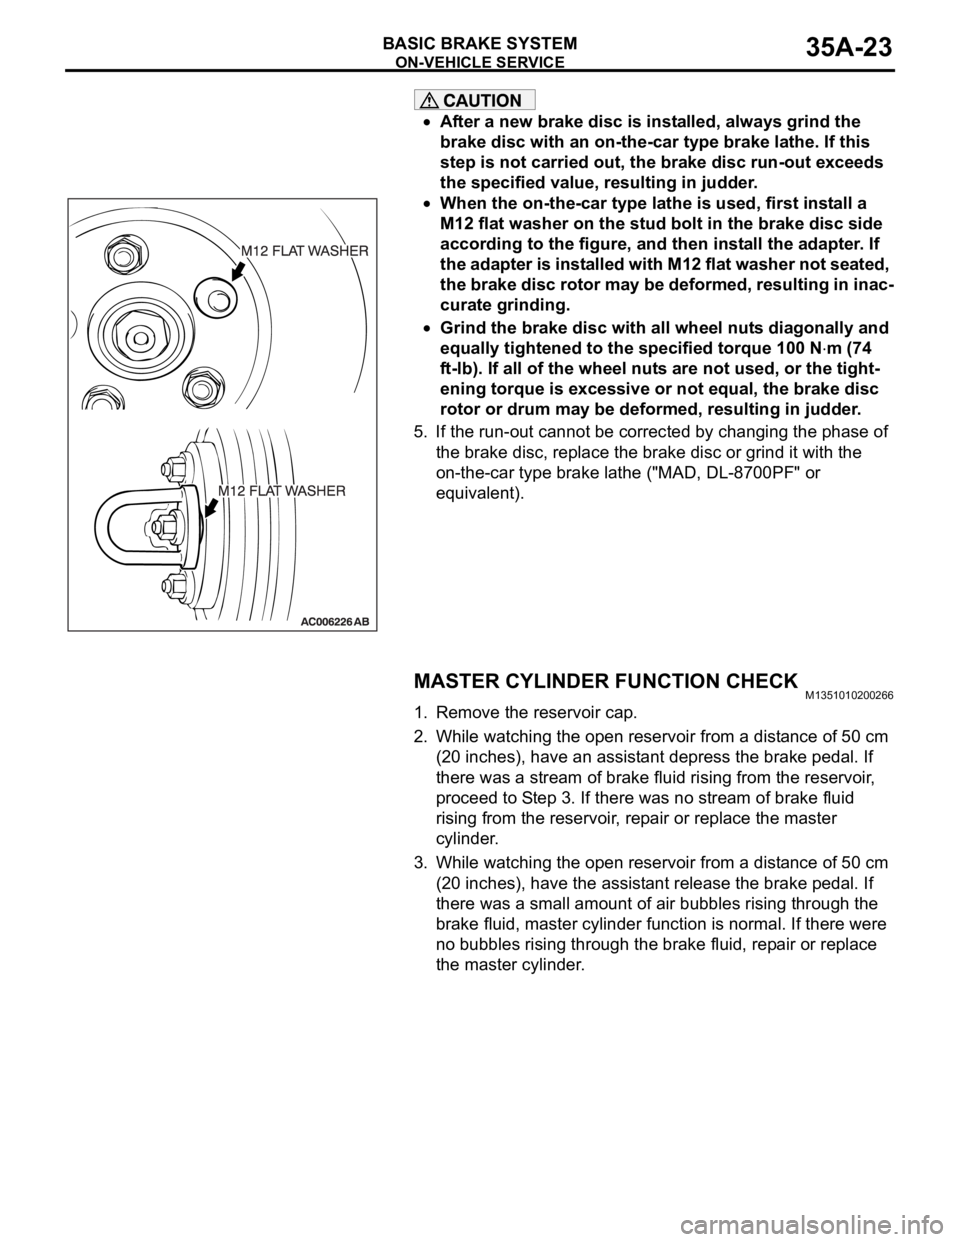
When the on-the-car type lathe is used, first install a
M12 flat washer on the stud bolt in the brake disc side
according to the figure, and then install the adapter. If
the adapter is installed with M12 flat washer not seated,
the brake disc rotor may be deformed, resulting in inac-
curate grinding.
Grind the brake disc with all wheel nuts diagonally and
equally tightened to the specified torque 100 N
m (74
ft-lb). If all of the wheel nuts are not used, or the tight-
ening torque is excessive or not equal, the brake disc
rotor or drum may be deformed, resulting in judder.
5. If the run-out cannot be corrected by changing the phase of
the brake disc, replace the brake disc or grind it with the
on-the-car type brake lathe ("MAD, DL-8700PF" or
equivalent).
MASTER CYLINDER FUNCTION CHECKM1351010200266
1. Remove the reservoir cap.
2. While watching the open reservoir from a distance of 50 cm
(20 inches), have an assistant depress the brake pedal. If
there was a stream of brake fluid rising from the reservoir,
proceed to Step 3. If there was no stream of brake fluid
rising from the reservoir, repair or replace the master
cylinder.
3. While watching the open reservoir from a distance of 50 cm
(20 inches), have the assistant release the brake pedal. If
there was a small amount of air bubbles rising through the
brake fluid, master cylinder function is normal. If there were
no bubbles rising through the brake fluid, repair or replace
the master cylinder.
Page 1191 of 1500

MASTER CYLINDER ASSEMBLY AND BRAKE BOOSTER
BASIC BRAKE SYSTEM35A-26
MASTER CYLINDER ASSEMBLY AND BRAKE BOOSTER
REMOVAL AND INSTALLATIONM1351003700407
Required Special Tool:
MB991568: Push Rod Adjusting Socket
Pre-removal Operation
Strut Tower Bar Removal (Refer to GROUP 42, Strut
To w e r B a r P.42-12).
Battery Removal
Brake Fluid DrainingPost-installation Operation
Brake Fluid Supplying and Air Bleeding (Refer to
P.35A-16).
Brake Pedal Adjustment (Refer to P.35A-13).
Battery Installation
Strut Tower Bar Installation (Refer to GROUP 42, Strut
Tower Bar P.42-12).
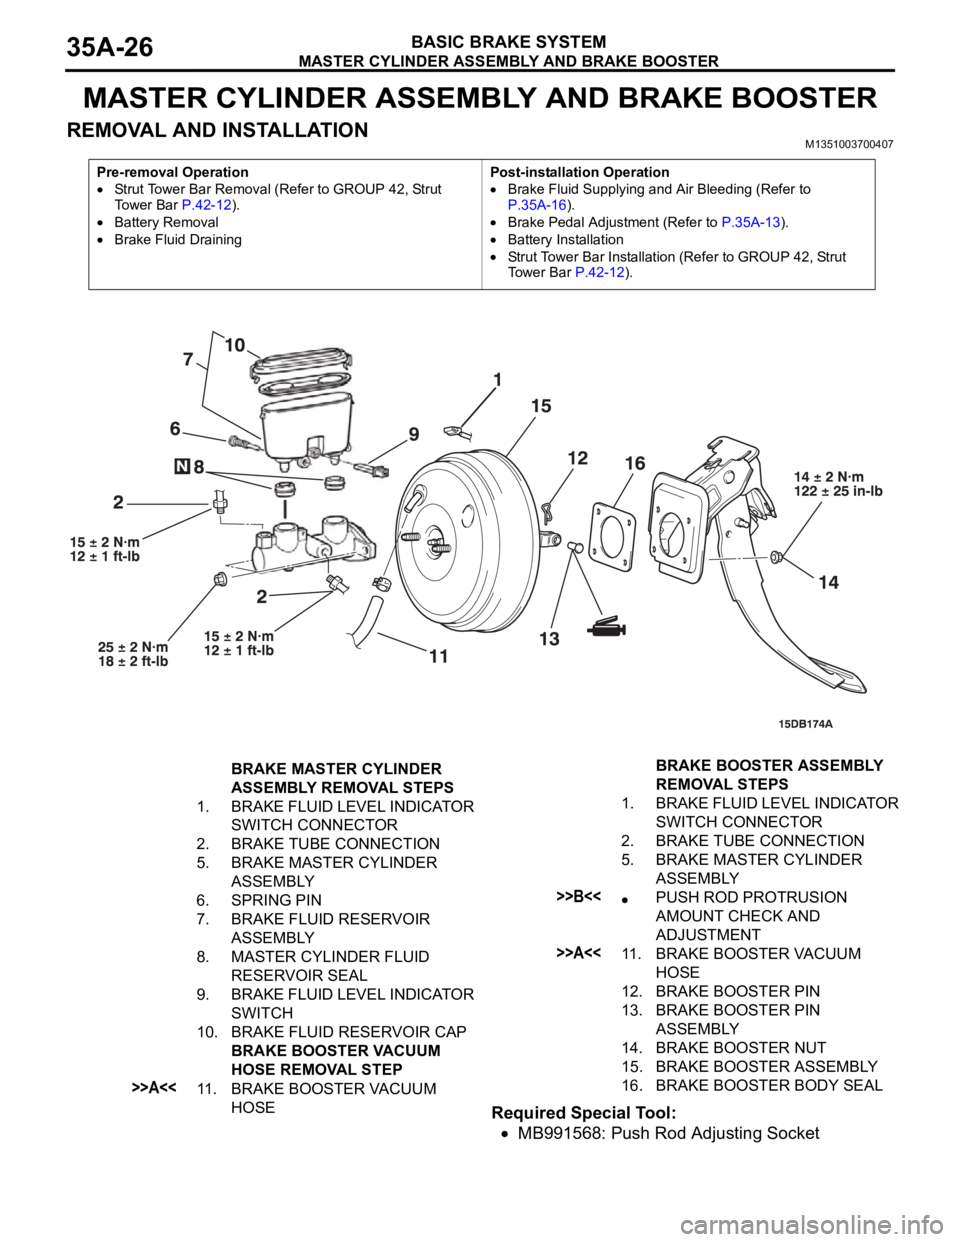
BRAKE MASTER CYLINDER
ASSEMBLY REMOVAL STEPS
1. BRAKE FLUID LEVEL INDICATOR
SWITCH CONNECTOR
2. BRAKE TUBE CONNECTION
5. BRAKE MASTER CYLINDER
ASSEMBLY
6. SPRING PIN
7. BRAKE FLUID RESERVOIR
ASSEMBLY
8. MASTER CYLINDER FLUID
RESERVOIR SEAL
9. BRAKE FLUID LEVEL INDICATOR
SWITCH
10. BRAKE FLUID RESERVOIR CAP
BRAKE BOOSTER VACUUM
HOSE REMOVAL STEP
>>A<<11. BRAKE BOOSTER VACUUM
HOSE BRAKE BOOSTER ASSEMBLY
REMOVAL STEPS
1. BRAKE FLUID LEVEL INDICATOR
SWITCH CONNECTOR
2. BRAKE TUBE CONNECTION
5. BRAKE MASTER CYLINDER
ASSEMBLY
>>B<
AMOUNT CHECK AND
ADJUSTMENT
>>A<<11. BRAKE BOOSTER VACUUM
HOSE
12. BRAKE BOOSTER PIN
13. BRAKE BOOSTER PIN
ASSEMBLY
14. BRAKE BOOSTER NUT
15. BRAKE BOOSTER ASSEMBLY
16. BRAKE BOOSTER BODY SEAL
Page 1193 of 1500
Page 1195 of 1500
DISC BRAKE ASSEMBLY
BASIC BRAKE SYSTEM35A-30
DISC BRAKE ASSEMBLY
REMOVAL AND INSTALLATIONM1351008000050
Required Special Tool:
MB990520: Disc Brake Piston Expander
Pre-removal Operation
Brake Fluid DrainingPost-installation OperationBrake Fluid Supplying and Air Bleeding (Refer to
P.35A-16).
REMOVAL STEPS
BRAKE FLUID DRAINING
1. BRAKE HOSE CONNECTION
2. GASKET
3. BRAKE CALIPER ASSEMBLY
4. BRAKE DISC
INSTALLATION STEPS
BRAKE FLUID DRAINING
4. BRAKE DISC
3. BRAKE CALIPER ASSEMBLY
2. GASKET1. BRAKE HOSE CONNECTION
BRAKE FLUID SUPPLYING AND AIR
BLEEDING (Refer to P.35A-16.)
>>A<
Page 1200 of 1500
Page 1203 of 1500