Page 1410 of 1500

EMISSION CONTROL
ENGINE AND EMISSION CONTROL17-79
VACUUM HOSE CHECKM1173007300171
1. Using the VACUUM HOSE ROUTING diagram as a guide,
check that the vacuum hoses are correctly connected.
2. Check the connection of the vacuum hoses, (removed,
loose, etc.) and confirm that there are no sharp bends or
damage.
POSITIVE CRANKCASE VENTILATION SYSTEM
GENERAL DESCRIPTION (POSITIVE CRANKCASE VENTILATION SYSTEM)M1173005000293
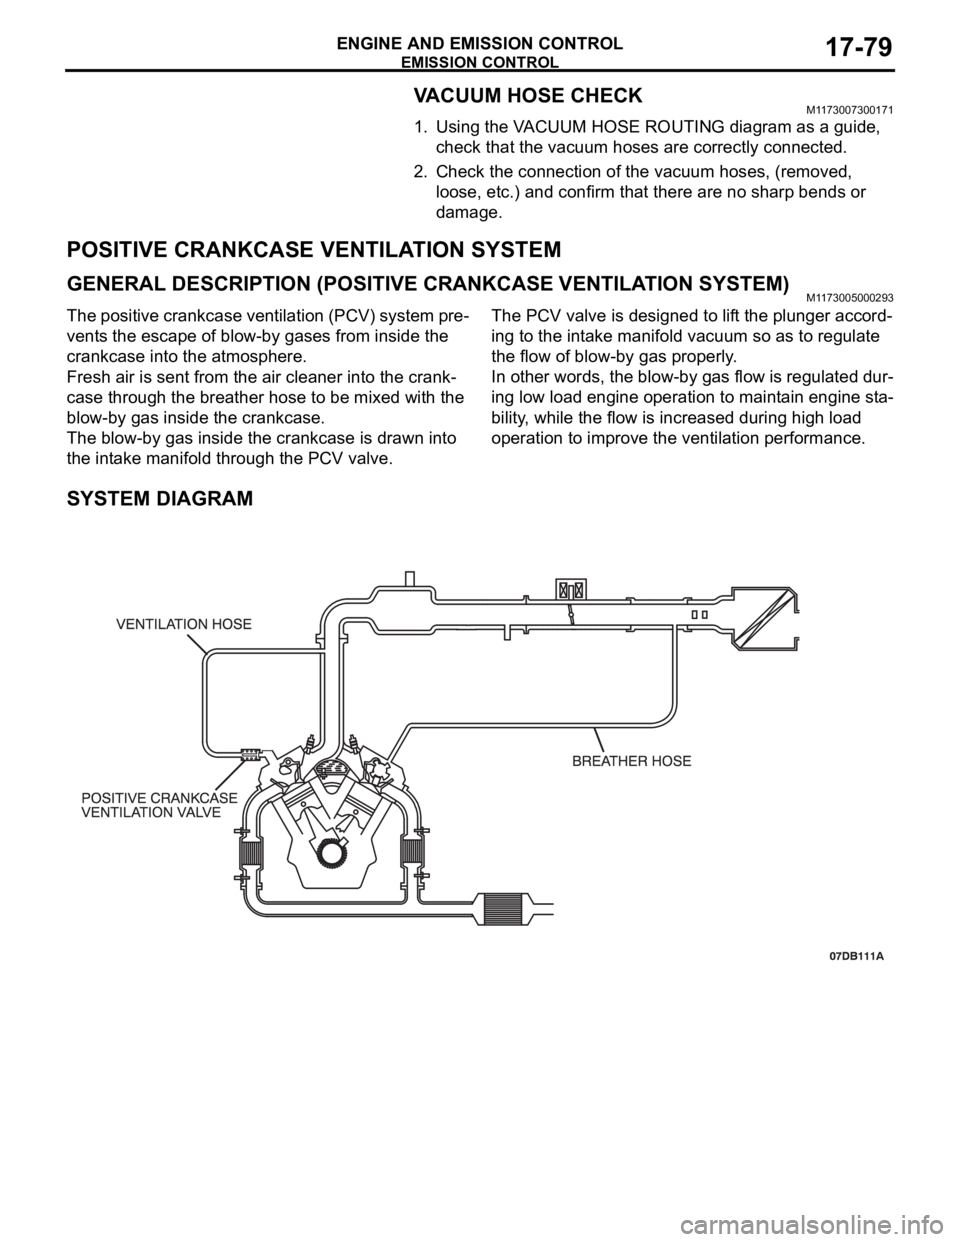
The positive crankcase ventilation (PCV) system pre-
vents the escape of blow-by gases from inside the
crankcase into the atmosphere.
Fresh air is sent from the air cleaner into the crank-
case through the breather hose to be mixed with the
blow-by gas inside the crankcase.
The blow-by gas inside the crankcase is drawn into
the intake manifold through the PCV valve.The PCV valve is designed to lift the plunger accord-
ing to the intake manifold vacuum so as to regulate
the flow of blow-by gas properly.
In other words, the blow-by gas flow is regulated dur-
ing low load engine operation to maintain engine sta-
bility, while the flow is increased during high load
operation to improve the ventilation performance.
SYSTEM DIAGRAM
Page 1411 of 1500

EMISSION CONTROL
ENGINE AND EMISSION CONTROL17-80
COMPONENT LOCATIONM1173007400189
POSITIVE CRANKCASE VENTILATION SYSTEM
CHECK
M1173001100232
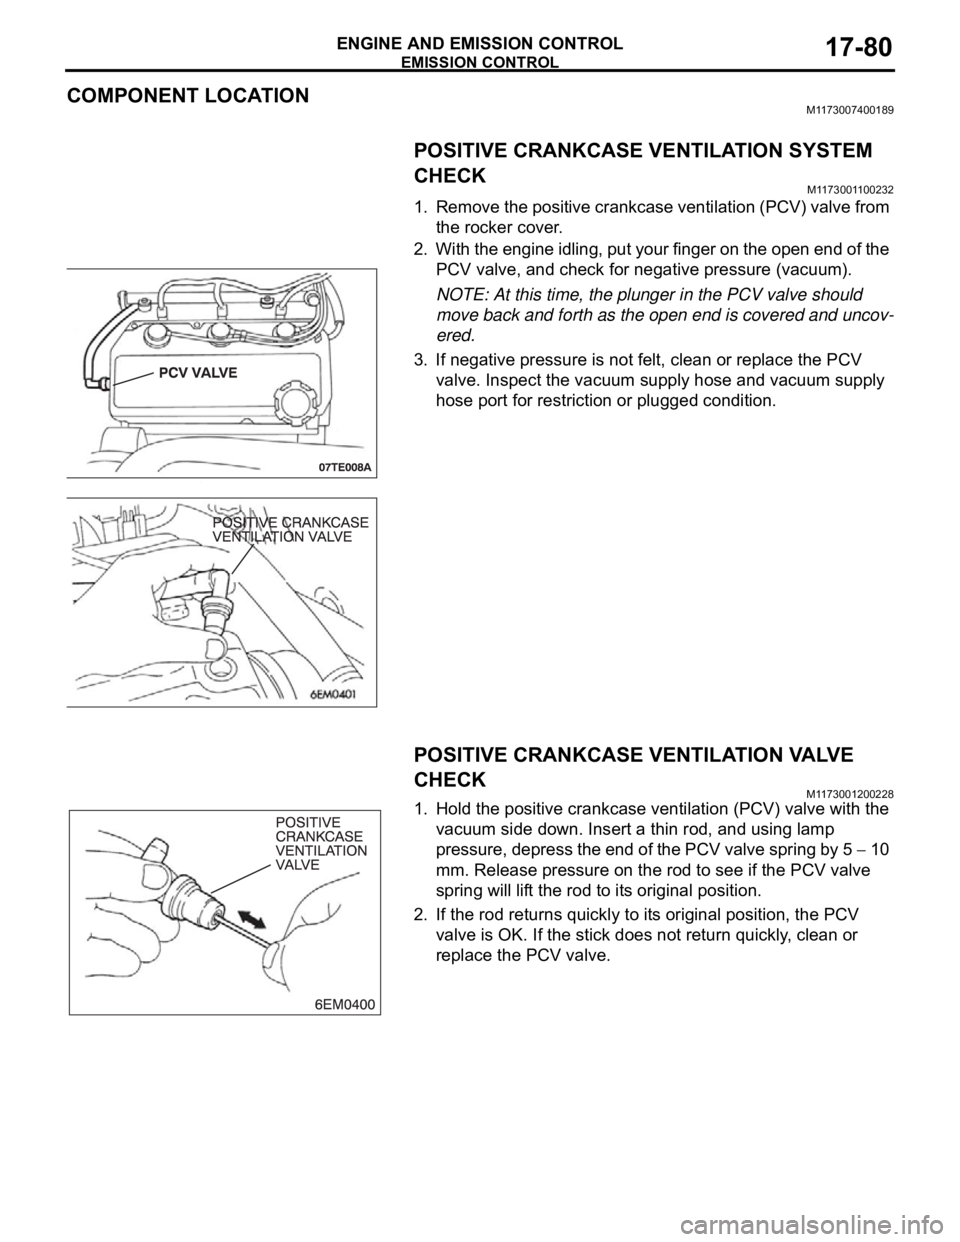
1. Remove the positive crankcase ventilation (PCV) valve from
the rocker cover.
2. With the engine idling, put your finger on the open end of the
PCV valve, and check for negative pressure (vacuum).
NOTE: At this time, the plunger in the PCV valve should
move back and forth as the open end is covered and uncov-
ered.
3. If negative pressure is not felt, clean or replace the PCV
valve. Inspect the vacuum supply hose and vacuum supply
hose port for restriction or plugged condition.
POSITIVE CRANKCASE VENTILATION VALVE
CHECK
M1173001200228
1. Hold the positive crankcase ventilation (PCV) valve with the
vacuum side down. Insert a thin rod, and using lamp
pressure, depress the end of the PCV valve spring by 5
10
mm. Release pressure on the rod to see if the PCV valve
spring will lift the rod to its original position.
2. If the rod returns quickly to its original position, the PCV
valve is OK. If the stick does not return quickly, clean or
replace the PCV valve.
Page 1413 of 1500
EMISSION CONTROL
ENGINE AND EMISSION CONTROL17-82
COMPONENT LOCATIONM1173007500205
PURGE CONTROL SYSTEM CHECK (PURGE FLOW CHECK)M1173001400620
Page 1414 of 1500

EMISSION CONTROL
ENGINE AND EMISSION CONTROL17-83
Required Special Tool:
MB995061: Purge Flow Indicator
1. Disconnect the purge hose from the evaporative emission
(EVAP) purge solenoid, and connect special tool MB995061
between the EVAP purge solenoid and the purge hose.
2. Before inspection, set the vehicle in the following conditions:
Engine coolant temperature: 80 95C (176 203F)
Lights, electric cooling fan and accessories: OFF
Transaxle: P range
3. Run the engine at idle for more than four minutes.
4. Check the purge flow volume when engine is revved
suddenly several times.
Standard value: Momentarily 20 cm
3/s (2.5 SCFH) or
more.
5. If the purge flow volume is less than the standard value,
check it again with the vacuum hose disconnected from the
EVAP canister. If the purge flow volume is less than the
standard value, check the vacuum port and the vacuum
hose for clogging. Also check the EVAP purge solenoid. If
the purge flow volume is at the standard value, replace the
EVAP canister.
EVAPORATIVE EMISSION PURGE SOLENOID
CHECK
M1173001700289
1. Disconnect the vacuum hose (black, black with red paint
mark) from the evaporative emission (EVAP) purge
solenoid.
NOTE: When disconnecting the vacuum hose, always place
an identification mark so that it can be reconnected at its
original position.
2. Disconnect the harness connector.
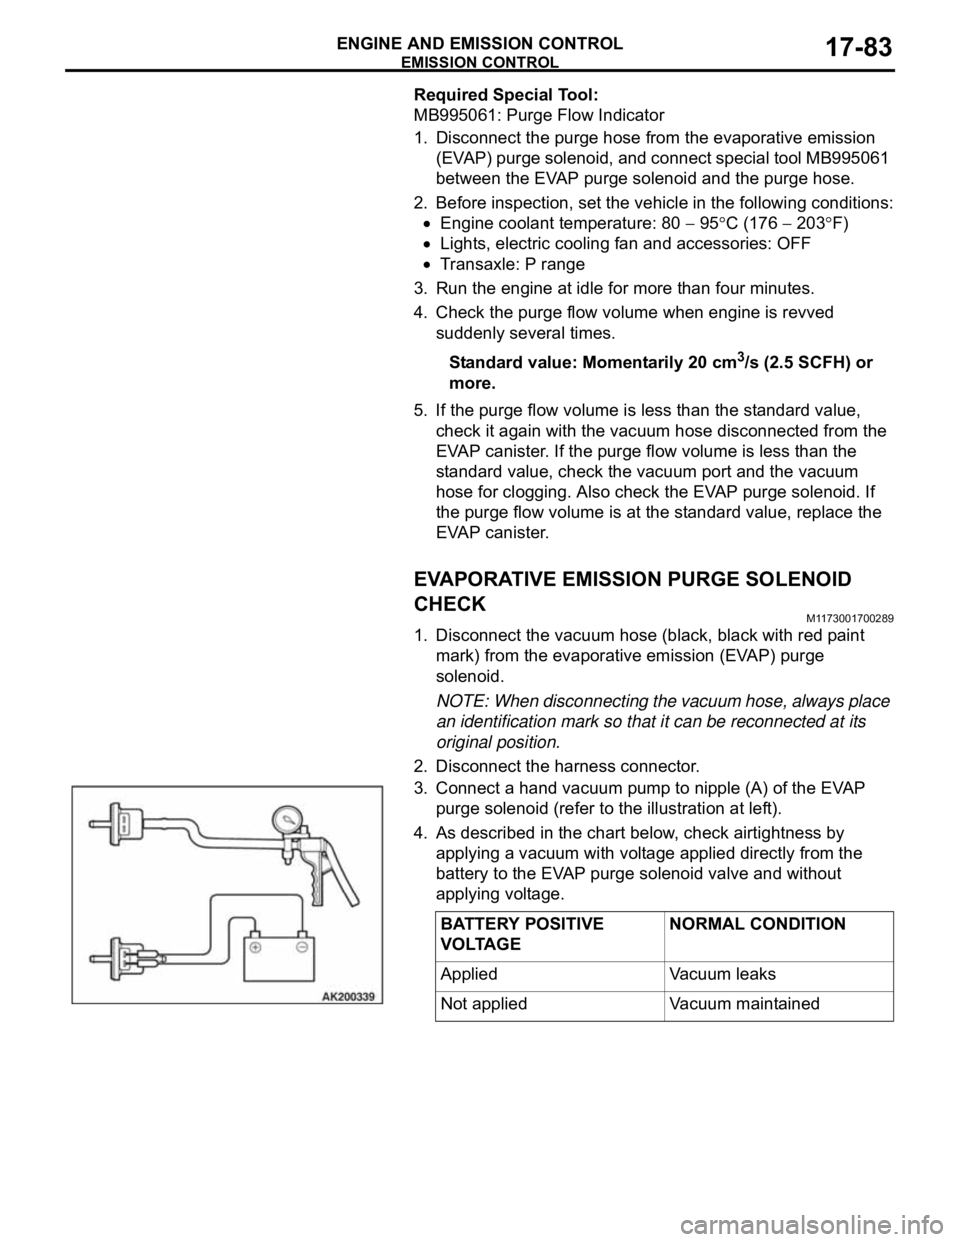
3. Connect a hand vacuum pump to nipple (A) of the EVAP
purge solenoid (refer to the illustration at left).
4. As described in the chart below, check airtightness by
applying a vacuum with voltage applied directly from the
battery to the EVAP purge solenoid valve and without
applying voltage.
BATTERY POSITIVE
VOLTAGENORMAL CONDITION
Applied Vacuum leaks
Not applied Vacuum maintained
Page 1415 of 1500
![MITSUBISHI 380 2005 Workshop Manual EMISSION CONTROL
ENGINE AND EMISSION CONTROL17-84
5. Measure the resistance between the terminals of the EVAP
purge solenoid.
Standard value: 16
[at 20C )]
6. Replace the solenoid if resistance is MITSUBISHI 380 2005 Workshop Manual EMISSION CONTROL
ENGINE AND EMISSION CONTROL17-84
5. Measure the resistance between the terminals of the EVAP
purge solenoid.
Standard value: 16
[at 20C )]
6. Replace the solenoid if resistance is](/manual-img/19/57086/w960_57086-1414.png)
EMISSION CONTROL
ENGINE AND EMISSION CONTROL17-84
5. Measure the resistance between the terminals of the EVAP
purge solenoid.
Standard value: 16
[at 20C )]
6. Replace the solenoid if resistance is out of specification.
MASS AIRFLOW SENSOR CHECKM1173050400053
To inspect these parts, refer to GROUP 13A, Multipoint Fuel
Injection (MPI)
Multipoint Fuel Injection (MPI) Diagnosis
Diagnostic Trouble Code Chart 13A-17.
ENGINE COOLANT TEMPERATURE SENSOR
CHECK
M1173008100523
To inspect the sensor, refer to GROUP 13A, Multipoint Fuel
Injection (MPI)
Multipoint Fuel Injection (MPI) Diagnosis
Diagnostic Trouble Code Chart 13A-17.
INTAKE AIR TEMPERATURE SENSOR CHECKM1173008200263
To inspect the sensor, refer to GROUP 13A, Multipoint Fuel
Injection (MPI)
Multipoint Fuel Injection (MPI) Diagnosis
Diagnostic Trouble Code Chart 13A-17.
CATALYTIC CONVERTER
GENERAL DESCRIPTION (CATALYTIC CONVERTER)M1173005300131
The three way catalytic converter, together with the
closed loop air-fuel ratio control based on the oxygen
sensor signal, oxidizes carbon monoxides (CO) and
hydrocarbons (HC), also reduces nitrogen oxides
(NOx). When the mixture is controlled at stoichiometric
air-fuel ratio, the three way catalytic converter pro-
vides the highest purification against the three con-
stituents, namely, CO, HC and NOx.
Page 1478 of 1500

AUTOMATIC TRANSMISSION DIAGNOSIS
AUTOMATIC TRANSMISSION23A-19
ROAD TESTM1231007800407
Check using the following procedures.
STEP CONDITION
BEFORE
TEST/OPERATIONTEST/OPERATION STANDARD INSPECTION
ITEMINSPECTION
PROCEDURE
PA G E
1 Ignition switch:
(LOCK) OFFIgnition switch
(1) ONData list No.8
(1) Control Relay
Voltage [V]A/T Control
relay
output
voltageA/T Control
relay system
(P.23A-207).
2 Ignition switch:
ON
Engine: Stopped
Transmission
range: PTransmission range
(1) P, (2) R, (3) N, (4)
DData list No.34
(1) P, (2) R, (3) N, (4)
DTransmissi
on range
switchTransmission
range switch
system
(P.23A-97,
P.23A-119).
Transmission range
(1) D (1st gear)
(2) Select the sport
mode (1st gear)
(3) Upshift and hold
the selector lever in
that position (2nd
gear)
(4) Downshift and
hold the selector
lever in that position
(1st gear)Data list No.27
(1) OFF, (2) ON, (3)
ON, (4) ON
Data list No.28
(1) OFF, (2) OFF, (3)
ON, (4) OFF
Data list No.29
(1) OFF, (2) OFF, (3)
OFF, (4) ONSelect
switch and
Shift switchShift switch
assembly
system
(P.23A-252).
Brake pedal
(1) Depressed
(2) ReleasedData list No.19
(1) ON
(2) OFFSto pl amp
switchSt o pla mp
switch system
(P.23A-89).
3 Ignition switch:
ST
Engine: StoppedCranking test with
lever in P or N rangeCranking should be
possibleCranking Engine does
not crank
(P.23A-218).
4 Engine warming
upDrive for 15 minutes
or more so that the
transmission fluid
temperature
becomes 70
90CData list No.7
Gradually rises to 70
90CTransmissi
on fluid
temperatur
e sensorTransmission
fluid
temperature
sensor system
(P.23A-36,
P.23A-47).
5 Engine: Idling
Transmission
range: NBrake pedal (Retest)
(1) Depressed
(2) ReleasedData list No.19
(1) ON
(2) OFFSto pl amp
switchSt o pla mp
switch system
(P.23A-89).
Transmission range
(1) N
D
(2) N
RShould be no
abnormal shift
shocks
Time delay when
engaging should be
within 2 secondsMalfunction
when
startingEngine stalls
when moving
selector lever
from N to D or
N to R
(P.23A-227).
Page 1484 of 1500

AUTOMATIC TRANSMISSION DIAGNOSIS
AUTOMATIC TRANSMISSION23A-25
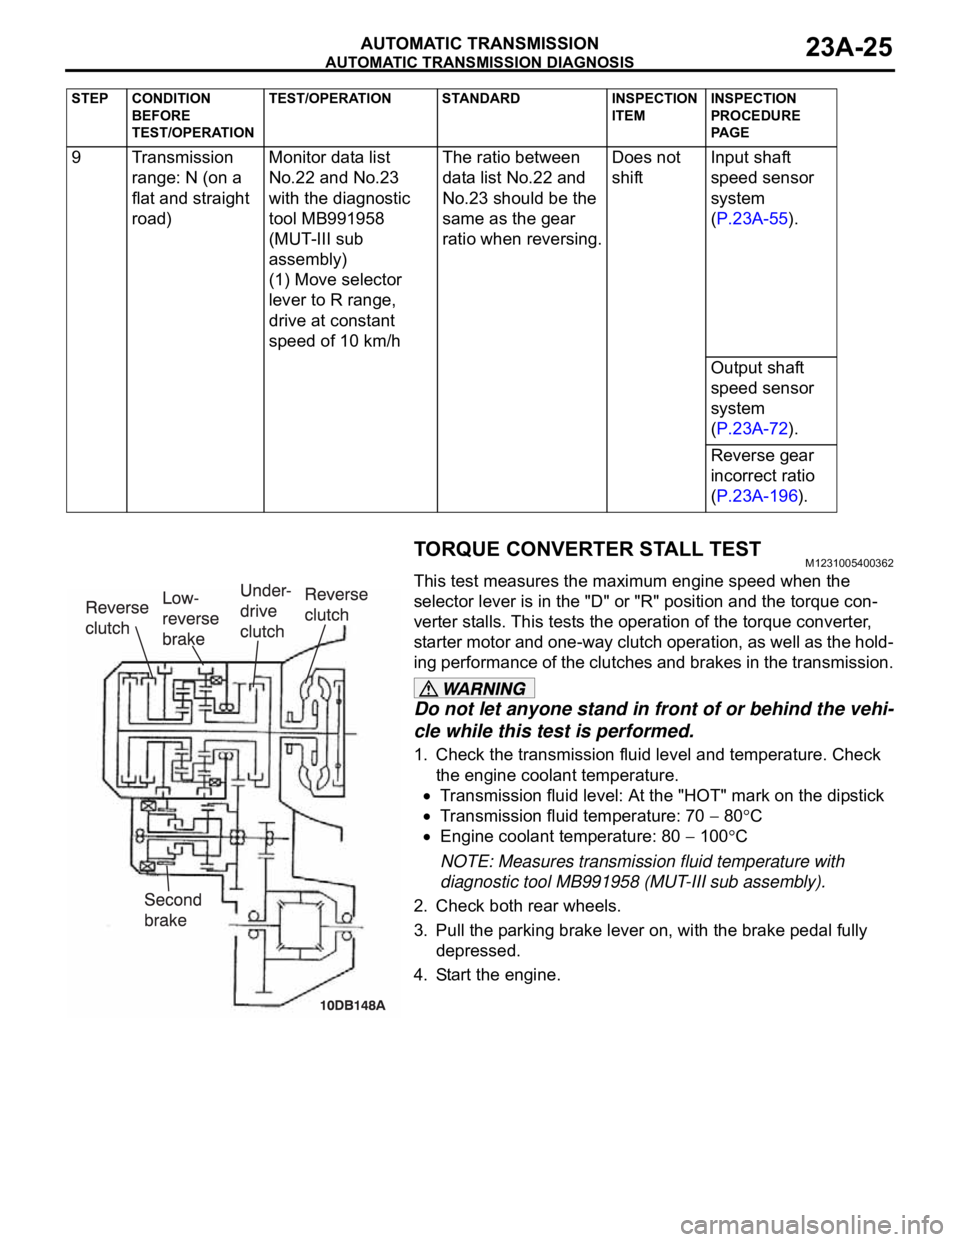
TORQUE CONVERTER STALL TESTM1231005400362
This test measures the maximum engine speed when the
selector lever is in the "D" or "R" position and the torque con-
verter stalls. This tests the operation of the torque converter,
starter motor and one-way clutch operation, as well as the hold-
ing performance of the clutches and brakes in the transmission.
Do not let anyone stand in front of or behind the vehi-
cle while this test is performed.
1. Check the transmission fluid level and temperature. Check
the engine coolant temperature.
Transmission fluid level: At the "HOT" mark on the dipstick
Transmission fluid temperature: 70 80C
Engine coolant temperature: 80 100C
NOTE: Measures transmission fluid temperature with
diagnostic tool MB991958 (MUT-III sub assembly).
2. Check both rear wheels.
3. Pull the parking brake lever on, with the brake pedal fully
depressed.
4. Start the engine. 9 Transmission
range: N (on a
flat and straight
road)Monitor data list
No.22 and No.23
with the diagnostic
tool MB991958
(MUT-III sub
assembly)
(1) Move selector
lever to R range,
drive at constant
speed of 10 km/hThe ratio between
data list No.22 and
No.23 should be the
same as the gear
ratio when reversing.Does not
shiftInput shaft
speed sensor
system
(P.23A-55).
Output shaft
speed sensor
system
(P.23A-72).
Reverse gear
incorrect ratio
(P.23A-196).
STEP CONDITION
BEFORE
TEST/OPERATIONTEST/OPERATION STANDARD INSPECTION
ITEMINSPECTION
PROCEDURE
PA G E
Page 1485 of 1500

AUTOMATIC TRANSMISSION DIAGNOSIS
AUTOMATIC TRANSMISSION23A-26
The throttle should not be fully open for any more than
five seconds.
If you repeat the stall test when the transmission fluid
temperature is greater than 80
C, move the selector
lever to the "N" position and let the engine run at
approximately 1,000 r/min for at least one minute. Wait
until the transmission fluid temperature returns to 80
C
or less.
5. Move the selector lever to the "D" position. Fully depress the
accelerator pedal and read the maximum engine speed at
this time.
Standard value: Stall speed: 2,100
2,600 r/min
6. Move the selector lever to the "R" position. Fully depress the
accelerator pedal and read the maximum engine speed.
Standard value: Stall speed: 2,100
2,600 r/min
TORQUE CONVERTER STALL TEST JUDGMENT
RESULTS
1. Stall speed is too high in both "D" and "R" range
Malfunction of the torque converter (Slippage on the splines
of the torque converter and the input shaft)
Low line pressure
Low-reverse brake slippage and malfunction of the one-way
clutch
2. Stall speed is too high in "D" range only
Underdrive clutch slippage
3. Stall speed is too high in "R" range only
Reverse clutch slippage
4. Stall speed is too low in both "D" and "R" ranges
Malfunction of the torque converter (Slippage of the
one-way clutch)
Insufficient engine output
HYDRAULIC PRESSURE TESTSM1231005500392
The transmission fluid temperature should be between 70
80C during the test.
1. Check the transmission fluid level and temperature. Check
engine coolant temperature.
Transmission fluid level: "HOT" mark on the dipstick
Transmission fluid temperature: 70 80C
Engine coolant temperature: 80 100C
2. Raise the vehicle so that the wheels are free to turn.