2005 MITSUBISHI 380 check engine
[x] Cancel search: check enginePage 1332 of 1500
17-1
GROUP 17
ENGINE AND
EMISSION
CONTROL
CONTENTS
ENGINE CONTROL. . . . . . . . . .
17-3
GENERAL DESCRIPTION . . . . . .
17-3
ENGINE CONTROL SYSTEM
DIAGNOSIS . . . . . . . . . . . . . . . . . .
17-3
INTRODUCTION . . . . . . . . . . . . . . . . . . 17-3
TROUBLESHOOTING STRATEGY . . . 17-3
SYMPTOM CHART . . . . . . . . . . . . . . . . 17-4
SYMPTOM PROCEDURES . . . . . . . . . 17-4
SPECIAL TOOL . . . . . . . . . . . . . . .17-8
ACCELERATOR PEDAL . . . . . . . .17-9
REMOVAL AND INSTALLATION . . . . . 17-9
AUTO-CRUISE CONTROL . . . .17-10
GENERAL DESCRIPTION . . . . . .
17-10
AUTO-CRUISE CONTROL SYSTEM
DIAGNOSIS . . . . . . . . . . . . . . . . . .
17-10
INTRODUCTION TO AUTO-CRUISE
CONTROL SYSTEM DIAGNOSIS . . . . . 17-10
DIAGNOSTIC TROUBLESHOOTING
STRATEGY . . . . . . . . . . . . . . . . . . . . . . 17-11
DIAGNOSTIC FUNCTION . . . . . . . . . . . 17-11
DIAGNOSTIC TROUBLE CODE CHART17-14
DIAGNOSTIC TROUBLE CODE
PROCEDURES . . . . . . . . . . . . . . . . . . . 17-15
SYMPTOM CHART . . . . . . . . . . . . . . . . 17-53
SYMPTOM PROCEDURES . . . . . . . . . . 17-54
DATA LIST REFERENCE TABLE . . . . . 17-65
ENGINE ECU TERMINAL VOLTAGE
REFERENCE CHART FOR AUTO-CRUISE
CONTROL SYSTEM OPERATION . . . . 17-67
SPECIAL TOOLS . . . . . . . . . . . . . .17-69
ON-VEHICLE SERVICE . . . . . . . . .17-71
AUTO-CRUISE CONTROL SWITCH
CHECK . . . . . . . . . . . . . . . . . . . . . . . . . . 17-71
AUTO-CRUISE CONTROL SYSTEM
COMPONENT CHECK. . . . . . . . . . . . . . 17-73
AUTO-CRUISE CONTROL. . . . . . .17-75
REMOVAL AND INSTALLATION . . . . . . 17-75
Continued on next page
Page 1333 of 1500
ENGINE AND EMISSION CONTROL17-2
EMISSION CONTROL . . . . . . . .17-76
GENERAL DESCRIPTION . . . . . .
17-76
DIAGNOSIS . . . . . . . . . . . . . . . . . .17-76
SPECIAL TOOLS. . . . . . . . . . . . . .17-76
VACUUM HOSES . . . . . . . . . . . . .17-77
VACUUM HOSE ROUTING. . . . . . . . . . 17-77
VACUUM CIRCUIT DIAGRAM . . . . . . . 17-78
VACUUM HOSE INSTALLATION . . . . . 17-78
VACUUM HOSE CHECK. . . . . . . . . . . . 17-79
POSITIVE CRANKCASE VENTILATION
SYSTEM . . . . . . . . . . . . . . . . . . . . .
17-79
GENERAL DESCRIPTION (POSITIVE
CRANKCASE VENTILATION SYSTEM)17-79
COMPONENT LOCATION . . . . . . . . . . 17-80
POSITIVE CRANKCASE VENTILATION
SYSTEM CHECK. . . . . . . . . . . . . . . . . . 17-80
POSITIVE CRANKCASE VENTILATION
VALVE CHECK . . . . . . . . . . . . . . . . . . . 17-80
EVAPORATIVE EMISSION CONTROL SYSTEM . . . . . . . . . . . . . . . . . . . . .
17-81
GENERAL DESCRIPTION (EVAPORATIVE
EMISSION SYSTEM) . . . . . . . . . . . . . . . 17-81
COMPONENT LOCATION . . . . . . . . . . . 17-82
PURGE CONTROL SYSTEM CHECK
(PURGE FLOW CHECK) . . . . . . . . . . . . 17-82
EVAPORATIVE EMISSION PURGE
SOLENOID CHECK . . . . . . . . . . . . . . . . 17-83
MASS AIRFLOW SENSOR CHECK . . . 17-84
ENGINE COOLANT TEMPERATURE
SENSOR CHECK . . . . . . . . . . . . . . . . . . 17-84
INTAKE AIR TEMPERATURE SENSOR
CHECK. . . . . . . . . . . . . . . . . . . . . .17-84
EVAPORATIVE EMISSION CANISTER
. . . . . . . . . . . . . . . . . . . . . . . . . . . .
17-81
REMOVAL AND INSTALLATION . . . . . . 17-81
INSPECTION . . . . . . . . . . . . . . . . . . . . . 17-81
CATALYTIC CONVERTER . . . . . .17-84
GENERAL DESCRIPTION (CATALYTIC
CONVERTER) . . . . . . . . . . . . . . . . . . . . 17-84
SPECIFICATIONS . . . . . . . . . . 17-85
FASTENER TIGHTENING
SPECIFICATIONS . . . . . . . . . . . . . . . . . 17-85
Page 1336 of 1500
ENGINE CONTROL
ENGINE AND EMISSION CONTROL17-5
DIAGNOSIS
Required Special Tools:
MB991958: Diagnostic Tool (MUT-III Sub Assembly)
MB991824: Vehicle Communication Interface (V.C.I.)
MB991827: MUT-III USB Cable
MB991910: MUT-III Main Harness A
STEP 1. Using Diagnostic Tool MB991958, read the
diagnostic trouble code (DTC).
To prevent damage to Diagnostic Tool MB991958, always
turn the ignition switch to the "LOCK" (OFF) position
before connecting or disconnecting Diagnostic Tool
MB991958.
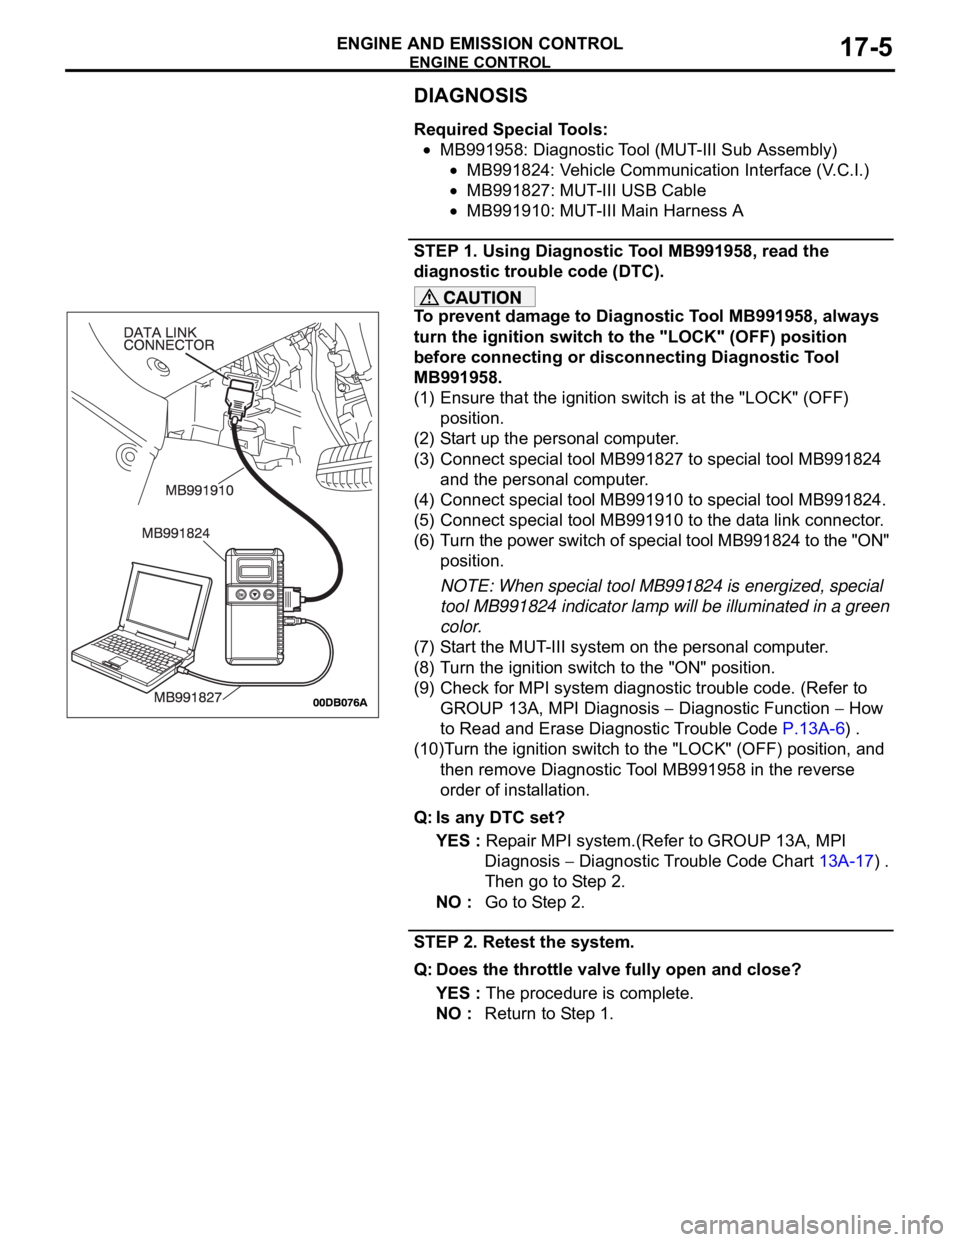
(1) Ensure that the ignition switch is at the "LOCK" (OFF)
position.
(2) Start up the personal computer.
(3) Connect special tool MB991827 to special tool MB991824
and the personal computer.
(4) Connect special tool MB991910 to special tool MB991824.
(5) Connect special tool MB991910 to the data link connector.
(6) Turn the power switch of special tool MB991824 to the "ON"
position.
NOTE: When special tool MB991824 is energized, special
tool MB991824 indicator lamp will be illuminated in a green
color.
(7) Start the MUT-III system on the personal computer.
(8) Turn the ignition switch to the "ON" position.
(9) Check for MPI system diagnostic trouble code. (Refer to
GROUP 13A, MPI Diagnosis
Diagnostic Function How
to Read and Erase Diagnostic Trouble Code P.13A-6) .
(10)Turn the ignition switch to the "LOCK" (OFF) position, and
then remove Diagnostic Tool MB991958 in the reverse
order of installation.
Q: Is any DTC set?
YES : Repair MPI system.(Refer to GROUP 13A, MPI
Diagnosis
Diagnostic Trouble Code Chart 13A-17) .
Then go to Step 2.
NO : Go to Step 2.
STEP 2. Retest the system.
Q: Does the throttle valve fully open and close?
YES : The procedure is complete.
NO : Return to Step 1.
Page 1337 of 1500

ENGINE CONTROL
ENGINE AND EMISSION CONTROL17-6
INSPECTION PROCEDURE 2: Accelerator Pedal Operation Not Smooth (Over Acceleration)
.
COMMENT
The accelerator pedal, its installation condition or the
accelerator pedal position (APP) sensor is sus-
pected.
.
TROUBLESHOOTING HINTS (THE MOST
LIKELY CAUSES FOR THIS CASE:)
Malfunction of the accelerator pedal.
Incorrectly installed accelerator pedal.
Malfunction of the accelerator pedal position
(APP) sensor.
Circuit drawings
Refer to circuit diagrams GROUP-90
Refer to configuration diagrams GROUP-80
Refer to component locations GROUP-70
DIAGNOSIS
Required Special Tools:
MB991958: Diagnostic Tool (MUT-III Sub Assembly)
MB991824: V.C.I.
MB991827: MUT-III USB Cable
MB991910: MUT-III Main Harness A
STEP 1. Check if the accelerator pedal is installed
correctly.
Q: Is the accelerator pedal installed correctly?
YES : Go to Step 2.
NO : Replace and reinstall the accelerator pedal. (Refer to
P.17-9). Go to Step 3.
Page 1338 of 1500
ENGINE CONTROL
ENGINE AND EMISSION CONTROL17-7
STEP 2. Using Diagnostic Tool MB991958, read the
diagnostic trouble code (DTC).
To prevent damage to Diagnostic Tool MB991958, always
turn the ignition switch to the "LOCK" (OFF) position
before connecting or disconnecting Diagnostic Tool
MB991958.
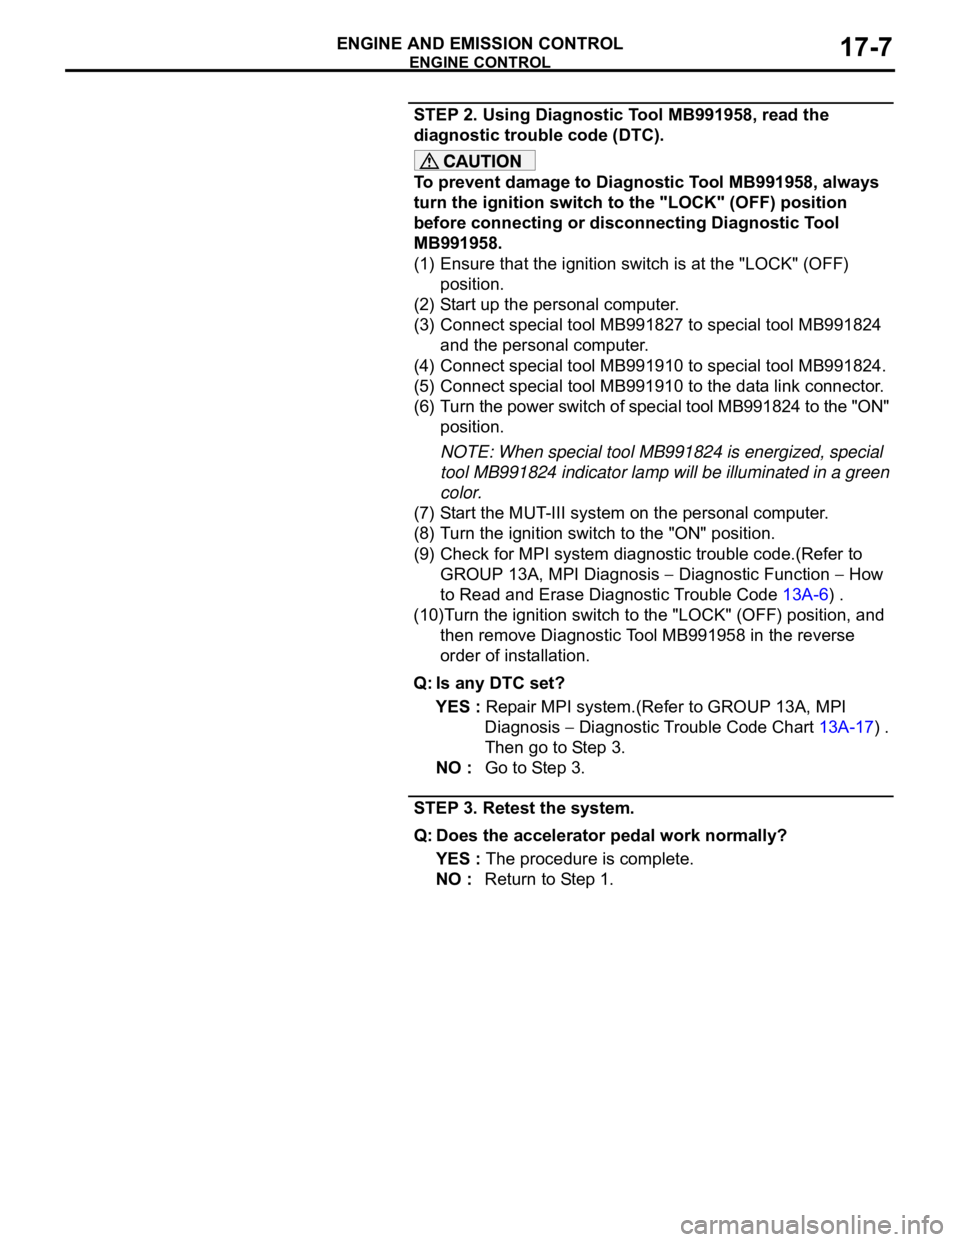
(1) Ensure that the ignition switch is at the "LOCK" (OFF)
position.
(2) Start up the personal computer.
(3) Connect special tool MB991827 to special tool MB991824
and the personal computer.
(4) Connect special tool MB991910 to special tool MB991824.
(5) Connect special tool MB991910 to the data link connector.
(6) Turn the power switch of special tool MB991824 to the "ON"
position.
NOTE: When special tool MB991824 is energized, special
tool MB991824 indicator lamp will be illuminated in a green
color.
(7) Start the MUT-III system on the personal computer.
(8) Turn the ignition switch to the "ON" position.
(9) Check for MPI system diagnostic trouble code.(Refer to
GROUP 13A, MPI Diagnosis
Diagnostic Function How
to Read and Erase Diagnostic Trouble Code 13A-6) .
(10)Turn the ignition switch to the "LOCK" (OFF) position, and
then remove Diagnostic Tool MB991958 in the reverse
order of installation.
Q: Is any DTC set?
YES : Repair MPI system.(Refer to GROUP 13A, MPI
Diagnosis
Diagnostic Trouble Code Chart 13A-17) .
Then go to Step 3.
NO : Go to Step 3.
STEP 3. Retest the system.
Q: Does the accelerator pedal work normally?
YES : The procedure is complete.
NO : Return to Step 1.
Page 1339 of 1500
ENGINE CONTROL
ENGINE AND EMISSION CONTROL17-8
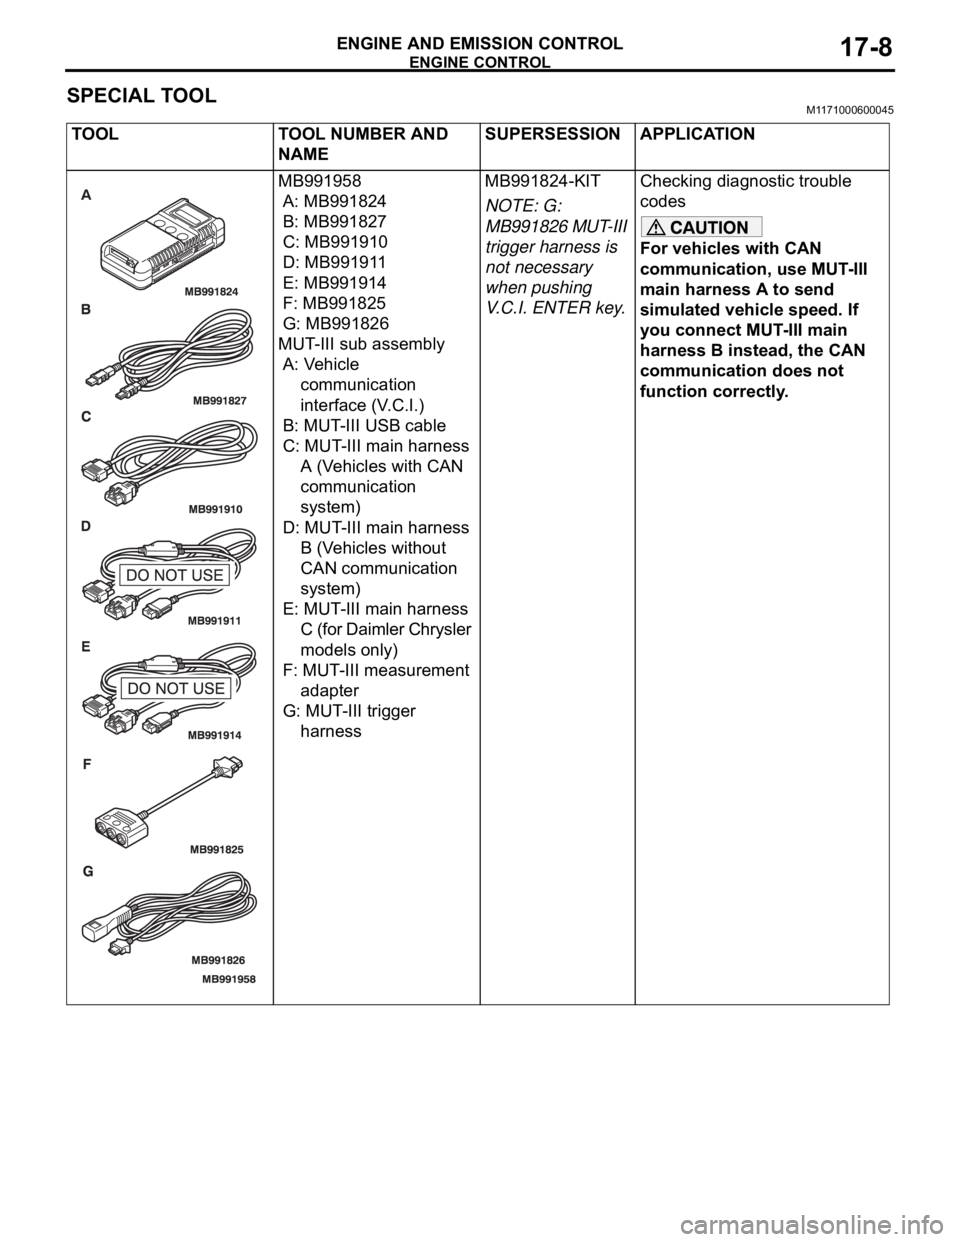
SPECIAL TOOLM1171000600045
TOOL TOOL NUMBER AND
NAMESUPERSESSION APPLICATION
MB991958
A: MB991824
B: MB991827
C: MB991910
D: MB991911
E: MB991914
F: MB991825
G: MB991826
MUT-III sub assembly
A: Vehicle
communication
interface (V.C.I.)
B: MUT-III USB cable
C: MUT-III main harness
A (Vehicles with CAN
communication
system)
D: MUT-III main harness
B (Vehicles without
CAN communication
system)
E: MUT-III main harness
C (for Daimler Chrysler
models only)
F: MUT-III measurement
adapter
G: MUT-III trigger
harnessMB991824-KIT
NOTE: G:
MB991826 MUT-III
trigger harness is
not necessary
when pushing
V.C.I. ENTER key.Checking diagnostic trouble
codes
For vehicles with CAN
communication, use MUT-III
main harness A to send
simulated vehicle speed. If
you connect MUT-III main
harness B instead, the CAN
communication does not
function correctly.
Page 1342 of 1500

AUTO-CRUISE CONTROL
ENGINE AND EMISSION CONTROL17-11
components, the Engine ECU estimates where the
problem may be occurring, and will set a diagnostic
trouble code. Diagnostic trouble codes cover the
auto-cruise control switch, stoplamp switch and
Engine ECU.
DIAGNOSTIC TROUBLESHOOTING STRATEGYM1172002000484
Use these steps to plan your diagnostic strategy. If
you follow them carefully, you will check most of the
possible causes of an auto-cruise control system
problem.
1. Gather information from the customer.
2. Verify that the condition described by the
customer exists.
3. Check the vehicle for any auto-cruise control
system DTC. (Refer to P.17-11, Diagnostic
Function
How to Read and Erase Diagnostic
Trouble Codes).
4. If you can verify the condition but no auto-cruise
control system DTCs are set, the malfunction may
be intermittent. (Refer to GROUP 00, How to Use
Troubleshooting/Inspection Service Points
How
to Cope with Intermittent Malfunctions P.00-14).5. If you can verify the condition but there are no
auto-cruise control system DTCs, or the system
cannot communicate with Diagnostic Tool
MB991958 (MUT-III sub assembly), and find the
fault. (Refer to P.17-53, Symptom Chart).
6. If there is an auto-cruise control system DTC,
record the number of the code, then erase the
code from Engine ECU memory using the
Diagnostic Tool MB991958 (MUT-III sub
assembly). (Refer to P.17-11, Diagnostic Function
How to Read and Erase Diagnostic Trouble
Codes).
7. Re-create the auto-cruise control system DTC set
conditions to see if the same Auto-cruise Control
System DTC will set again. (Refer to P.17-11,
Diagnostic Function
How to Read and Erase
Diagnostic Trouble Codes).
If the same Auto-cruise Control System DTC sets
again, perform the diagnostic procedures for the
set code. (Refer to P.17-14, Diagnostic Trouble
Code Chart).
DIAGNOSTIC FUNCTIONM1172004900171
HOW TO CONNECT THE DIAGNOSTIC TOOL.
Required Special Tools:
MB991958: Diagnostic Tool (MUT-III Sub Assembly)
MB991824: Vehicle Communication Interface (V.C.I.)
MB991827: MUT-III USB Cable
MB991910: MUT-III Main Harness A
Page 1343 of 1500
AUTO-CRUISE CONTROL
ENGINE AND EMISSION CONTROL17-12
To prevent damage to Diagnostic Tool MB991958, always
turn the ignition switch to the "LOCK" (OFF) position
before connecting or disconnecting Diagnostic Tool
MB991958.
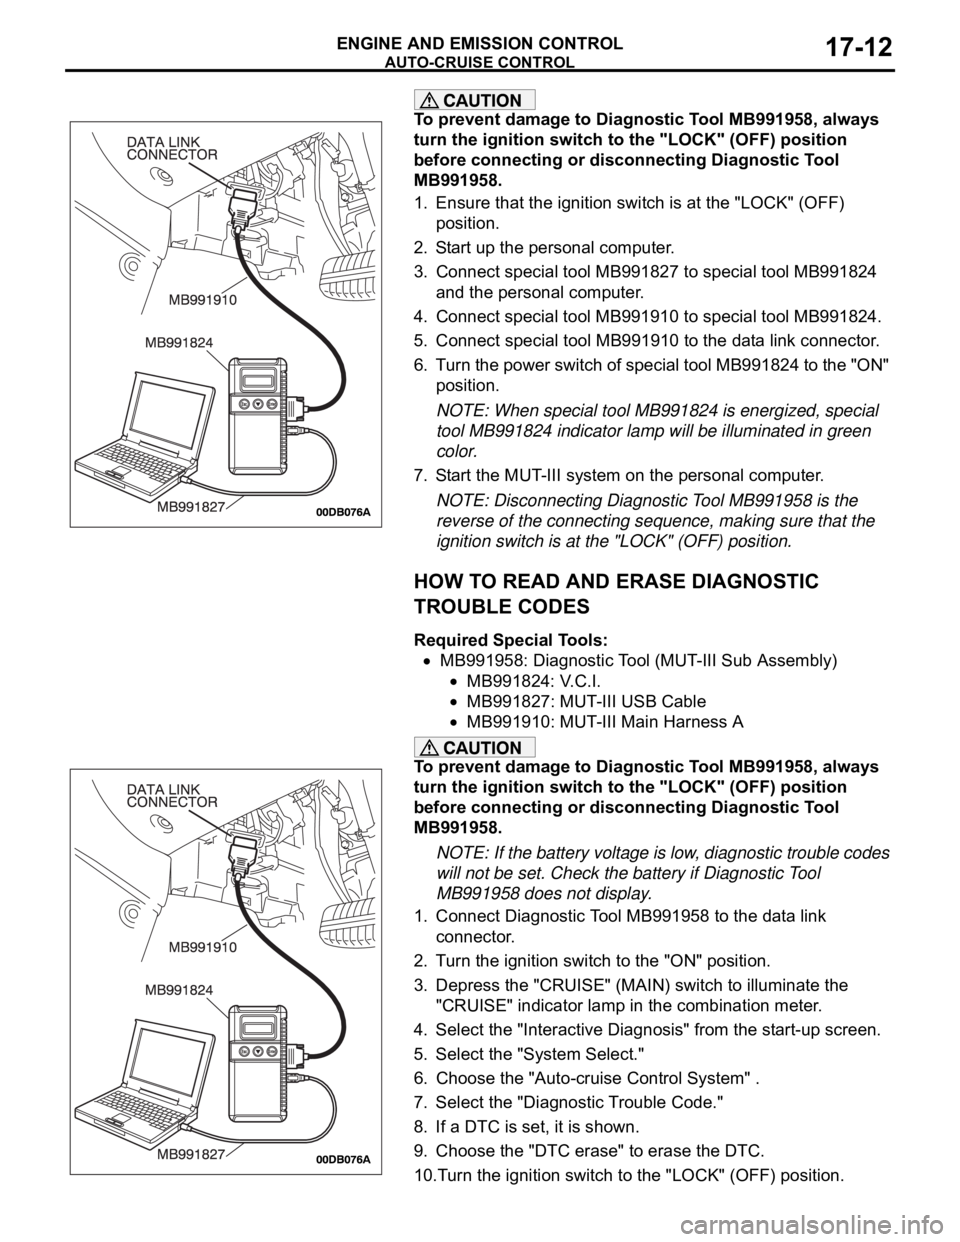
1. Ensure that the ignition switch is at the "LOCK" (OFF)
position.
2. Start up the personal computer.
3. Connect special tool MB991827 to special tool MB991824
and the personal computer.
4. Connect special tool MB991910 to special tool MB991824.
5. Connect special tool MB991910 to the data link connector.
6. Turn the power switch of special tool MB991824 to the "ON"
position.
NOTE: When special tool MB991824 is energized, special
tool MB991824 indicator lamp will be illuminated in green
color.
7. Start the MUT-III system on the personal computer.
NOTE: Disconnecting Diagnostic Tool MB991958 is the
reverse of the connecting sequence, making sure that the
ignition switch is at the "LOCK" (OFF) position.
HOW TO READ AND ERASE DIAGNOSTIC
TROUBLE CODES
Required Special Tools:
MB991958: Diagnostic Tool (MUT-III Sub Assembly)
MB991824: V.C.I.
MB991827: MUT-III USB Cable
MB991910: MUT-III Main Harness A
To prevent damage to Diagnostic Tool MB991958, always
turn the ignition switch to the "LOCK" (OFF) position
before connecting or disconnecting Diagnostic Tool
MB991958.
NOTE: If the battery voltage is low, diagnostic trouble codes
will not be set. Check the battery if Diagnostic Tool
MB991958 does not display.
1. Connect Diagnostic Tool MB991958 to the data link
connector.
2. Turn the ignition switch to the "ON" position.
3. Depress the "CRUISE" (MAIN) switch to illuminate the
"CRUISE" indicator lamp in the combination meter.
4. Select the "Interactive Diagnosis" from the start-up screen.
5. Select the "System Select."
6. Choose the "Auto-cruise Control System" .
7. Select the "Diagnostic Trouble Code."
8. If a DTC is set, it is shown.
9. Choose the "DTC erase" to erase the DTC.
10.Turn the ignition switch to the "LOCK" (OFF) position.