2005 MERCEDES-BENZ SPRINTER rear view mirror
[x] Cancel search: rear view mirrorPage 235 of 1232
POWER MIRRORS
TABLE OF CONTENTS
page page
POWER MIRRORS
DESCRIPTION..........................3
POWER MIRROR SWITCH
DIAGNOSIS AND TESTING - POWER MIRROR
SWITCH.............................3REMOVAL.............................3
INSTALLATION..........................4
POWER MIRRORS
DESCRIPTION
The power operated outside rear view mirrors
allow the driver to adjust both outside mirrors elec-
trically from the driver side front seat position by
operating a switch on the driver side front door trim
panel. The power mirrors receive a non-switched bat-
tery feed through a fuse so that the system will
remain operational, regardless of the ignition switch
position.
POWER MIRROR SWITCH
DIAGNOSIS AND TESTING - POWER MIRROR
SWITCH
(1) Disconnect and isolate the battery negative
cable.
(2) Remove power mirror switch (Refer to 8 -
ELECTRICAL/POWER MIRRORS/POWER MIRROR
SWITCH - REMOVAL).
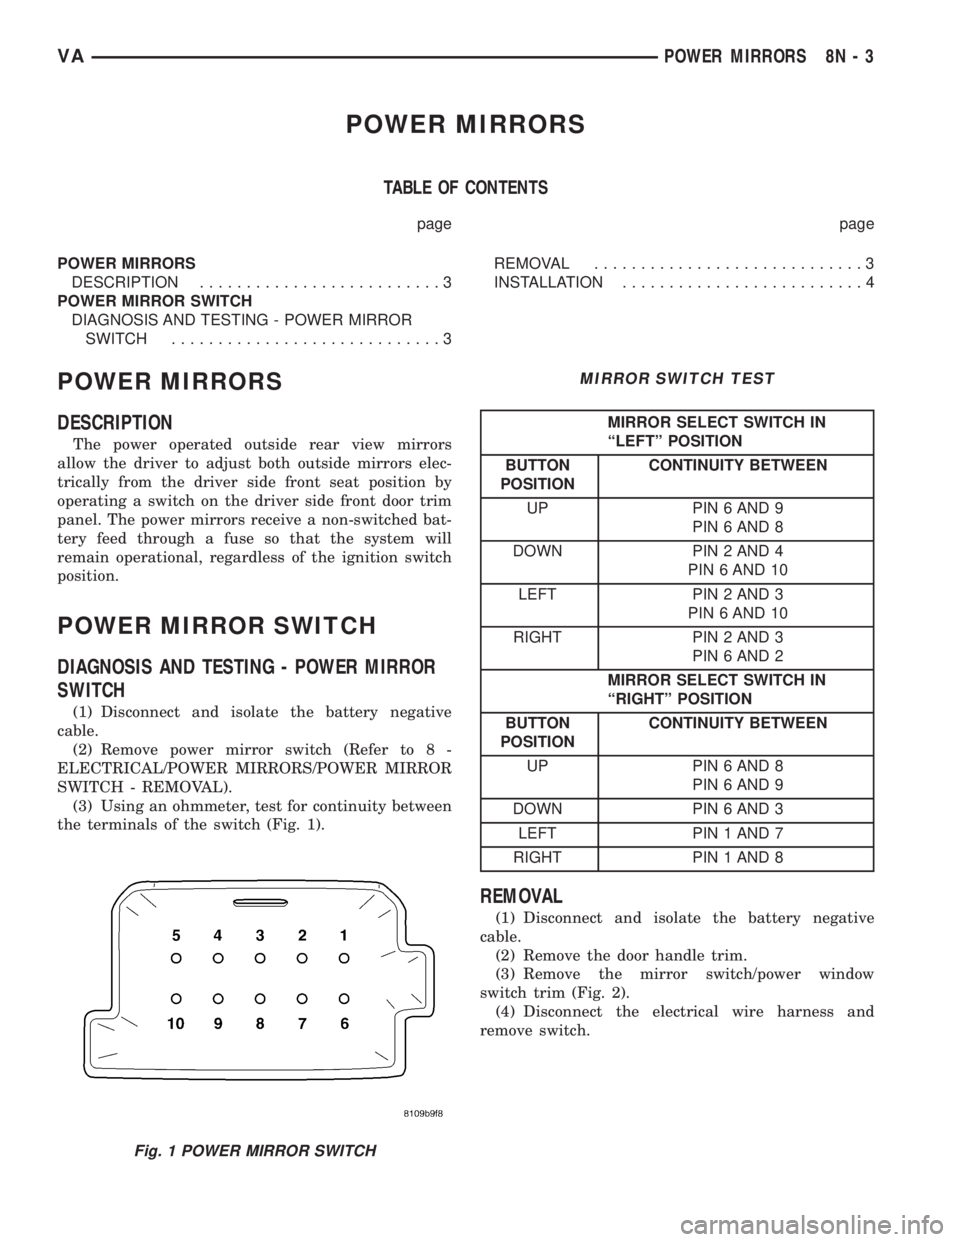
(3) Using an ohmmeter, test for continuity between
the terminals of the switch (Fig. 1).
MIRROR SWITCH TEST
MIRROR SELECT SWITCH IN
ªLEFTº POSITION
BUTTON
POSITIONCONTINUITY BETWEEN
UP PIN 6 AND 9
PIN 6 AND 8
DOWN PIN 2 AND 4
PIN 6 AND 10
LEFT PIN 2 AND 3
PIN 6 AND 10
RIGHT PIN 2 AND 3
PIN 6 AND 2
MIRROR SELECT SWITCH IN
ªRIGHTº POSITION
BUTTON
POSITIONCONTINUITY BETWEEN
UP PIN 6 AND 8
PIN 6 AND 9
DOWN PIN 6 AND 3
LEFT PIN 1 AND 7
RIGHT PIN 1 AND 8
REMOVAL
(1) Disconnect and isolate the battery negative
cable.
(2) Remove the door handle trim.
(3) Remove the mirror switch/power window
switch trim (Fig. 2).
(4) Disconnect the electrical wire harness and
remove switch.
Fig. 1 POWER MIRROR SWITCH
VAPOWER MIRRORS 8N - 3
Page 1050 of 1232
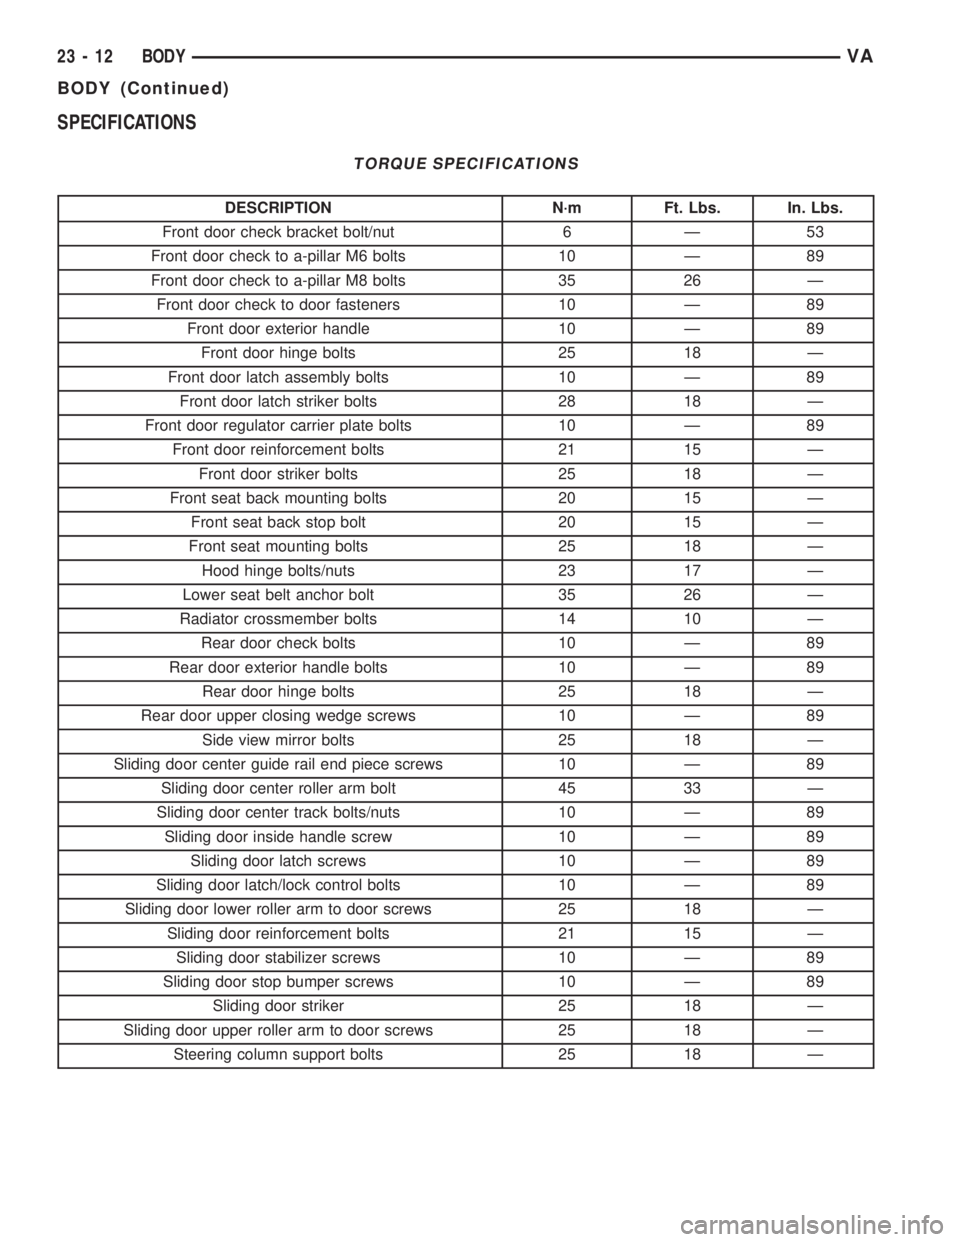
SPECIFICATIONS
TORQUE SPECIFICATIONS
DESCRIPTION N´m Ft. Lbs. In. Lbs.
Front door check bracket bolt/nut 6 Ð 53
Front door check to a-pillar M6 bolts 10 Ð 89
Front door check to a-pillar M8 bolts 35 26 Ð
Front door check to door fasteners 10 Ð 89
Front door exterior handle 10 Ð 89
Front door hinge bolts 25 18 Ð
Front door latch assembly bolts 10 Ð 89
Front door latch striker bolts 28 18 Ð
Front door regulator carrier plate bolts 10 Ð 89
Front door reinforcement bolts 21 15 Ð
Front door striker bolts 25 18 Ð
Front seat back mounting bolts 20 15 Ð
Front seat back stop bolt 20 15 Ð
Front seat mounting bolts 25 18 Ð
Hood hinge bolts/nuts 23 17 Ð
Lower seat belt anchor bolt 35 26 Ð
Radiator crossmember bolts 14 10 Ð
Rear door check bolts 10 Ð 89
Rear door exterior handle bolts 10 Ð 89
Rear door hinge bolts 25 18 Ð
Rear door upper closing wedge screws 10 Ð 89
Side view mirror bolts 25 18 Ð
Sliding door center guide rail end piece screws 10 Ð 89
Sliding door center roller arm bolt 45 33 Ð
Sliding door center track bolts/nuts 10 Ð 89
Sliding door inside handle screw 10 Ð 89
Sliding door latch screws 10 Ð 89
Sliding door latch/lock control bolts 10 Ð 89
Sliding door lower roller arm to door screws 25 18 Ð
Sliding door reinforcement bolts 21 15 Ð
Sliding door stabilizer screws 10 Ð 89
Sliding door stop bumper screws 10 Ð 89
Sliding door striker 25 18 Ð
Sliding door upper roller arm to door screws 25 18 Ð
Steering column support bolts 25 18 Ð
23 - 12 BODYVA
BODY (Continued)
Page 1055 of 1232
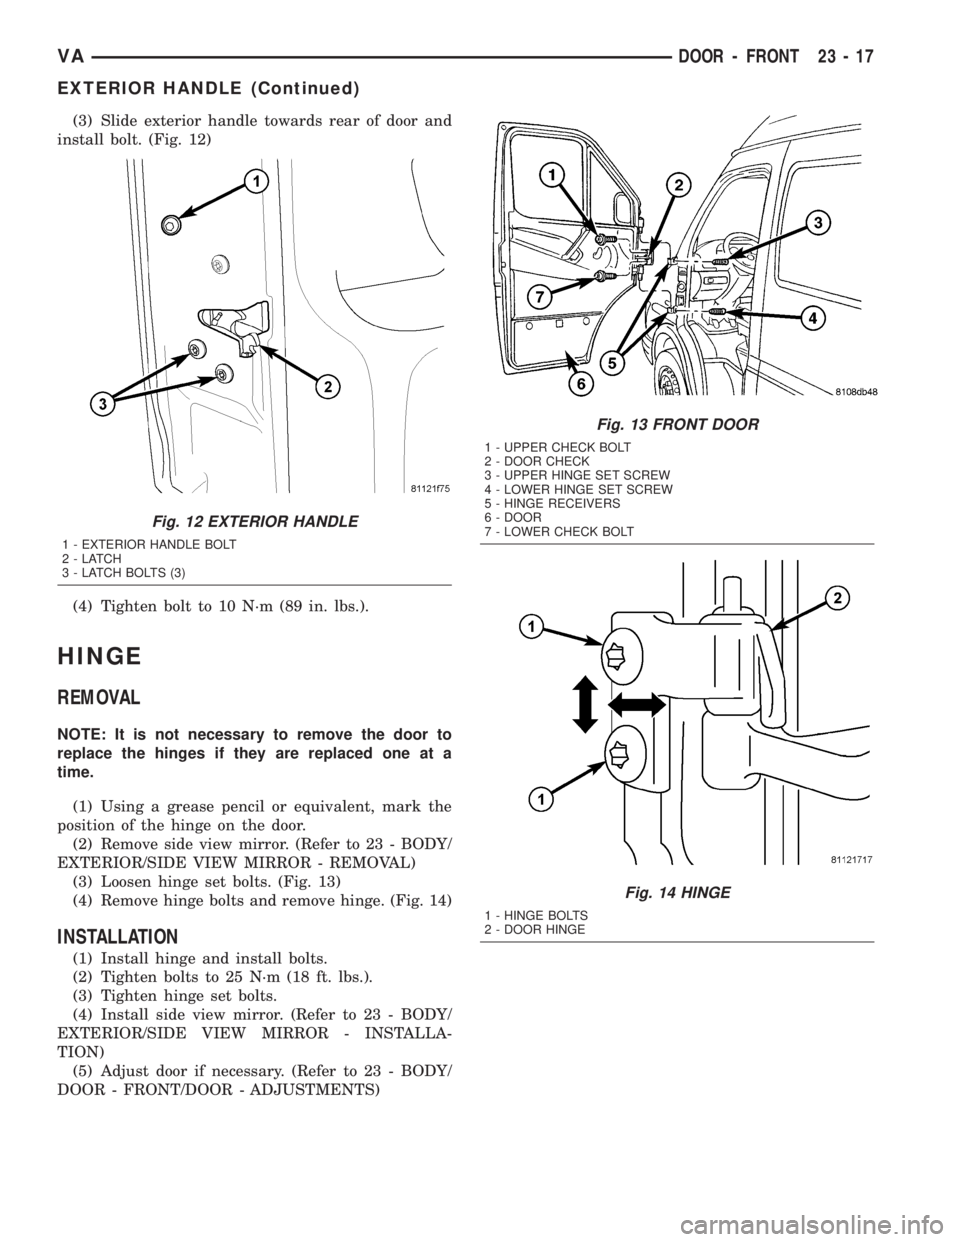
(3) Slide exterior handle towards rear of door and
install bolt. (Fig. 12)
(4) Tighten bolt to 10 N´m (89 in. lbs.).
HINGE
REMOVAL
NOTE: It is not necessary to remove the door to
replace the hinges if they are replaced one at a
time.
(1) Using a grease pencil or equivalent, mark the
position of the hinge on the door.
(2) Remove side view mirror. (Refer to 23 - BODY/
EXTERIOR/SIDE VIEW MIRROR - REMOVAL)
(3) Loosen hinge set bolts. (Fig. 13)
(4) Remove hinge bolts and remove hinge. (Fig. 14)
INSTALLATION
(1) Install hinge and install bolts.
(2) Tighten bolts to 25 N´m (18 ft. lbs.).
(3) Tighten hinge set bolts.
(4) Install side view mirror. (Refer to 23 - BODY/
EXTERIOR/SIDE VIEW MIRROR - INSTALLA-
TION)
(5) Adjust door if necessary. (Refer to 23 - BODY/
DOOR - FRONT/DOOR - ADJUSTMENTS)
Fig. 12 EXTERIOR HANDLE
1 - EXTERIOR HANDLE BOLT
2-LATCH
3 - LATCH BOLTS (3)
Fig. 13 FRONT DOOR
1 - UPPER CHECK BOLT
2 - DOOR CHECK
3 - UPPER HINGE SET SCREW
4 - LOWER HINGE SET SCREW
5 - HINGE RECEIVERS
6 - DOOR
7 - LOWER CHECK BOLT
Fig. 14 HINGE
1 - HINGE BOLTS
2 - DOOR HINGE
VADOOR - FRONT 23 - 17
EXTERIOR HANDLE (Continued)
Page 1105 of 1232
INTERIOR
TABLE OF CONTENTS
page page
INTERIOR
CAUTION.............................67
A-PILLAR TRIM
REMOVAL.............................67
INSTALLATION.........................68
ASSIST HANDLE
REMOVAL.............................68
INSTALLATION.........................68
B-PILLAR TRIM
REMOVAL.............................68
INSTALLATION.........................69
BULKHEAD TRIM PANEL
REMOVAL.............................69
INSTALLATION.........................69
CARPETS AND FLOOR MATS
REMOVAL.............................69
INSTALLATION.........................70
COWL TRIM
REMOVAL.............................70
INSTALLATION.........................70
D-PILLAR TRIM
REMOVAL.............................70INSTALLATION.........................70
HEADLINER
REMOVAL.............................70
INSTALLATION.........................71
QUARTER TRIM PANEL
REMOVAL.............................71
INSTALLATION.........................72
REAR VIEW MIRROR
REMOVAL.............................72
INSTALLATION
INSTALLATION.......................72
INSTALLATION - REAR VIEW MIRROR
SUPPORT BRACKET...................72
STEPWELL SCUFF PADS
REMOVAL.............................72
INSTALLATION.........................73
SUN VISOR
REMOVAL.............................73
INSTALLATION.........................73
INTERIOR
CAUTION
CAUTION:: Do not attempt to remove interior trim
panels/moldings without first removing the neces-
sary adjacent panels. To avoid damaging the pan-
els, ensure that all the screws and clips are
removed before attempting to remove an interior
trim panel/molding. Trim panels are somewhat flex-
ible but can be damaged if handled improperly.
A-PILLAR TRIM
REMOVAL
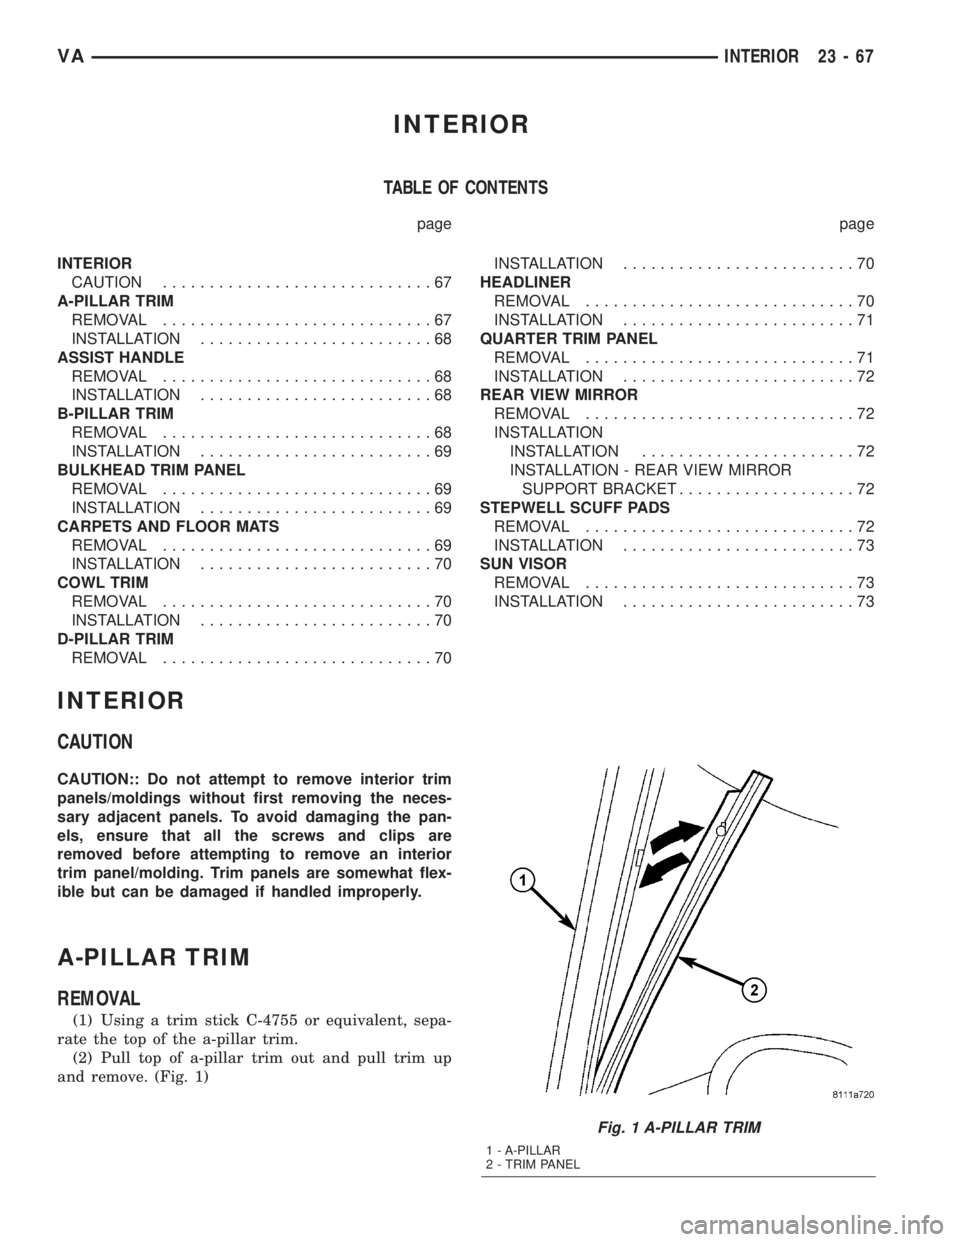
(1) Using a trim stick C-4755 or equivalent, sepa-
rate the top of the a-pillar trim.
(2) Pull top of a-pillar trim out and pull trim up
and remove. (Fig. 1)
Fig. 1 A-PILLAR TRIM
1 - A-PILLAR
2 - TRIM PANEL
VAINTERIOR 23 - 67
Page 1110 of 1232
Cargo Van
(1) Remove bolts and remove tie down rings, if
equipped.
(2) Remove rivets and remove paneling
INSTALLATION
Passenger Van
(1) Position trim panels and seat push-pin fasten-
ers fully.
(2) Install d-pillar trim, if necessary. (Refer to 23 -
BODY/INTERIOR/D-PILLAR TRIM - INSTALLA-
TION)
(3) Install seats, if necessary. (Refer to 23 - BODY/
SEATS/SEAT - INSTALLATION)
Cargo Van
(1) Install paneling and replace rivets.
(2) Install tie down rings and bolts, if equipped.
REAR VIEW MIRROR
REMOVAL
(1) Slide mirror off support bracket.
INSTALLATION
INSTALLATION
(1) Install the support bracket if necessary. (Refer
to 23 - BODY/INTERIOR/REAR VIEW MIRROR -
INSTALLATION - SUPPORT BRACKET)
(2) Slide mirror onto support bracket fully.
INSTALLATION - REAR VIEW MIRROR
SUPPORT BRACKET
(1) Mark the position for the mirror bracket on the
outside of the windshield glass with a wax pencil.
(2) Clean the bracket contact area on the glass.
Use a mild powdered cleanser on a cloth saturated
with isopropyl (rubbing) alcohol. Finally, clean the
glass with a paper towel dampened with alcohol.
(3) Sand the surface on the support bracket with
fine grit-sandpaper. Wipe the bracket surface clean
with a paper towel.
(4) Apply accelerator to the surface on the bracket
according to the following instructions:
(a) Crush the vial to saturate the felt applicator.
(b) Remove the paper sleeve.
(c) Apply accelerator to the contact surface on
the bracket.
(d) Allow the accelerator to dry for five minutes.
(e) Do not touch the bracket contact surface
after the accelerator has been applied.(5) Apply adhesive accelerator to the bracket con-
tact surface on the windshield glass. Allow the accel-
erator to dry for one minute. Do not touch the glass
contact surface after the accelerator has been
applied.
(6) Install the bracket according to the following
instructions:
(a) Apply one drop of adhesive at the center of
the bracket contact-surface on the windshield
glass.
(b) Apply an even coat of adhesive to the contact
surface on the bracket.
(c) Align the bracket with the marked position
on the windshield glass.
(d) Press and hold the bracket in place for at
least one minute.
NOTE: Verify that the mirror support bracket is cor-
rectly aligned, because the adhesive will cure rap-
idly.
(7) Allow the adhesive to cure for 8-10 minutes.
Remove any excess adhesive with an alcohol-damp-
ened cloth.
(8) Allow the adhesive to cure for an additional
8-10 minutes before installing the mirror.
STEPWELL SCUFF PADS
REMOVAL
(1) Remove screws and remove seat bracket if nec-
essary.
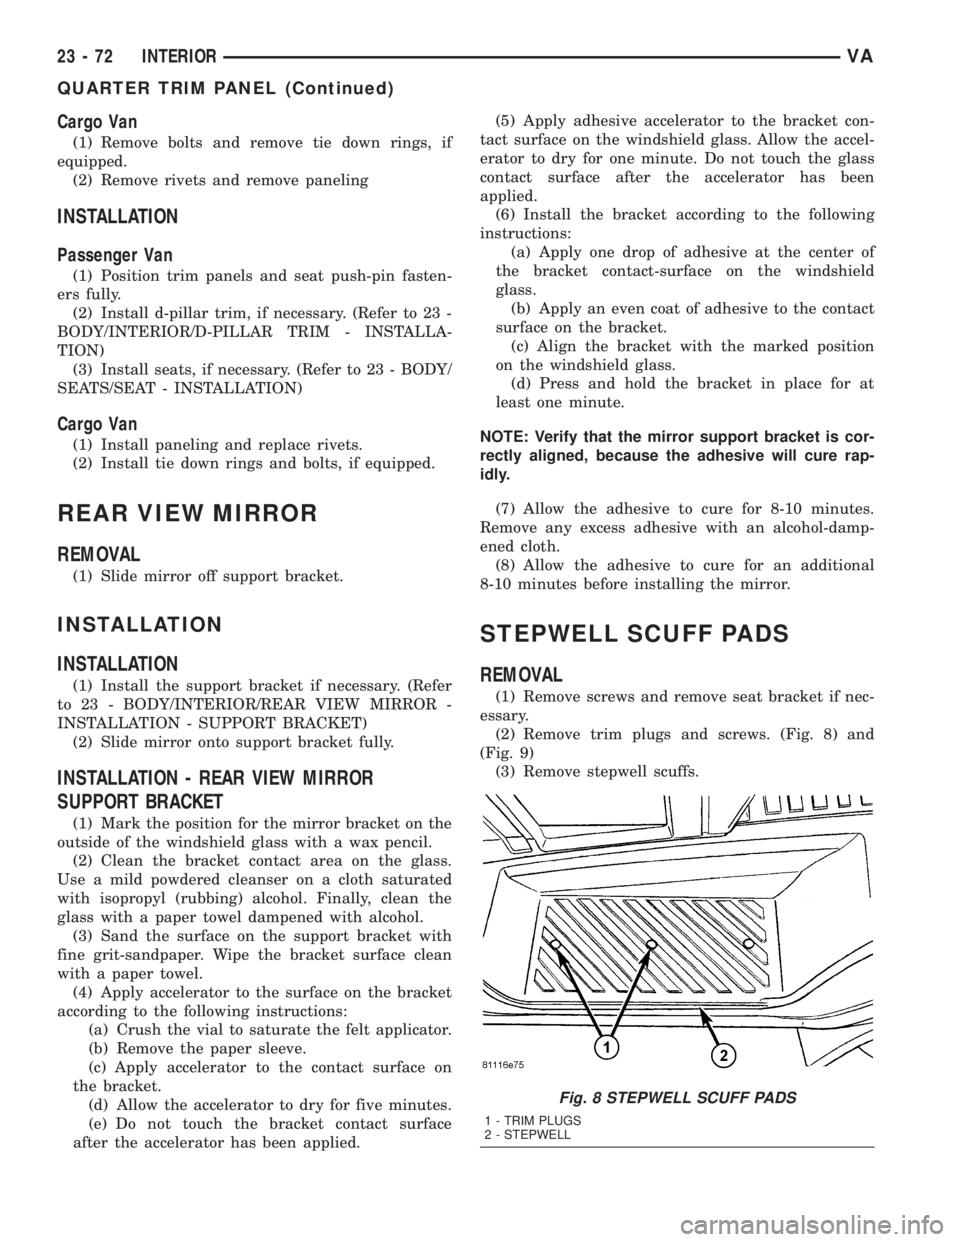
(2) Remove trim plugs and screws. (Fig. 8) and
(Fig. 9)
(3) Remove stepwell scuffs.
Fig. 8 STEPWELL SCUFF PADS
1 - TRIM PLUGS
2 - STEPWELL
23 - 72 INTERIORVA
QUARTER TRIM PANEL (Continued)
Page 1120 of 1232
NOTE: Use mineral spirits as a lubricant to aid seal
installation in the window opening.
(3) Position the glass and seal in the window open-
ing.
(4) Pull the installation cord outward and force the
seal lip over the panel flange around the edge of the
opening.
(5) Seat the seal inner lip on the panel flange.
Press against the lip around the edge of the seal.
NOTE: Remove any mineral spirits with a clean
cloth after glass installation.
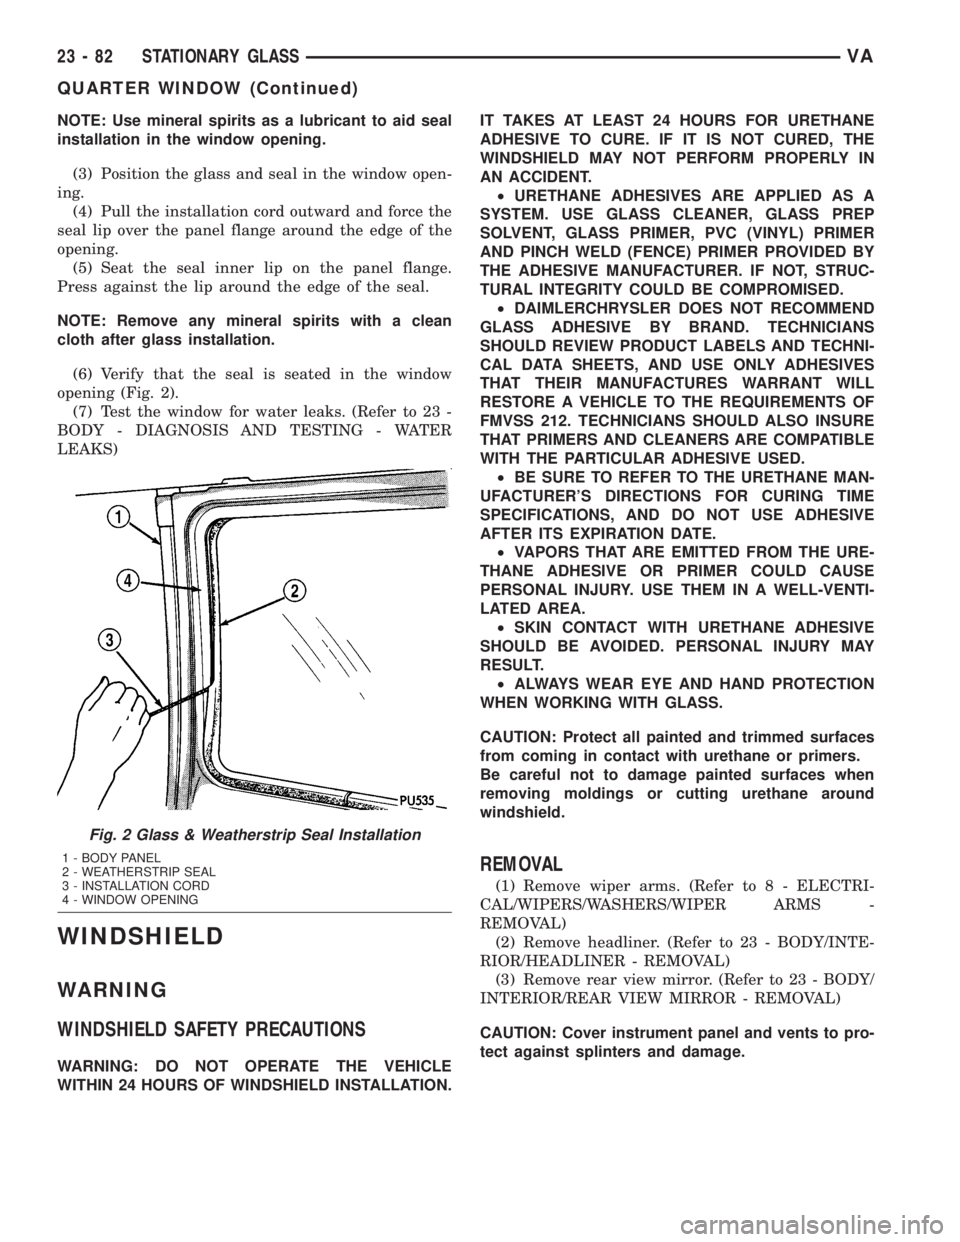
(6) Verify that the seal is seated in the window
opening (Fig. 2).
(7) Test the window for water leaks. (Refer to 23 -
BODY - DIAGNOSIS AND TESTING - WATER
LEAKS)
WINDSHIELD
WARNING
WINDSHIELD SAFETY PRECAUTIONS
WARNING: DO NOT OPERATE THE VEHICLE
WITHIN 24 HOURS OF WINDSHIELD INSTALLATION.IT TAKES AT LEAST 24 HOURS FOR URETHANE
ADHESIVE TO CURE. IF IT IS NOT CURED, THE
WINDSHIELD MAY NOT PERFORM PROPERLY IN
AN ACCIDENT.
²URETHANE ADHESIVES ARE APPLIED AS A
SYSTEM. USE GLASS CLEANER, GLASS PREP
SOLVENT, GLASS PRIMER, PVC (VINYL) PRIMER
AND PINCH WELD (FENCE) PRIMER PROVIDED BY
THE ADHESIVE MANUFACTURER. IF NOT, STRUC-
TURAL INTEGRITY COULD BE COMPROMISED.
²DAIMLERCHRYSLER DOES NOT RECOMMEND
GLASS ADHESIVE BY BRAND. TECHNICIANS
SHOULD REVIEW PRODUCT LABELS AND TECHNI-
CAL DATA SHEETS, AND USE ONLY ADHESIVES
THAT THEIR MANUFACTURES WARRANT WILL
RESTORE A VEHICLE TO THE REQUIREMENTS OF
FMVSS 212. TECHNICIANS SHOULD ALSO INSURE
THAT PRIMERS AND CLEANERS ARE COMPATIBLE
WITH THE PARTICULAR ADHESIVE USED.
²BE SURE TO REFER TO THE URETHANE MAN-
UFACTURER'S DIRECTIONS FOR CURING TIME
SPECIFICATIONS, AND DO NOT USE ADHESIVE
AFTER ITS EXPIRATION DATE.
²VAPORS THAT ARE EMITTED FROM THE URE-
THANE ADHESIVE OR PRIMER COULD CAUSE
PERSONAL INJURY. USE THEM IN A WELL-VENTI-
LATED AREA.
²SKIN CONTACT WITH URETHANE ADHESIVE
SHOULD BE AVOIDED. PERSONAL INJURY MAY
RESULT.
²ALWAYS WEAR EYE AND HAND PROTECTION
WHEN WORKING WITH GLASS.
CAUTION: Protect all painted and trimmed surfaces
from coming in contact with urethane or primers.
Be careful not to damage painted surfaces when
removing moldings or cutting urethane around
windshield.
REMOVAL
(1) Remove wiper arms. (Refer to 8 - ELECTRI-
CAL/WIPERS/WASHERS/WIPER ARMS -
REMOVAL)
(2) Remove headliner. (Refer to 23 - BODY/INTE-
RIOR/HEADLINER - REMOVAL)
(3) Remove rear view mirror. (Refer to 23 - BODY/
INTERIOR/REAR VIEW MIRROR - REMOVAL)
CAUTION: Cover instrument panel and vents to pro-
tect against splinters and damage.
Fig. 2 Glass & Weatherstrip Seal Installation
1 - BODY PANEL
2 - WEATHERSTRIP SEAL
3 - INSTALLATION CORD
4 - WINDOW OPENING
23 - 82 STATIONARY GLASSVA
QUARTER WINDOW (Continued)
Page 1124 of 1232
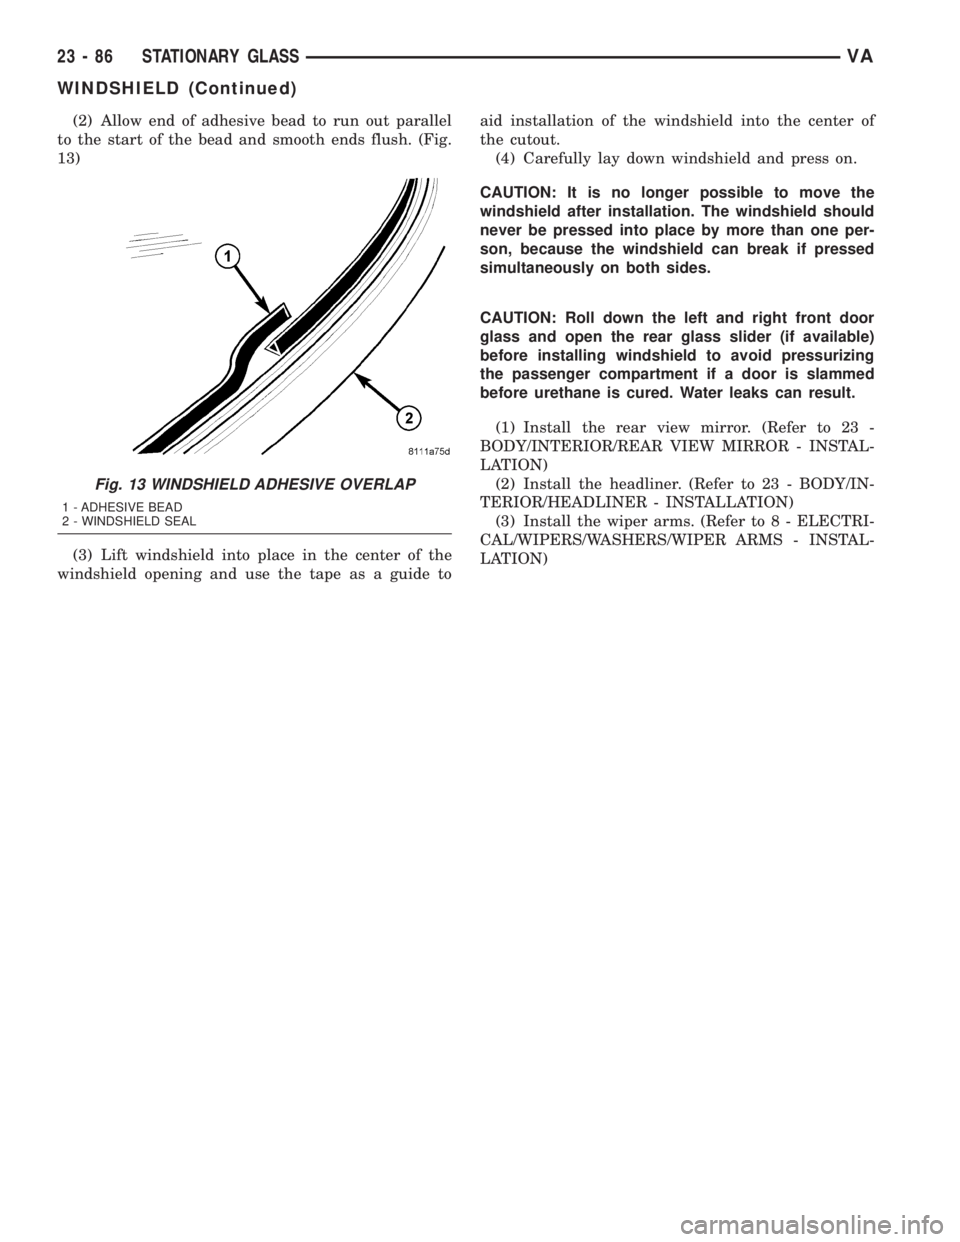
(2) Allow end of adhesive bead to run out parallel
to the start of the bead and smooth ends flush. (Fig.
13)
(3) Lift windshield into place in the center of the
windshield opening and use the tape as a guide toaid installation of the windshield into the center of
the cutout.
(4) Carefully lay down windshield and press on.
CAUTION: It is no longer possible to move the
windshield after installation. The windshield should
never be pressed into place by more than one per-
son, because the windshield can break if pressed
simultaneously on both sides.
CAUTION: Roll down the left and right front door
glass and open the rear glass slider (if available)
before installing windshield to avoid pressurizing
the passenger compartment if a door is slammed
before urethane is cured. Water leaks can result.
(1) Install the rear view mirror. (Refer to 23 -
BODY/INTERIOR/REAR VIEW MIRROR - INSTAL-
LATION)
(2) Install the headliner. (Refer to 23 - BODY/IN-
TERIOR/HEADLINER - INSTALLATION)
(3) Install the wiper arms. (Refer to 8 - ELECTRI-
CAL/WIPERS/WASHERS/WIPER ARMS - INSTAL-
LATION)
Fig. 13 WINDSHIELD ADHESIVE OVERLAP
1 - ADHESIVE BEAD
2 - WINDSHIELD SEAL
23 - 86 STATIONARY GLASSVA
WINDSHIELD (Continued)
Page 1212 of 1232
BACKLITE - BULKHEAD TRIM PANEL -
INSTALLATION.......................23-81
BACKLITE - BULKHEAD TRIM PANEL -
REMOVAL..........................23-81
BACKUP LAMP BULB - INSTALLATION.....8L-6
BACKUP LAMP BULB - REMOVAL........8L-5
BALANCE - STANDARD PROCEDURE,
TIRE AND WHEEL.....................22-3
BALL JOINT - INSTALLATION, LOWER......2-6
BALL JOINT - REMOVAL, LOWER..........2-6
BAR - DESCRIPTION, STABILIZER.........2-9
BAR - INSTALLATION, STABILIZER.....2-15,2-9
BAR - OPERATION, STABILIZER...........2-9
BAR - REMOVAL, STABILIZER........2-15,2-9
BASE BRAKE, SPECIFICATIONS............5-6
BASE BRAKE SYSTEM - DIAGNOSIS AND
TESTING.............................5-2
BASECOAT/CLEARCOAT FINISH -
DESCRIPTION.......................23-74
BATTERY - DESCRIPTION...............8F-6
BATTERY - DIAGNOSIS AND TESTING.....8F-7
BATTERY - OPERATION.................8F-7
BATTERY CABLES - DESCRIPTION.......8F-14
BATTERY CABLES - DIAGNOSIS AND
TESTING...........................8F-14
BATTERY CABLES - INSTALLATION.......8F-16
BATTERY CABLES - OPERATION.........8F-14
BATTERY CABLES - REMOVAL..........8F-16
BATTERY CHARGING - STANDARD
PROCEDURE.........................8F-8
BATTERY ELECTROLYTE LEVEL -
STANDARD PROCEDURE, CHECKING.....8F-12
BATTERY HOLDDOWN - DESCRIPTION....8F-14
BATTERY HOLDDOWN - INSTALLATION . . . 8F-14
BATTERY HOLDDOWN - REMOVAL.......8F-14
BATTERY INSTALLATION, INSTALLATION
- AUXILIARY........................8F-13
BATTERY INSTALLATION, INSTALLATION
- UNDER HOOD......................8F-13
BATTERY REMOVAL, REMOVAL -
AUXILIARY..........................8F-13
BATTERY REMOVAL, REMOVAL - UNDER
HOOD..............................8F-12
BATTERY SYSTEM - CLEANING...........8F-5
BATTERY SYSTEM - DESCRIPTION........8F-1
BATTERY SYSTEM - DIAGNOSIS AND
TESTING............................8F-2
BATTERY SYSTEM - INSPECTION.........8F-6
BATTERY SYSTEM - OPERATION.........8F-2
BATTERY SYSTEM SPECIAL TOOLS,
SPECIAL TOOLS......................8F-6
BATTERY TESTER - STANDARD
PROCEDURE, USING MICRO 420........8F-11
BATTERY TRAY - DESCRIPTION.........8F-16
BATTERY TRAY - INSTALLATION.........8F-16
BATTERY TRAY - OPERATION...........8F-16
BATTERY TRAY - REMOVAL............8F-16
BEAM HEADLAMP BULB -
INSTALLATION, HIGH.................8L-17
BEAM HEADLAMP BULB -
INSTALLATION, LOW..................8L-19
BEAM HEADLAMP BULB - REMOVAL,
HIGH..............................8L-17
BEAM HEADLAMP BULB - REMOVAL,
LOW ..............................8L-18
BEAM INDICATOR - DESCRIPTION, HIGH . . 8J-17
BEAM INDICATOR - OPERATION, HIGH....8J-17
BEARING - INSTALLATION, CENTER........3-9
BEARING - INSTALLATION, HUB...........2-5
BEARING - INSTALLATION, OUTPUT
SHAFT............................21-122
BEARING - REMOVAL, CENTER...........3-8
BEARING - REMOVAL, HUB..............2-4
BEARING - REMOVAL, OUTPUT SHAFT . . . 21-122
BEARINGS/SEALS - INSTALLATION, AXLE . . 3-17
BEARINGS/SEALS - INSTALLATION, AXLE
HUB................................3-20
BEARINGS/SEALS - REMOVAL, AXLE......3-17
BEARINGS/SEALS - REMOVAL, AXLE
HUB
................................3-20
BELT - DIAGNOSIS AND TESTING,
ACCESSORY DRIVE
.....................7-5
BELT & RETRACTOR - INSTALLATION,
FRONT SEAT
........................8O-21
BELT & RETRACTOR - INSTALLATION,
REAR SEAT
.........................8O-29
BELT & RETRACTOR - REMOVAL, FRONT
SEAT
..............................8O-19BELT & RETRACTOR - REMOVAL, REAR
SEAT ..............................8O-27
BELT BUCKLE - INSTALLATION, FRONT
SEAT ..............................8O-23
BELT BUCKLE - REMOVAL, FRONT SEAT . . 8O-22
BELT SWITCH - DESCRIPTION, SEAT.....8O-31
BELT SWITCH - OPERATION, SEAT.......8O-31
BELT TENSIONER - DESCRIPTION, SEAT . . 8O-31
BELT TENSIONER - OPERATION, SEAT....8O-32
BELT TENSIONERS - DESCRIPTION........7-5
BELT TENSIONERS - OPERATION..........7-5
BELT TURNING LOOP ADJUSTER -
INSTALLATION, SEAT.................8O-34
BELT TURNING LOOP ADJUSTER -
REMOVAL, SEAT.....................8O-33
BELT WEATHERSTRIP - INSTALLATION,
FRONT DOOR INNER..................23-87
BELT WEATHERSTRIP - INSTALLATION,
FRONT DOOR OUTER.................23-87
BELT WEATHERSTRIP - REMOVAL,
FRONT DOOR INNER..................23-87
BELT WEATHERSTRIP - REMOVAL,
FRONT DOOR OUTER.................23-87
BELTS - INSTALLATION, DRIVE............7-8
BELTS - REMOVAL, DRIVE...............7-8
BEZEL - INSTALLATION, ACCESSORY
SWITCH............................23-54
BEZEL - INSTALLATION, CLUSTER.......23-54
BEZEL - INSTALLATION, INSTRUMENT
PANEL CENTER......................23-55
BEZEL - REMOVAL, ACCESSORY SWITCH . 23-54
BEZEL - REMOVAL, CLUSTER...........23-53
BEZEL - REMOVAL, INSTRUMENT PANEL
CENTER............................23-55
BLADE - DESCRIPTION, WIPER.........8R-15
BLADE - INSTALLATION, WIPER.........8R-16
BLADE - OPERATION, WIPER...........8R-15
BLADE - REMOVAL, WIPER............8R-16
BLEED PROCEDURE, STANDARD
PROCEDURE - POWER STEERING
PUMP FILL.........................19-14
BLEEDING - STANDARD PROCEDURE,
MANUAL.............................5-4
BLEEDING - STANDARD PROCEDURE,
MASTER CYLINDER...................5-17
BLEEDING - STANDARD PROCEDURE,
PRESSURE...........................5-5
BLOCK - DESCRIPTION, BLOWER
MOTOR RESISTOR...................24-16
BLOCK - DIAGNOSIS AND TESTING,
BLOWER MOTOR RESISTOR............24-16
BLOCK - INSTALLATION, BLOWER
MOTOR RESISTOR...................24-17
BLOCK - OPERATION, BLOWER MOTOR
RESISTOR..........................24-16
BLOCK - REMOVAL, BLOWER MOTOR
RESISTOR..........................24-16
BLOCK #1 - DESCRIPTION, FUSE......8W-97-2
BLOCK #1 - INSTALLATION, FUSE.....8W-97-3
BLOCK #1 - OPERATION, FUSE.......8W-97-2
BLOCK #1 - REMOVAL, FUSE.........8W-97-3
BLOCK #2 - DESCRIPTION, FUSE......8W-97-3
BLOCK #2 - OPERATION, FUSE.......8W-97-3
BLOCK HEATER - INSTALLATION,
ENGINE.............................7-14
BLOCK HEATER - REMOVAL, ENGINE......7-14
BLOCK JOURNALS - STANDARD
PROCEDURE, MEASURE CRANKSHAFT
....9-35
BLOWER MOTOR - INSTALLATION
. . 24-33,24-40
BLOWER MOTOR - REMOVAL
......24-32,24-39
BLOWER MOTOR RELAY - DESCRIPTION
. . 24-23
BLOWER MOTOR RELAY - DIAGNOSIS
AND TESTING
.......................24-24
BLOWER MOTOR RELAY -
INSTALLATION
.......................24-24
BLOWER MOTOR RELAY - OPERATION
. . . 24-23
BLOWER MOTOR RELAY - REMOVAL
.....24-24
BLOWER MOTOR RESISTOR BLOCK -
DESCRIPTION
.......................24-16
BLOWER MOTOR RESISTOR BLOCK -
DIAGNOSIS AND TESTING
.............24-16
BLOWER MOTOR RESISTOR BLOCK -
INSTALLATION
.......................24-17
BLOWER MOTOR RESISTOR BLOCK -
OPERATION
.........................24-16
BLOWER MOTOR RESISTOR BLOCK -
REMOVAL
..........................24-16BLOWER MOTOR SWITCH -
DESCRIPTION..................24-17,24-22
BLOWER MOTOR SWITCH - DIAGNOSIS
AND TESTING..................24-17,24-23
BLOWER MOTOR SWITCH -
INSTALLATION.......................24-23
BLOWER MOTOR SWITCH - OPERATION . . 24-17,
24-22
BLOWER MOTOR SWITCH - REMOVAL . . . 24-17,
24-23
BODY & CABLE - INSTALLATION,
ANTENNA...........................8A-1
BODY & CABLE - REMOVAL, ANTENNA....8A-1
BODY PANEL REPAIR - STANDARD
PROCEDURE, PLASTIC.................23-3
BOLT INSPECTION - STANDARD
PROCEDURE, CYLINDER HEAD...........9-21
BOOST PRESSURE SENSOR -
DESCRIPTION.......................14-17
BOOST PRESSURE SENSOR -
DIAGNOSIS AND TESTING.............14-18
BOOST PRESSURE SENSOR -
INSTALLATION.......................14-18
BOOST PRESSURE SENSOR -
OPERATION.........................14-18
BOOST PRESSURE SENSOR - REMOVAL . . 14-18
BOOSTER - DESCRIPTION, POWER
BRAKE..............................5-19
BOOSTER - DIAGNOSIS AND TESTING,
MASTER CYLINDER/POWER.............5-16
BOOSTER - INSTALLATION, POWER
BRAKE..............................5-19
BOOSTER - OPERATION, POWER BRAKE....5-19
BOOSTER - REMOVAL, POWER BRAKE....5-19
BORES - STANDARD PROCEDURE,
MEASURING CYLINDER................9-34
BOX - INSTALLATION, GLOVE...........23-56
BOX - REMOVAL, GLOVE..............23-56
B-PILLAR TRIM - INSTALLATION........23-69
B-PILLAR TRIM - REMOVAL............23-68
BRACKET - INSTALLATION, LICENSE
PLATE .............................23-47
BRACKET - INSTALLATION, PASSENGER
AIRBAG............................8O-27
BRACKET - INSTALLATION, REAR VIEW
MIRROR SUPPORT...................23-72
BRACKET - REMOVAL, LICENSE PLATE . . . 23-47
BRACKET - REMOVAL, PASSENGER
AIRBAG............................8O-27
BRAKE - CLEANING, REAR DRUM IN
HAT ................................5-27
BRAKE - DESCRIPTION, CONTROLLER
ANTILOCK...........................8E-3
BRAKE - INSTALLATION, CONTROLLER
ANTILOCK...........................8E-3
BRAKE - REMOVAL, CONTROLLER
ANTILOCK...........................8E-3
BRAKE BOOSTER - DESCRIPTION,
POWER.............................5-19
BRAKE BOOSTER - INSTALLATION,
POWER.............................5-19
BRAKE BOOSTER - OPERATION, POWER . . . 5-19
BRAKE BOOSTER - REMOVAL, POWER....5-19
BRAKE CABLES - ADJUSTMENT,
PARKING............................5-25
BRAKE FLUID - DESCRIPTION............0-3
BRAKE FLUID CONTAMINATION -
DIAGNOSIS AND TESTING..............5-14
BRAKE FLUID LEVEL - STANDARD
PROCEDURE.........................5-14
BRAKE FLUID, SPECIFICATIONS..........5-14
BRAKE INDICATOR - DESCRIPTION,
BRAKE/PARK........................8J-11
BRAKE INDICATOR - OPERATION,
BRAKE/PARK........................8J-12
BRAKE LAMP SWITCH - INSTALLATION....8L-6
BRAKE LAMP SWITCH - REMOVAL.......8L-6
BRAKE, SPECIAL TOOLS - PARK.........5-23
BRAKE, SPECIFICATIONS - BASE..........5-6
BRAKE SWITCH - INSTALLATION, PARK . . . 8L-20
BRAKE SWITCH - REMOVAL, PARK
......8L-20
BRAKE SYSTEM - DIAGNOSIS AND
TESTING, BASE
........................5-2
BRAKE WEAR INDICATOR -
DESCRIPTION
.......................8J-12
BRAKE WEAR INDICATOR - OPERATION
. . . 8J-12
BRAKE/PARK BRAKE INDICATOR -
DESCRIPTION
.......................8J-11
2 INDEXVA
Description Group-Page Description Group-Page Description Group-Page