Page 175 of 417
174 Controls in detailAutomatic transmissionStopping
When you stop briefly, e.g. at traffic lights:�
Leave the transmission in gear.
�
Hold the vehicle with the brake.
When you stop longer with the engine
idling or on an uphill gradient:
�
Move the gear selector lever to
positionP.
�
Set the parking brake.Maneuvering
When you maneuver in tight areas,
e.g. when pulling into a parking space:
�
Control the vehicle speed by gradually
releasing the brakes.
�
Accelerate gently.
�
Never abruptly step on the accelerator.
Working on the vehicle
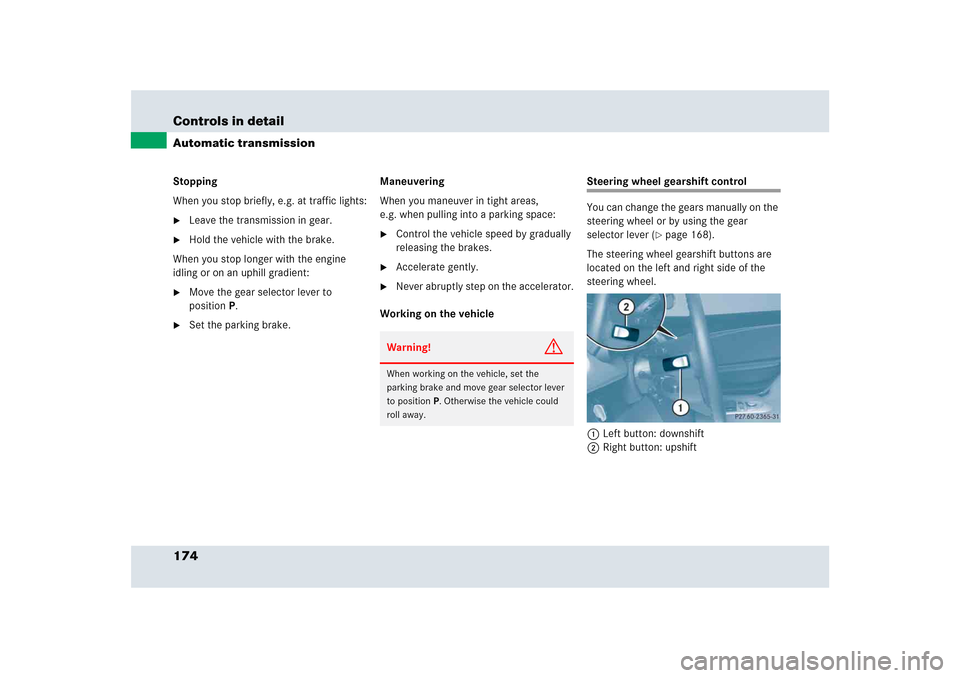
Steering wheel gearshift control
You can change the gears manually on the
steering wheel or by using the gear
selector lever (
�page 168).
The steering wheel gearshift buttons are
located on the left and right side of the
steering wheel.
1Left button: downshift
2Right button: upshift
Warning!
G
When working on the vehicle, set the
parking brake and move gear selector lever
to positionP. Otherwise the vehicle could
roll away.
Page 176 of 417

175 Controls in detail
Automatic transmission
Downshifting
�
Press button1 on the left side of the
steering wheel.
The transmission shifts to the next low-
er gear.
The current gear selector position ap-
pears in the right multifunction display
(�page 117).
The gear range (
�page 170) is limited
when you are not driving in the manual
gearshift program modeM (
�page 175).
Upshifting
�
Press button2 on the right side of the
steering wheel.
The transmission shifts to the next
higher gear.
The current gear selector position ap-
pears in the right multifunction display
(�page 117).
The gear range (
�page 170) is extended
when you are not driving in the manual
gearshift program modeM (
�page 175).
Manual gearshift program
In the manual gearshift programM you can
change the gears manually on the steering
wheel (
�page 174) or by using the gear
selector lever (
�page 168).
Activating manual gearshift program
�
Turn program mode selector switch1
(�page 173) to the MAN setting.
The transmission switches to the
manual program modeM. The letter
M
appears in the right multifunction dis-
play and the lamp in program mode se-
lector switch3 (
�page 176) comes
on. Automatic shifting is switched off.
The gear range is not limited.
iYou can change gears using the steer-
ing wheel gearshift buttons indepen-
dent of the currently selected gearshift
program (C/MAN/S).
You cannot shift with the steering
wheel gearshift buttons when the gear
selector lever is in positionP,N orR.Warning!
G
On slippery road surfaces, never downshift
in order to obtain braking action. This could
result in drive wheel slip and reduced
vehicle control. Your vehicle’s ABS will not
prevent this type of loss of control.
Page 177 of 417

176 Controls in detailAutomatic transmissionSelecting manual gearshift program
3Program selector switch for the manual
gearshift program
I Sport For sporty driving
II Super Sport For very sporty driving
III Race For racing-like driving
1
The individual shifting programs differ with
regard to spontaneity, response time, and
shifting smoothness.
�
Turn program selector switch3 to the
desired setting (I, II or III).
Downshifting
�
Press the button1 (
�page 174) on
the left side of the steering wheel.
or
�
Briefly press the gear selector lever to
the left in theD-direction.
The transmission shifts to the next low-
er gear.
The current gear selector position ap-
pears in the right multifunction display
(�page 117).
1Please always drive carefully and obey applicable
speed limits.
iThe currently selected manual gear-
shift program (I, II or III) does not ap-
pear in the right multifunction display.
The current setting is indicated only on
the program mode selector switch 3.Warning!
G
On slippery road surfaces, never downshift
in order to obtain braking action. This could
result in drive wheel slip and reduced
vehicle control. Your vehicle’s ABS will not
prevent this type of loss of control.
iWhen you brake or stop, the transmis-
sion shifts down to a gear from which
you can easily accelerate or take off.
Page 180 of 417
.
Auto-dimming mirror
The reflection brightness of the int")
179 Controls in detail
Good visibility
Rear view mirrors
For more information on setting the rear
view mirrors, see “Mirrors” (
�page 43).
Auto-dimming mirror
The reflection brightness of the interior
rear view mirror will respond automatically
to glare when
�
the ignition is switched on
and
�
incoming light from headlamps falls on
the sensor in the interior rear view
mirror.
The rear view mirror will not react if
�
reverse gearR is engaged
�
the interior lighting is turned on
Warning!
G
The auto-dimming function does not react if
incoming light is not aimed directly at sen-
sors in the interior rear view mirror.
Glare can endanger you and others.Warning!
G
In the case of an accident liquid electrolyte
may escape from the mirror housing if the
mirror glass breaks.
Electrolyte has an irritating effect. Do not
allow the liquid to come into contact with
eyes, skin, clothing, or respiratory system.
In case it does, immediately flush affected
area with water, and seek medical help if
necessary.
!Electrolyte drops coming into contact
with the vehicle paint finish can be
completely removed only while in the
liquid state and by applying plenty of
water.Warning!
G
Exercise care when using the passen-
ger-side exterior rear view mirror. The mirror
surface is convex (outwardly curved surface
for a wider field of view). Objects in mirror
are closer than they appear. Check your
interior rear view mirror or glance over your
shoulder before changing lanes.
Page 181 of 417
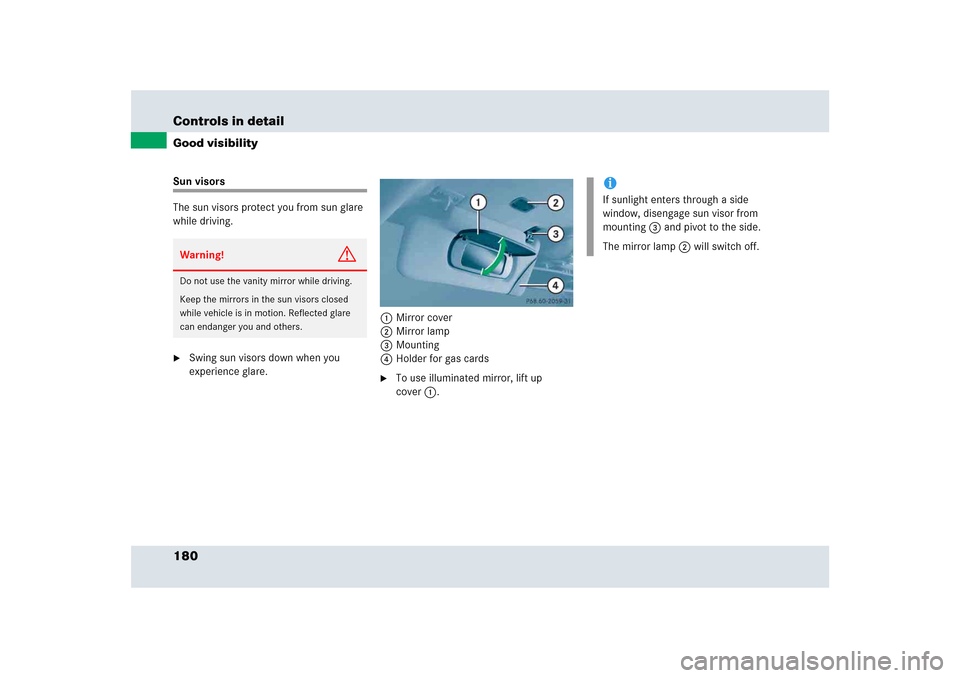
180 Controls in detailGood visibilitySun visors
The sun visors protect you from sun glare
while driving. �
Swing sun visors down when you
experience glare.1Mirror cover
2Mirror lamp
3Mounting
4Holder for gas cards
�
To use illuminated mirror, lift up
cover1.
Warning!
G
Do not use the vanity mirror while driving.
Keep the mirrors in the sun visors closed
while vehicle is in motion. Reflected glare
can endanger you and others.
iIf sunlight enters through a side
window, disengage sun visor from
mounting3 and pivot to the side.
The mirror lamp2 will switch off.
Page 182 of 417

181 Controls in detail
Good visibility
Rear window defroster
The rear window defroster uses a large
amount of power. To keep the battery
drain to a minimum, switch off the
defroster as soon as the rear window is
clear. The defroster is automatically
deactivated after approximately
6 to 17 minutes of operation depending on
the outside temperature.Activating
�
Press buttonF in the climate
control panel (
�page 184).
The indicator lamp on the button
comes on.Deactivating
�
Press buttonF again.
The indicator lamp on the button goes
out.
Warning!
G
Any accumulation of snow and ice should be
removed from the rear window before
driving. Visibility could otherwise be
impaired, endangering you and others.
!If the rear window defroster switches
off too soon and the indicator lamp
starts flashing, this means that too
many electrical consumers are
operating simultaneously and there is
insufficient voltage in the battery. The
system responds automatically by
deactivating the rear window defroster.
As soon as the battery has sufficient
voltage, the rear window defroster
automatically turns itself back on.
Page 186 of 417

185 Controls in detail
Automatic climate control
The automatic climate control is operation-
al whenever the engine is running. You can
operate the climate control system in ei-
ther the automatic or manual mode. The
system cools or heats the interior depend-
ing on the selected interior temperature
and the current outside temperature.Nearly all dust particles, pollutants and
odors are filtered out before outside air en-
ters the passenger compartment through
the air distribution system.
Adjusting the temperature
Use temperature controls6 andb to
separately adjust the air temperature on
each side of the passenger compartment.
You should raise or lower the temperature
setting in small increments, preferably
starting at 72°F (22°C).
Increasing�
Turn the outer adjustment ring slightly
to the right.
The automatic climate control system
will correspondingly adjust the interior
air temperature.
Warning!
G
When operating the automatic climate con-
trol, the air that enters the passenger com-
partment through the air vents in the
footwell can be very hot or very cold (de-
pending on the set temperature). This may
cause burns or frostbite on unprotected skin
in the immediate area of the air vents. Al-
ways keep sufficient distance between un-
protected parts of the body and the footwell
air vents. If necessary change the air flow
using the air distribution controls to direct
the air away from the footwell air vents
(�page 187).
Warning!
G
Follow the recommended settings for heat-
ing and cooling given on the following pag-
es. Otherwise the windows could fog up,
impairing visibility and endangering you and
others.iIf the vehicle interior is hot, ventilate
the interior before driving off.
Keep the air intake grille in front of the
windshield free of snow and debris.
iWhen operating the climate control
system in automatic mode, you will
only rarely need to adjust the tempera-
ture, air volume and air distribution.
Page 189 of 417
.
The indicator lamp on the button
comes on.
Deactivating
�
Press button P (
�page 184")
188 Controls in detailAutomatic climate controlDefrosting the windshield
Activating�
Press button P (
�page 184).
The indicator lamp on the button
comes on.
Deactivating
�
Press button P (
�page 184).
The indicator lamp on the button goes
out. Defrosting is turned off.
Air recirculation mode
Switch to air recirculation mode to prevent
unpleasant odors from entering the vehicle
from the outside. This setting cuts off the
intake of outside air and recirculates the
air in the passenger compartment.Activating
�
Press button , (
�page 184).
The indicator lamp on the button
comes on.
iThese settings should only be selected
for a short time.
Warning!
G
When the outside temperature is below
41°F (5°C), only switch to air recirculation
mode for short periods to prevent window
fogging.
Warning!
G
Never operate the windows if there is the
possibility of anyone being harmed by the
closing procedure.
In the event that the procedure causes po-
tential danger, the closing of the windows
can be immediately halted by releasing the ,
button or by pressing or pulling the re-
spective window switch.