Page 109 of 417

108 Controls in detailLightingLocator lighting and night security
illumination
The locator lighting and the night security
illumination are described in the “Control
system” section, see “Setting locator light-
ing” (
�page 132) and “Setting night secu-
rity illumination” (
�page 132).
Fog lampsFront fog lamps
�
Switch on the low beam headlamps
(�page 105).
�
Pull out the exterior lamp switch to first
stop.
The front fog lamps switch on.
The green indicator lamp‡ in the
exterior lamp switch comes on.
�
Push in the exterior lamp switch.
The front fog lamps switch off.
The green indicator lamp‡ in the
exterior lamp switch goes out.
Warning!
G
In low ambient lighting or foggy conditions,
only switch from positionU toB with
the vehicle at a standstill. Switching
fromU toB will briefly switch off the
headlamps. Doing so while driving in low
ambient lighting conditions may result in an
accident.
iFog lamps will operate with the parking
lamps and/or the low beam headlamps
on. Fog lamps should only be used in
conjunction with low beam headlamps.
Consult your State or Province Motor
Vehicle Regulations regarding permis-
sible lamp operation.iFog lamps cannot be switched on with
the exterior lamp switch in
positionU. For switching on the fog
lamps, turn the exterior lamp switch to
positionB first.
Page 111 of 417
110 Controls in detailLightingHazard warning flasher
The hazard warning flasher can be
switched on at all times, even with the
SmartKey removed from the starter
switch.
The hazard warning flasher switches on
automatically when an airbag deploys.
The hazard warning flasher switch is
located on the upper part of the center
console.
1Hazard warning flasher switchSwitching on hazard warning flasher
�
Press hazard warning flasher
switch1.
All turn signals are flashing.Switching off hazard warning flasher
�
Press hazard warning flasher switch1
again.
iWith the hazard warning flasher
activated and the combination switch
set for either left or right turn, only the
respective turn signals will operate
when the ignition is switched on.
iIf the hazard warning flasher has been
activated automatically, press hazard
warning flasher switch1 once to
switch it off.
Page 115 of 417
114 Controls in detailInstrument clusterCoolant temperature gaugeDuring severe operating conditions, e.g.
stop-and-go traffic, the coolant tempera-
ture may rise close to 248°F (120°C).
The engine should not be operated with
the coolant temperature above 248°F
(120°C). Doing so may cause serious en-
gine damage which is not covered by the
Mercedes-Benz Limited Warranty.Warning
G
�
Driving when your engine is badly over-
heated can cause some fluids which
may have leaked into the engine com-
partment to catch fire. You could be se-
riously burned.
�
Steam from an overheated engine can
cause serious burns an can occur just by
opening the hood. Stay away from the
engine if you see or hear steam coming
from it.
Turn off the engine, get out of the vehicle
and do not stand near the vehicle until the
engine has cooled down.
!Excessive coolant temperature triggers
the coolant temperature warning lamp
(�page 300) and a warning in the
multifunction display (
�page 320).
Page 116 of 417
.
�
If it is not d")
115 Controls in detail
Instrument cluster
Resetting the trip odometer�
Make sure you are viewing the trip
odometer and main odometer in the
right multifunction display
(�page 117).
�
If it is not displayed, press buttonè
orÿ on the multifunction steering
wheel until the trip odometer appears
in the right multifunction display.
�
Press and hold reset button 4
(�page 29) until the trip odometer is
reset.
Tachometer
The red marking on the tachometer
(�page 29) denotes excessive engine
speed.
To help protect the engine, the fuel supply
is interrupted if the engine is operated
within the red marking.
Outside temperature indicator
The outside temperature is displayed in
the right multifunction display
(�page 29). For information on how to se-
lect the unit of the displayed temperature,
i.e. degrees Celsius (°C) or degrees Fahr-
enheit (°F), see “Selecting temperature
display mode” (
�page 129).
!Avoid driving at excessive engine
speeds, as it may result in serious
engine damage that is not covered by
the Mercedes-Benz Limited Warranty.
Warning!
G
The outside temperature indicator is not de-
signed to serve as an ice-warning device and
is therefore unsuitable for that purpose.
Indicated temperatures just above the freez-
ing point do not guarantee that the road sur-
face is free of ice. The road may still be icy,
especially in wooded areas or on bridges.
Page 118 of 417

117 Controls in detail
Control system
�Control system
The control system is activated as soon as
the SmartKey in the starter switch is
turned to position1. The control system
enables you to�
call up information about your vehicle
�
change vehicle settings
For example, you can use the control sys-
tem to find out when your vehicle is next
due for service, to set the language for
messages in the instrument cluster dis-
play, and much more.
The control system relays information to
the multifunction display.
Multifunction display
The multifunction display consists of the
display fields in the speedometer and the
tachometer. In its default state, the left
display field shows the trip and main
odometer, while the present outside tem-
perature appears in the right display field.
This default setting is referred to as the
standard display.Standard display1Main odometer
2Trip odometer
3Current gear selector lever posi-
tion/gear range
4Outside temperature
5Automatic transmission shift program
mode
6Clock
Warning!
G
A driver’s attention to the road and traffic
conditions must always be his/her primary
focus when driving.
For your safety and the safety of others, se-
lecting features through the multifunction
steering wheel should only be done by the
driver when traffic and road conditions per-
mit it to be done safely.
Bear in mind that at a speed of just 30 mph
(approximately 50 km/h), your vehicle is
covering a distance of 44 feet (approximate-
ly 14 m) every second.
Page 122 of 417
121 Controls in detail
Control system
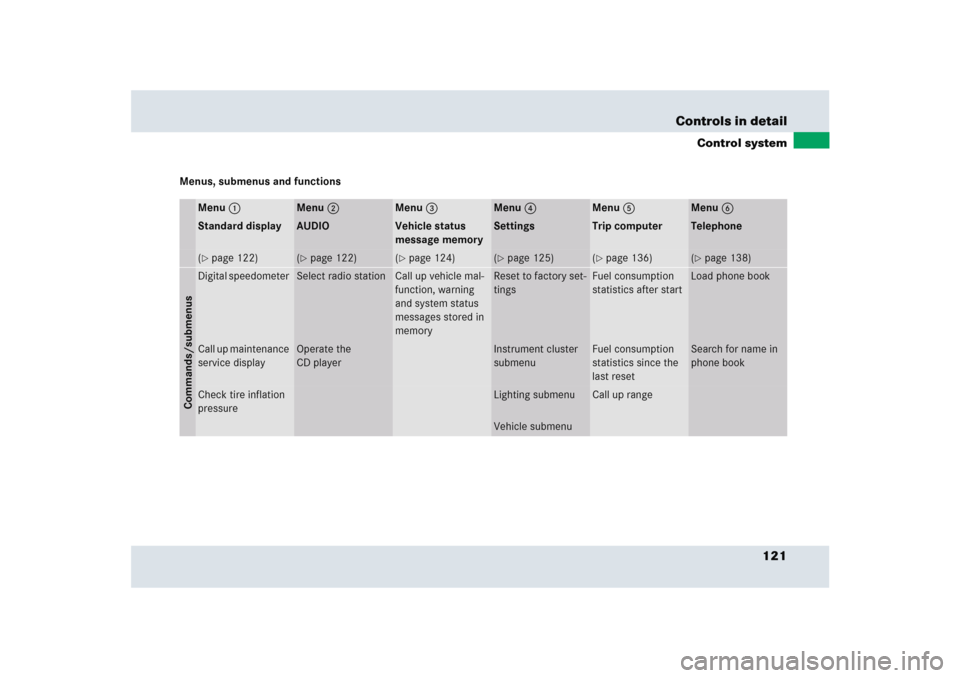
Menus, submenus and functions
Menu1
Menu2
Menu3
Menu4
Menu5
Menu6
Standard display
AUDIO
Vehicle status
message memory
Settings
Trip computer
Telephone
(�page 122)
(�page 122)
(�page 124)
(�page 125)
(�page 136)
(�page 138)
Commands/submenusDigital speedometer
Select radio station
Call up vehicle mal-
function, warning
and system status
messages stored in
memory
Reset to factory set-
tings
Fuel consumption
statistics after start
Load phone book
Call up maintenance
service display
Operate the
CD player
Instrument cluster
submenu
Fuel consumption
statistics since the
last reset
Search for name in
phone book
Check tire inflation
pressure
Lighting submenu
Call up range
Vehicle submenu
Page 125 of 417

124 Controls in detailControl systemVehicle status message memory
Use the vehicle status message memory
menu to scan malfunction and warning
messages that may be stored in the
system. Such messages appear in the mul-
tifunction display and are based on condi-
tions or system status the vehicle’s system
has recorded.
�
Press buttonè orÿ repeatedly
until the vehicle status message
memory appears in the right display.
The following functions are available:
No vehicle status messages
If no conditions are recorded in memory,
the message in the right display is:
Malfunction memory, no malfunctions
Vehicle status messages have been
recorded
If conditions have occurred causing status
messages to be recorded, the number of
messages appears in the right display:
1Number of messages�
Press button k or j.
The stored messages will now be
displayed in the order in which they
have occurred.
For malfunction and warning messag-
es, see “What to do if ...” (
�page 296).
Warning!
G
Malfunction and warning messages are only
indicated for certain systems and are inten-
tionally not very detailed. The malfunction
and warning messages are simply a remind-
er with respect to the operation of certain
systems and do not replace the owner’s
and/or driver’s responsibility to maintain
the vehicle’s operating safety by having all
required maintenance and safety checks
performed on the vehicle and by bringing
the vehicle to an authorized Mercedes-Benz
Center to address the malfunction and
warning messages (
�page 296).
Function
Page
No malfunction messages
124
Malfunctions occurred
124
Page 139 of 417

138 Controls in detailControl systemResetting fuel consumption statistics�
Press button ÿ or è repeatedly
until you see the first function of the
Trip computer menu.
�
Press button j or k repeatedly
until you see the reading that you want
to reset in the left display.
�
Press and hold the reset button in the
instrument cluster (
�page 29) until
the value is reset to 0.Calling up range (distance to empty)
�
Press button ÿ or è repeatedly
until you see the first function of the
Trip computer menu.
�
Press button j or k repeatedly
until you see this message in the left
display:
Range
.
In the right display you will see the cal-
culated range based on the current fuel
tank level. Your driving style will affect
the accuracy of the calculated range.
TEL menuWarning!
G
A driver’s attention to the road must always
be his/her primary focus when driving. For
your safety and the safety of others, we rec-
ommend that you pull over to a safe location
and stop before placing or taking a tele-
phone call. If you choose to use the tele-
phone while driving, please use the
hands-free device and only use the tele-
phone when weather, road, and traffic con-
ditions permit.
Some jurisdictions prohibit the driver from
using a cellular telephone while driving a ve-
hicle.
Bear in mind that at a speed of just 30 mph
(approximately 50 km/h), your vehicle is
covering a distance of 44 feet
(approximately 14 m) every second.

.
The engine")