Page 9 of 215

8 IntroductionSymbolsThe following symbols are used in this
Operator’s Manual:* The asterisk identifies optional
equipment. Since not all models
have the same standard equip-
ment, your COMAND system’s
equipment may deviate from
some descriptions and illustra-
tions.
�
This symbol points to instruc-
tions for you to follow.
�
A number of these symbols ap-
pearing in succession indicates
a multiple-step procedure.
��
This continuation symbol marks
an interrupted procedure which
will be continued on the next
page.
�page This symbol tells you where to
look for further information on
this subject.
->This symbol is used in the glos-
sary. It indicates that the term
immediately following the sym-
bol is also explained in the glos-
sary.Display
Words appearing on the
COMAND display or the multi-
function display are printed in
the type shown here.
Warning
G
Warning notices draw your attention to haz-
ards that may endanger your health or life,
or the health or life of others.!Highlights hazards that may result in
damage to your COMAND.iHelpful hints or further information you
may find useful.
Page 50 of 215

49 Audio
Single CD operation
� Single CD operation
�
Only touch the CD on the edges.
�
Clean the CD with a dry, lint-free cloth.
Wipe the CD a straight line from the
center. Never wipe the CD in a circular
motion.
�
Do not use rubbing alcohol or solvents
to clean CDs.
�
D o n o t e x p o s e t h e C D s t o h e a t o r d i r e c t
sunlight.
�
Do not write or put labels on CDs
Safety instructionsWarning
G
In order to avoid distraction which could
lead to an accident, the driver should insert
CDs with the vehicle at a standstill and
operate the audio system only when road,
weather and traffic conditions permit.
Bear in mind that at a speed of just 30 mph
(approximately 50 km/h), your vehicle is
covering a distance of 44 feet (approximate-
ly 14 m) every second.
Warning
G
The CD drive is a Class 1 laser product.
There is a danger of invisible laser radiation
when you open or damage the cover.
Do not remove the cover. The CD drive does
not contain any parts serviceable by the us-
er. For safety reasons, have any necessary
service work performed by qualified person-
nel.
Tips on caring for your CDs
Page 58 of 215

57 Audio
MP3 operation
�
Only touch the CD on the edges.
�
Clean the CD with a dry, lint-free cloth.
Wipe the CD a straight line from the
center. Never wipe the CD in a circular
motion.
�
Do not use rubbing alcohol or solvents
to clean CDs.
�
Do not expose the CDs to heat or direct
sunlight.
�
Do not write or put labels on CDsPermissible MP3 CDs
In MP3 mode COMAND can read CD-R and
CD-RW CDs.
Permissible file systems
The permitted file system is
ISO9660/Joliet for CD-R and CD-RW.
Multi session CDs
With multi session CDs, the content of the
first session determines how COMAND
treats the CD. Tips on caring for your MP3 CDs
Tips on creating MP3 CDs iCDs, software and hardware for writing
audio data to CDs are widely available.
Therefore, we cannot guarantee that
COMAND will be able to play every
user-written CD.
Problems may be encountered during
playback of user-written CDs with a
storage capacity of more than 700 MB.
These CDs do not meet valid standards
as of this printing.
Page 69 of 215

68 AudioCD changer* operation
�
Only touch the CD on the edges.
�
Clean the CD with a dry, lint-free cloth.
Wipe the CD a straight line from the
center. Never wipe the CD in a circular
motion.
�
Do not use rubbing alcohol or solvents
to clean CDs.
�
Do not expose the CDs to heat or direct
sunlight.
�
Do not write or put labels on CDs.
Safety instructionsWarning
G
In order to avoid distraction which could
lead to an accident, the driver should insert
CDs with the vehicle at a standstill and
operate the audio system only when road,
weather and traffic conditions permit.
Bear in mind that at a speed of just 30 mph
(approximately 50 km/h), your vehicle is
covering a distance of 44 feet (approximate-
ly 14 m) every second.
Warning
G
The CD changer is a Class 1 laser product.
There is a danger of invisible laser radiation
when you open or damage the cover.
Do not remove the cover. The CD changer
does not contain any parts serviceable by
the user. For safety reasons, have any nec-
essary service work performed by qualified
personnel.
Tips on caring for your CDs
Page 72 of 215
71 Audio
CD changer* operation
Loading a single magazine compart-
ment �
Open the glove box
(�Vehicle owner's manual).
�
Briefly press the button 2 of the emp-
ty magazine compartment to be load-
ed.
�
Wait until the LED in the button 2
flashes green.
This indicates that the CD changer re-
quests a CD.
�
Insert an audio CD into the CD slot 1
within approx. 15 seconds. Insert the
CD face up.
The CD is pulled in. The red LED in the
corresponding magazine compartment
button 2 lights up continuously. The
system starts playing the CD.
The loading procedure is completed.
Loading all six magazine compart-
ments
Initial situation: all magazine compart-
ments are empty.
The CD changer loads all magazine com-
partments beginning with compartment 1.
�
Open the glove box
(�Vehicle owner's manual).
1CD slot
2Magazine compartment buttons
iLoading a magazine slot will stop the
playback of a CD in the changer.
��
Page 73 of 215

72 AudioCD changer* operation�
Press and hold the button of an empty
magazine compartment 2 for more
than 2 seconds.
The LEDs of all magazine compartment
buttons 2 briefly light up green sever-
al times.
�
Wait until the LED in the first magazine
compartment button 2 flashes green.
This indicates that the CD changer re-
quests a CD.
�
Insert an audio CD into the CD slot 1
within approx. 15 seconds. Insert the
CD face up.
The CD is pulled in; the magazine com-
partment is loaded. The red LED in the corresponding mag-
azine compartment button 2 lights up
continuously.
The CD changer then requests inser-
tion of the next CD. The LED in the cor-
responding magazine compartment
button 2 flashes green.
�
Repeat the last step until all six maga-
zine compartments are loaded.
The system plays the sixth CD. The
LEDs in all magazine compartment but-
tons 2 light up red continuously.
The loading procedure is completed.
iIf, for example, only compartments 1
through 4 are to be loaded instead of
all six compartments, simply do not in-
sert the a fifth CD into the slot 1. The
CD changer attempts to load the fifth
CD, yet aborts the loading procedure.
The system automatically plays the last
(fourth) CD.
Page 108 of 215

107 Telephone*
Telephone operation
COMAND automatically creates a list of
accepted and missed calls. This list can
contain 10 entries max.
The accepted and missed calls list can be
opened, an entry selected, and the call re-
turned.
Selecting an entry from the list of ac-
cepted and missed calls.
Opening of list: �
Press the
Recvd.#
soft key in the Tele-
phone main menu (�page 102).
The list appears with the last call high-
lighted.
The list is sorted chronologically, the
last accepted or missed call is dis-
played at the top of the list.Switching list displays:
�
Press the
123
soft key.
The list switches to number display.
If a name in the phone book is stored
with the number of the highlighted call
it is shown in the status bar;
or
iIf no calls have been received yet the Recvd.#
soft key is shaded out and with-
out function.
iThe list shows up to ten calls you re-
ceived last. It is a combined listing of
both accepted and missed calls. The
list does not show or specify which
calls were accepted and which ones
were missed.
��
Page 109 of 215
108 Telephone*Telephone operation�
Press the
ABC
soft key.
The list switches to name display.
The number in the phone book that be-
longs to the highlighted name is shown
in the status bar.
Selecting a list entry and establishing
the connection:
�
Use�� or �� to select the desired
entry.
�
Press�0.
The telephone initiates the call to the
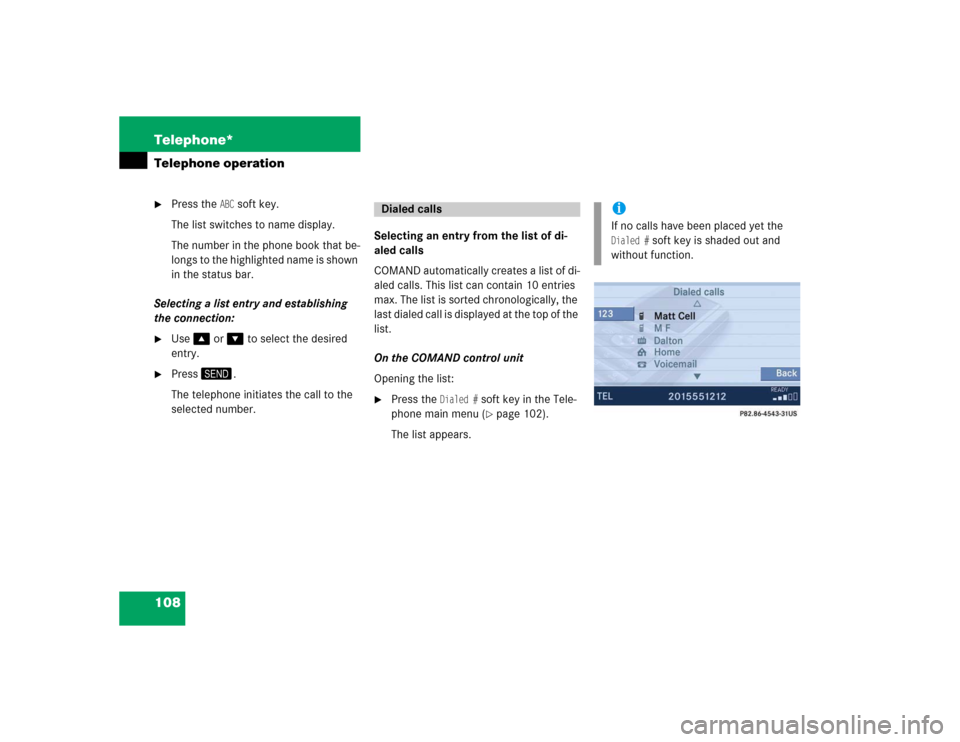
selected number.Selecting an entry from the list of di-
aled calls
COMAND automatically creates a list of di-
aled calls. This list can contain 10 entries
max. The list is sorted chronologically, the
last dialed call is displayed at the top of the
list.
On the COMAND control unit
Opening the list:
�
Press the
Dialed #
soft key in the Tele-
phone main menu (�page 102).
The list appears.
Dialed calls
iIf no calls have been placed yet the Dialed #
soft key is shaded out and
without function.