Page 252 of 474
251
Controls in detail
Loading
Folding the backrest forward
1 Release handle
2 Seat cushion
3 Release lever
4 Backrest
�
Pull release handle 1.
�
Fold seat cushion 2 forward.
�
Fully retract and fold rearward head
restraints (
�page 104).
�
Pull release lever 3.
�
Fold backrest 4 forward. Setting up rear seat bench
1 Indicator
�
Fold backrest rearward until it engag-
es.
�
Fold seat cushion rearward until it
locks into position.
If the backrest is not locked into position,
a red indicator 1 will be visible.
�
Check for secure locking by pushing
and pulling on the backrest.
!Always release the seat cushion and
fold it forward before folding the seat
backrests forward. Otherwise, the
backrest covering may be damaged.
��
Page 253 of 474

252 Controls in detailLoading
Luggage cover1 Securing straps
Removal�
Take off securing straps 1.
�
Pull cover in direction of arrow 2.
Installation
�
Place cover into holder.
�
Attach securing straps to trunk lid.
Loading instructions
The total load weight including vehicle
occupants and luggage/cargo should not
exceed the load limit or vehicle capacity
weight indicated on the corresponding
placard located on the driver’s door
B-pillar.
The handling characteristics of a fully load-
ed vehicle depend greatly on the load dis-
tribution. It is therefore recommended to
load the vehicle according to the illustra-
tions shown, with the heaviest items being
placed towards the front of the vehicle.
Warning!
G
If a red indicator is visible with the backrest
up, then the backrest is not properly locked
into position.
Always lock backrest in its upright position
when rear seat bench is occupied, or the
extended cargo compartment is not in use.
Check for secure locking by pushing and
pulling on the backrest.
In an accident, during hard braking or sud-
den maneuvers, loose items will be thrown
around inside the vehicle, and cause injury
to vehicle occupants unless the items are
securely fastened in the vehicle.
To help avoid personal injury during a colli-
sion or sudden maneuver, exercise care
when transporting cargo.
!Do not place anything on the luggage
cover below the rear window.
��
Page 255 of 474
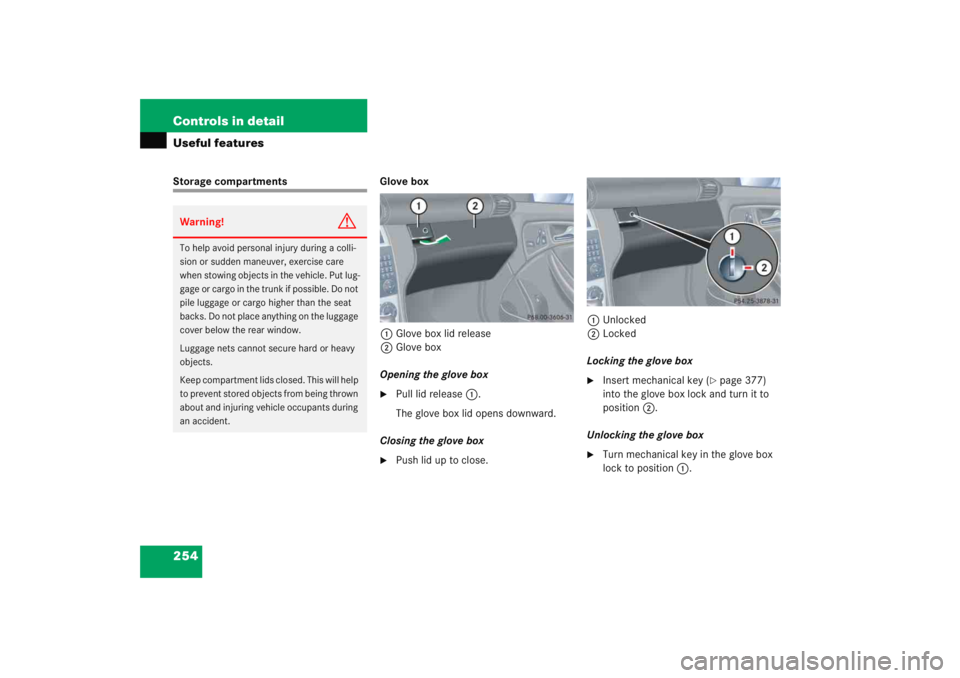
254 Controls in detailUseful featuresStorage compartmentsGlove box
1 Glove box lid release
2 Glove box
Opening the glove box
�
Pull lid release 1.
The glove box lid opens downward.
Closing the glove box
�
Push lid up to close. 1
Unlocked
2 Locked
Locking the glove box
�
Insert mechanical key (
�page 377)
into the glove box lock and turn it to
position 2.
Unlocking the glove box
�
Turn mechanical key in the glove box
lock to position 1.
Warning!
G
To help avoid personal injury during a colli-
sion or sudden maneuver, exercise care
when stowing objects in the vehicle. Put lug-
g a g e o r c a r g o i n t h e t r u n k i f p o s s i b l e . D o n o t
pile luggage or cargo higher than the seat
backs. Do not place anything on the luggage
cover below the rear window.
Luggage nets cannot secure hard or heavy
objects.
Keep compartment lids closed. This will help
to prevent stored objects from being thrown
about and injuring vehicle occupants during
an accident.
Page 260 of 474
259
Controls in detail
Useful features
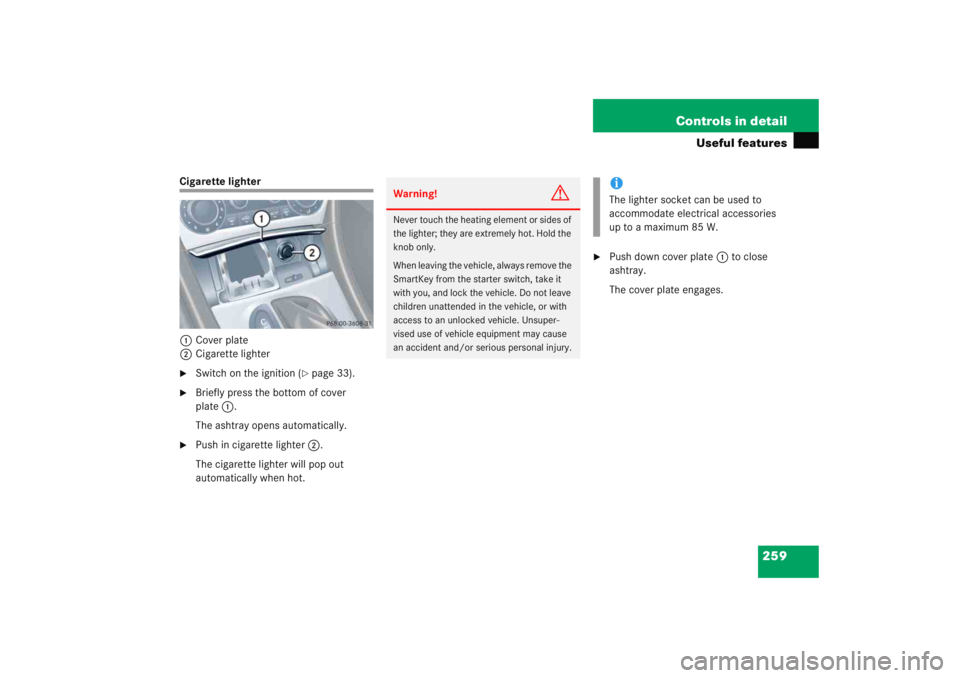
Cigarette lighter
1 Cover plate
2 Cigarette lighter�
Switch on the ignition (
�page 33).
�
Briefly press the bottom of cover
plate 1.
The ashtray opens automatically.
�
Push in cigarette lighter 2.
The cigarette lighter will pop out
automatically when hot.
�
Push down cover plate 1 to close
ashtray.
The cover plate engages.
Warning!
G
Never touch the heating element or sides of
the lighter; they are extremely hot. Hold the
knob only.
When leaving the vehicle, always remove the
SmartKey from the starter switch, take it
with you, and lock the vehicle. Do not leave
children unattended in the vehicle, or with
access to an unlocked vehicle. Unsuper-
vised use of vehicle equipment may cause
an accident and/or serious personal injury.
iThe lighter socket can be used to
accommodate electrical accessories
up to a maximum 85 W.
Page 263 of 474

The Tele Aid system consists of three
types of response:
�
automatic and manual emergency
�
ro")
262 Controls in detailUseful featuresThe Tele Aid system
(Telematic A
larm I
dentification on D
e-
mand)
The Tele Aid system consists of three
types of response:
�
automatic and manual emergency
�
roadside assistance and
�
information
The Tele Aid system is operational provid-
ing that the vehicle’s battery is charged,
properly connected, not damaged and
cellular and GPS coverage is available.
The speaker volume of a Tele Aid call can
be adjusted when using the volume control
on the multifunction steering wheel. To
raise, press button æ and to lower,
press button ç. The volume can also
be adjusted using the volume knob on your
audio system or COMAND* head unit.
�
To activate, press the SOS button, the
Roadside Assistance button • or
the Information button ¡, depend-
ing on the type of response required. Shortly after the completion of your Tele
Aid acquaintance call, you will receive a
user ID and password. By visiting
www.mbusa.com and selecting “Tele Aid”
(USA only), you will have access to account
information, remote door unlock and
more.
System self-check
Initially, after switching on ignition, mal-
functions are detected and indicated (the
indicator lamps in the SOS button, the
Roadside Assistance button
• and the
Information button ¡ stay on longer
than ten seconds or do not come on). The
message
Tele Aid malfunction. Drive
to workshop
appears for approximately
ten seconds in the multifunction display.
iThe SOS button is located above the in-
side rear view mirror.
The Roadside Assistance button •
and the Information button ¡ are
located below the center armrest
cover.!The Tele Aid system utilizes the cellular
network for communication and the
GPS (Global Positioning System) satel-
lites for vehicle location. If either of
these signals are unavailable, the
Tele Aid system may not function and if
this occurs, assistance must be sum-
moned by other means.
Page 269 of 474
,
and the reserve key is not handy:�
Contact the Mercedes")
268 Controls in detailUseful features
Remote door unlock
In case you have locked your vehicle unin-
tentionally (e.g. SmartKey inside vehicle),
and the reserve key is not handy:�
Contact the Mercedes-Benz Response
Center at 1-800-756-9018 (in the USA)
or 1-888-923-8367 (in Canada).
You will be asked to provide your pass-
word which you provided when you
completed the subscriber agreement.
�
Then return to your vehicle and pull the
trunk lid recessed handle for minimum
of 20 seconds until the SOS button is
flashing.
The message
Connecting call
appears in the multifunction display.
As an alternative, you may unlock the vehi-
cle via Internet using the ID and password
sent to you shortly after the completion of
your acquaintance call.
The Response Center will then unlock your
vehicle with the remote door unlocking
feature.
iWhen a Tele Aid call has been initiated,
the audio system or the COMAND*
system audio is muted and the select-
ed mode (radio, tape or CD) pauses.
The optional cellular phone (if installed)
switches off. If you must use this
phone, the vehicle must be parked.
Disconnect the coiled cord and place
the call. The COMAND* navigation
system (if engaged) will continue to
run. The display in the instrument clus-
ter is available for use and spoken com-
mands are only available by pressing
the RPT button on the COMAND* unit.
A pop-up window will appear in the
COMAND* display to indicate that a
Tele Aid call is in progress.
iThe remote door unlock feature is avail-
able if the relevant cellular phone net-
work is available.
The SOS button will flash and the mes-
sage
Connecting call
will appear in
the multifunction display to indicate
receipt of the door unlock command.
Once the vehicle is unlocked, a
Response Center specialist will
attempt to establish voice contact with
the vehicle occupants.
If the trunk lid recessed handle was
pulled for more than 20 seconds be-
fore door unlock authorization was re-
ceived by the Response Center, you
must wait 15 minutes before pulling
the trunk lid recessed handle again.
Page 280 of 474

279
Operation
Driving instructions
After hard braking, it is advisable to drive
on for some time, rather than immediately
parking, so that the air stream will cool
down the brakes faster.Driving off
Apply the brakes to test them briefly after
driving off. Perform this procedure only
when the road is clear of other traffic.
Warm up the engine smoothly. Do not
place full load on the engine until the oper-
ating temperature has been reached.
When starting off on a slippery surface, do
not allow a wheel to spin for an extended
period with the ESP switched off. Doing so
may cause serious damage to the
drivetrain which is not covered by the
Mercedes-Benz Limited Warranty.
Parking
!When driving down long and steep
grades, relieve the load on the brakes
by shifting into a lower gear to use the
engine’s braking power. This helps pre-
vent overheating of the brakes and re-
duces brake pad wear.
!Simultaneously depressing the acceler-
ator pedal and applying the brake re-
duces engine performance and causes
premature brake and drivetrain wear.!Set the parking brake whenever park-
ing or leaving the vehicle. In addition,
move gear selector lever to position
P
(manual transmission: first or reverse
gear).
When parking on hills, always turn front
wheel towards the curb.
Warning!
G
Do not park this vehicle in areas where com-
bustible materials such as grass, hay or
leaves can come into contact with the hot
exhaust system, as these materials could be
ignited and cause a vehicle fire.
To reduce the risk of personal injury as a re-
sult of vehicle movement, before turning off
the engine and leaving the vehicle always:�
Keep right foot on brake pedal.
�
Firmly depress parking brake pedal.
�
Move the gear selector lever to
position P (manual transmission: first or
reverse gear).
�
Slowly release brake pedal.
�
When parked on an incline, turn front
wheel against curb.
�
Turn the SmartKey to starter switch
position 0 and remove the SmartKey
from the starter switch.
�
Take the SmartKey with you and lock
the vehicle when leaving.
Page 289 of 474

288 OperationAt the gas stationRefuelingThe fuel filler flap is located on the
right-hand side of the vehicle towards the
rear. Locking/unlocking the vehicle with
the remote control automatically
locks/unlocks the fuel filler flap.
1 To open the fuel filler flap
2 Supplemental tire inflation pressure
table
3 To insert the fuel filler cap
�
Turn off the engine.
�
Remove the SmartKey from the starter
switch.
Warning!
G
Gasoline is highly flammable and poisonous.
It burns violently and can cause serious inju-
ry. Whenever you are around gasoline, avoid
inhaling fumes and skin contact, extinguish
all smoking materials. Never allow sparks,
flame or smoking materials near gasoline!
Warning!
G
Flexible Fuel Vehicles (identified by a label
reading Premium gasoline or E85 only! on
fuel filler flap):
Ethanol fuel (E85) and its vapors are highly
flammable, poisonous and burn easily. Etha-
nol fuel can cause serious injuries if ignited
or if you come into contact with it or inhale
fumes of it. Avoid inhalation of ethanol
fumes and skin contact with ethanol. Extin-
guish all open flames before refueling. Never
smoke or create sparks close to ethanol.