Page 382 of 474
381
Practical hints
Opening/closing in an emergency
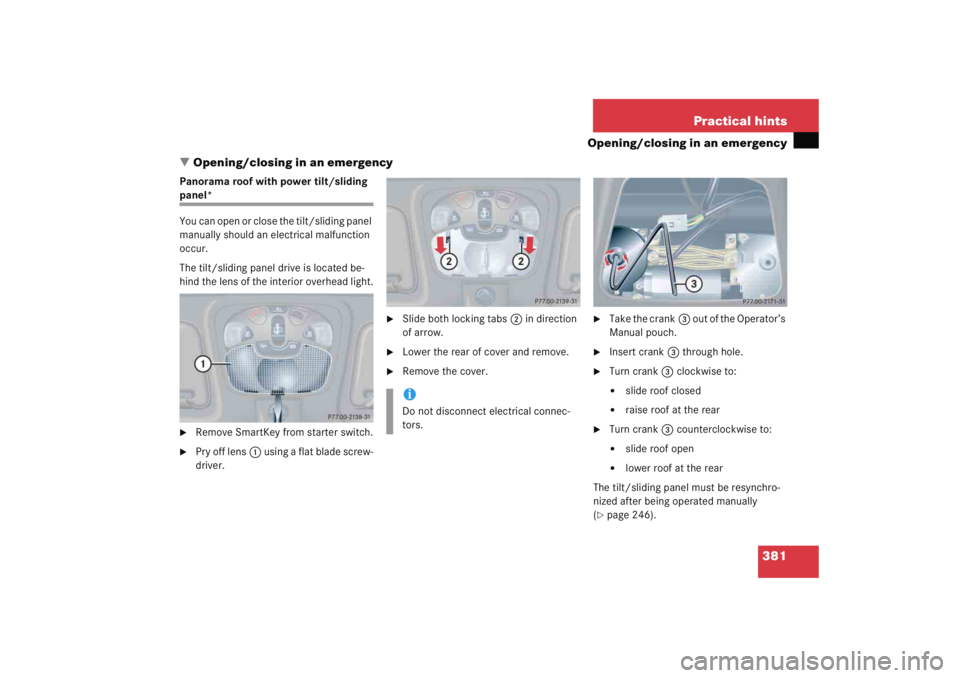
� Opening/closing in an emergency
Panorama roof with power tilt/sliding panel*
You can open or close the tilt/sliding panel
manually should an electrical malfunction
occur.
The tilt/sliding panel drive is located be-
hind the lens of the interior overhead light.�
Remove SmartKey from starter switch.
�
Pry off lens 1 using a flat blade screw-
driver.
�
Slide both locking tabs 2 in direction
of arrow.
�
Lower the rear of cover and remove.
�
Remove the cover.
�
Take the crank 3 out of the Operator’s
Manual pouch.
�
Insert crank 3 through hole.
�
Turn crank 3 clockwise to:�
slide roof closed
�
raise roof at the rear
�
Turn crank 3 counterclockwise to:�
slide roof open
�
lower roof at the rear
The tilt/sliding panel must be resynchro-
nized after being operated manually
(
�page 246).
iDo not disconnect electrical connec-
tors.
Page 383 of 474
382 Practical hintsReplacing SmartKey batteriesIf the batteries in the SmartKey are dis-
charged, the vehicle can no longer be
locked or unlocked. It is recommended to
have the batteries replaced at an autho-
rized Mercedes-Benz Center.Batteries contain materials that can harm
the environment if disposed of improperly.
Recycling of batteries is the preferred
method of disposal. Many states require
sellers of batteries to accept old batteries
for recycling.Warning!
G
Keep the batteries out of reach of children.
If a battery is swallowed, seek medical help
immediately.
iWhen inserting the batteries, make
sure they are clean and free of lint.iWhen changing batteries, always
replace both batteries.
The required replacement batteries are
available at any Mercedes-Benz
Center.
Page 384 of 474
383
Practical hints
Replacing SmartKey batteries
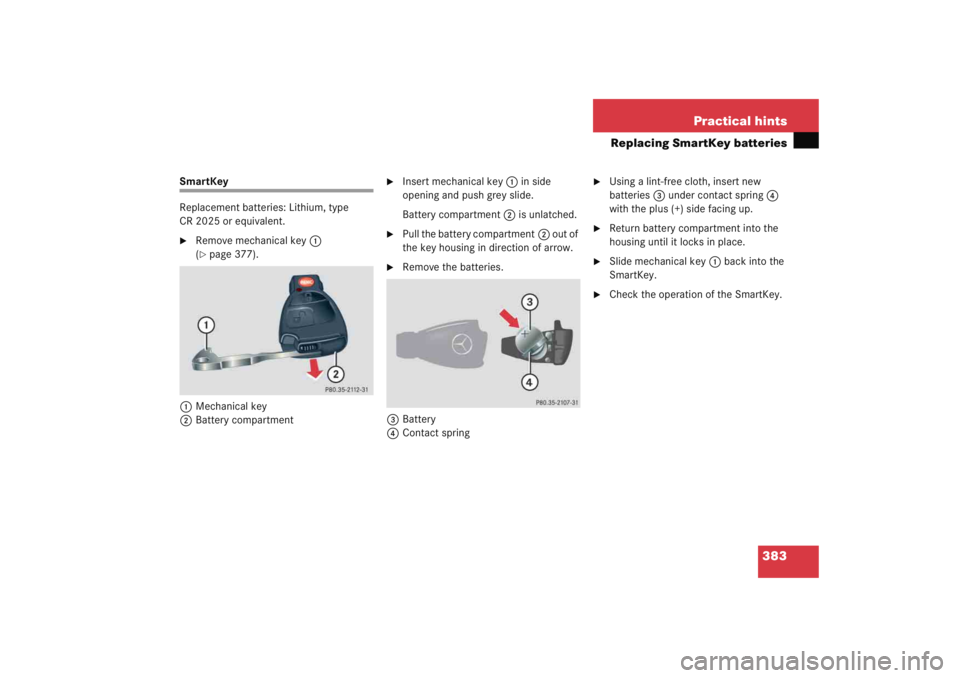
SmartKey
Replacement batteries: Lithium, type
CR 2025 or equivalent.�
Remove mechanical key
1
(�page 377).
1 Mechanical key
2 Battery compartment
�
Insert mechanical key 1 in side
opening and push grey slide.
Battery compartment 2 is unlatched.
�
Pull the battery compartment 2 out of
the key housing in direction of arrow.
�
Remove the batteries.
3 Battery
4 Contact spring
�
Using a lint-free cloth, insert new
batteries 3 under contact spring 4
with the plus (+) side facing up.
�
Return battery compartment into the
housing until it locks in place.
�
Slide mechanical key 1 back into the
SmartKey.
�
Check the operation of the SmartKey.
Page 388 of 474

387
Practical hints
Replacing bulbs
3
Bulb socket for turn signal lamp bulb
4 Bulb holder of low beam bulb
5 Bulb holder of high beam bulb
6 Bulb socket for parking and standing
lamp bulb Low beam bulb
�
Turn housing cover
1 counterclock-
wise and remove it.
�
Turn bulb holder 4 with the bulb coun-
terclockwise and remove it.
�
Pull the bulb at its socket out of bulb
holder 4.
�
Insert the new bulb so that its socket
locates in the recess of bulb holder 4
and is level to it.
�
Reinsert bulb holder 4 with the bulb in
the lamp and turn clockwise.
�
Align housing cover 1 and turn it
clockwise. High beam bulb
�
Turn housing cover
2 counterclock-
wise and remove it.
�
Turn bulb holder 5 with the bulb coun-
terclockwise and remove it.
�
Pull the bulb at its socket out of bulb
holder 5.
�
Insert the new bulb so that its socket
locates in the recess of bulb holder 5
and is level to it.
�
Reinsert bulb holder 5 w i t h t h e b u l b i n
the lamp and turn clockwise.
�
Align housing cover 2 and turn it
clockwise.
Page 389 of 474
388 Practical hintsReplacing bulbsFront turn signal lamp bulb�
Turn bulb socket3 counterclockwise
and remove it.
�
Press gently onto the bulb and turn
counterclockwise out of bulb
socket 3.
�
Press the new bulb gently into bulb
socket 3 and turn clockwise until it
engages.
�
Place bulb socket 3 back into the
lamp and turn it clockwise. Parking and standing lamp bulb
�
Turn housing cover
2 counterclock-
wise and remove it.
�
Pull out bulb socket 6 with the bulb.
�
Pull the bulb out of bulb socket 6.
�
Press the new bulb into bulb socket 6.
�
Press bulb socket 6 back into the
lamp.
�
Align housing cover 2 and turn it
clockwise. Bi-Xenon* headlamps
Warning!
G
Do not remove the cover
1
for the
Bi-Xenon headlamp. Because of high voltage
in Bi-Xenon lamps, it is dangerous to replace
the bulb or repair the lamp and its compo-
nents. We recommend that you have such
work done by a qualified technician.
Page 390 of 474

389
Practical hints
Replacing bulbs
Left headlamp, mirror-image of right
headlamp1
Housing cover for Bi-Xenon headlamp
2 Housing cover for high beam flasher,
parking and standing lamp 3
Bulb socket for turn signal lamp
4 Bulb holder for high beam flasher
5 Bulb socket for parking and standing
lamp bulb
High beam bulb for high beam flasher
�
Turn housing cover 2 counterclock-
wise and remove it.
�
Turn bulb holder 4 with the bulb coun-
terclockwise and remove it.
�
Pull the bulb at its socket out of bulb
holder 4.
�
Insert the new bulb so that its socket
locates in the recess of bulb holder 4
and is level to it.
�
Reinsert bulb holder 4 w i t h t h e b u l b i n
the lamp and turn clockwise.
�
Align housing cover 2 and turn it
clockwise.
Front turn signal lamp bulb
�
Turn bulb socket 3 with the bulb
counterclockwise and remove it.
�
Press gently onto the bulb and turn
counterclockwise out of bulb
socket 3.
�
Press the new bulb gently into bulb
socket 3 and turn clockwise until it
engages.
�
Place bulb socket 3 back into the
lamp and turn it clockwise.
Page 391 of 474

390 Practical hintsReplacing bulbsParking and standing lamp bulb�
Turn housing cover2 counterclock-
wise and remove it.
�
Pull out bulb socket 5 with the bulb.
�
Pull the bulb out of bulb socket 5.
�
Press the new bulb into bulb socket 5.
�
Press bulb socket 5 back into the
lamp.
�
Align housing cover 2 and turn it
clockwise. Side marker lamp bulb
�
Carefully slide the lamp towards the
rear in direction of arrows.
�
Remove the front end first.
�
Turn the bulb socket with the bulb
counterclockwise and remove it.
�
Pull the bulb out of the bulb socket.
�
Insert the new bulb into the bulb sock-
et.
�
Place the bulb socket back into the
lamp and turn it clockwise.
�
To reinstall the lamp, set the rear end in
the bumper and let the front end en-
gage.
Replacing bulbs for rear lamps
Before you start to replace a bulb for a rear
lamp, do the following first:�
Turn the exterior lamp switch to
position
M (
�page 110).
Tail lamp unit
1 Trim panel
2 Latch
�
Open the trunk lid.
�
Turn latches 1 on respective trim
panel 2 clockwise.
�
Fold trim panel 2 to the side.
Page 392 of 474

391
Practical hints
Replacing bulbs
3
Tab
4 Bulb socket for side marker lamp bulb�
Press tabs 3 together.
�
Remove the bulb carrier.
�
Press gently onto the respective bulb
and turn counterclockwise out of its
bulb socket.
�
Press the new bulb gently into its bulb
socket and turn clockwise until it en-
gages. 5
Brake lamp bulb
6 Backup lamp bulb
7 Turn signal lamp bulb
8 Rear fog lamp bulb (only driver’s side),
tail, parking and standing lamp
�
Reinstall the bulb carrier.
Let tabs 3 engage.
�
Reinstall trim panel 2.
�
Turn latches 1 counterclockwise. Side marker lamp
The bulb socket for the side marker lamp
bulb is located between the bulb carrier
and the vehicle’s body.
�
Open the trunk lid.
�
Turn latches
1 on respective trim
panel 2 clockwise.
�
Fold trim panel 2 to the side.
�
Pull bulb socket 4 with the bulb out of
its holder.
�
Pull the bulb out of bulb socket 4.
�
Press the new bulb into bulb socket 4.
�
Press bulb socket 4 back into its
holder.
�
Reinstall trim panel 2.
�
Turn latches 1 counterclockwise.