Page 368 of 474
367
Practical hints
What to do if …
Display symbol
Display message
Possible cause
Possible solution
.
High beam left
The left high beam lamp is
malfunctioning.
�
Replace the bulb as soon as possible.
High beam right
The right high beam lamp is
malfunctioning.
�
Replace the bulb as soon as possible.
License plate lamp,
left
The left license plate lamp is
malfunctioning.
�
Replace the bulb as soon as possible.
License plate lamp,
right
The right license plate lamp is
malfunctioning.
�
Replace the bulb as soon as possible.
Light sensor
Drive to workshop
The lamp sensor is malfunctioning.
The headlamps switch on automatically.
�
In the control system, set lamp
operation to manual (
�page 133).
�
Switch on headlamps using the
exterior lamp switch (
�page 51).
�
Visit an authorized Mercedes-Benz
Center as soon as possible.
Page 370 of 474
369
Practical hints
What to do if …
Display symbol
Display message
Possible cause
Possible solution
.
Switch off lights.
This display appears if the driver’s door is
opened and no SmartKey is in the starter
switch.
�
Switch off the headlamps.
Taillamp left
Substitute bulb on
The left tail lamp is malfunctioning.
A substitute bulb is being used.
�
Replace the bulb as soon as possible.
Taillamp right
Substitute bulb on
The right tail lamp is malfunctioning.
A substitute bulb is being used.
�
Replace the bulb as soon as possible.
Turn signal
left front
The left front turn signal lamp is
malfunctioning.
�
Replace the bulb as soon as possible.
Turn signal
right front
The right front turn signal lamp is
malfunctioning.
�
Replace the bulb as soon as possible.
Page 371 of 474
370 Practical hintsWhat to do if …Display symbol
Display message
Possible cause
Possible solution
.
Turn signal
left mirror
The left turn signal in the side mirror is
malfunctioning. This message will only
appear if all light emitting diodes have
stopped working.
�
Visit an authorized Mercedes-Benz
Center as soon as possible.
Turn signal
right mirror
The right turn signal in the side mirror is
malfunctioning. This message will only
appear if all light emitting diodes have
stopped working.
�
Visit an authorized Mercedes-Benz
Center as soon as possible.
Turn signal
left rear
Substitute bulb on
The left rear turn signal lamp is
malfunctioning. A substitute bulb is being
used.
�
Replace the bulb as soon as possible.
Turn signal
right rear
Substitute bulb on
The right rear turn signal lamp is
malfunctioning. A substitute bulb is being
used.
�
Replace the bulb as soon as possible.
Page 377 of 474

376 Practical hintsWhere will I find ...?Storing the spare wheel
If you wish to store the spare wheel after
use, carry out the following steps. Other-
wise the spare wheel will not fit the wheel
well.�
Unscrew the valve cap from the valve
of the spare wheel.
�
Carefully push the tip of the valve cap
into the spare wheel valve and allow
the air to escape.
�
Screw the valve cap back on the valve.
�
Place spare wheel1 in wheel well.
�
Turn retaining screw 3 clockwise to
its stop to secure the spare wheel.
�
Install the trunk floor. Spare wheel bolts
1 Wheel bolt for light alloy rims
2 Wheel bolt for light alloy spare wheel
rim size 4
1/2B x15 H2 For more information on model and spare
wheel rim size, see “Technical data”
section (
�page 422).
iIt may take a few minutes for the col-
lapsible tire to deflate completely.
!Wheel bolts
2 must be used when
mounting spare wheel rim
size 4
1/2Bx15 H2 (
�page 422).
The use of any wheel bolts other than
wheel bolts 2 for spare wheel rim
size 4
1/2B x15 H2 can cause physical
damage to the vehicle.
Warning!
G
Make sure to use the original length wheel
bolts when remounting the original wheel af-
ter it has been repaired.
Page 382 of 474
381
Practical hints
Opening/closing in an emergency
� Opening/closing in an emergency
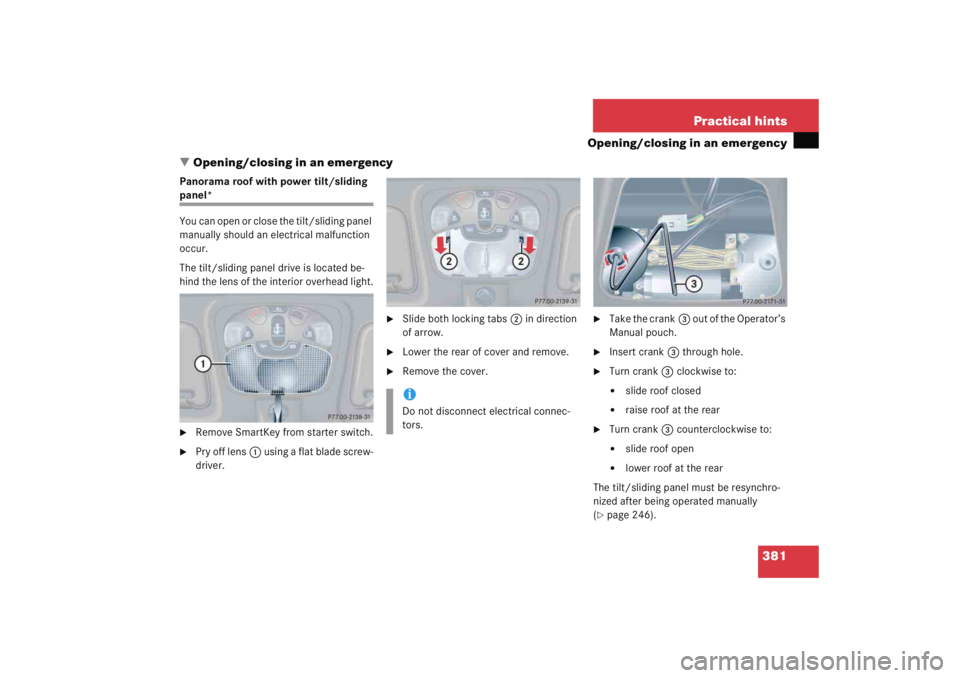
Panorama roof with power tilt/sliding panel*
You can open or close the tilt/sliding panel
manually should an electrical malfunction
occur.
The tilt/sliding panel drive is located be-
hind the lens of the interior overhead light.�
Remove SmartKey from starter switch.
�
Pry off lens 1 using a flat blade screw-
driver.
�
Slide both locking tabs 2 in direction
of arrow.
�
Lower the rear of cover and remove.
�
Remove the cover.
�
Take the crank 3 out of the Operator’s
Manual pouch.
�
Insert crank 3 through hole.
�
Turn crank 3 clockwise to:�
slide roof closed
�
raise roof at the rear
�
Turn crank 3 counterclockwise to:�
slide roof open
�
lower roof at the rear
The tilt/sliding panel must be resynchro-
nized after being operated manually
(
�page 246).
iDo not disconnect electrical connec-
tors.
Page 385 of 474
384 Practical hintsReplacing bulbsSafe vehicle operation depends on proper
exterior lighting and signaling. It is there-
fore essential that all bulbs and lamp as-
semblies are in good working order at all
times.
Correct headlamp adjustment is extremely
important. Have headlamps checked and
readjusted at regular intervals and when a
bulb has been replaced. See an authorized
Mercedes-Benz Center for headlamp
adjustment.
Bulbs
iIf the headlamps or front fog lamps are
fogged up on the inside as a result of
high humidity, driving the vehicle a dis-
tance with the lights on should clear up
the fogging.iSubstitute bulbs will be brought into
use when lamps malfunction. Observe
the messages in the multifunction dis-
play (
�page 366).
Page 387 of 474

386 Practical hintsReplacing bulbs
Notes on bulb replacement�
Use only 12-volt bulbs of the same type
and with the specified watt rating.
�
Switch lights off before replacing a bulb
to prevent short circuits.
�
Always use a clean lint-free cloth when
handling bulbs.
�
Your hands should be dry and free of oil
and grease.
�
If the newly installed bulb does not
come on, visit an authorized
Mercedes-Benz Center.
Have the LEDs and bulbs for the following
lamps replaced by an authorized
Mercedes-Benz Center.
�
Additional turn signals in the exterior
rear view mirrors
�
High mounted brake lamp
�
Xenon* lamps
�
Front fog lamps
Replacing bulbs for front lamps
Before you start to replace a bulb for a
front lamp, do the following first:�
Turn the exterior lamp switch to
position M (
�page 110).
�
Open the hood (
�page 291) (except
for side marker lamps).
Halogen headlamps
Left headlamp, mirror-image of right
headlamp1 Housing cover for low beam headlamp
2 Housing cover for high beam head-
lamp, parking and standing lamp
Warning!
G
Bulbs and bulb sockets can be very hot. Al-
low the lamp to cool down before changing
a bulb.
Keep bulbs out of reach of children.
Halogen lamps contain pressurized gas.
A bulb can explode if you�
touch or move it when hot
�
drop the bulb
�
scratch the bulb
Wear eye and hand protection.
Because of high voltage in Xenon lamps, it is
dangerous to replace the bulb or repair the
lamp and its components. We recommend
that you have such work done by a qualified
technician.
Page 398 of 474

397
Practical hints
Flat tire
Mounting the spare wheel
1 Wheel bolt for light alloy rims
2 Wheel bolt for light alloy spare wheel
rim size 4
1/2B x15 H2
�
Clean contact surfaces of wheel and
wheel hub.
�
Guide the spare wheel onto the align-
ment bolt and push it on.
�
Insert wheel bolts and tighten them
slightly.
�
Inflate the spare tire using the electric
air pump (
�page 398).
!Wheel bolts 2 must be used when
mounting spare wheel rim
size 4
1/2Bx15 H2 (
�page 422).
The use of any wheel bolts other than
wheel bolts 2 for spare wheel rim
size 4
1/2B x15 H2 can cause physical
damage to the vehicle.
!To avoid paint damage, place wheel flat
against hub and hold it there while
installing first wheel bolt.Warning!
G
Always replace wheel bolts that are dam-
aged or rusted.
Never apply oil or grease to wheel bolts.
Damaged wheel hub threads should be re-
paired immediately. Do not continue to drive
under these circumstances! Contact an
authorized Mercedes-Benz Center or call
Roadside Assistance.
Incorrect wheel bolts or improperly tight-
ened wheel bolts can cause the wheel to
come off. This could cause an accident.
Make sure to use the correct mounting
bolts.
Warning!
G
Inflate spare wheel with collapsible tire only
after the wheel is properly mounted.
Inflate the spare wheel tire using the electric
air pump before lowering the vehicle.
��