Page 291 of 474

290 OperationAt the gas stationCheck regularly and before a long trip1 Coolant level
2 Brake fluid (fuse box cover removed)
3 Windshield washer and headlamp
cleaning system* Brake fluid
Remove fuse box cover before checking
brake fluid (
�page 410).
Engine oil level
For more information on engine oil, see
“Engine oil” (�page 292).
Opening hood, see (
�page 291). Coolant
For normal replenishing, use water (pota-
ble water quality). For more information on
coolant, see “Coolant level” (
�page 296)
Vehicle lighting
Check function and cleanliness. For infor-
mation on replacing light bulbs, see “Re-
placing bulbs” (
�page 384).
Exterior lamp switch, see (
�page 110).
Tire inflation pressure
For information on tire inflation pressure,
see “Checking tire inflation pressure”
(
�page 311).
Windshield washer and headlamp
cleaning system*
For more information on filling up the
washer reservoir, see “Windshield washer
system and headlamp cleaning system*”
(�page 299).
!If you find that the brake fluid in the
brake fluid reservoir has fallen to the
minimum mark or below, have the
brake system checked for brake pad
thickness and leaks immediately. Noti-
fy an authorized Mercedes-Benz Center
immediately. Do not add brake fluid as
this will not solve the problem. For
more information, see “Practical Hints”
(�page 341).
Page 303 of 474
302 OperationTires and wheelsTread depth
Do not allow your tires to wear down too
far. Adhesion properties on wet roads are
sharply reduced at tread depths under 1/8in (3 mm).
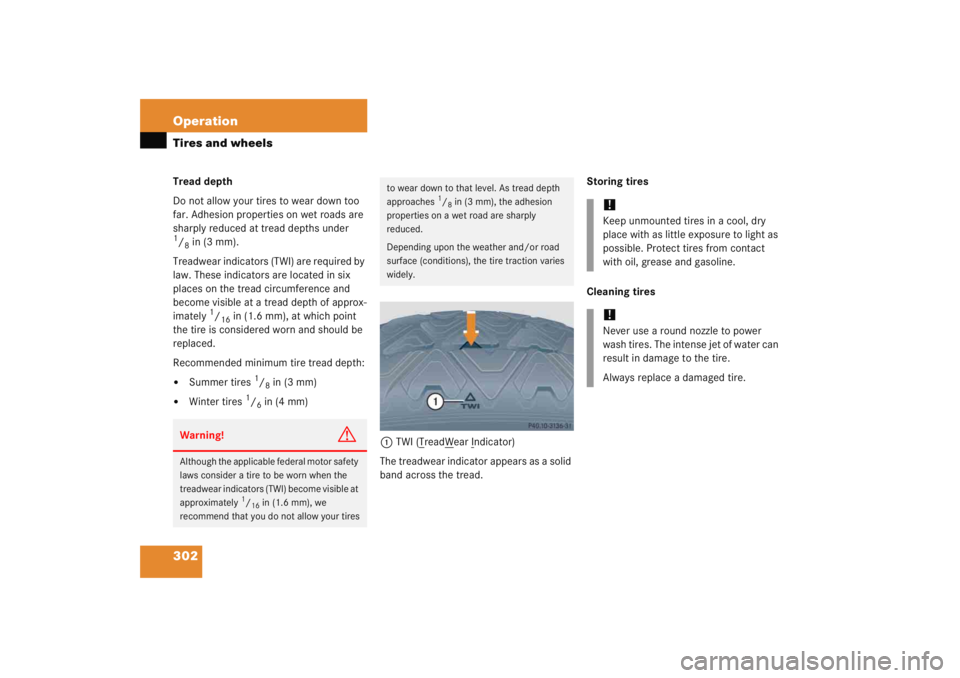
Treadwear indicators (TWI) are required by
law. These indicators are located in six
places on the tread circumference and
become visible at a tread depth of approx-
imately
1/16
in (1.6 mm), at which point
the tire is considered worn and should be
replaced.
Recommended minimum tire tread depth:
�
Summer tires
1/8in (3 mm)
�
Winter tires
1/6in (4 mm)
1TWI (T
readW
ear I
ndicator)
The treadwear indicator appears as a solid
band across the tread. Storing tires
Cleaning tires
Warning!
G
Although the applicable federal motor safety
laws consider a tire to be worn when the
treadwear indicators (TWI) become visible at
approximately
1/16in (1.6 mm), we
recommend that you do not allow your tires
to wear down to that level. As tread depth
approaches
1/8in (3 mm), the adhesion
properties on a wet road are sharply
reduced.
Depending upon the weather and/or road
surface (conditions), the tire traction varies
widely.
!Keep unmounted tires in a cool, dry
place with as little exposure to light as
possible. Protect tires from contact
with oil, grease and gasoline.!Never use a round nozzle to power
wash tires. The intense jet of water can
result in damage to the tire.
Always replace a damaged tire.
Page 315 of 474
314 OperationTires and wheelsTire size designation, load and speed
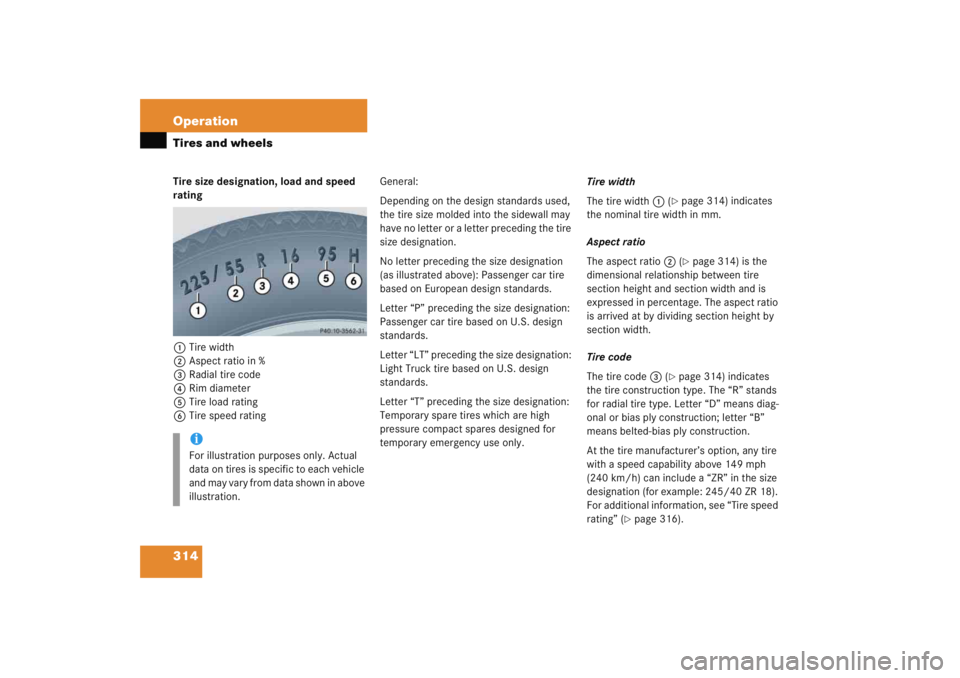
rating1 Tire width
2 Aspect ratio in %
3 Radial tire code
4 Rim diameter
5 Tire load rating
6 Tire speed rating General:
Depending on the design standards used,
the tire size molded into the sidewall may
have no letter or a letter preceding the tire
size designation.
No letter preceding the size designation
(as illustrated above): Passenger car tire
based on European design standards.
Letter “P” preceding the size designation:
Passenger car tire based on U.S. design
standards.
Letter “LT” preceding the size designation:
Light Truck tire based on U.S. design
standards.
Letter “T” preceding the size designation:
Temporary spare tires which are high
pressure compact spares designed for
temporary emergency use only. Tire width
The tire width
1 (
�page 314) indicates
the nominal tire width in mm.
Aspect ratio
The aspect ratio 2 (�page 314) is the
dimensional relationship between tire
section height and section width and is
expressed in percentage. The aspect ratio
is arrived at by dividing section height by
section width.
Tire code
The tire code 3 (
�page 314) indicates
the tire construction type. The “R” stands
for radial tire type. Letter “D” means diag-
onal or bias ply construction; letter “B”
means belted-bias ply construction.
At the tire manufacturer’s option, any tire
with a speed capability above 149 mph
(240 km/h) can include a “ZR” in the size
designation (for example: 245/40 ZR 18).
For additional information, see “Tire speed
rating” (
�page 316).
iFor illustration purposes only. Actual
data on tires is specific to each vehicle
and may vary from data shown in above
illustration.
Page 318 of 474
317
Operation
Tires and wheels
�
Any tire with a speed capability above
186 mph (300 km/h) must include a
“ZR” in the size designation AND the
service description must be placed in
parenthesis. Example: 275/40 ZR 18
(99Y). The “(Y)” speed rating in paren-
thesis designates the maximum speed
capability of the tire as being above
186 mph (300 km/h). Consult the tire
manufacturer for the actual maximum
permissible speed of the tire.
All-season and winter tires
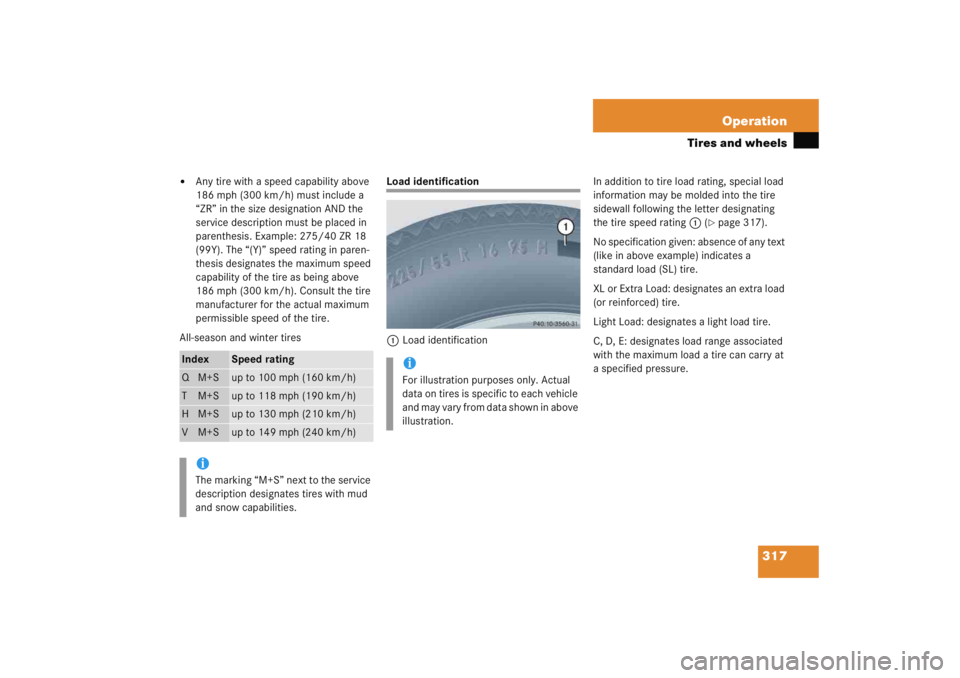
Load identification
1 Load identification In addition to tire load rating, special load
information may be molded into the tire
sidewall following the letter designating
the tire speed rating
1 (
�page 317).
No specification given: absence of any text
(like in above example) indicates a
standard load (SL) tire.
XL or Extra Load: designates an extra load
(or reinforced) tire.
Light Load: designates a light load tire.
C, D, E: designates load range associated
with the maximum load a tire can carry at
a specified pressure.
Index
Speed rating
QM+S
up to 100 mph (160 km/h)
TM+S
up to 118 mph (190 km/h)
HM+S
up to 130 mph (210 km/h)
VM+S
up to 149 mph (240 km/h)
iThe marking “M+S” next to the service
description designates tires with mud
and snow capabilities.
iFor illustration purposes only. Actual
data on tires is specific to each vehicle
and may vary from data shown in above
illustration.
Page 336 of 474

335
Operation
Vehicle care
Engine cleaning
Prior to cleaning the engine compartment
make sure to protect electrical compo-
nents and connectors from the intrusion of
water and cleaning agents.
Corrosion protection, such as MB Anticor-
rosion Wax, should be applied to the en-
gine compartment after every engine
cleaning. Before applying, all control link-
age bushings and joints should be lubricat-
ed. The poly-V-belt and all pulleys should
be protected from any wax.
Vehicle washing
Do not use hot water or wash your vehicle
in direct sunlight. Use only a mild car wash
detergent, such as Mercedes-Benz ap-
proved Car Shampoo.
Thoroughly spray the vehicle with a dif-
fused jet of water. Direct only a very weak
spray towards the ventilation intake. Use
plenty of water and rinse the sponge and
chamois frequently.
Rinse with clear water and thoroughly dry
with a chamois. Do not allow cleaning
agents to dry on the finish.
Due to the width of the vehicle, fold in ex-
terior rear view mirrors prior to running the
vehicle through an automatic car wash to
prevent damage to the mirrors.
In the winter, thoroughly remove all traces
of road salt as soon as possible.
When washing the underbody, do not
forget to clean the inner sides of the
wheels. Ornamental moldings
For regular cleaning and care of very dirty
chrome-plated parts, use a chrome clean-
er.
Headlamps, tail lamps, side markers,
turn signal lenses
Use a mild car wash detergent, such as
Mercedes-Benz approved Car Shampoo,
with plenty of water.
To prevent scratches, never apply strong
force and use only a soft, non-scratchy
cloth when cleaning the lenses. Do not
attempt to wipe dirty lenses with a dry
cloth or sponge.
Page 337 of 474
336 OperationVehicle careWiper blades�
Fold wiper arms forward.
�
Clean the wiper blade inserts with a
clean cloth and detergent solution.Window cleaning
�
Fold wiper arms forward.
�
Use a window cleaning solution on all
glass surfaces.
An automotive glass cleaner is
recommended.Light alloy wheels
Mercedes-Benz approved Wheel Care
should be used for regular cleaning of the
light alloy wheels.
If possible, clean wheels once a week with
Mercedes-Benz approved Wheel Care, us-
ing a soft bristle brush and a strong spray
of water.
Follow the instructions on container.
Warning!
G
For safety reasons, switch off wipers and
remove SmartKey from starter switch
before cleaning the wiper blades. Other-
wise, the wiper motor could suddenly turn
on and cause injury.!Fold the windshield wiper arms back
onto the windshield before turning the
SmartKey in the starter switch.
Hold on to the wiper when folding the
wiper arm back. If released, the force
of the impact from the tensioning
spring could crack the windshield.
Warning!
G
For safety reasons, switch off wipers and
remove SmartKey from starter switch
before cleaning the windshield. Otherwise,
the wiper motor could suddenly turn on and
cause injury.!Fold the windshield wiper arms back
onto the windshield before turning the
SmartKey in the starter switch.
Hold onto the wiper when folding the
wiper arm back. If released, the force
of the impact from the tensioning
spring could crack the windshield.
iOnly use acid-free cleaning materials.
Acid may cause corrosion or damage
the clear coat.
Page 338 of 474
337
Operation
Vehicle care
Instrument cluster
Use a gentle dishwashing detergent or
mild detergent for delicate fabrics as a
washing solution. Wipe with a cloth moist-
ened in lukewarm solution. Do not use
scouring agents.
Steering wheel and gear selector lever
Wipe with a damp cloth and dry thoroughly
or clean with Mercedes-Benz approved
Leather Care.
Cup holders
Use a gentle dishwashing detergent or
mild detergent for delicate fabrics as a
washing solution. Wipe with a cloth moist-
ened in lukewarm solution. Do not use
scouring agents.
Hard plastic trim items
Pour Mercedes-Benz approved Interior
Care onto soft lint-free cloth and apply
with light pressure. Headliner
Clean with soft bristle brush, or use a
dry-shampoo cleaner in case of excessive
dirt.
Seat belts
The webbing must not be treated with
chemical cleaning agents. Use only clear,
lukewarm water and soap. Do not dry the
webbing at temperatures above 176°F
(80°C) or in direct sunlight.
Warning!
G
Do not bleach or dye seat belts as this may
severely weaken them. In a crash they may
not be able to provide adequate protection.
Page 339 of 474
338 OperationVehicle careUpholstery
Using aftermarket seat covers or wearing
clothing that have the tendency to give off
coloring (e.g. when wet, etc.) may cause
the upholstery to become permanently dis-
colored. By lining the seats with a proper
intermediate cover, contact-discoloration
will be prevented.
Leather upholstery
Wipe leather upholstery with a damp cloth
and dry thoroughly or clean with
Mercedes-Benz approved Leather Care.
Exercise particular care when cleaning per-
forated leather as its underside should not
become wet.MB Tex upholstery
Pour Mercedes-Benz approved Interior
Care onto soft lint-free cloth and apply
with light pressure.
Plastic and rubber parts
Do not use oil or wax on these parts.
Wood trims
Dampen cloth using water and use damp
cloth to clean wood trims in your vehicle.
Do not use solvents like tar remover or
wheel cleaner nor polishes or waxes as
these may be abrasive.