Page 35 of 474

34 Getting startedUnlocking
iWhen you switch on the ignition, the in-
dicator and warning lamps (except low
beam headlamp indicator lamp, high
beam headlamp indicator lamp, and
turn signal indicator lamps unless acti-
vated) in the instrument cluster come
on. This indicates that the respective
systems are operational. The indicator
and warning lamps (except low beam
headlamp indicator lamp, high beam
headlamp indicator lamp, and turn sig-
nal indicator lamps if activated) should
go out when the engine is running.iVehicles with automatic transmission:
The SmartKey can only be removed
from the starter switch with the gear
selector lever in positionP.
!If the SmartKey cannot be turned in the
starter switch, the battery may not be
sufficiently charged.�
Check the battery and charge it if
necessary (
�page 401).
�
Get a jump start (
�page 404).
To prevent accelerated battery dis-
charge and a possible dead battery, al-
ways remove the SmartKey from the
starter switch when the engine is not in
operation.
Page 42 of 474

41
Getting started
Adjusting
Steering wheel adjustment, manual
1 Handle�
To unlock the steering column, pull
handle 1 out until its stop limit.
�
Move steering wheel to the desired
position.
�
To lock the steering column, push
handle 1 all the way in until it
engages.
The steering wheel is once again
locked into position.
�
Make sure the steering wheel is
securely locked by trying to move it up
and down, and in and out before driving
off.
Make sure your legs can move freely and
that all the displays (inclusive malfunction
and indicator lamps) on the instrument
cluster are clearly visible. Steering wheel adjustment, electrical*
The stalk for steering wheel adjustment is
located on the steering column (lower left).
1 Adjusting steering column, in or out
2 Adjusting steering column, up or down
�
Switch on the ignition (
�page 33).
or
�
Open the driver’s door.
Warning!
G
Only adjust the steering wheel with the vehi-
cle at a standstill and make sure the steer-
ing wheel is securely locked in place before
driving off.
Driving without the steering wheel adjust-
ment locked may cause an unexpected
steering wheel movement which could
cause the driver to lose control of the vehi-
cle. Make sure the steering wheel is secure-
ly locked by trying to move it up and down,
and in and out before driving off.
Page 51 of 474

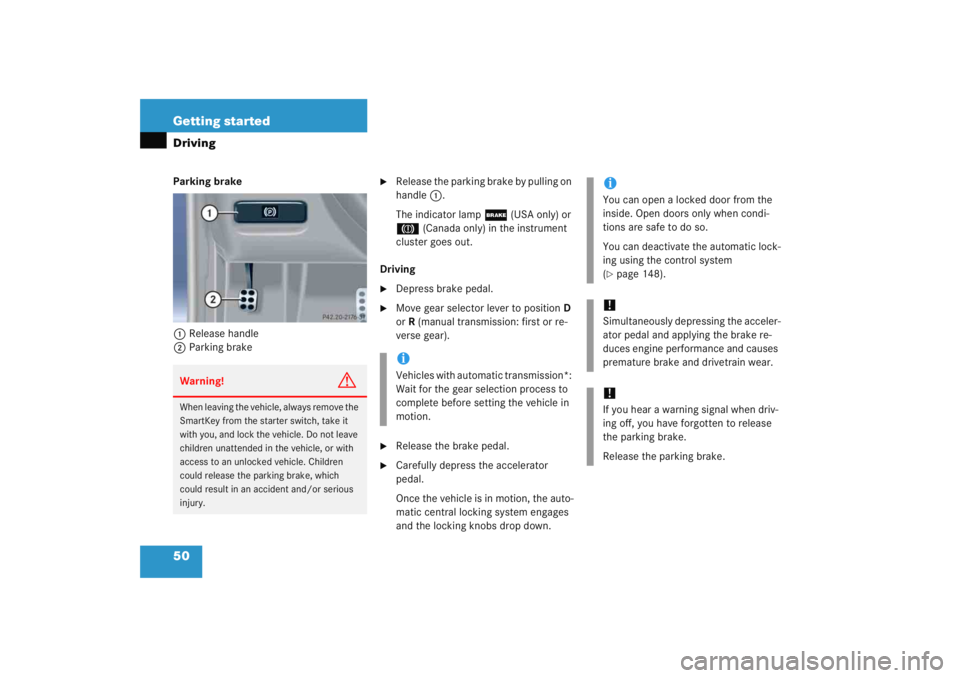
50 Getting startedDrivingParking brake 1 Release handle
2 Parking brake
�
Release the parking brake by pulling on
handle 1.
The indicator lamp ; (USA only) or
3 (Canada only) in the instrument
cluster goes out.
Driving
�
Depress brake pedal.
�
Move gear selector lever to position D
or R (manual transmission: first or re-
verse gear).
�
Release the brake pedal.
�
Carefully depress the accelerator
pedal.
Once the vehicle is in motion, the auto-
matic central locking system engages
and the locking knobs drop down.
Warning!
G
When leaving the vehicle, always remove the
SmartKey from the starter switch, take it
with you, and lock the vehicle. Do not leave
children unattended in the vehicle, or with
access to an unlocked vehicle. Children
could release the parking brake, which
could result in an accident and/or serious
injury.
iVehicles with automatic transmission*:
Wait for the gear selection process to
complete before setting the vehicle in
motion.
iYou can open a locked door from the
inside. Open doors only when condi-
tions are safe to do so.
You can deactivate the automatic lock-
ing using the control system
(�page 148).
!Simultaneously depressing the acceler-
ator pedal and applying the brake re-
duces engine performance and causes
premature brake and drivetrain wear.!If you hear a warning signal when driv-
ing off, you have forgotten to release
the parking brake.
Release the parking brake.
Page 53 of 474

52 Getting startedDriving�
Turn the exterior lamp switch to
positionB.
The low beam headlamp indicator
lamp B in the instrument cluster
comes on (
�page 24).
High beam
The combination switch is located on the
left of the steering column.
Combination switch1 High beam
2 High beam flasher
�
Push the combination switch in
direction of arrow 1.
The high beam headlamp indicator
lamp A in the instrument cluster
comes on (
�page 24).
For more information on headlamps, see
“Combination switch” (
�page 114).
Turn signals
The combination switch is located on the
left of the steering column.Combination switch1 Turn signals, right
2 Turn signals, left
�
Press combination switch in direction
of arrow 1 or 2.
The corresponding turn signal indicator
lamp L or K in the instrument
cluster flashes.
The combination switch resets auto-
matically after major steering wheel
movements.iTo signal minor directional changes,
such as changing lanes, press combi-
nation switch only to point of resis-
tance and release. The corresponding
turn signal will flash three times.
Page 57 of 474

56 Getting startedParking and lockingYou have now completed your first drive.
You have properly stopped and parked
your vehicle. End your drive as follows.
Parking brake1 Release handle
2 Parking brake�
Step firmly on parking brake 2.
When the engine is running, the indica-
tor lamp ; (USA only) or 3
(Canada only) in the instrument cluster
will be illuminated.
Warning!
G
Vehicles with manual transmission:
Wait until the vehicle is stationary before
removing the SmartKey from the starter
switch. The vehicle cannot be steered when
the SmartKey is removed.Warning!
G
With the engine not running, there is no
power assistance for the brake and steering
system. In this case, it is important to keep
in mind that a considerably higher degree of
effort is necessary to brake and steer the ve-
hicle.
Warning!
G
Do not park this vehicle in areas where com-
bustible materials such as grass, hay or
leaves can come into contact with the hot
exhaust system, as these materials could be
ignited and cause a vehicle fire.
To reduce the risk of personal injury as a re-
sult of vehicle movement, before turning off
the engine and leaving the vehicle always:�
Keep right foot on brake pedal.
�
Firmly depress parking brake pedal.
�
Move the gear selector lever to
position P (manual transmission: first or
reverse gear).
�
Slowly release brake pedal.
�
When parked on an incline, turn front
wheels towards road curb.
�
Turn the SmartKey in the starter switch
to position 0 and remove the SmartKey
from the starter switch.
�
Take the SmartKey with you and lock
the vehicle when leaving.
Page 61 of 474

60 Safety and SecurityOccupant safetyIn this section you will learn the most im-
portant facts about the restraint system
components of the vehicle.
Restraint system with�
Seat belts (
�page 66)
�
Child restraints (
�page 77)
�
Lower anchors and tethers for children
(LATCH) (
�page 78)
Supplemental Restraint System (SRS) with
�
Air bags (
�page 61)
�
Air bag control unit (with crash
sensors)
�
Emergency tensioning device (ETD) for
seat belts (
�page 69) Air bag system components with
�
56
indicator lamp (
�page 76)
�
Front passenger seat with Occupant
Classification System (OCS)
(�page 73)
As independent systems, their protective
functions work in conjunction with each
other. The SRS system conducts a self-test when
the ignition is switched on and in regular
intervals while the engine is running. This
facilitates early detection of malfunctions.
The
1 indicator lamp in the instrument
cluster comes on when the ignition is
switched on and goes out no later than a
few seconds after the engine has been
started.
The SRS components are in operational
readiness if the 1indicator lamp is not
lit when the engine is running.
A malfunction in the system has been
detected if the 1indicator lamp:
�
fails to go out after approximately four
seconds after the engine was started
�
does not come on at all
�
comes on after the engine was started
or while driving.
iFor information on infants and children
traveling with you in the vehicle and
restraint systems for infants and chil-
dren, see “Children in the vehicle”
(�page 70).
Page 82 of 474

81
Safety and Security
Driving safety systems
� Driving safety systems
In this section you will find information on
the following driving safety systems:�
ABS (A
ntilock B
rake S
ystem)
�
BAS (B
rake A
ssist S
ystem)
�
ESP (E
lectronic S
tability P
rogram)
ABS
The Antilock Brake System (ABS) regulates
the brake pressure so that the wheels do
not lock during braking. This allows you to
maintain the ability to steer your vehicle.
The ABS is functional above a speed of ap-
proximately 5 mph (8 km/h) independent
of road surface conditions. On slippery road surfaces, the ABS will re-
spond even to light brake pressure.
The
- indicator lamp in the instrument
cluster (
�page 24) comes on when you
switch on the ignition. It goes out when the
engine is running.
Braking
At the instant one of the wheels is about to
lock up, a slight pulsation can be felt in the
brake pedal, indicating that the ABS is in
the regulating mode.
�
Keep firm and steady pressure on the
brake pedal while experiencing the pul-
sation.
Continuous, steady brake pedal pressure
yields the advantages provided by the ABS,
namely braking power and the ability to
steer the vehicle.
The pulsating brake pedal can be an indica-
tion of hazardous road conditions and
functions as a reminder to take extra care
while driving.
Warning!
G
The following factors increase the risk of ac-
cidents:�
Excessive speed, especially in turns
�
Wet and slippery road surfaces
�
Following another vehicle too closely
The ABS, BAS and ESP cannot reduce this
risk.
Always adjust your driving style to the pre-
vailing road and weather conditions.
iIn winter operation, the maximum ef-
fectiveness of the ABS and ESP is only
achieved with winter tires (M + S tires),
or snow chains as required.Warning!
G
Do not pump the brake pedal. Use firm,
steady brake pedal pressure instead. Pump-
ing the brake pedal defeats the purpose of
the ABS and significantly reduces braking
effectiveness.
Page 90 of 474
89
Controls in detail
Locking and unlocking
Seats
Memory function*
Lighting
Instrument cluster Control system
Manual transmission
Automatic transmission*
Good visibility
Climate control
Automatic climate control* Audio system
Power windows
Panorama roof with power tilt/sliding panel*
Driving systemsLoading
Useful features