Page 799 of 969

2350 Author�: Date�:
2005 LEXUS ES330 REPAIR MANUAL (RM1124U)
(b")
B00540
A88419
Disconnect Wire
from Terminal B
Generator Voltmeter
BatteryAmmeter 19-18
- STARTING & CHARGINGCHARGING SYSTEM (3MZ-FE)
2350 Author�: Date�:
2005 LEXUS ES330 REPAIR MANUAL (RM1124U)
(b) Check that the belt fits properly in the ribbed grooves.
Confirm that the belt has not slipped out of the groove on the
bottom of the pulley by hand.
5. INSPECT GENERATOR WIRING
(a) Visually check the generator wiring.
(1) Check that the wiring is in good condition.
6. INSPECT ABNORMAL NOISES
(a) Listen to abnormal noises from generator.
(1) Check that no abnormal noise is heard from the generator while the engine is running.
7. INSPECT CHARGE WARNING LIGHT CIRCUIT
(a) Turn the ignition switch ON. Check that the charge warning light comes on.
(b) Start the engine, then check that the light goes off.
If the light does not operate as specified, troubleshoot the charge warning light circuit.
8. INSPECT CHARGING CIRCUIT WITHOUT LOAD
(a) If a tester is not available, connect a voltmeter to the
charging circuit as follows.
(1) Disconnect the wire from terminal B of the genera-
tor, then connect it to the negative (-) lead of the
ammeter.
(2) Connect the positive (+) lead of the ammeter to ter-
minal B of the generator.
(3) Connect the positive (+) lead of the voltmeter to ter-
minal B of the generator.
(4) Ground the negative (-) lead of the voltmeter.
(b) Check the charging circuit.
(1) Keep the engine speed at 2,000 rpm, then check
the reading on the ammeter and voltmeter.
Standard amperage: 10 A or less
Standard voltage: 13.2 to 14.8 V
9. INSPECT CHARGING CIRCUIT WITH LOAD
(a) With the engine running at 2,000 rpm, turn the high beam headlights ON and turn the heater blower
switch to the ºHIº position.
(b) Check the reading on the ammeter.
Standard amperage: 30 A or more
�If the ammeter reading is less than the standard amperage, repair the generator.
�If the battery is fully charged, the indication will sometimes be less than the standard amperage.
Page 800 of 969
190SK-01
A87596N´m (kgf´cm, ft´lbf) : Specified torqueGenerator
Connector
Generator Assy
V-ribbed Belt No. 1
18 (184, 13)
Plate Washer
9.8 (100, 7)
58 (591, 43)
8.4 (86, 74 in.Vlbf)
Wiring Harness Clamp Bracket
- STARTING & CHARGINGGENERATOR ASSY (3MZ-FE)
19-19
2351 Author�: Date�:
2005 LEXUS ES330 REPAIR MANUAL (RM1124U)
GENERATOR ASSY (3MZ-FE)
COMPONENTS
Page 802 of 969
190SL-01
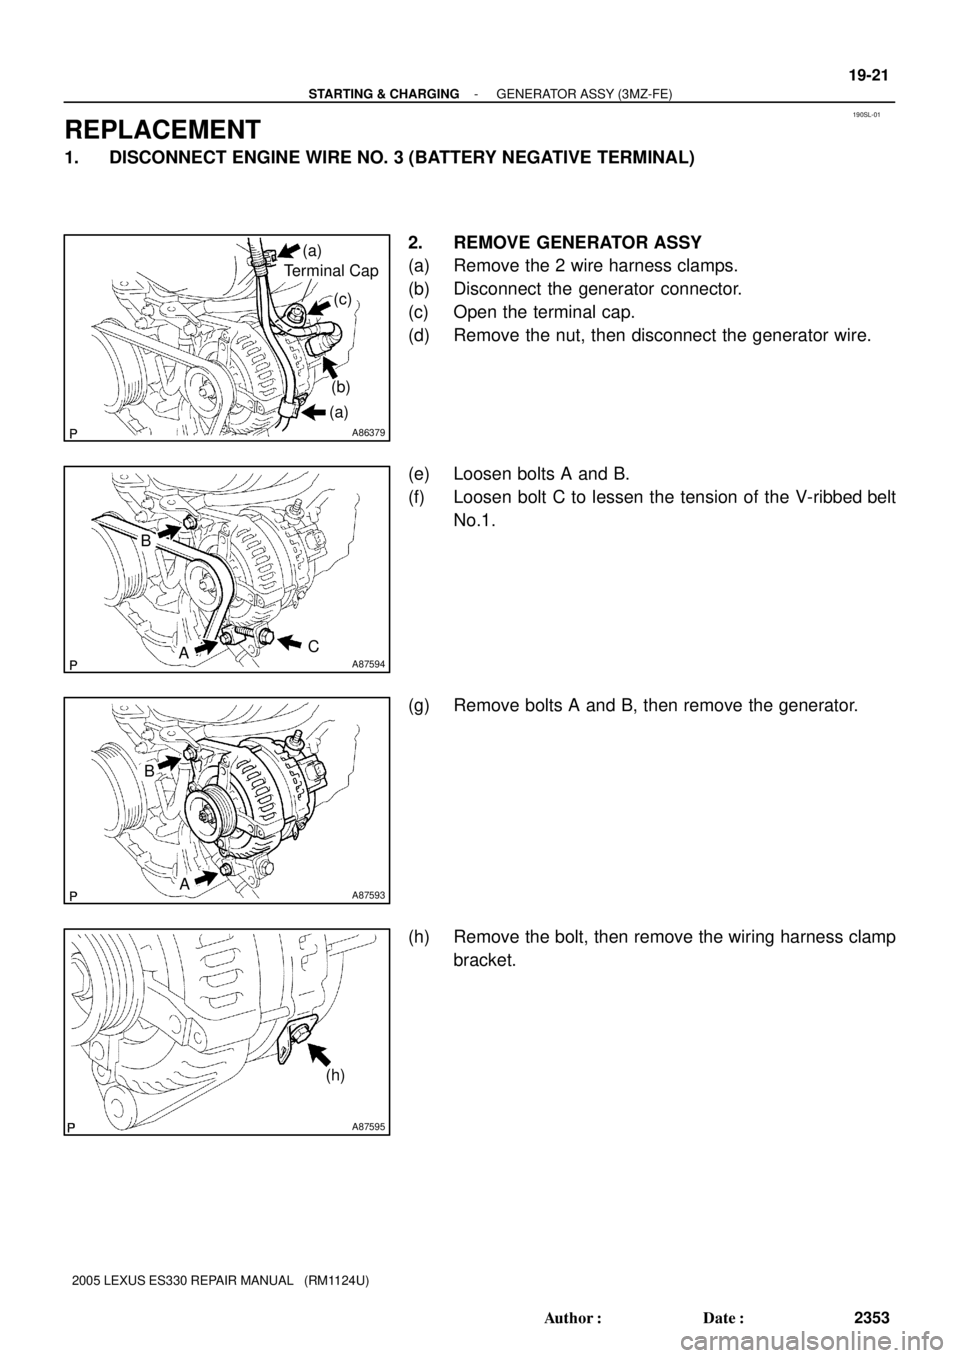
A86379
(a)
(b)
(c)
(a)
Terminal Cap
A87594
B
AC
A87593
B
A
A87595
(h)
- STARTING & CHARGINGGENERATOR ASSY (3MZ-FE)
19-21
2353 Author�: Date�:
2005 LEXUS ES330 REPAIR MANUAL (RM1124U)
REPLACEMENT
1. DISCONNECT ENGINE WIRE NO. 3 (BATTERY NEGATIVE TERMINAL)
2. REMOVE GENERATOR ASSY
(a) Remove the 2 wire harness clamps.
(b) Disconnect the generator connector.
(c) Open the terminal cap.
(d) Remove the nut, then disconnect the generator wire.
(e) Loosen bolts A and B.
(f) Loosen bolt C to lessen the tension of the V-ribbed belt
No.1.
(g) Remove bolts A and B, then remove the generator.
(h) Remove the bolt, then remove the wiring harness clamp
bracket.
Page 803 of 969
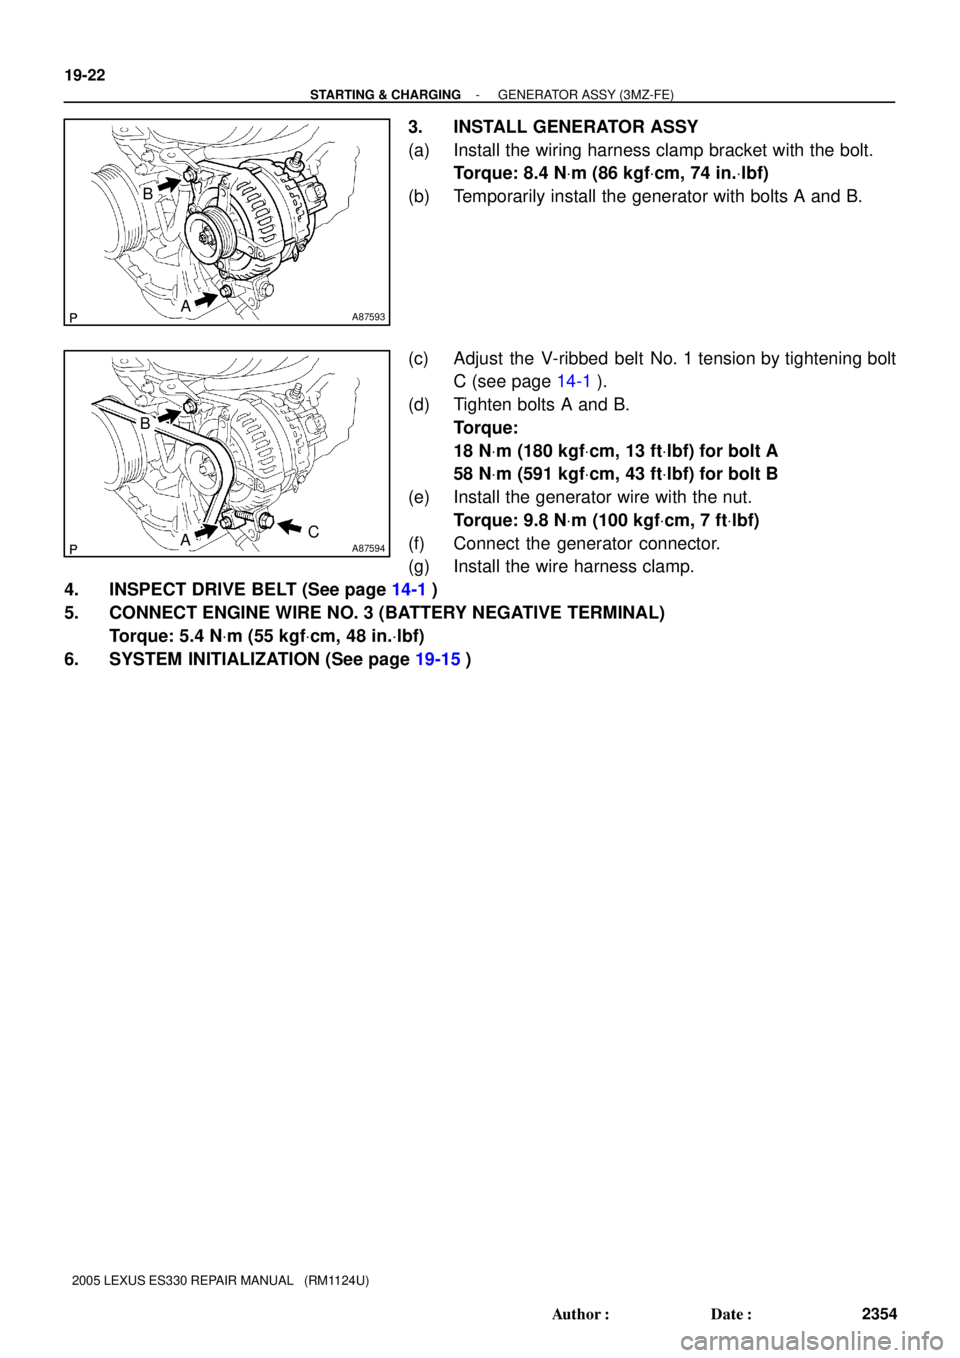
A87593
B
A
A87594
B
AC 19-22
- STARTING & CHARGINGGENERATOR ASSY (3MZ-FE)
2354 Author�: Date�:
2005 LEXUS ES330 REPAIR MANUAL (RM1124U)
3. INSTALL GENERATOR ASSY
(a) Install the wiring harness clamp bracket with the bolt.
Torque: 8.4 NVm (86 kgfVcm, 74 in.Vlbf)
(b) Temporarily install the generator with bolts A and B.
(c) Adjust the V-ribbed belt No. 1 tension by tightening bolt
C (see page 14-1).
(d) Tighten bolts A and B.
Torque:
18 NVm (180 kgfVcm, 13 ftVlbf) for bolt A
58 NVm (591 kgfVcm, 43 ftVlbf) for bolt B
(e) Install the generator wire with the nut.
Torque: 9.8 NVm (100 kgfVcm, 7 ftVlbf)
(f) Connect the generator connector.
(g) Install the wire harness clamp.
4. INSPECT DRIVE BELT (See page 14-1)
5. CONNECT ENGINE WIRE NO. 3 (BATTERY NEGATIVE TERMINAL)
Torque: 5.4 NVm (55 kgfVcm, 48 in.Vlbf)
6. SYSTEM INITIALIZATION (See page 19-15)
Page 917 of 969
BATTERY MAINTENANCE FOR IN±STOCK VEHICLES & PRE±DELIVERY ± PG009-02 September 12, 2002
Page 4 of 4
In addition to this new pre±delivery battery test, a monthly battery inspection is still
required for stored vehicles. If your dealership is located in an area subject to extreme
temperatures (hot or cold), periodic maintenance may need to be performed more
frequently.
To reduce parasitic battery drain for vehicles in storage for one week or more, the
negative battery cable should always be disconnected to reduce battery discharge.
When the negative battery cable is reconnected, please check and reset electrical
components such as the clock, radio, etc.
NOTE:
For your reference, the electrical system is made inoperative by removing the
appropriate fuse indicated in the Electrical Wiring Diagram. Recom-
mended
Battery
Maintenance
 : Specified torqueGenerator
Connector
Generator Assy
V-ribbed Belt No. 1
18 (184, 13)
Plate Washer
9.8 (100, 7)
58 (591, 43)
8.4 (86, 74 in.Vlbf)
Wiring Harnes")