Page 784 of 969
190SF-01
A86242: Specified torque
9.0 (92, 79 in.Vlbf)
Battery Clamp Sub-assy
Battery
Battery Tray
VSV Connector
Air Cleaner Inlet
Assy
Air Cleaner Inlet
No. 1Air Cleaner Case
Sub-assyAir Cleaner Filter
Element Sub-assyAir Cleaner Cap
Sub-assy Mass
Air Flow Meter
Connector Vacuum Hose
5.0 (51, 44 in.Vlbf)
x2
x3
5.0 (51, 44 in.Vlbf)
5.0 (51, 44 in.Vlbf)
Air Cleaner Hose
No. 1
5.0 (51, 44 in.Vlbf)
N´m (kgf´cm, ft´lbf)Vacuum Hose
Air Cleaner Bracket
7.5 (76, 66 in.Vlbf)x2
Clip
Radiator Lower Air Deflector x7
Clip
3.5 (36, 31 in.Vlbf)
- STARTING & CHARGINGSTARTER ASSY (3MZ-FE)
19-3
2335 Author�: Date�:
2005 LEXUS ES330 REPAIR MANUAL (RM1124U)
STARTER ASSY (3MZ-FE)
COMPONENTS
Page 786 of 969
190SG-01
A86308
A86245
(a)
(b)
(c)
(b)
(c)
A81652
(a)
(b)
(b)
(b)
(b)
(c)
(c)
(d)
- STARTING & CHARGINGSTARTER ASSY (3MZ-FE)
19-5
2337 Author�: Date�:
2005 LEXUS ES330 REPAIR MANUAL (RM1124U)
REPLACEMENT
1. REMOVE RADIATOR SIDE DEFLECTOR RH
(a) Remove the 8 clips, then remove the radiator lower air de-
flector.
2. REMOVE AIR CLEANER INLET ASSY
(a) Remove the wire harness clamp.
(b) Remove the 2 vacuum hoses from the hose clamp.
(c) Remove the 2 bolts, then remove the air cleaner inlet.
3. REMOVE BATTERY
4. REMOVE BATTERY TRAY
5. REMOVE AIR CLEANER ASSY
(a) Disconnect the mass air flow meter connector.
(b) Disconnect the 4 vacuum hoses.
(c) Loosen the 2 air cleaner cap bolts.
(d) Loosen the air cleaner hose clamp bolt, then remove the
air cleaner cap.
(e) Remove the air cleaner filter element.
Page 866 of 969
Lexus Supports ASE CertificationPage 1 of 7
Title:
RADIATOR CAP INSPECTION
Models:
All Models
Technical Service
Information Bulletin
March 28, 2005
EG007-05
The procedure for inspecting the radiator cap has been revised. Please refer to the
following procedures when inspecting the radiator cap on all Lexus models.
�All Lexus models.
MANUFACTUREREQUIPMENTQTY
Snap±On/Sun
SVTS262A
(or equivalent)Cooling System Tester
(Radiator Cap Tester)1
NOTE:
Additional Lexus Approved Dealer Equipment may be ordered by calling Lexus
Approved Dealer Equipment at 1±800±368±6787.
OP CODEDESCRIPTIONTIMEOFPT1T2
N/ANot Applicable to Warranty±±±±
ENGINE
Introduction
Applicable
Vehicles
Required
Equipment
Warranty
Information
Page 867 of 969
RADIATOR CAP INSPECTION ± EG007-05 March 28, 2005
Page 2 of 7
ITEM
NO.SPECIAL SERVICE TOOLS (SSTs)PART NUMBERQTYDRW**
1Radiator Cap Test Set*09230±00030±0217
2Radiator Cap Test Set (Small)*09230±00020±0217
* Essential SSTs.
** Refers to drawer number in SST Storage System.
NOTE:
Additional SSTs may be ordered by calling SPX/OTC at 1-800-933-8335.
1. Use the illustration below to identify the vehicle's radiator cap type and kPa rating.
2. Proceed to the required inspection procedure for the radiator cap and kPa rating.
kPa Rating
Radiator Cap Identification
Compact Cap N±CapPlastic Cap
Required
SSTs
Radiator Cap
Identification
Procedure
Page 868 of 969

RADIATOR CAP INSPECTION ± EG007-05 March 28, 2005
Page 3 of 7
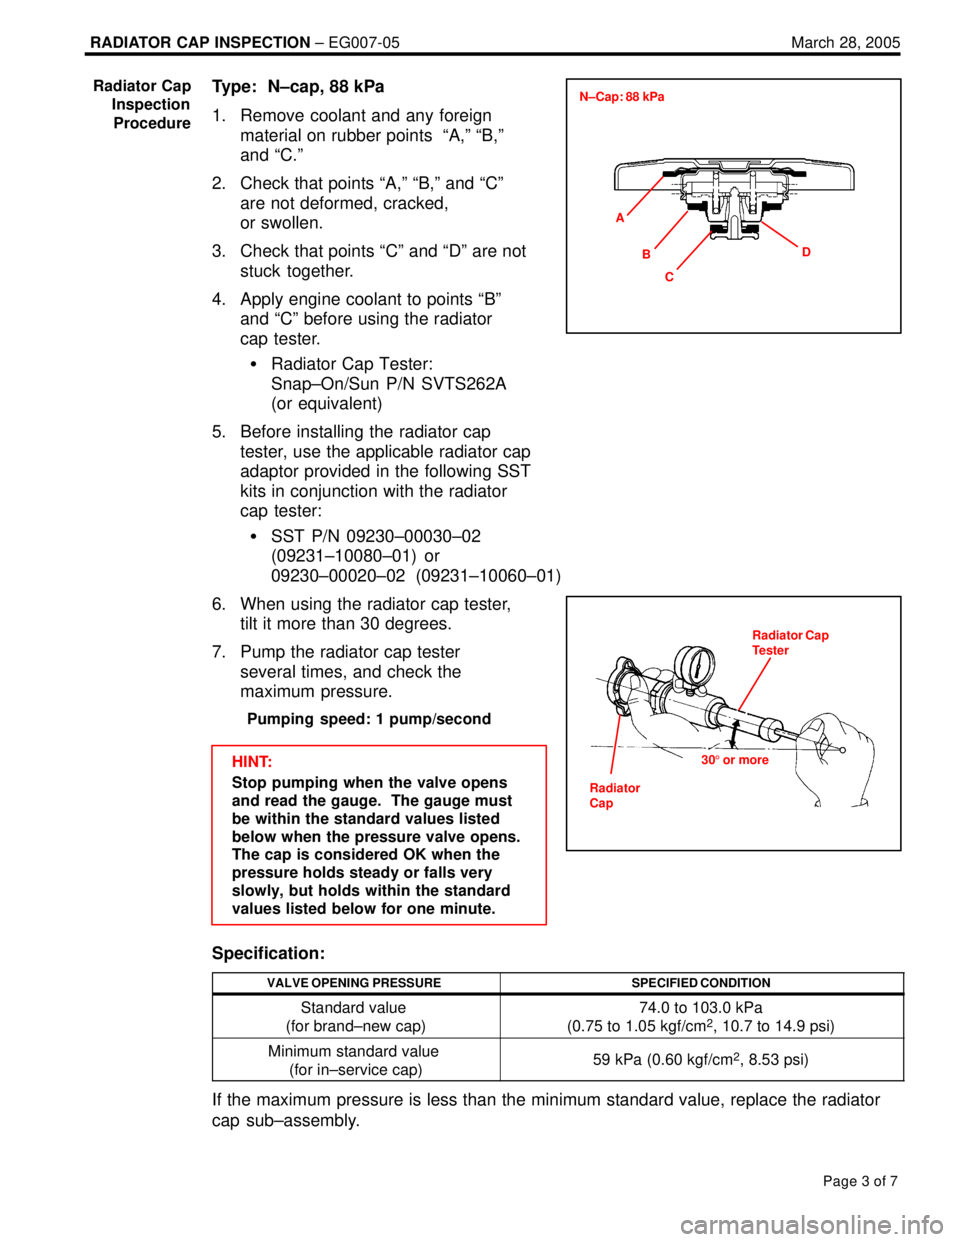
Type: N±cap, 88 kPa
1. Remove coolant and any foreign
material on rubber points ªA,º ªB,º
and ªC.º
2. Check that points ªA,º ªB,º and ªCº
are not deformed, cracked,
or swollen.
3. Check that points ªCº and ªDº are not
stuck together.
4. Apply engine coolant to points ªBº
and ªCº before using the radiator
cap tester.
�Radiator Cap Tester:
Snap±On/Sun P/N SVTS262A
(or equivalent)
5. Before installing the radiator cap
tester, use the applicable radiator cap
adaptor provided in the following SST
kits in conjunction with the radiator
cap tester:
�SST P/N 09230±00030±02
(09231±10080±01) or
09230±00020±02 (09231±10060±01)
6. When using the radiator cap tester,
tilt it more than 30 degrees.
7. Pump the radiator cap tester
several times, and check the
maximum pressure.
Pumping speed: 1 pump/second
HINT:
Stop pumping when the valve opens
and read the gauge. The gauge must
be within the standard values listed
below when the pressure valve opens.
The cap is considered OK when the
pressure holds steady or falls very
slowly, but holds within the standard
values listed below for one minute.
Specification:
VALVE OPENING PRESSURESPECIFIED CONDITION
Standard value
(for brand±new cap)74.0 to 103.0 kPa
(0.75 to 1.05 kgf/cm2, 10.7 to 14.9 psi)
Minimum standard value
(for in±service cap)59 kPa (0.60 kgf/cm2, 8.53 psi)
If the maximum pressure is less than the minimum standard value, replace the radiator
cap sub±assembly.
Radiator Cap
Inspection
Procedure
A
C BD N±Cap: 88 kPa
Radiator Cap
Tester
Radiator
Cap305 or more
Page 869 of 969

RADIATOR CAP INSPECTION ± EG007-05 March 28, 2005
Page 4 of 7
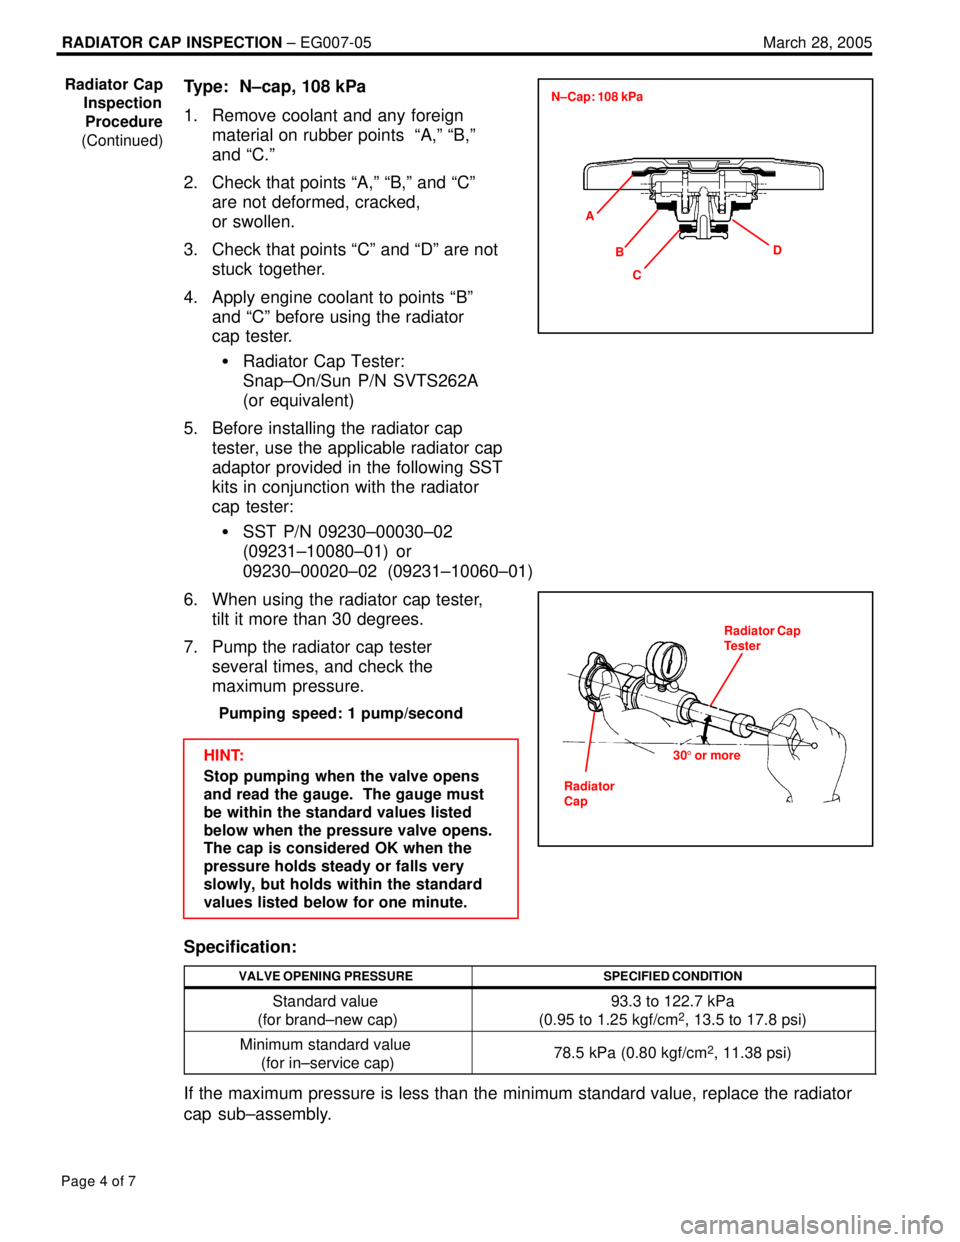
Type: N±cap, 108 kPa
1. Remove coolant and any foreign
material on rubber points ªA,º ªB,º
and ªC.º
2. Check that points ªA,º ªB,º and ªCº
are not deformed, cracked,
or swollen.
3. Check that points ªCº and ªDº are not
stuck together.
4. Apply engine coolant to points ªBº
and ªCº before using the radiator
cap tester.
�Radiator Cap Tester:
Snap±On/Sun P/N SVTS262A
(or equivalent)
5. Before installing the radiator cap
tester, use the applicable radiator cap
adaptor provided in the following SST
kits in conjunction with the radiator
cap tester:
�SST P/N 09230±00030±02
(09231±10080±01) or
09230±00020±02 (09231±10060±01)
6. When using the radiator cap tester,
tilt it more than 30 degrees.
7. Pump the radiator cap tester
several times, and check the
maximum pressure.
Pumping speed: 1 pump/second
HINT:
Stop pumping when the valve opens
and read the gauge. The gauge must
be within the standard values listed
below when the pressure valve opens.
The cap is considered OK when the
pressure holds steady or falls very
slowly, but holds within the standard
values listed below for one minute.
Specification:
VALVE OPENING PRESSURESPECIFIED CONDITION
Standard value
(for brand±new cap)93.3 to 122.7 kPa
(0.95 to 1.25 kgf/cm2, 13.5 to 17.8 psi)
Minimum standard value
(for in±service cap)78.5 kPa (0.80 kgf/cm2, 11.38 psi)
If the maximum pressure is less than the minimum standard value, replace the radiator
cap sub±assembly.
Radiator Cap
Inspection
Procedure
(Continued)
A
C BD N±Cap: 108 kPa
Radiator Cap
Tester
305 or more
Radiator
Cap
Page 870 of 969

RADIATOR CAP INSPECTION ± EG007-05 March 28, 2005
Page 5 of 7
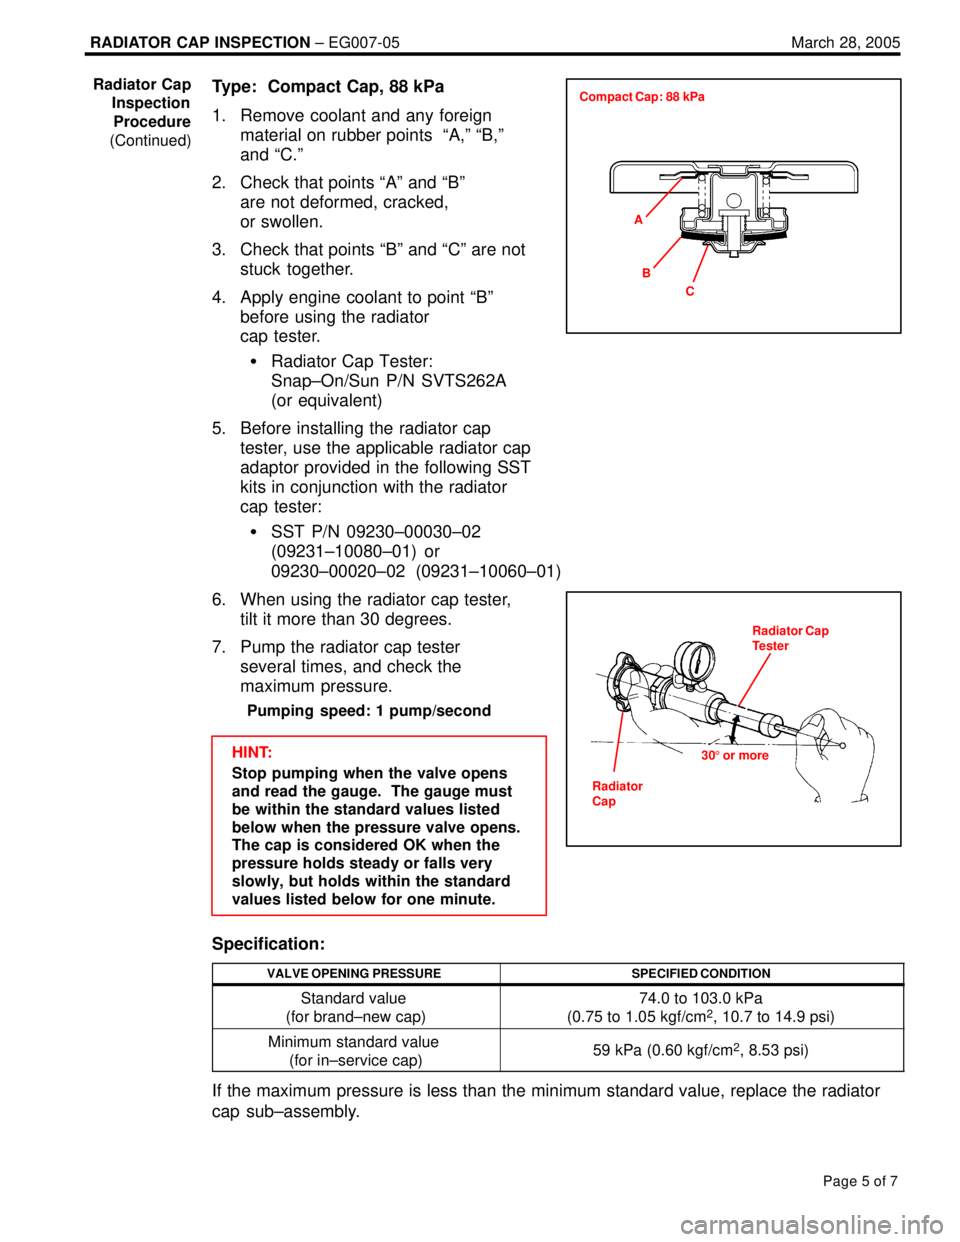
Type: Compact Cap, 88 kPa
1. Remove coolant and any foreign
material on rubber points ªA,º ªB,º
and ªC.º
2. Check that points ªAº and ªBº
are not deformed, cracked,
or swollen.
3. Check that points ªBº and ªCº are not
stuck together.
4. Apply engine coolant to point ªBº
before using the radiator
cap tester.
�Radiator Cap Tester:
Snap±On/Sun P/N SVTS262A
(or equivalent)
5. Before installing the radiator cap
tester, use the applicable radiator cap
adaptor provided in the following SST
kits in conjunction with the radiator
cap tester:
�SST P/N 09230±00030±02
(09231±10080±01) or
09230±00020±02 (09231±10060±01)
6. When using the radiator cap tester,
tilt it more than 30 degrees.
7. Pump the radiator cap tester
several times, and check the
maximum pressure.
Pumping speed: 1 pump/second
HINT:
Stop pumping when the valve opens
and read the gauge. The gauge must
be within the standard values listed
below when the pressure valve opens.
The cap is considered OK when the
pressure holds steady or falls very
slowly, but holds within the standard
values listed below for one minute.
Specification:
VALVE OPENING PRESSURESPECIFIED CONDITION
Standard value
(for brand±new cap)74.0 to 103.0 kPa
(0.75 to 1.05 kgf/cm2, 10.7 to 14.9 psi)
Minimum standard value
(for in±service cap)59 kPa (0.60 kgf/cm2, 8.53 psi)
If the maximum pressure is less than the minimum standard value, replace the radiator
cap sub±assembly.
Radiator Cap
Inspection
Procedure
(Continued)
A
C B Compact Cap: 88 kPa
Radiator Cap
Tester
305 or more
Radiator
Cap
Page 871 of 969

RADIATOR CAP INSPECTION ± EG007-05 March 28, 2005
Page 6 of 7
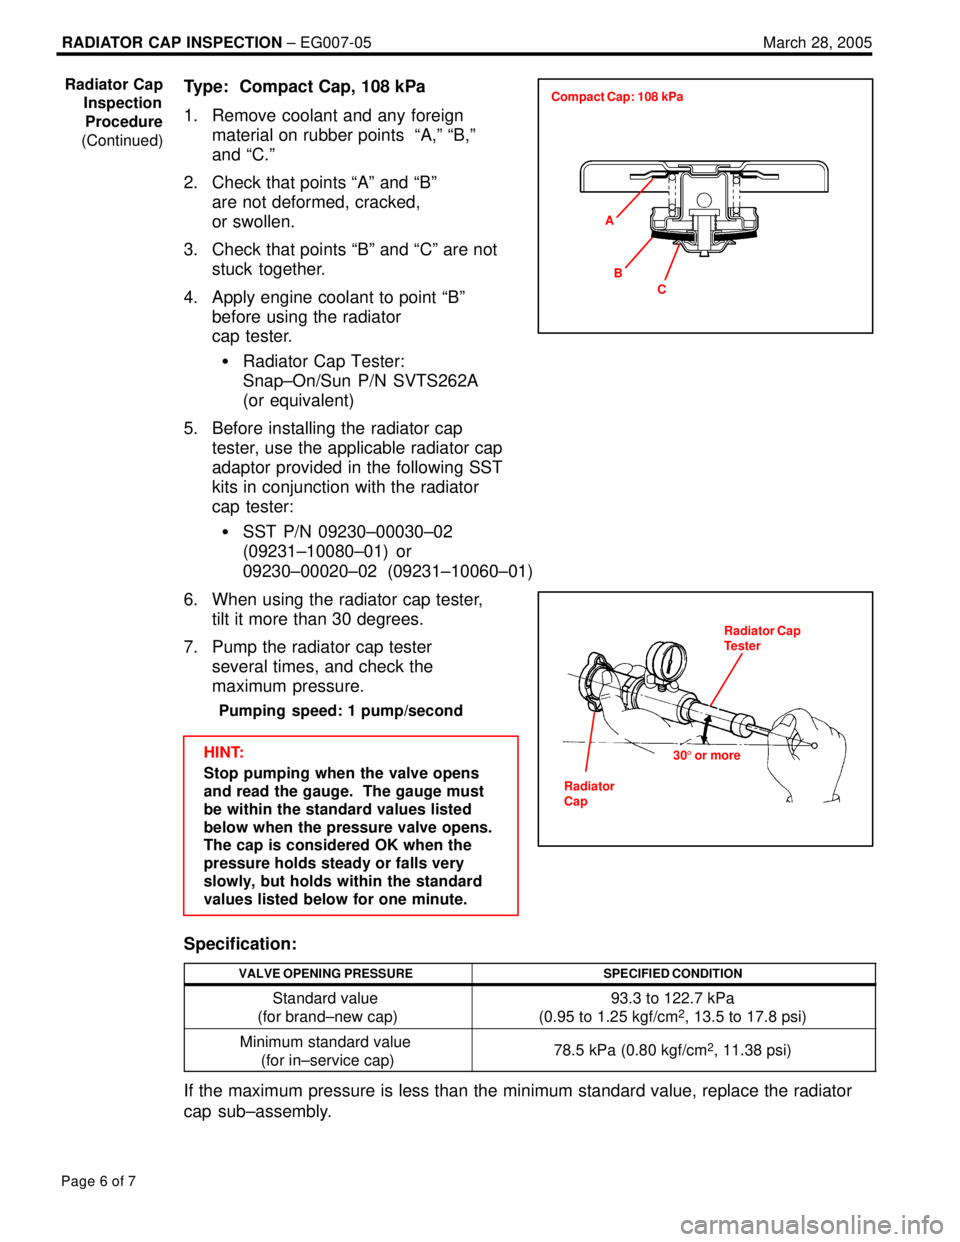
Type: Compact Cap, 108 kPa
1. Remove coolant and any foreign
material on rubber points ªA,º ªB,º
and ªC.º
2. Check that points ªAº and ªBº
are not deformed, cracked,
or swollen.
3. Check that points ªBº and ªCº are not
stuck together.
4. Apply engine coolant to point ªBº
before using the radiator
cap tester.
�Radiator Cap Tester:
Snap±On/Sun P/N SVTS262A
(or equivalent)
5. Before installing the radiator cap
tester, use the applicable radiator cap
adaptor provided in the following SST
kits in conjunction with the radiator
cap tester:
�SST P/N 09230±00030±02
(09231±10080±01) or
09230±00020±02 (09231±10060±01)
6. When using the radiator cap tester,
tilt it more than 30 degrees.
7. Pump the radiator cap tester
several times, and check the
maximum pressure.
Pumping speed: 1 pump/second
HINT:
Stop pumping when the valve opens
and read the gauge. The gauge must
be within the standard values listed
below when the pressure valve opens.
The cap is considered OK when the
pressure holds steady or falls very
slowly, but holds within the standard
values listed below for one minute.
Specification:
VALVE OPENING PRESSURESPECIFIED CONDITION
Standard value
(for brand±new cap)93.3 to 122.7 kPa
(0.95 to 1.25 kgf/cm2, 13.5 to 17.8 psi)
Minimum standard value
(for in±service cap)78.5 kPa (0.80 kgf/cm2, 11.38 psi)
If the maximum pressure is less than the minimum standard value, replace the radiator
cap sub±assembly.
Radiator Cap
Inspection
Procedure
(Continued)
A
C B Compact Cap: 108 kPa
Radiator Cap
Tester
305 or more
Radiator
Cap