Page 31 of 969
I31502
I31501
I315812 Clamps
I31766
- HEATER & AIR CONDITIONERAIR CONDITIONING RADIATOR ASSY
55-31
2646 Author�: Date�:
2005 LEXUS ES330 REPAIR MANUAL (RM1124U)
39. INSTALL INSTRUMENT FINISH PANEL RETAINER
LOWER
(a) Install the instrument finish panel retainer lower with the
2 bolts.
40. INSTALL INSTRUMENT PANEL BRACE SUB-ASSY
NO.1
(a) Install the instrument panel brace sub-assy No. 1 with the
nut.
(b) Install the bolt and screw.
Torque: 9.8 NVm (100 kgfVcm, 87 in.Vlbf) (Screw)
(c) Install the 2 clamps.
(d) Install the earth wire with the bolt.
Torque: 8.4 NVm (85 kgfVcm, 73 in.Vlbf)
41. INSTALL INSTRUMENT PANEL SAFETY PAD SUB-ASSY (See page 71-1 1)
Page 32 of 969
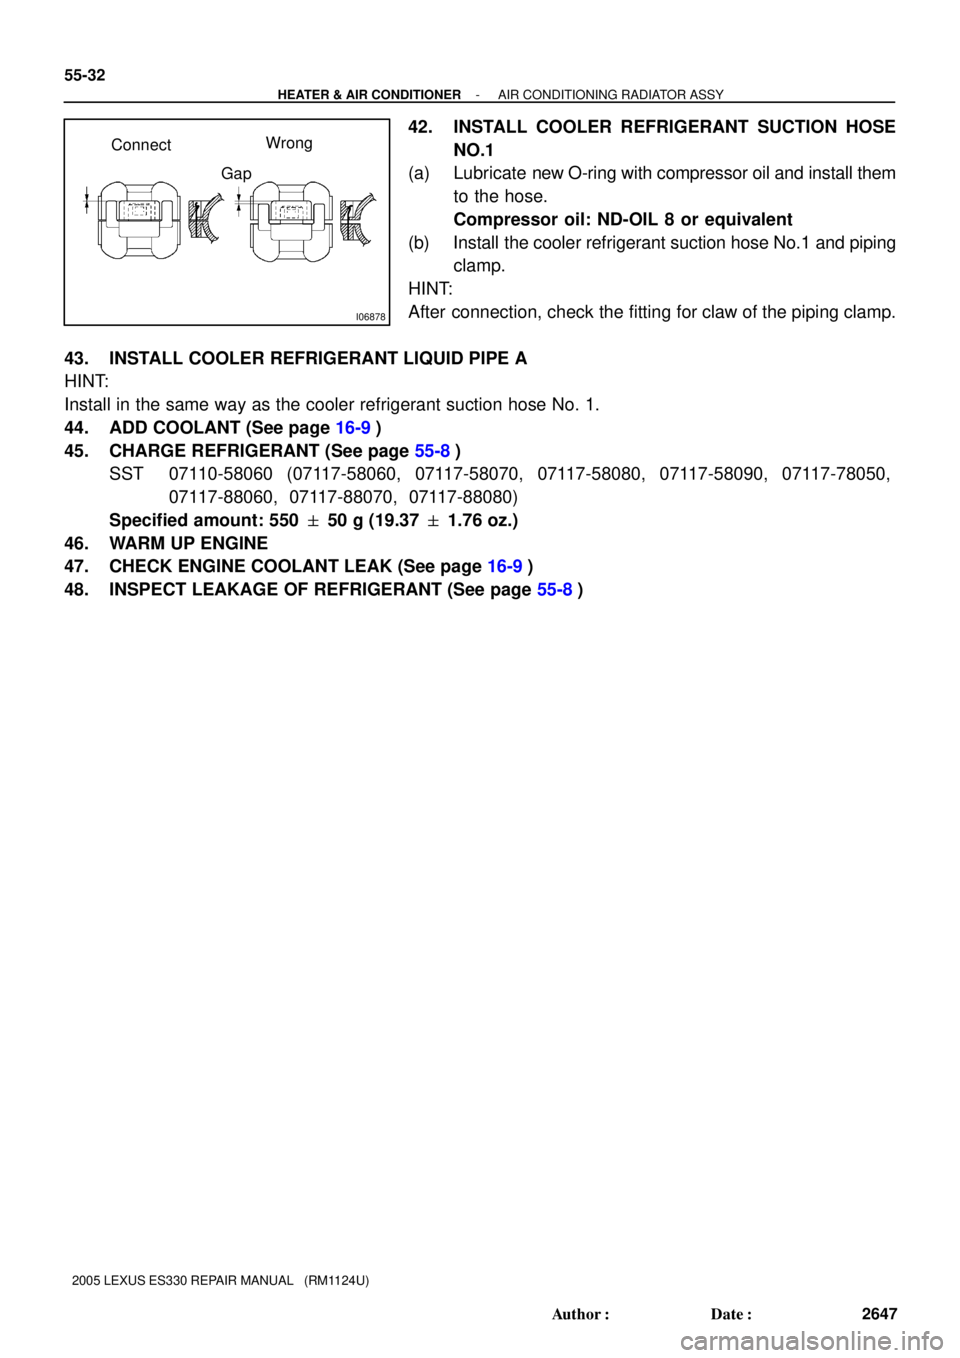
I06878
Connect
GapWrong 55-32
- HEATER & AIR CONDITIONERAIR CONDITIONING RADIATOR ASSY
2647 Author�: Date�:
2005 LEXUS ES330 REPAIR MANUAL (RM1124U)
42. INSTALL COOLER REFRIGERANT SUCTION HOSE
NO.1
(a) Lubricate new O-ring with compressor oil and install them
to the hose.
Compressor oil: ND-OIL 8 or equivalent
(b) Install the cooler refrigerant suction hose No.1 and piping
clamp.
HINT:
After connection, check the fitting for claw of the piping clamp.
43. INSTALL COOLER REFRIGERANT LIQUID PIPE A
HINT:
Install in the same way as the cooler refrigerant suction hose No. 1.
44. ADD COOLANT (See page 16-9)
45. CHARGE REFRIGERANT (See page 55-8)
SST 07110-58060 (07117-58060, 07117-58070, 07117-58080, 07117-58090, 07117-78050,
07117-88060, 07117-88070, 07117-88080)
Specified amount: 550 � 50 g (19.37 � 1.76 oz.)
46. WARM UP ENGINE
47. CHECK ENGINE COOLANT LEAK (See page 16-9)
48. INSPECT LEAKAGE OF REFRIGERANT (See page 55-8)
Page 44 of 969
550DH-02
I31635
Radiator Support Upper
O-ring �
Cooler Condenser Assy
Cooler Dryer
Filter
Cap
9.8 (100, 85 in.Vlbf)
Non-reusable parts Compressor oil ND-OIL 8 or equivalent
9.8 (100, 85 in.Vlbf)
O-ring �5.4 (55, 47 in.Vlbf)
O-ring �
12 (125, 9)
�
Air Cleaner Inlet No. 1
Air Cleaner Inlet Assy
NVm (kgfVcm, ftVlbf): Specified torque
Radiator Lower Air Deflector
Hood Lock Release Lever
Protector
55-44
- HEATER & AIR CONDITIONERCOOLER CONDENSER ASSY
2659 Author�: Date�:
2005 LEXUS ES330 REPAIR MANUAL (RM1124U)
COMPONENTS
Page 45 of 969

OVERHAUL
HINT:
COMPONENTS: See page 55-44
1. DISCHAR")
550DI-02
I31538
I31539
I31540
- HEATER & AIR CONDITIONERCOOLER CONDENSER ASSY
55-45
2660 Author�: Date�:
2005 LEXUS ES330 REPAIR MANUAL (RM1124U)
OVERHAUL
HINT:
COMPONENTS: See page 55-44
1. DISCHARGE REFRIGERANT FROM REFRIGERATION SYSTEM (See page 55-8)
SST 07110-58060 (07117-58080, 07117-58090, 07117-78050, 07117-88060, 07117-88070,
07117-88080)
2. REMOVE COOLER REFRIGERANT DISCHARGE
HOSE NO.1
(a) Remove the bolt and disconnect the cooler refrigerant
discharge hose No. 1 from the cooler condenser assy.
(b) Remove the O-ring from the cooler refrigerant discharge
hose No. 1.
NOTICE:
Seat the opening of the disconnected parts using vinyl tape
to prevent moisture and foreign matter from entering.
3. DISCONNECT COOLER REFRIGERANT LIQUID PIPE
A
(a) Remove the bolt and disconnect the cooler refrigerant liq-
uid pipe A from the cooler condenser assy.
(b) Remove the O-ring from the cooler refrigerant liquid pipe
A.
NOTICE:
Seal the opening of the disconnected parts using vinyl tape
to prevent moisture and foreign matter from entering.
4. REMOVE AIR CLEANER INLET ASSY (See page 16-21)
5. REMOVE RADIATOR SUPPORT UPPER (See page 16-21)
6. REMOVE COOLER CONDENSER ASSY
(a) Remove the 2 nuts and cooler condenser assy.
Page 47 of 969

9. INSTALL COOLER CONDENSER ASSY
(a) Install the cooler conde")
I31541
I31539
I31538
- HEATER & AIR CONDITIONERCOOLER CONDENSER ASSY
55-47
2662 Author�: Date�:
2005 LEXUS ES330 REPAIR MANUAL (RM1124U)
9. INSTALL COOLER CONDENSER ASSY
(a) Install the cooler condenser assy with the 2 nuts.
Torque: 9.8 NVm (100 kgfVcm, 85 in.Vlbf)
10. INSTALL RADIATOR SUPPORT UPPER (See page 16-21)
11. INSTALL COOLER REFRIGERANT LIQUID PIPE A
(a) Remove the attached vinyl tape from the tube and con-
necting part of the cooler condenser assy.
(b) Sufficiently apply compressor oil to the new O-ring and
tube joint.
Compressor oil: ND-OIL 8 or equivalent
(c) Install a O-ring to the cooler refrigerant liquid pipe A.
(d) Connect the cooler refrigerant liquid pipe A to the cooler
condenser assy with the bolt.
Torque: 5.4 NVm (55 kgfVcm, 47 in.Vlbf)
12. INSTALL COOLER REFRIGERANT DISCHARGE
HOSE NO.1
(a) Remove the attached vinyl tape from the tube and con-
necting part of the cooler condenser assy.
(b) Sufficiently apply compressor oil to the new O-ring and
tube joint.
Compressor oil: ND-OIL 8 or equivalent
(c) Install a O-ring to the cooler refrigerant discharge hose
No. 1.
(d) Connect the cooler refrigerant discharge hose No. 1 to
the cooler condenser assy with the bolt.
Torque: 5.4 NVm (55 kgfVcm, 47 in.Vlbf)
Page 217 of 969

(d) Clea")
C11090
D25368
OK NG
The Bottom is
Damaged
C81014
40-18
- AUTOMATIC TRANSMISSION / TRANSTORQUE CONVERTER CLUTCH AND DRIVE PLATE
2533 Author�: Date�:
2005 LEXUS ES330 REPAIR MANUAL (RM1124U)
(d) Clean and check the oil cooler and oil pipe line.
(1) If the torque converter clutch is inspected or the ATF
is exchanged, clean the oil cooler and oil pipe line.
HINT:
�Spray compressed air of 196 kPa (2 kgf/cm2, 28 psi) from
the inlet hose.
�If plenty of fine powders are identified in the ATF, add new
ATF using a bucket pump and clean it again.
(2) If the ATF is cloudy, inspect the oil cooler (radiator).
(e) Prevent deformation of the torque converter clutch and
damage to the oil pump gear.
(1) When any marks due to interference are found on
the end of the bolt for the torque converter clutch
and on the bottom of the bolt hole, replace the bolt
and the torque converter clutch.
(2) All of the bolts must be have the same length.
(3) No missing spring washer.
2. INSPECT DRIVE PLATE & RING GEAR SUB-ASSY
(a) Set up a dial indicator and measure the drive plate runout.
(b) Check the damage of the ring gear.
Maximum runout: 0.20 mm (0.0079 in.)
If the runout is not within the specification or ring gear is dam-
aged, replace the drive plate.
Page 243 of 969
400FW-02
D25414
D25415
C93327
40-44
- AUTOMATIC TRANSMISSION / TRANSTRANSMISSION CONTROL CABLE ASSY
2559 Author�: Date�:
2005 LEXUS ES330 REPAIR MANUAL (RM1124U)
TRANSMISSION CONTROL CABLE ASSY
REPLACEMENT
1. REMOVE INSTRUMENT PANEL SAFETY PAD SUB-ASSY (SEE PAGE 71-1 1)
2. REMOVE AIR CONDITIONING RADIATOR ASSY (SEE PAGE 55-17)
3. REMOVE AIR BAG SENSOR ASSY CENTER (SEE PAGE60-55)
4. REMOVE BATTERY
5. REMOVE AIR CLEANER ASSY
6. REMOVE AIR CLEANER HOSE NO.1
7. REMOVE INTAKE AIR RESONATOR SUB-ASSY
8. REMOVE TRANSMISSION CONTROL CABLE ASSY
(a) Remove the nut from the control shaft lever.
(b) Disconnect the control cable from the control shaft lever.
(c) Remove the clip and disconnect the control cable from
the control cable bracket.
(d) Disconnect the control cable from the control cable
clamp.
Page 245 of 969
C90581
C93327
D25414
D25415
40-46
- AUTOMATIC TRANSMISSION / TRANSTRANSMISSION CONTROL CABLE ASSY
2561 Author�: Date�:
2005 LEXUS ES330 REPAIR MANUAL (RM1124U)
(d) Install the shift cable grommet retainer No.2 with the 2
bolts.
Torque: 4.9 NVm (50 kgfVcm, 43 in.Vlbf)
(e) Connect the control cable to the control cable clamp.
(f) Temporarily install the control cable to the control shaft le-
ver with nuts.
(g) Install the control cable and a new clip to the bracket.
10. INSTALL INTAKE AIR RESONATOR SUB-ASSY
11. INSTALL AIR CLEANER HOSE NO.1
12. INSTALL AIR CLEANER ASSY
13. INSTALL AIR BAG SENSOR ASSY CENTER (SEE PAGE 60-55)
14. INSTALL AIR CONDITIONING RADIATOR ASSY (SEE PAGE 55-17)
15. INSTALL INSTRUMENT PANEL SAFETY PAD SUB-ASSY (SEE PAGE 71-1 1)
16. INSTALL BATTERY
17. ADJUST SHIFT LEVER POSITION (SEE PAGE40-40)
18. INSPECT SHIFT LEVER POSITION (SEE PAGE40-40)