Page 286 of 969
320E8-04
F41547
F41548
F41550
- BRAKEREAR BRAKE
32-41
2475 Author�: Date�:
2005 LEXUS ES330 REPAIR MANUAL (RM1124U)
OVERHAUL
HINT:
�Overhaul the RH side by the same procedures with LH side.
�Two types of brake pad exist; one is with slit and the other without slit.
1. REMOVE REAR WHEEL
2. DRAIN BRAKE FLUID
NOTICE:
Wash the brake fluid off immediately if it comes into contact with any painted surfaces.
3. DISCONNECT REAR LH FLEXIBLE HOSE
(a) Remove the union bolt and a gasket from the disc brake cylinder, then disconnect the flexible hose
from the disc brake cylinder.
4. REMOVE REAR DISC BRAKE CYLINDER SLIDE PIN
(a) Remove the rear disc brake cylinder slide pin.
5. REMOVE DISC BRAKE CYLINDER ASSY REAR LH
(a) Lift up the disc brake cylinder and remove the disc brake
cylinder.
6. REMOVE REAR DISC BRAKE CYLINDER SLIDE
BUSH
(a) Remove the cylinder slide bush from the disc brake cylin-
der.
Page 288 of 969

14. REMOVE CYLINDER BOOT
(a) Using a screwdriver, remove the set ring and cylinder boot
fro")
F41553
C82872
F41541
- BRAKEREAR BRAKE
32-43
2477 Author�: Date�:
2005 LEXUS ES330 REPAIR MANUAL (RM1124U)
14. REMOVE CYLINDER BOOT
(a) Using a screwdriver, remove the set ring and cylinder boot
from the disc brake cylinder.
15. REMOVE REAR DISC BRAKE PISTON
(a) Place a piece of cloth or like, between the piston and the
disc brake cylinder.
(b) Use compressed air to remove the piston from the disc
brake cylinder.
CAUTION:
Do not place your fingers in front of the piston when using
compressed air.
NOTICE:
Do not spatter the brake fluid.
16. REMOVE PISTON SEAL
(a) Using a screwdriver, remove the piston seal from the disc brake cylinder.
NOTICE:
Do not damage the inner cylinder and the cylinder groove.
17. REMOVE REAR DISC BRAKE BLEEDER PLUG CAP
18. REMOVE REAR DISC BRAKE BLEEDER PLUG
19. INSPECT BRAKE CYLINDER AND PISTON
(a) Check the cylinder bore and piston for rust or scoring.
20. INSPECT PAD LINING THICKNESS
(a) Using a ruler, measure the pad lining thickness.
USA, Canada models:
Standard thickness: 10.0 mm (0.394 in.)
Minimum thickness: 1.0 mm (0.039 in.)
Brazil models:
Standard thickness: 11.0 mm (0.433 in.)
Minimum thickness: 1.0 mm (0.039 in.)
21. INSPECT REAR DISC BRAKE PAD SUPPORT PLATE
(a) Make sure that they have sufficient rebound, no deformation cracks or wear, and all rust, dirt are
cleaned off.
22. INSPECT REAR DISC BRAKE PAD SUPPORT PLATE
(a) Make sure that they have sufficient rebound, no deformation cracks or wear, and all rust, dirt are
cleaned off.
Page 291 of 969

F41551
F41562
Cylinder Slide Pin
Cylinder Mounting
Lithium soap base glycol grease
F41558Lithium soap base glycol grease
32-46
- BRAKEREAR BRAKE
2480 Author�: Date�:
2005 LEXUS ES330 REPAIR MANUAL (RM1124U)
40. INSTALL REAR DISC BRAKE CYLINDER SLIDE PIN
(a) Using a hexagon wrench (8 mm), install the cylinder slide
pin.
Torque: 39.2 NVm (400 kgfVcm, 29 ftVlbf)
41. INSTALL REAR DISC BRAKE BUSH DUST BOOT
(a) Apply the lithium soap base glycol grease to seal surface
of a new bush dust boot.
(b) Install the bush dust boot to the cylinder slide pin.
42. INSTALL REAR DISC BRAKE CYLINDER SLIDE BUSH
(a) Apply the lithium soap base glycol grease to a new cylin-
der slide bush.
(b) Install the cylinder slide bush to the disc brake cylinder.
43. INSTALL DISC BRAKE CYLINDER ASSY REAR LH
(a) Apply the lithium soap base glycol grease to the cylinder slide pin.
(b) Install the disc brake cylinder to the cylinder slide pin.
44. INSTALL REAR DISC BRAKE CYLINDER SLIDE PIN
(a) Apply the lithium soap base glycol grease to the cylinder slide pin.
(b) Install the cylinder slide pin to the disc brake cylinder.
Torque: 34.3 NVm (350 kgfVcm, 25 ftVlbf)
45. CONNECT REAR LH FLEXIBLE HOSE
(a) Connect a new gasket and flexible hose with the union bolt.
Torque: 29.4 NVm (300 kgfVcm, 22 ftVlbf)
HINT:
Install the flexible hose lock securely in the lock hole of the disc brake cylinder.
46. FILL RESERVOIR WITH BRAKE FLUID
47. BLEED MASTER CYLINDER (SEE PAGE 32-4)
SST 09023-00101
48. BLEED BRAKE LINE (SEE PAGE 32-4)
49. CHECK FLUID LEVEL IN RESERVOIR (SEE PAGE 32-4)
50. CHECK BRAKE FLUID LEAKAGE
51. INSTALL REAR WHEEL
Torque: 103 NVm (1050 kgfVcm, 76 ftVlbf)
Page 293 of 969

2482 Author�: Date�:
2005 LEXUS ES330 REPAIR MANUAL (RM1124")
320E2-04
F40998
C84798
To RL W/C
To FR W/C
To FL W/C
To RR W/C From M/C 2nd
From M/C 1st
F40998
32-48
- BRAKEBRAKE ACTUATOR ASSY (W/O VSC)
2482 Author�: Date�:
2005 LEXUS ES330 REPAIR MANUAL (RM1124U)
REPLACEMENT
1. DRAIN BRAKE FLUID
NOTICE:
Wash off the brake fluid immediately if it comes into contact with a painted surface.
2. REMOVE BRAKE ACTUATOR WITH BRACKET
(a) Using SST, disconnect the 6 brake lines from the actuator.
SST 09023-00101
(b) Use tags or make a memo to identify the place to recon-
nect.
(c) Disconnect the brake actuator connector.
(d) Remove the 3 nuts and brake actuator with bracket.
3. REMOVE BRAKE ACTUATOR ASSY
(a) Remove the 2 nuts and brake actuator from the bracket.
(b) Remove the 2 holders and 3 cushions from the brake actuator.
4. INSTALL BRAKE ACTUATOR ASSY
(a) Install the 3 cushions and 2 holders to the brake actuator.
(b) Install the brake actuator to the bracket with the 2 nuts.
Torque: 5.4 NVm (55 kgfVcm, 48 in.Vlbf)
5. INSTALL BRAKE ACTUATOR WITH BRACKET
(a) Install the brake actuator with the 3 nuts.
Torque: 19 NVm (194 kgfVcm, 14 ftVlbf)
(b) Connect the brake actuator connector.
Page 294 of 969
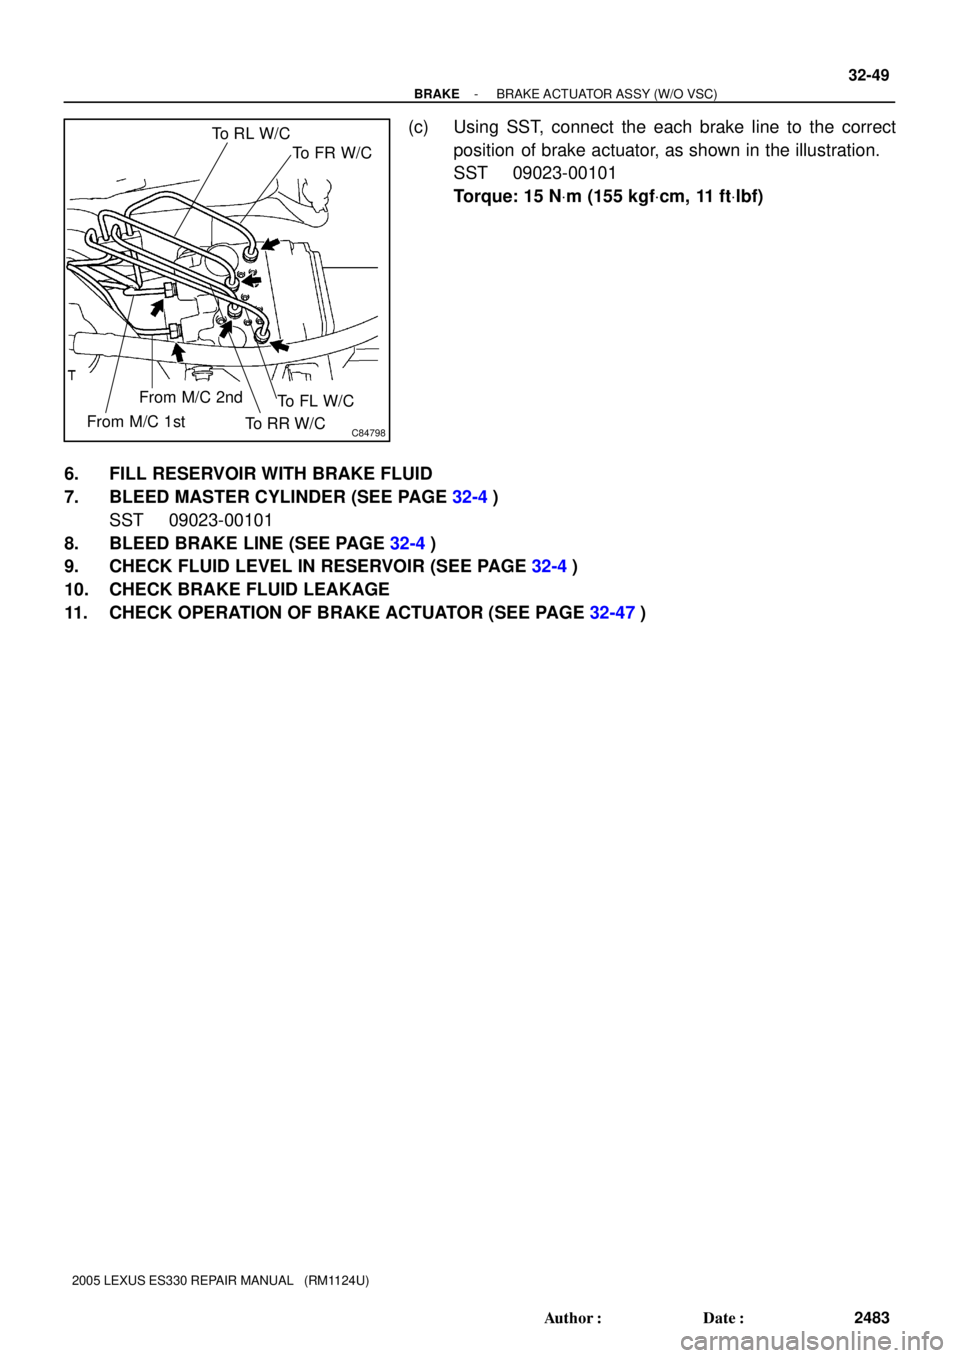
C84798
To RL W/C
To FR W/C
To FL W/C
To RR W/C From M/C 2nd
From M/C 1st
- BRAKEBRAKE ACTUATOR ASSY (W/O VSC)
32-49
2483 Author�: Date�:
2005 LEXUS ES330 REPAIR MANUAL (RM1124U)
(c) Using SST, connect the each brake line to the correct
position of brake actuator, as shown in the illustration.
SST 09023-00101
Torque: 15 NVm (155 kgfVcm, 11 ftVlbf)
6. FILL RESERVOIR WITH BRAKE FLUID
7. BLEED MASTER CYLINDER (SEE PAGE 32-4)
SST 09023-00101
8. BLEED BRAKE LINE (SEE PAGE 32-4)
9. CHECK FLUID LEVEL IN RESERVOIR (SEE PAGE 32-4)
10. CHECK BRAKE FLUID LEAKAGE
11. CHECK OPERATION OF BRAKE ACTUATOR (SEE PAGE 32-47)
Page 296 of 969
3211Y-04
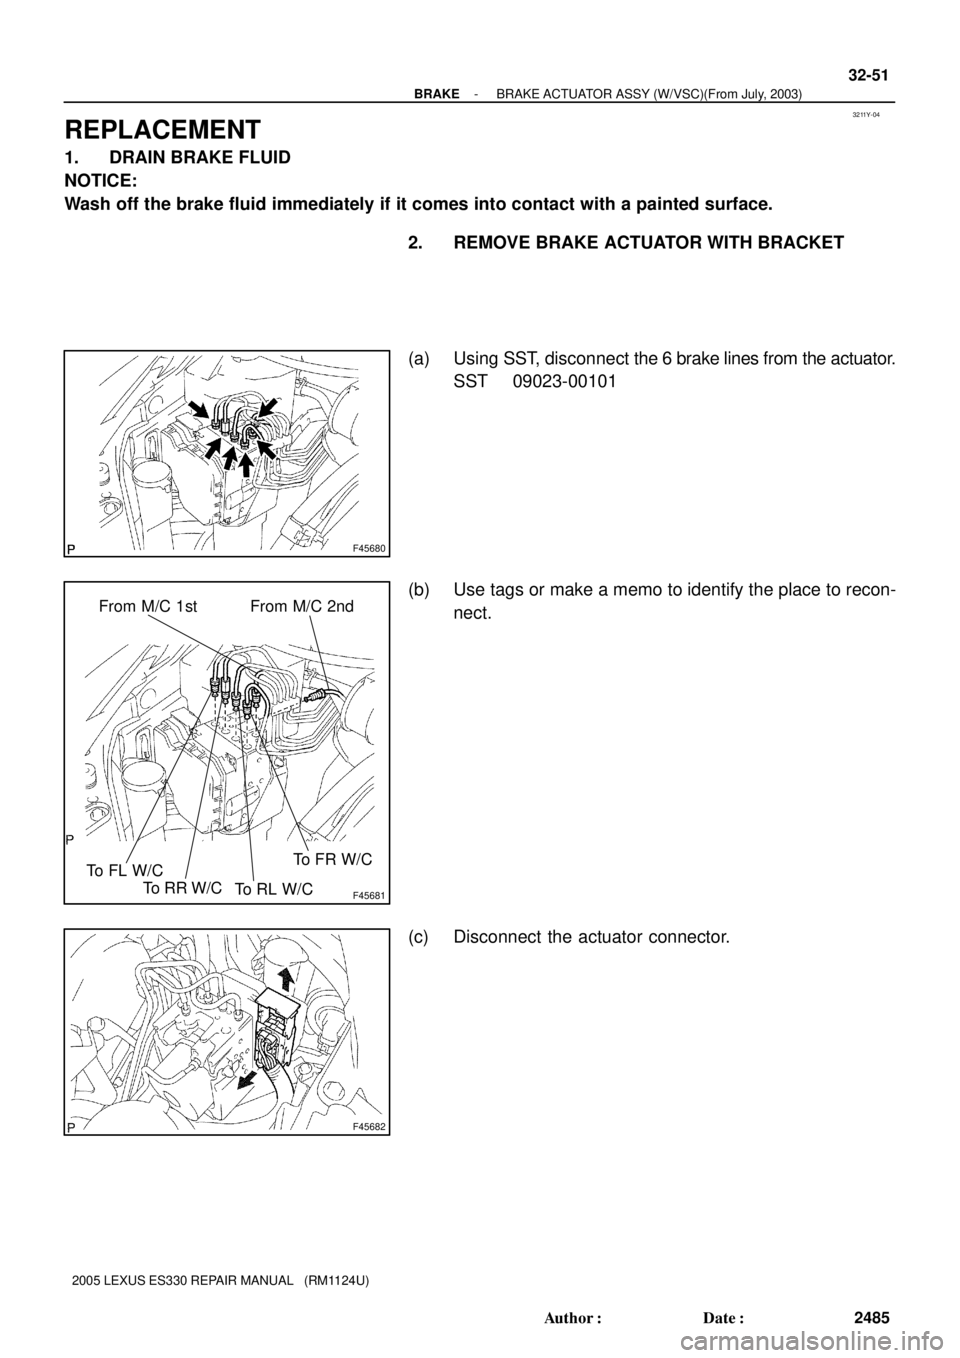
F45680
F45681
From M/C 1st
To FL W/CFrom M/C 2nd
To RR W/C
To RL W/CTo FR W/C
F45682
- BRAKEBRAKE ACTUATOR ASSY (W/VSC)(From July, 2003)
32-51
2485 Author�: Date�:
2005 LEXUS ES330 REPAIR MANUAL (RM1124U)
REPLACEMENT
1. DRAIN BRAKE FLUID
NOTICE:
Wash off the brake fluid immediately if it comes into contact with a painted surface.
2. REMOVE BRAKE ACTUATOR WITH BRACKET
(a) Using SST, disconnect the 6 brake lines from the actuator.
SST 09023-00101
(b) Use tags or make a memo to identify the place to recon-
nect.
(c) Disconnect the actuator connector.
Page 297 of 969
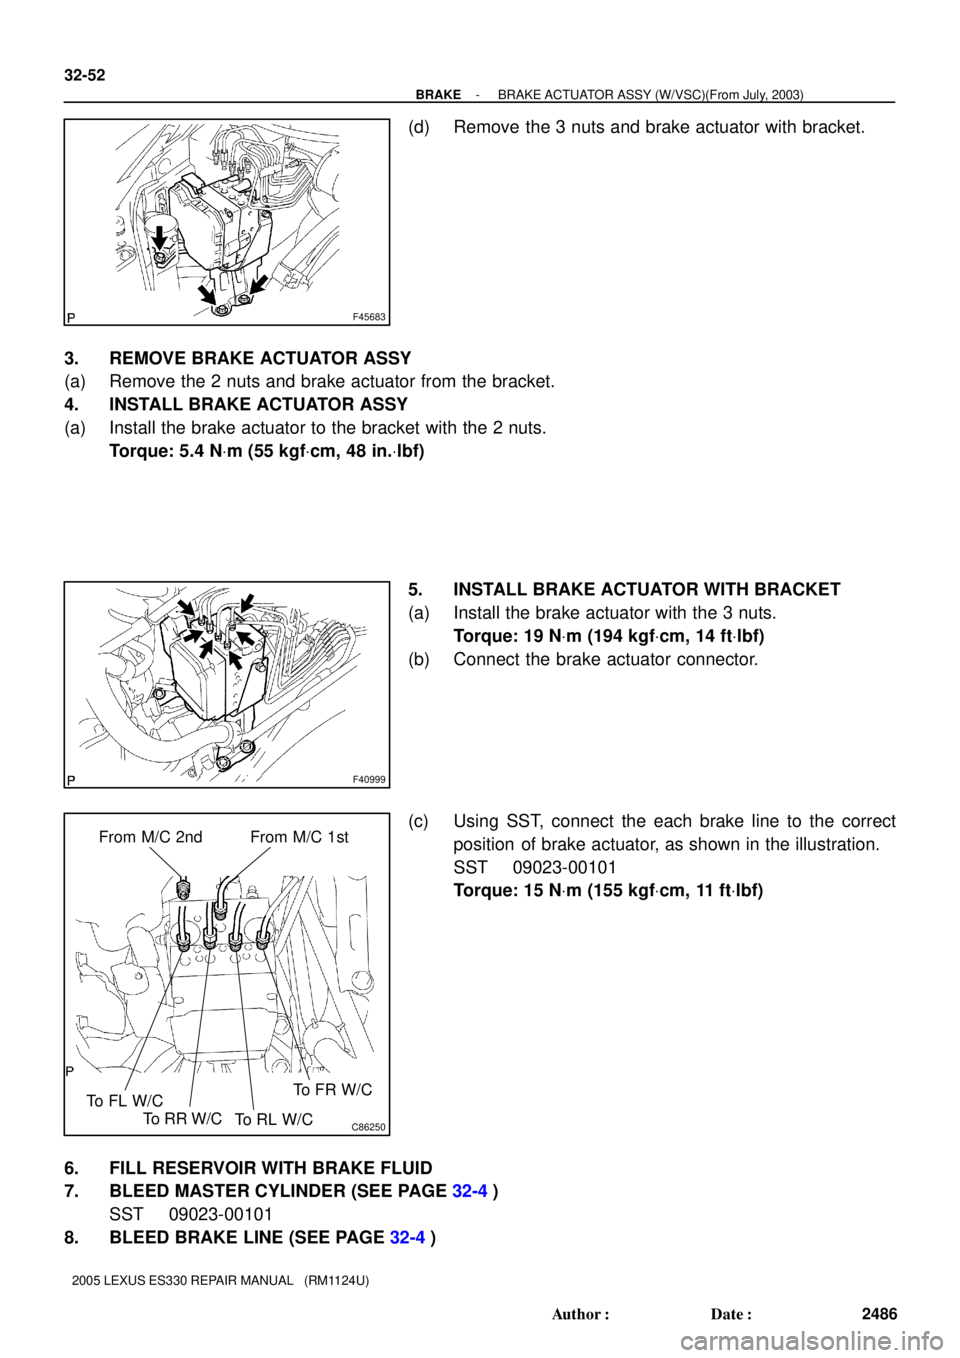
F45683
F40999
C86250
From M/C 2nd
To FL W/CFrom M/C 1st
To RR W/C
To RL W/CTo FR W/C
32-52
- BRAKEBRAKE ACTUATOR ASSY (W/VSC)(From July, 2003)
2486 Author�: Date�:
2005 LEXUS ES330 REPAIR MANUAL (RM1124U)
(d) Remove the 3 nuts and brake actuator with bracket.
3. REMOVE BRAKE ACTUATOR ASSY
(a) Remove the 2 nuts and brake actuator from the bracket.
4. INSTALL BRAKE ACTUATOR ASSY
(a) Install the brake actuator to the bracket with the 2 nuts.
Torque: 5.4 NVm (55 kgfVcm, 48 in.Vlbf)
5. INSTALL BRAKE ACTUATOR WITH BRACKET
(a) Install the brake actuator with the 3 nuts.
Torque: 19 NVm (194 kgfVcm, 14 ftVlbf)
(b) Connect the brake actuator connector.
(c) Using SST, connect the each brake line to the correct
position of brake actuator, as shown in the illustration.
SST 09023-00101
Torque: 15 NVm (155 kgfVcm, 11 ftVlbf)
6. FILL RESERVOIR WITH BRAKE FLUID
7. BLEED MASTER CYLINDER (SEE PAGE 32-4)
SST 09023-00101
8. BLEED BRAKE LINE (SEE PAGE 32-4)
Page 298 of 969
- BRAKEBRAKE ACTUATOR ASSY (W/VSC)(From July, 2003)
32-53
2487 Author�: Date�:
2005 LEXUS ES330 REPAIR MANUAL (RM1124U)
9. BLEED BRAKE ACTUATOR ASSY (W/ VSC) (SEE PAGE 32-4)
SST 09992-00242, 09992-00350
10. CHECK FLUID LEVEL IN RESERVOIR(SEE PAGE 32-4)
11. CHECK BRAKE FLUID LEAKAGE
12. CHECK OPERATION OF BRAKE ACTUATOR (SEE PAGE 32-47)