Page 650 of 969
160QB-01
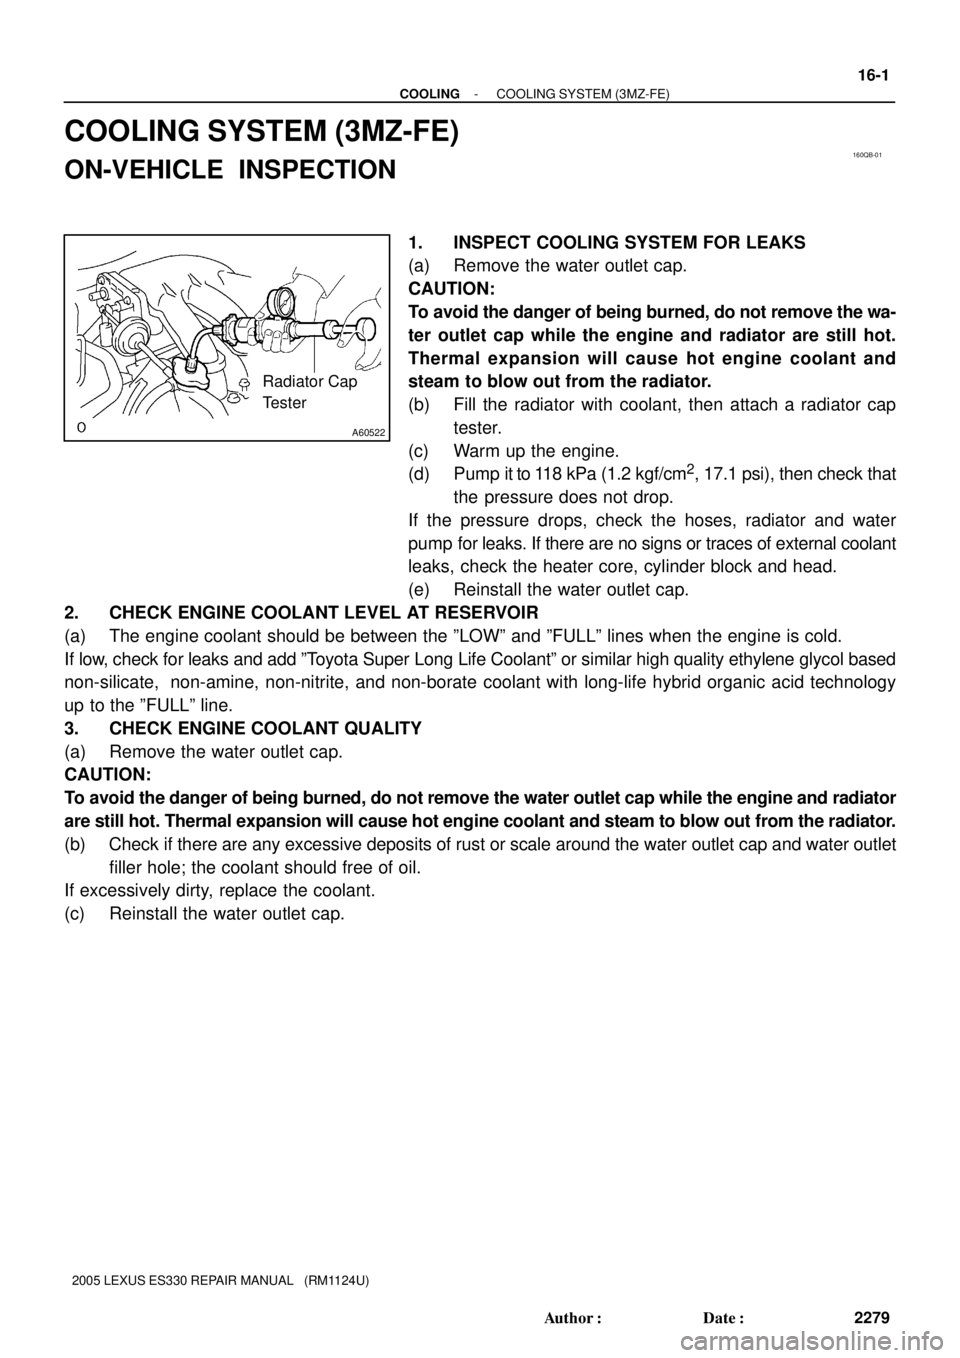
A60522
Radiator Cap
Tester
- COOLINGCOOLING SYSTEM (3MZ-FE)
16-1
2279 Author�: Date�:
2005 LEXUS ES330 REPAIR MANUAL (RM1124U)
COOLING SYSTEM (3MZ-FE)
ON-VEHICLE INSPECTION
1. INSPECT COOLING SYSTEM FOR LEAKS
(a) Remove the water outlet cap.
CAUTION:
To avoid the danger of being burned, do not remove the wa-
ter outlet cap while the engine and radiator are still hot.
Thermal expansion will cause hot engine coolant and
steam to blow out from the radiator.
(b) Fill the radiator with coolant, then attach a radiator cap
tester.
(c) Warm up the engine.
(d) Pump it to 118 kPa (1.2 kgf/cm
2, 17.1 psi), then check that
the pressure does not drop.
If the pressure drops, check the hoses, radiator and water
pump for leaks. If there are no signs or traces of external coolant
leaks, check the heater core, cylinder block and head.
(e) Reinstall the water outlet cap.
2. CHECK ENGINE COOLANT LEVEL AT RESERVOIR
(a) The engine coolant should be between the ºLOWº and ºFULLº lines when the engine is cold.
If low, check for leaks and add ºToyota Super Long Life Coolantº or similar high quality ethylene glycol based
non-silicate, non-amine, non-nitrite, and non-borate coolant with long-life hybrid organic acid technology
up to the ºFULLº line.
3. CHECK ENGINE COOLANT QUALITY
(a) Remove the water outlet cap.
CAUTION:
To avoid the danger of being burned, do not remove the water outlet cap while the engine and radiator
are still hot. Thermal expansion will cause hot engine coolant and steam to blow out from the radiator.
(b) Check if there are any excessive deposits of rust or scale around the water outlet cap and water outlet
filler hole; the coolant should free of oil.
If excessively dirty, replace the coolant.
(c) Reinstall the water outlet cap.
Page 677 of 969
170FZ-02
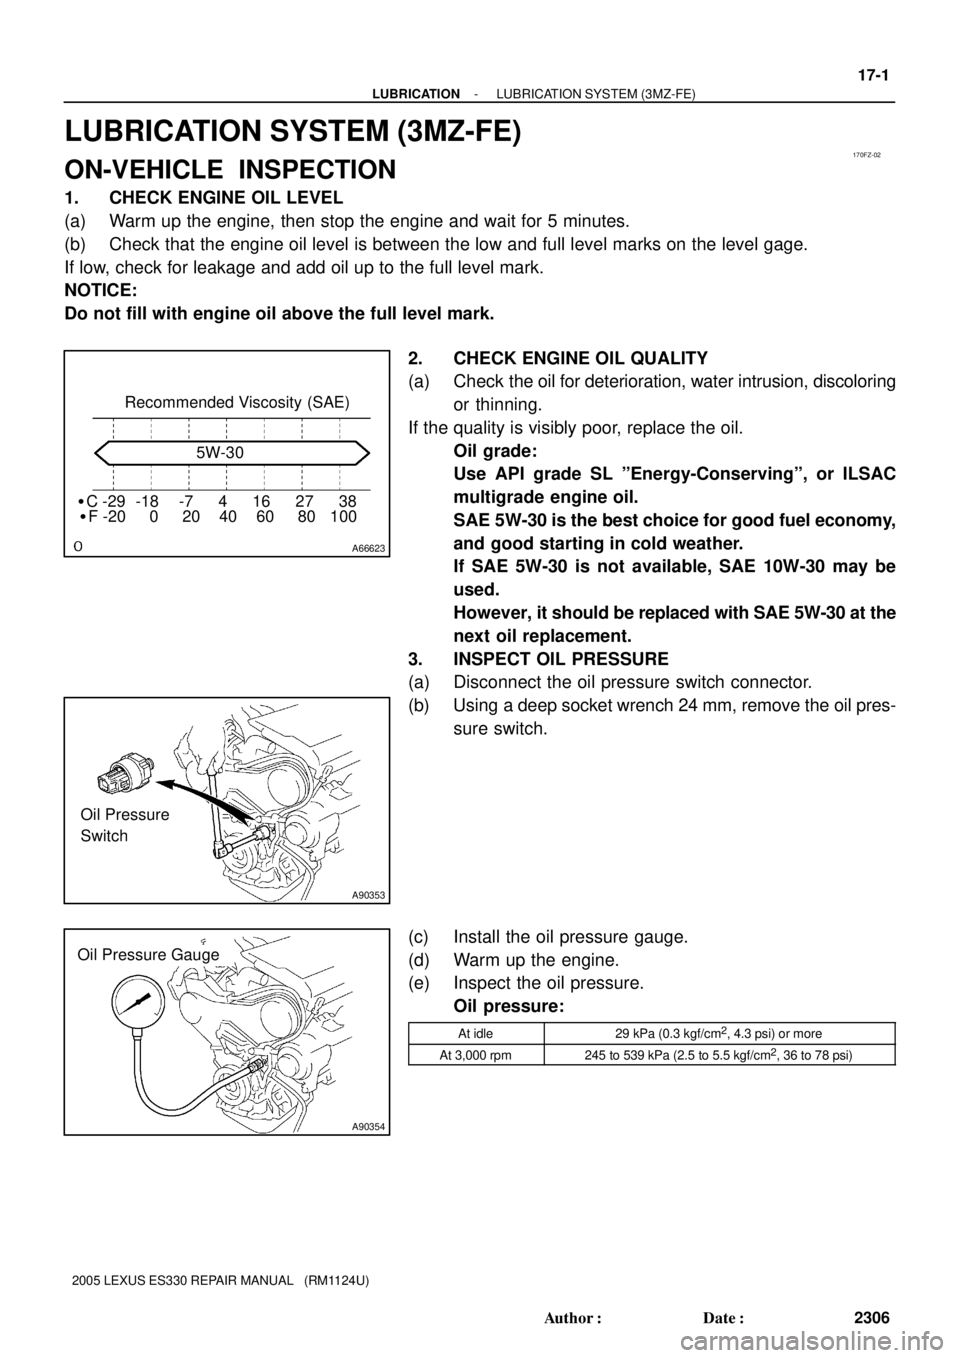
A66623
�C -29 -18 -7 4 16 27 38Recommended Viscosity (SAE)
�F -20 0 20 40 60 80 1005W-30
A90353
Oil Pressure
Switch
A90354
Oil Pressure Gauge
- LUBRICATIONLUBRICATION SYSTEM (3MZ-FE)
17-1
2306 Author�: Date�:
2005 LEXUS ES330 REPAIR MANUAL (RM1124U)
LUBRICATION SYSTEM (3MZ-FE)
ON-VEHICLE INSPECTION
1. CHECK ENGINE OIL LEVEL
(a) Warm up the engine, then stop the engine and wait for 5 minutes.
(b) Check that the engine oil level is between the low and full level marks on the level gage.
If low, check for leakage and add oil up to the full level mark.
NOTICE:
Do not fill with engine oil above the full level mark.
2. CHECK ENGINE OIL QUALITY
(a) Check the oil for deterioration, water intrusion, discoloring
or thinning.
If the quality is visibly poor, replace the oil.
Oil grade:
Use API grade SL ºEnergy-Conservingº, or ILSAC
multigrade engine oil.
SAE 5W-30 is the best choice for good fuel economy,
and good starting in cold weather.
If SAE 5W-30 is not available, SAE 10W-30 may be
used.
However, it should be replaced with SAE 5W-30 at the
next oil replacement.
3. INSPECT OIL PRESSURE
(a) Disconnect the oil pressure switch connector.
(b) Using a deep socket wrench 24 mm, remove the oil pres-
sure switch.
(c) Install the oil pressure gauge.
(d) Warm up the engine.
(e) Inspect the oil pressure.
Oil pressure:
At idle29 kPa (0.3 kgf/cm2, 4.3 psi) or more
At 3,000 rpm245 to 539 kPa (2.5 to 5.5 kgf/cm2, 36 to 78 psi)
Page 700 of 969
B62019
A84690
Ohmmeter
A84688
Ohmmeter 18-4
- IGNITIONIGNITION SYSTEM (3MZ-FE)
2329 Author�: Date�:
2005 LEXUS ES330 REPAIR MANUAL (RM1124U)
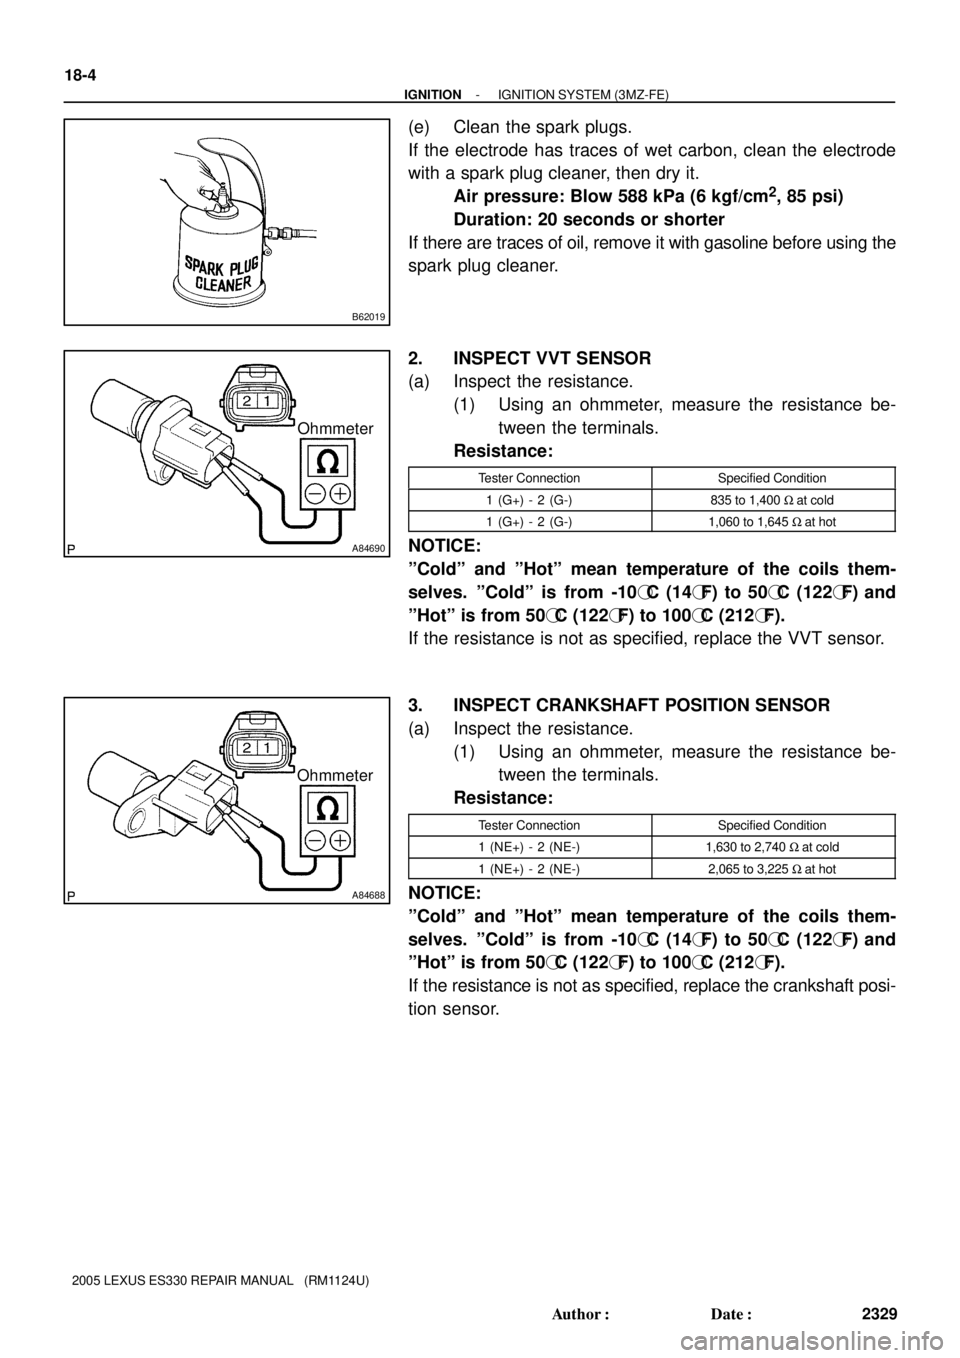
(e) Clean the spark plugs.
If the electrode has traces of wet carbon, clean the electrode
with a spark plug cleaner, then dry it.
Air pressure: Blow 588 kPa (6 kgf/cm
2, 85 psi)
Duration: 20 seconds or shorter
If there are traces of oil, remove it with gasoline before using the
spark plug cleaner.
2. INSPECT VVT SENSOR
(a) Inspect the resistance.
(1) Using an ohmmeter, measure the resistance be-
tween the terminals.
Resistance:
Tester ConnectionSpecified Condition
1 (G+) - 2 (G-)835 to 1,400 W at cold
1 (G+) - 2 (G-)1,060 to 1,645 W at hot
NOTICE:
ºColdº and ºHotº mean temperature of the coils them-
selves. ºColdº is from -10�C (14�F) to 50�C (122�F) and
ºHotº is from 50�C (122�F) to 100�C (212�F).
If the resistance is not as specified, replace the VVT sensor.
3. INSPECT CRANKSHAFT POSITION SENSOR
(a) Inspect the resistance.
(1) Using an ohmmeter, measure the resistance be-
tween the terminals.
Resistance:
Tester ConnectionSpecified Condition
1 (NE+) - 2 (NE-)1,630 to 2,740 W at cold
1 (NE+) - 2 (NE-)2,065 to 3,225 W at hot
NOTICE:
ºColdº and ºHotº mean temperature of the coils them-
selves. ºColdº is from -10�C (14�F) to 50�C (122�F) and
ºHotº is from 50�C (122�F) to 100�C (212�F).
If the resistance is not as specified, replace the crankshaft posi-
tion sensor.
Page 729 of 969
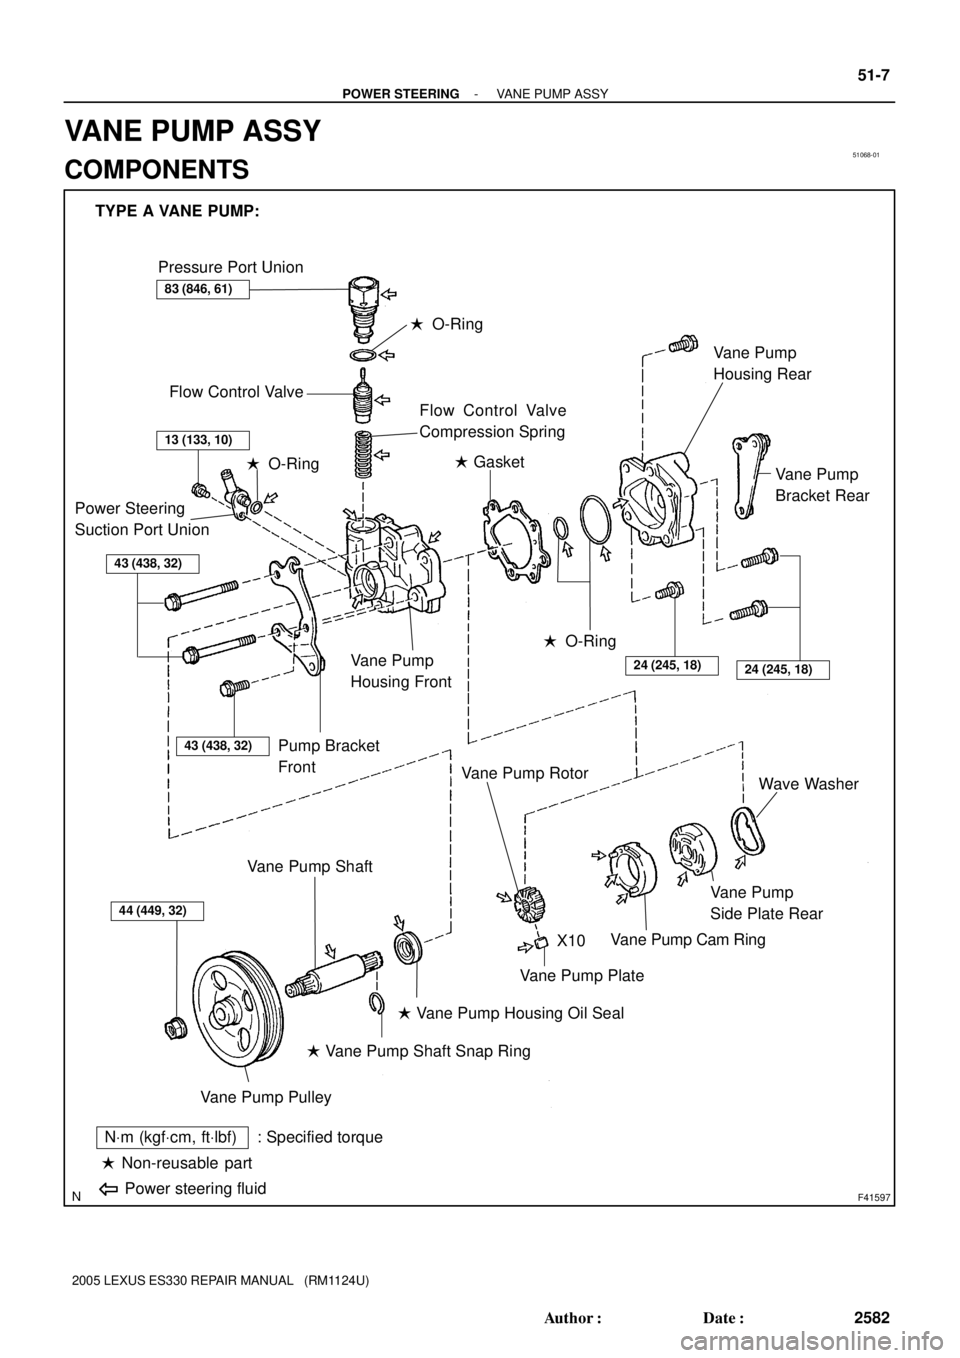
51068-01
F41597
TYPE A VANE PUMP:
Pressure Port Union
Flow Control Valve
� O-Ring
Flow Control Valve
Compression Spring
Power Steering
Suction Port Union
43 (438, 32)
Pump Bracket
Front
Vane Pump
Housing Front
� O-Ring� Gasket
� O-Ring
24 (245, 18)24 (245, 18)
Vane Pump
Bracket Rear Vane Pump
Housing Rear
44 (449, 32)
Vane Pump Pulley
Vane Pump Shaft
� Vane Pump Shaft Snap Ring
� Vane Pump Housing Oil Seal
Vane Pump Plate
Vane Pump Rotor
Vane Pump Cam Ring
Vane Pump
Side Plate RearWave Washer
� Non-reusable part
NVm (kgfVcm, ftVlbf) : Specified torque
Power steering fluid
X10
83 (846, 61)
13 (133, 10)
43 (438, 32)
- POWER STEERINGVANE PUMP ASSY
51-7
2582 Author�: Date�:
2005 LEXUS ES330 REPAIR MANUAL (RM1124U)
VANE PUMP ASSY
COMPONENTS
Page 730 of 969
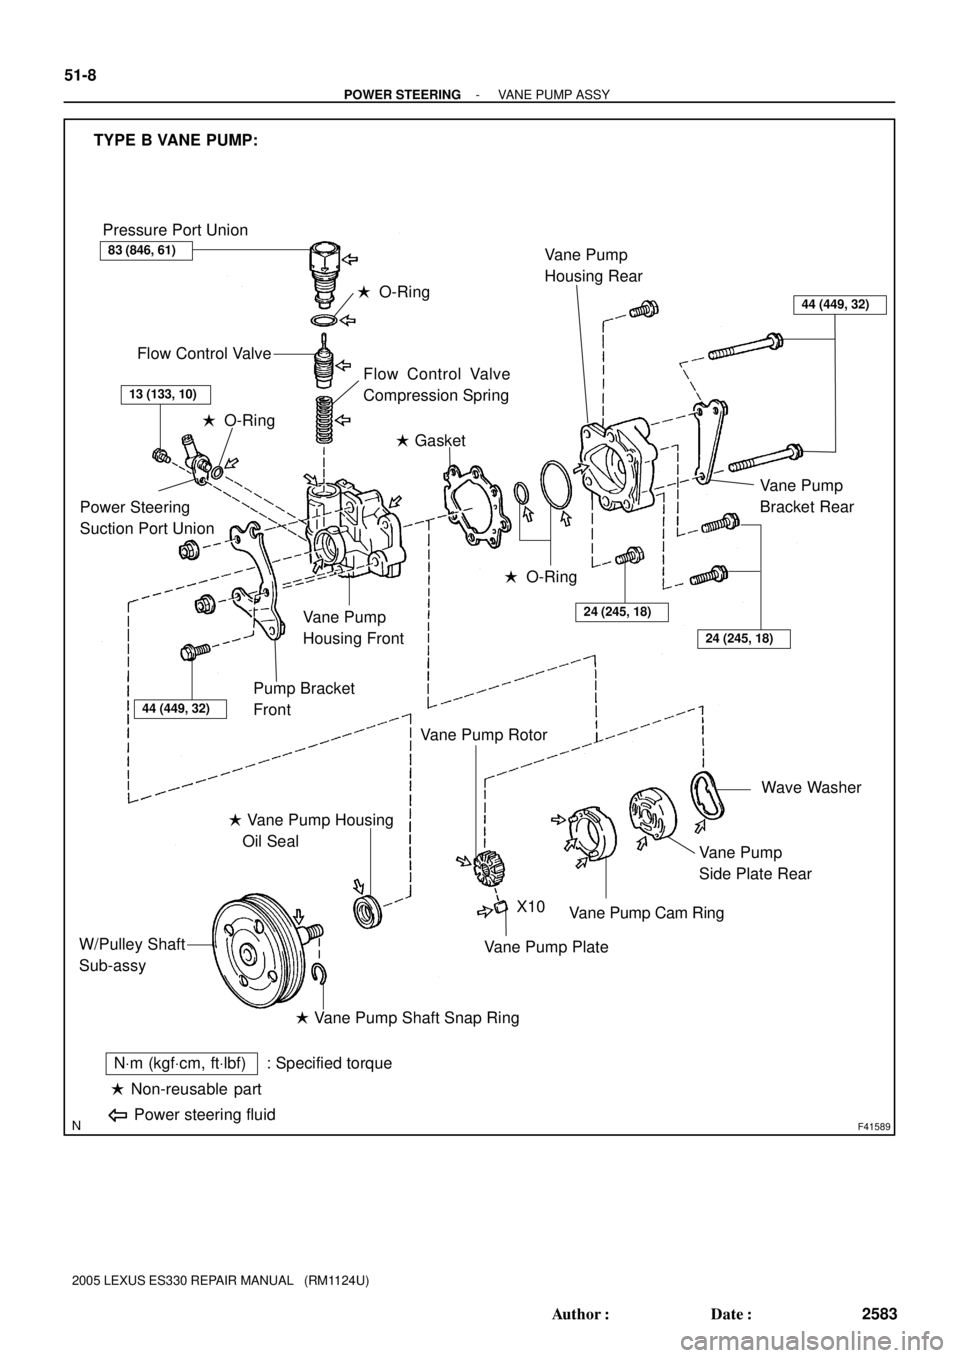
F41589
TYPE B VANE PUMP:
Pressure Port Union
� O-Ring
Flow Control Valve
Flow Control Valve
Compression Spring
� Gasket
Power Steering
Suction Port Union
� O-Ring
Pump Bracket
Front
Vane Pump
Housing Front
� O-Ring
24 (245, 18)
24 (245, 18)
Vane Pump
Housing Rear
Wave Washer
Vane Pump
Side Plate Rear
Vane Pump Cam Ring
Vane Pump Plate
� Vane Pump Shaft Snap Ring W/Pulley Shaft
Sub-assy� Vane Pump Housing
Oil Seal
� Non-reusable part
NVm (kgfVcm, ftVlbf) : Specified torque
Power steering fluid
Vane Pump
Bracket Rear
X10
Vane Pump Rotor
83 (846, 61)
13 (133, 10)
44 (449, 32)
44 (449, 32)
51-8
- POWER STEERINGVANE PUMP ASSY
2583 Author�: Date�:
2005 LEXUS ES330 REPAIR MANUAL (RM1124U)
Page 738 of 969
F41600
SST
F41599
A
B
W03441
Pressure
Feed
Hose
Stopper 51-16
- POWER STEERINGVANE PUMP ASSY
2591 Author�: Date�:
2005 LEXUS ES330 REPAIR MANUAL (RM1124U)
45. INSTALL POWER STEERING SUCTION PORT UNION
(a) Coat a new O-ring with power steering fluid and install it to the power steering suction port union.
(b) Install the power steering suction port union with the bolt.
Torque: 13 NVm (133 kgfVcm, 10 ftVlbf)
46. INSTALL VANE PUMP PULLEY(TYPE A VANE PUMP)
(a) Install the vane pump pulley to the vane pump shaft.
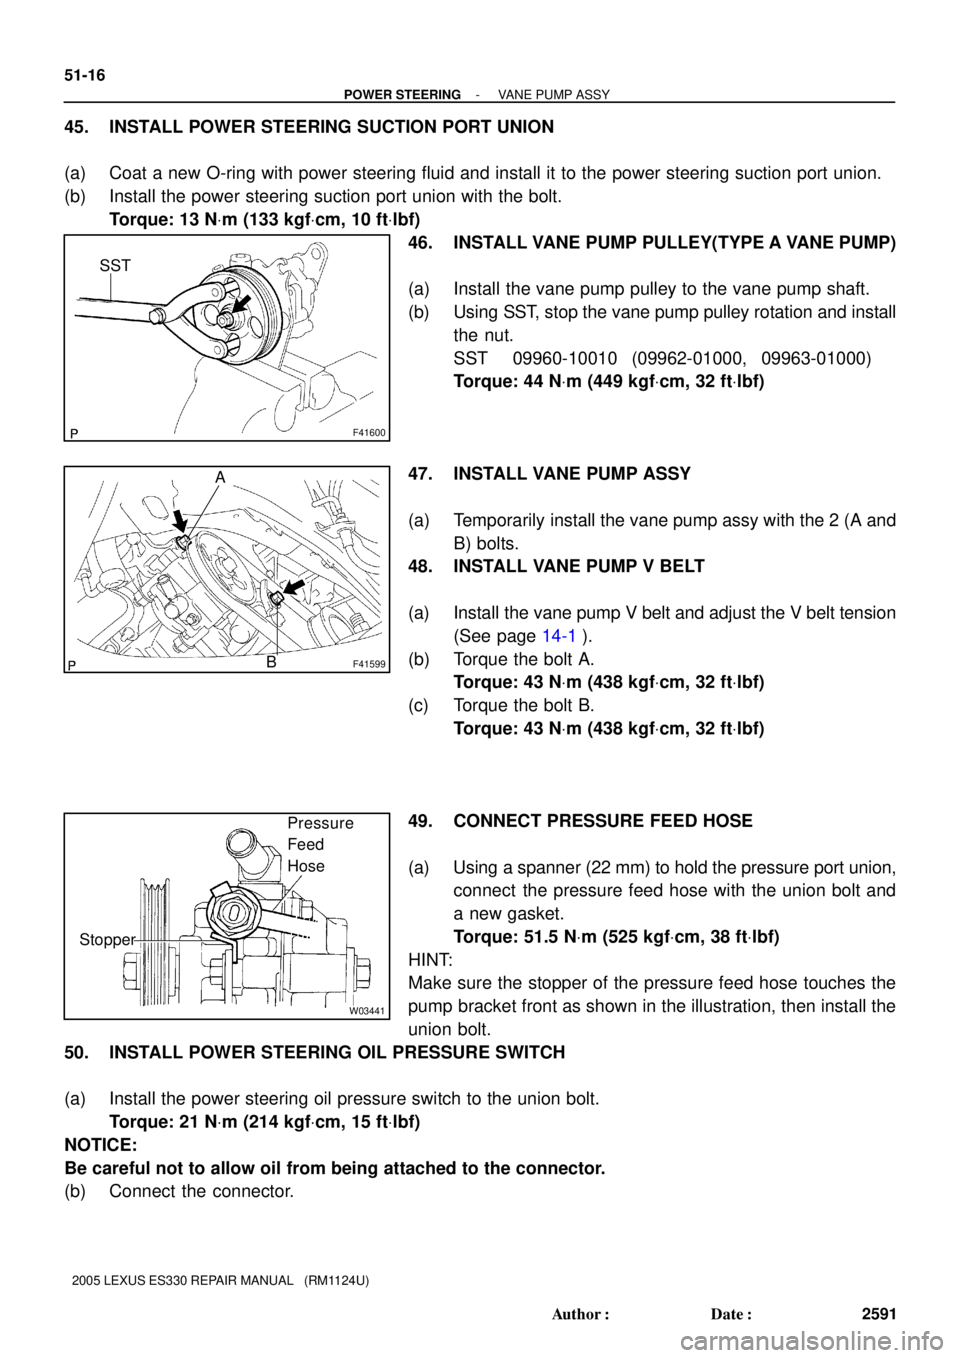
(b) Using SST, stop the vane pump pulley rotation and install
the nut.
SST 09960-10010 (09962-01000, 09963-01000)
Torque: 44 NVm (449 kgfVcm, 32 ftVlbf)
47. INSTALL VANE PUMP ASSY
(a) Temporarily install the vane pump assy with the 2 (A and
B) bolts.
48. INSTALL VANE PUMP V BELT
(a) Install the vane pump V belt and adjust the V belt tension
(See page 14-1).
(b) Torque the bolt A.
Torque: 43 NVm (438 kgfVcm, 32 ftVlbf)
(c) Torque the bolt B.
Torque: 43 NVm (438 kgfVcm, 32 ftVlbf)
49. CONNECT PRESSURE FEED HOSE
(a) Using a spanner (22 mm) to hold the pressure port union,
connect the pressure feed hose with the union bolt and
a new gasket.
Torque: 51.5 NVm (525 kgfVcm, 38 ftVlbf)
HINT:
Make sure the stopper of the pressure feed hose touches the
pump bracket front as shown in the illustration, then install the
union bolt.
50. INSTALL POWER STEERING OIL PRESSURE SWITCH
(a) Install the power steering oil pressure switch to the union bolt.
Torque: 21 NVm (214 kgfVcm, 15 ftVlbf)
NOTICE:
Be careful not to allow oil from being attached to the connector.
(b) Connect the connector.