2005 LEXUS ES300 diagnostic menu
[x] Cancel search: diagnostic menuPage 935 of 969
DIAGNOSTIC TESTER IMMOBILIZER FUNCTIONS ± SS005-01 Revised July 6, 2001
Page 4 of 14
1. Transponder Key Type
Before any Immobilizer functions are performed, verify the type of transponder key
that you are attempting to use for the service operation. Some functions may only be
performed with a registered Master Key.
A. Insert the current key into the ignition cylinder and turn to the ON position.
HINT:
The Immobilizer key blanks are preconfigured as Master or Sub Keys. Master Key
blanks cannot be registered as Sub Keys nor can Sub Key blanks be registered as
Master Keys. Also, the flat key is now enabled as a full function Master Key that must
be registered.
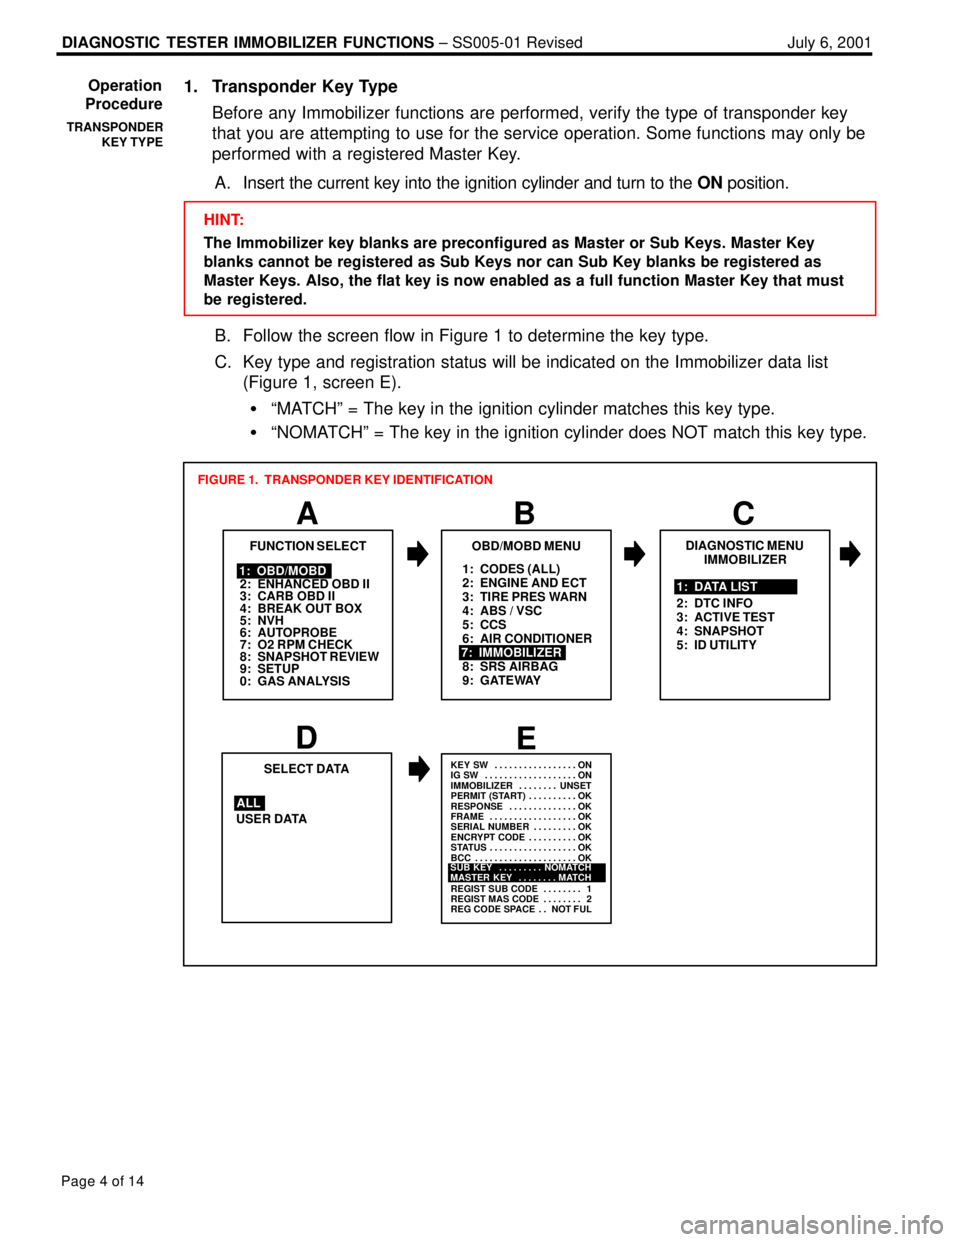
B. Follow the screen flow in Figure 1 to determine the key type.
C. Key type and registration status will be indicated on the Immobilizer data list
(Figure 1, screen E).
�ªMATCHº = The key in the ignition cylinder matches this key type.
�ªNOMATCHº = The key in the ignition cylinder does NOT match this key type.
1: CODES (ALL)
2: ENGINE AND ECT
3: TIRE PRES WARN
4: ABS / VSC
5: CCS
6: AIR CONDITIONER
8: SRS AIRBAG
9: GATEWAY
A
FUNCTION SELECT
B
1: OBD/MOBD
2: ENHANCED OBD II
3: CARB OBD II
4: BREAK OUT BOX
5: NVH
6: AUTOPROBE
7: O2 RPM CHECK
8: SNAPSHOT REVIEW
9: SETUP
0: GAS ANALYSIS
OBD/MOBD MENU
7: IMMOBILIZER
FIGURE 1. TRANSPONDER KEY IDENTIFICATION
DE
USER DATASELECT DATA
ALL
KEY SW ON. . . . . . . . . . . . . . . . .
IG SW ON. . . . . . . . . . . . . . . . . . .
IMMOBILIZER UNSET. . . . . . . .
PERMIT (START) OK. . . . . . . . . .
RESPONSE OK. . . . . . . . . . . . . .
FRAME OK. . . . . . . . . . . . . . . . . .
SERIAL NUMBER OK. . . . . . . . .
ENCRYPT CODE OK. . . . . . . . . .
STATUS OK. . . . . . . . . . . . . . . . . .
BCC OK. . . . . . . . . . . . . . . . . . . . .
REGIST SUB CODE 1. . . . . . . .
REGIST MAS CODE 2. . . . . . . .
REG CODE SPACE NOT FUL. .
SUB KEY NOMATCH. . . . . . . . .
MASTER KEY MATCH. . . . . . . .
C
DIAGNOSTIC MENU
IMMOBILIZER
1: DATA LIST
2: DTC INFO
3: ACTIVE TEST
4: SNAPSHOT
5: ID UTILITY
Operation
Procedure
TRANSPONDER
KEY TYPE
Page 937 of 969

DIAGNOSTIC TESTER IMMOBILIZER FUNCTIONS ± SS005-01 Revised July 6, 2001
Page 6 of 14
1: CODES (ALL)
2: ENGINE AND ECT
3: TIRE PRES WARN
4: ABS / VSC
5: CCS
6: AIR CONDITIONER
7: IMMOBILIZER
8: SRS AIRBAG
9: GATEWAY
A
FUNCTION SELECT
B
1: OBD/MOBD
2: ENHANCED OBD II
3: CARB OBD II
4: BREAK OUT BOX
5: NVH
6: AUTOPROBE
7: O2 RPM CHECK
8: SNAPSHOT REVIEW
9: SETUP
0: GAS ANALYSIS
OBD/MOBD MENU
FIGURE 2. REGISTRATION OF ADDITIONAL TRANSPONDER KEY
1: TRANSP CODE REG
2: TRANSP CODE ERS
D
ID UTILITY
IMMOBILIZER
EF
GH
THIS FUNCTION WILL
REGISTER THE
TRANSPONDER CODE.
Do you wish to
continue the
registration?
PRESS [YES] OR [NO] 9: TRANSP CODE RESETPlease remove the
Master Key from
the IG cylinder,
insert it again,
and turn the IG ON
within 120 seconds.
Then press [ENTER]
Remaining Time:
[120] Seconds
Please remove the Master
Key from the IG cylinder
within 20 seconds.
Then press [ENTER]
Remaining Time:
[20] SecondsPlease insert the New Key
into the IG cylinder within
10 seconds.
Remaining Time:
[10] Seconds
I
**NOW REGISTERING**
[60] SecondsPlease wait.
J
K
THE TRANSPONDER
CODE WAS REGISTERED
CORRECTLY.Please insert a
Master Key and
turn the IG to
ON.
If the ignition
is already ON,
please turn it
OFF and back to
ON.
DO NOT TURN IG ON
PRESS [ENTER]
PRESS [ENTER]
C
DIAGNOSTIC MENU
IMMOBILIZER
5: ID UTILITY 1: DATA LIST
2: DTC INFO
3: ACTIVE TEST
4: SNAPSHOT
Operation
Procedure
(Continued)
TRANSPONDER
CODE
REGISTRATION
Page 938 of 969
DIAGNOSTIC TESTER IMMOBILIZER FUNCTIONS ± SS005-01 Revised July 6, 2001
Page 7 of 14
3. Transponder Code Erasure
This function allows the user to erase all the transponder keys except the registered
Master Key used during this function.
NOTE:
This function requires the use of one registered Master Key. The use of a Sub Key will
NOT complete Transponder Code Erasure.
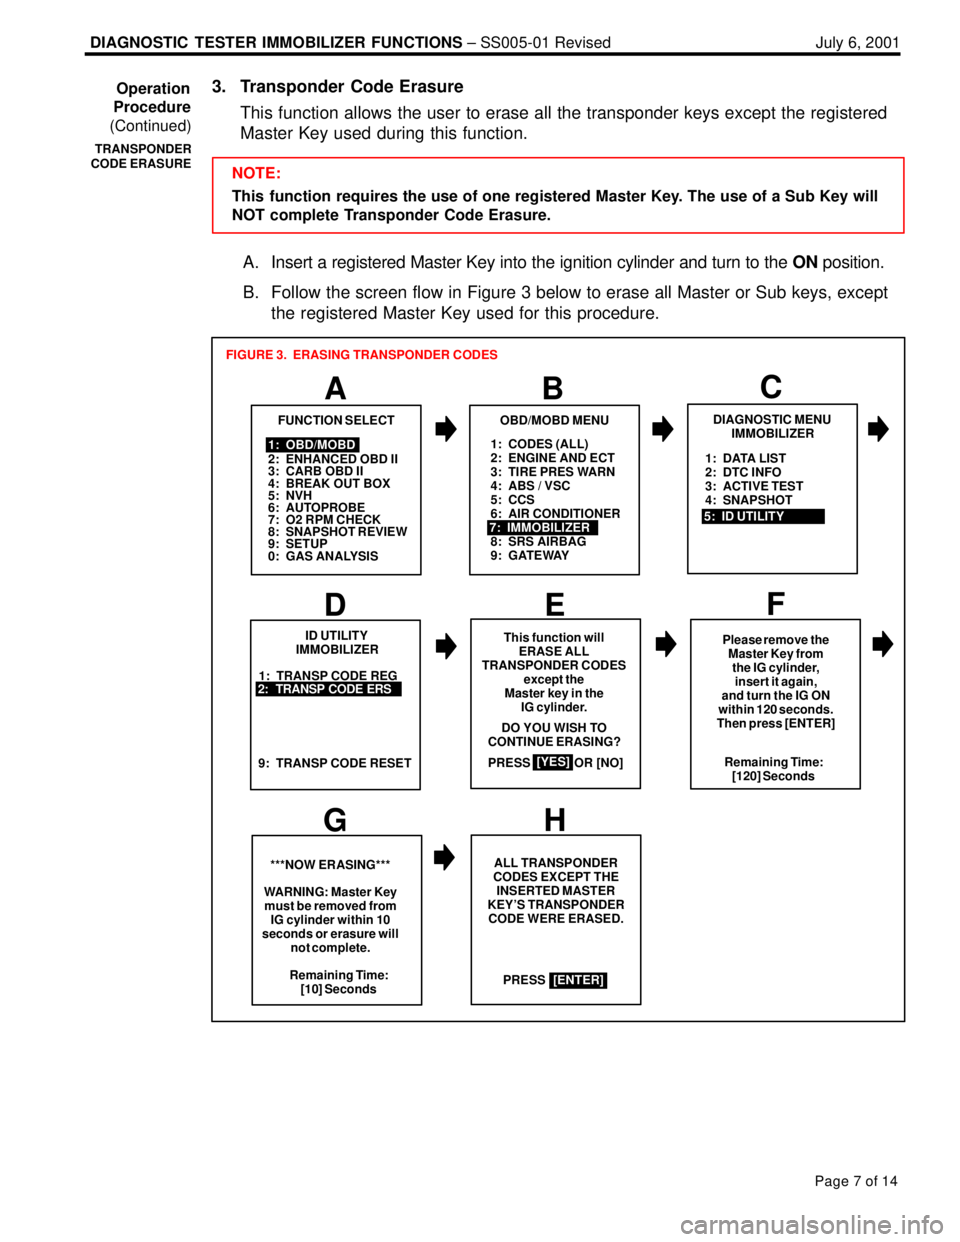
A. Insert a registered Master Key into the ignition cylinder and turn to the ON position.
B. Follow the screen flow in Figure 3 below to erase all Master or Sub keys, except
the registered Master Key used for this procedure.
1: CODES (ALL)
2: ENGINE AND ECT
3: TIRE PRES WARN
4: ABS / VSC
5: CCS
6: AIR CONDITIONER
8: SRS AIRBAG
9: GATEWAY
A
FUNCTION SELECT
B
1: OBD/MOBD
2: ENHANCED OBD II
3: CARB OBD II
4: BREAK OUT BOX
5: NVH
6: AUTOPROBE
7: O2 RPM CHECK
8: SNAPSHOT REVIEW
9: SETUP
0: GAS ANALYSIS
OBD/MOBD MENU
7: IMMOBILIZER
FIGURE 3. ERASING TRANSPONDER CODES
1: TRANSP CODE REG
D
ID UTILITY
IMMOBILIZER
EF
GH
This function will
ERASE ALL
TRANSPONDER CODES
except the
Master key in the
IG cylinder.
PRESS OR [NO]
[YES]
2: TRANSP CODE ERS
9: TRANSP CODE RESETRemaining Time:
[120] Seconds
***NOW ERASING***
WARNING: Master Key
must be removed from
IG cylinder within 10
seconds or erasure will
not complete.ALL TRANSPONDER
CODES EXCEPT THE
INSERTED MASTER
KEY'S TRANSPONDER
CODE WERE ERASED.
PRESS DO YOU WISH TO
CONTINUE ERASING?
Remaining Time:
[10] Seconds
[ENTER]Please remove the
Master Key from
the IG cylinder,
insert it again,
and turn the IG ON
within 120 seconds.
Then press [ENTER]
C
DIAGNOSTIC MENU
IMMOBILIZER
5: ID UTILITY1: DATA LIST
2: DTC INFO
3: ACTIVE TEST
4: SNAPSHOT
Operation
Procedure
(Continued)
TRANSPONDER
CODE ERASURE
Page 940 of 969
DIAGNOSTIC TESTER IMMOBILIZER FUNCTIONS ± SS005-01 Revised July 6, 2001
Page 9 of 14
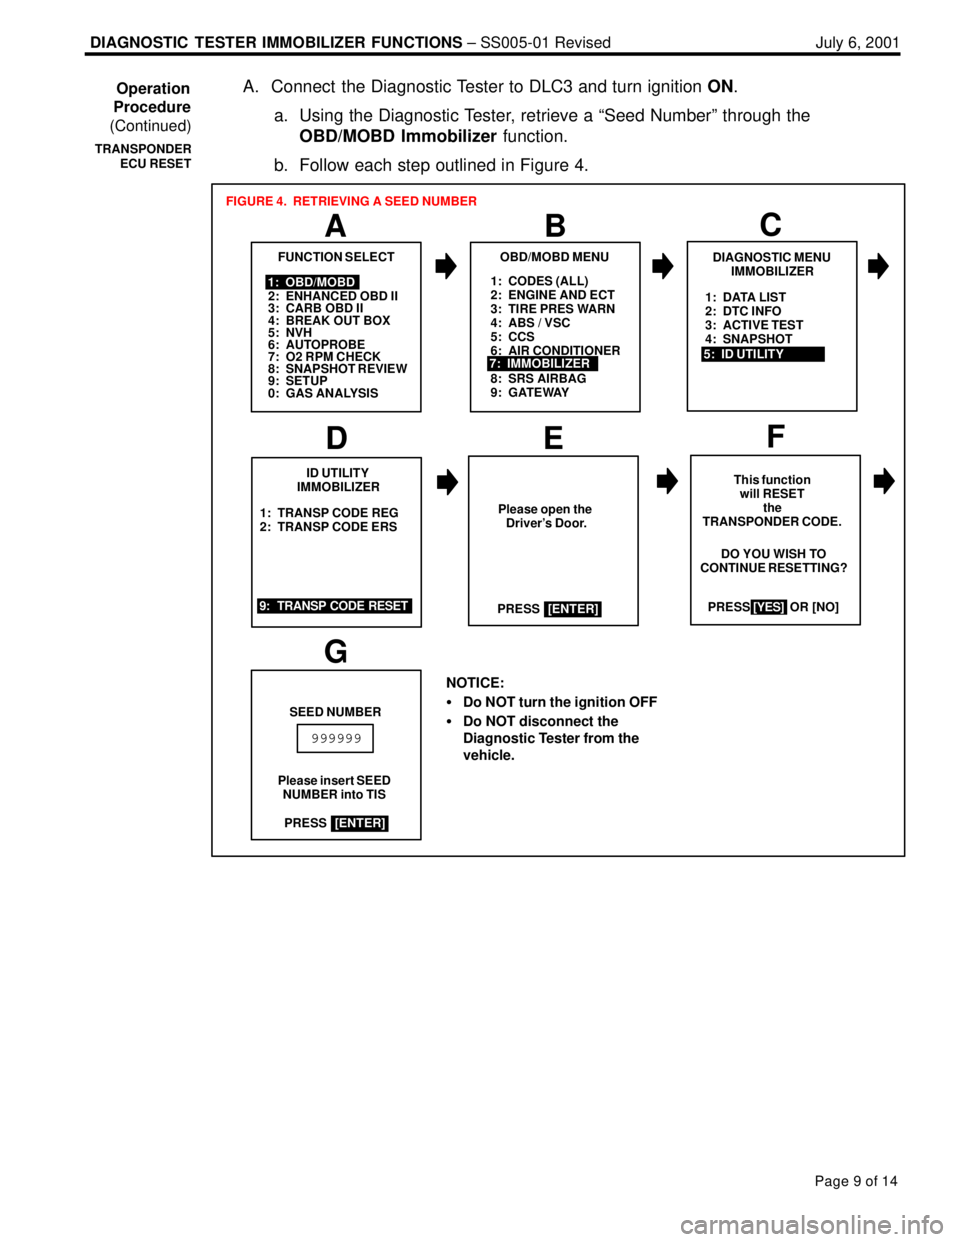
A. Connect the Diagnostic Tester to DLC3 and turn ignition ON.
a. Using the Diagnostic Tester, retrieve a ªSeed Numberº through the
OBD/MOBD Immobilizer function.
b. Follow each step outlined in Figure 4.
1: CODES (ALL)
2: ENGINE AND ECT
3: TIRE PRES WARN
4: ABS / VSC
5: CCS
6: AIR CONDITIONER
8: SRS AIRBAG
9: GATEWAY
A
FUNCTION SELECT
B
1: OBD/MOBD
2: ENHANCED OBD II
3: CARB OBD II
4: BREAK OUT BOX
5: NVH
6: AUTOPROBE
7: O2 RPM CHECK
8: SNAPSHOT REVIEW
9: SETUP
0: GAS ANALYSIS
OBD/MOBD MENU
7: IMMOBILIZER
FIGURE 4. RETRIEVING A SEED NUMBER
1: TRANSP CODE REG
2: TRANSP CODE ERS
D
ID UTILITY
IMMOBILIZER
EF
This function
will RESET
the
TRANSPONDER CODE.
PRESS [YES] OR [NO]
9: TRANSP CODE RESETDO YOU WISH TO
CONTINUE RESETTING?
NOTICE:
�Do NOT turn the ignition OFF
�Do NOT disconnect the
Diagnostic Tester from the
vehicle.
[YES]
G
SEED NUMBER
Please insert SEED
NUMBER into TIS
999999
Please open the
Driver's Door.
PRESS
[ENTER]
PRESS
[ENTER]
C
DIAGNOSTIC MENU
IMMOBILIZER
5: ID UTILITY1: DATA LIST
2: DTC INFO
3: ACTIVE TEST
4: SNAPSHOT
Operation
Procedure
(Continued)
TRANSPONDER
ECU RESET
Page 960 of 969
RESET MEMORY FUNCTION ± TC002-03 Revised May 5, 2003
Page 2 of 3
SPECIAL SERVICE TOOLS (SSTs)PART NUMBERQUANTITY
Lexus Diagnostic Tester Kit*010012701
CAN Interface Module Kit*010027441
12 Megabyte Diagnostic Tester Program Card
with version 12.01a Software (or later)*01002593-0051
* Essential SSTs.
NOTE:
Additional Diagnostic Tester Kits, CAN Interface Modules, Program Cards or other
SSTs may be ordered by calling SPX/OTC at 1-800-933-8335.
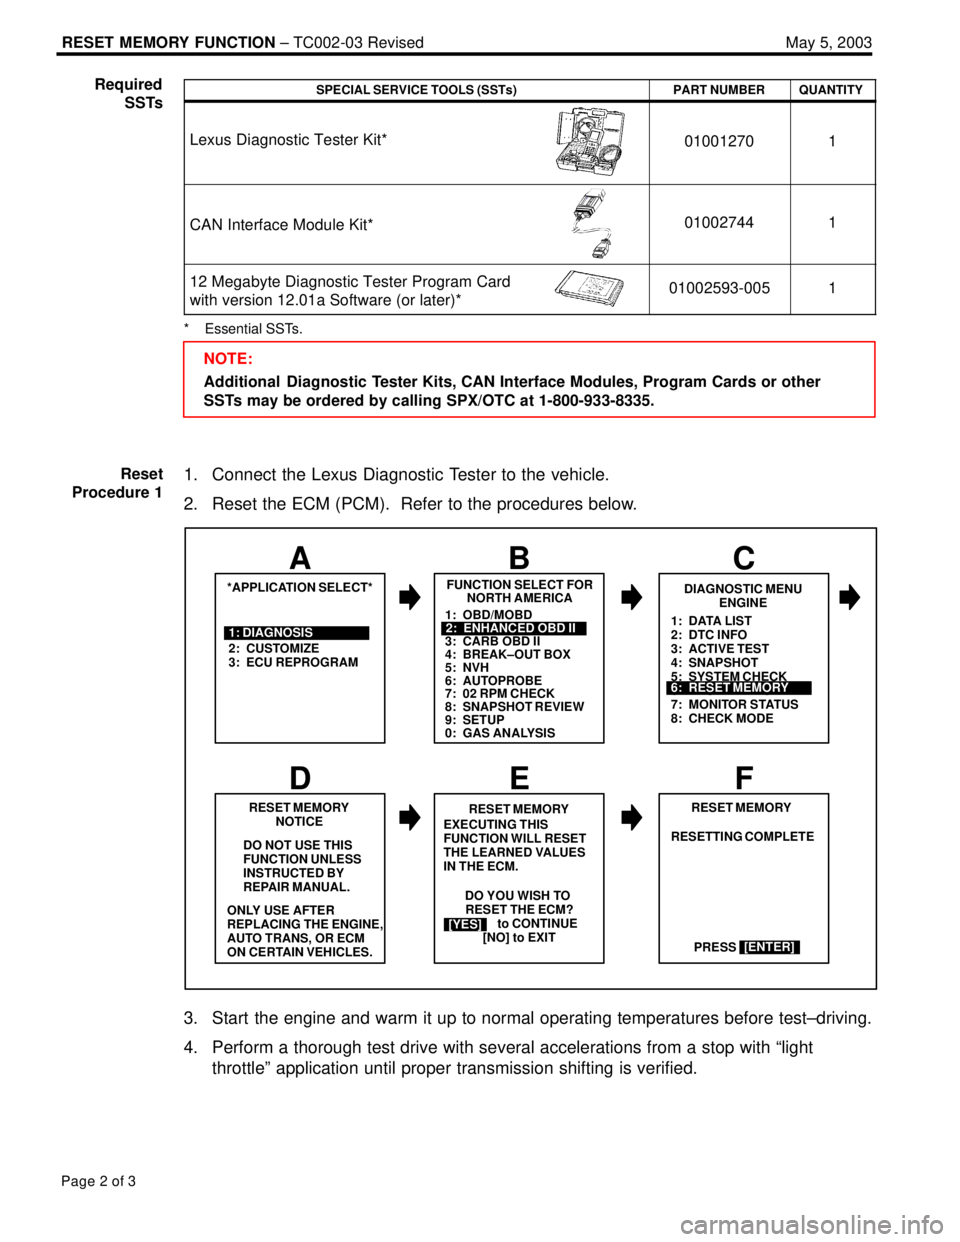
1. Connect the Lexus Diagnostic Tester to the vehicle.
2. Reset the ECM (PCM). Refer to the procedures below.
DO YOU WISH TO
RESET THE ECM?
[YES] to CONTINUE
[NO] to EXIT
2: CUSTOMIZE
3: ECU REPROGRAMFUNCTION SELECT FOR
NORTH AMERICA
B
*APPLICATION SELECT*
A
1: DIAGNOSISDIAGNOSTIC MENU
ENGINE
C
DO NOT USE THIS
FUNCTION UNLESS
INSTRUCTED BY
REPAIR MANUAL.RESET MEMORY
E
RESET MEMORY
NOTICE
D
[YES]
F
1: OBD/MOBD
3: CARB OBD II
4: BREAK±OUT BOX
5: NVH
6: AUTOPROBE
7: 02 RPM CHECK
8: SNAPSHOT REVIEW
9: SETUP
0: GAS ANALYSIS2: ENHANCED OBD II1: DATA LIST
2: DTC INFO
3: ACTIVE TEST
4: SNAPSHOT
5: SYSTEM CHECK
6: RESET MEMORY
7: MONITOR STATUS
8: CHECK MODE
6: RESET MEMORY
ONLY USE AFTER
REPLACING THE ENGINE,
AUTO TRANS, OR ECM
ON CERTAIN VEHICLES.EXECUTING THIS
FUNCTION WILL RESET
THE LEARNED VALUES
IN THE ECM.RESET MEMORY
RESETTING COMPLETE
PRESS
[ENTER]
3. Start the engine and warm it up to normal operating temperatures before test±driving.
4. Perform a thorough test drive with several accelerations from a stop with ªlight
throttleº application until proper transmission shifting is verified.
Required
SSTs
Reset
Procedure 1
Page 966 of 969
ECM CALIBRATION: SHIFTING ENHANCEMENT ± TC004-03 Revised August 4, 2003
Page 5 of 6
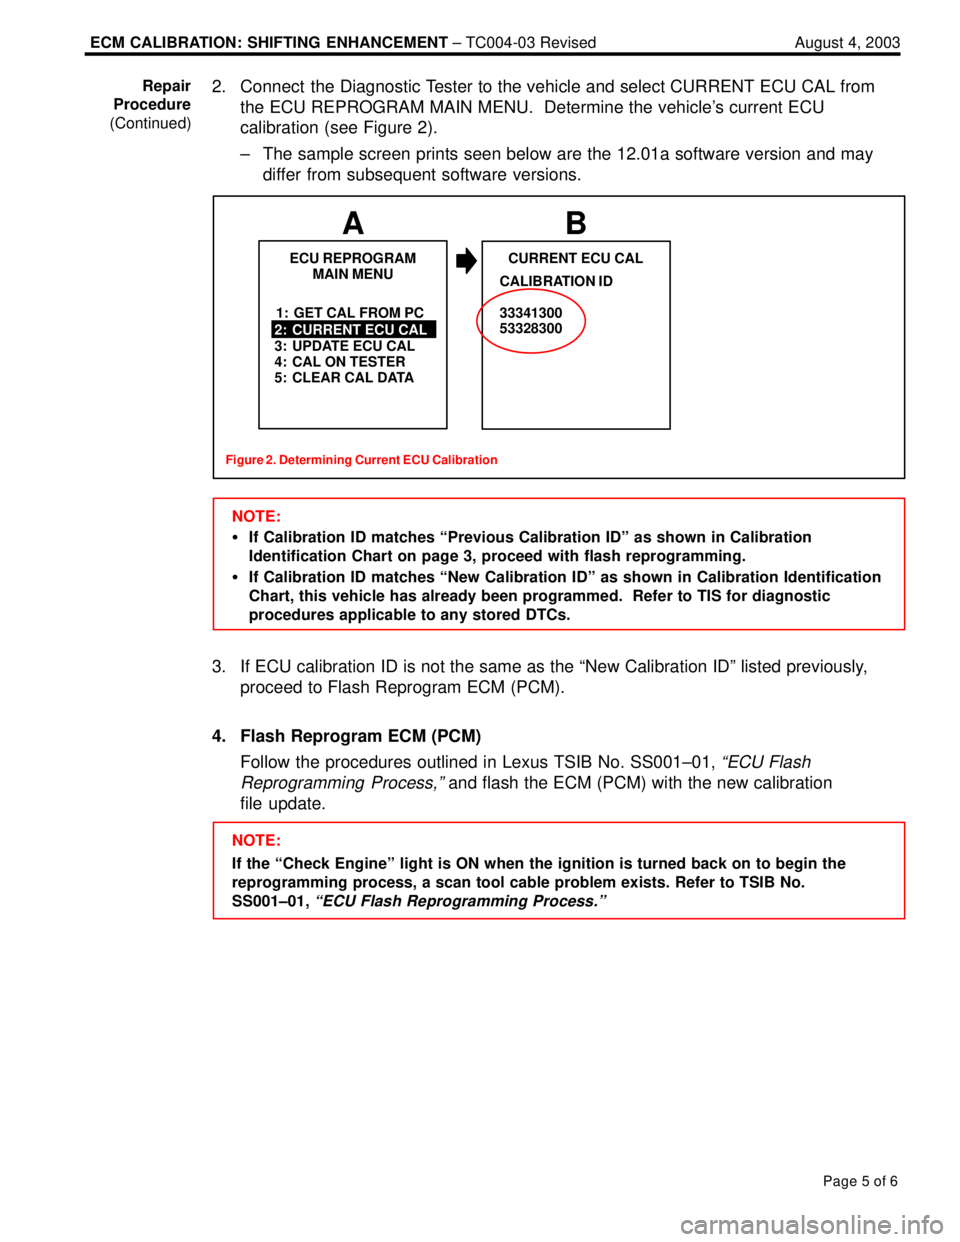
2. Connect the Diagnostic Tester to the vehicle and select CURRENT ECU CAL from
the ECU REPROGRAM MAIN MENU. Determine the vehicle's current ECU
calibration (see Figure 2).
± The sample screen prints seen below are the 12.01a software version and may
differ from subsequent software versions.
Figure 2. Determining Current ECU Calibration
ECU REPROGRAM
MAIN MENU
1: GET CAL FROM PC
2: CURRENT ECU CAL
3: UPDATE ECU CAL
4: CAL ON TESTER
5: CLEAR CAL DATA
A
CURRENT ECU CAL
B
CALIBRATION ID
33341300
53328300
NOTE:
�If Calibration ID matches ªPrevious Calibration IDº as shown in Calibration
Identification Chart on page 3, proceed with flash reprogramming.
�If Calibration ID matches ªNew Calibration IDº as shown in Calibration Identification
Chart, this vehicle has already been programmed. Refer to TIS for diagnostic
procedures applicable to any stored DTCs.
3. If ECU calibration ID is not the same as the ªNew Calibration IDº listed previously,
proceed to Flash Reprogram ECM (PCM).
4. Flash Reprogram ECM (PCM)
Follow the procedures outlined in Lexus TSIB No. SS001±01,
ªECU Flash
Reprogramming Process,º
and flash the ECM (PCM) with the new calibration
file update.
NOTE:
If the ªCheck Engineº light is ON when the ignition is turned back on to begin the
reprogramming process, a scan tool cable problem exists. Refer to TSIB No.
SS001±01,
ªECU Flash Reprogramming Process.º
Repair
Procedure
(Continued)
Page 967 of 969
ECM CALIBRATION: SHIFTING ENHANCEMENT ± TC004-03 Revised August 4, 2003
Page 6 of 6
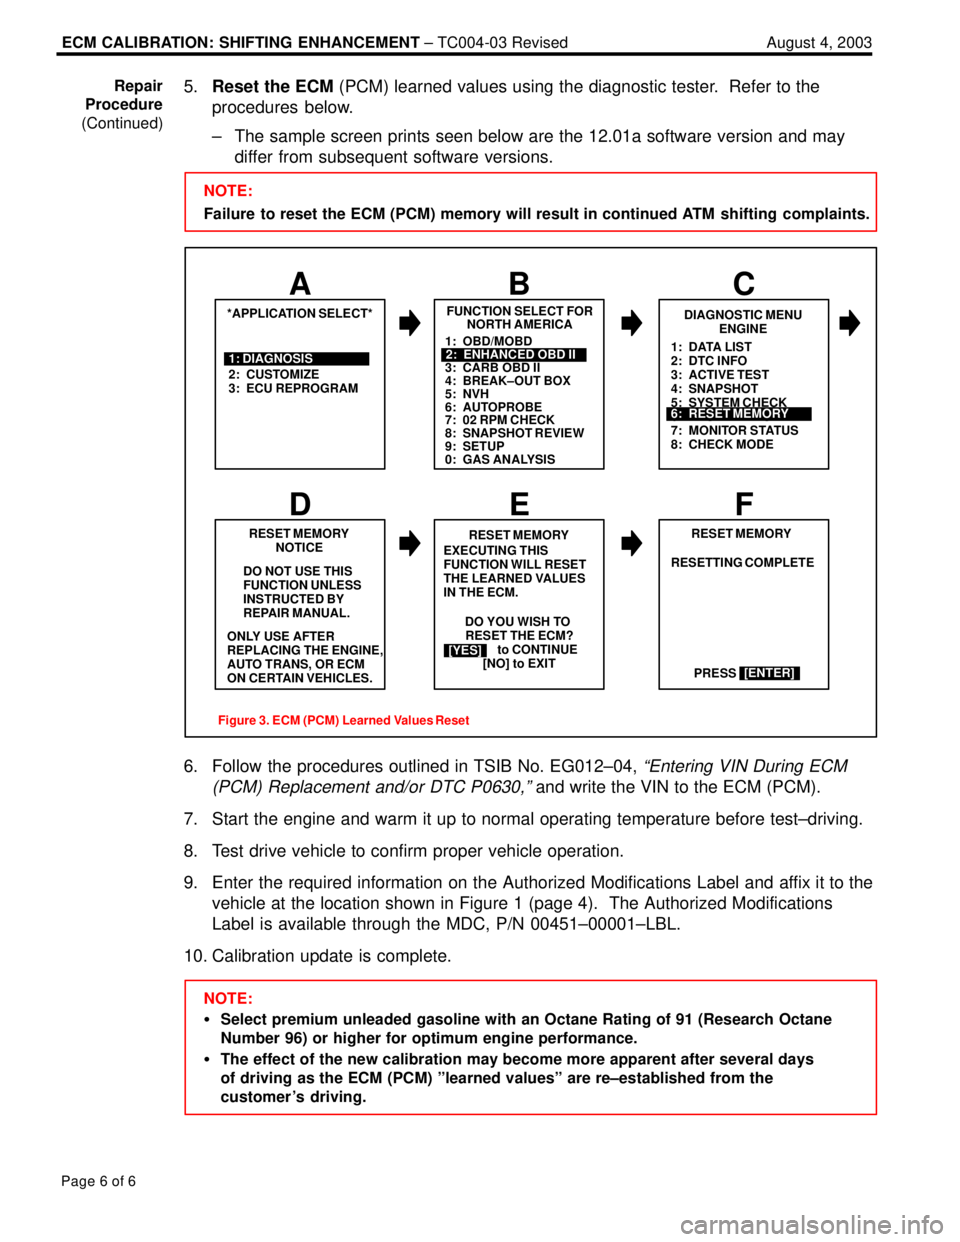
5.Reset the ECM (PCM) learned values using the diagnostic tester. Refer to the
procedures below.
± The sample screen prints seen below are the 12.01a software version and may
differ from subsequent software versions.
NOTE:
Failure to reset the ECM (PCM) memory will result in continued ATM shifting complaints.
DO YOU WISH TO
RESET THE ECM?
[YES] to CONTINUE
[NO] to EXIT
2: CUSTOMIZE
3: ECU REPROGRAMFUNCTION SELECT FOR
NORTH AMERICA
B
*APPLICATION SELECT*
A
1: DIAGNOSISDIAGNOSTIC MENU
ENGINE
C
DO NOT USE THIS
FUNCTION UNLESS
INSTRUCTED BY
REPAIR MANUAL.RESET MEMORY
E
RESET MEMORY
NOTICE
D
[YES]
F
1: OBD/MOBD
3: CARB OBD II
4: BREAK±OUT BOX
5: NVH
6: AUTOPROBE
7: 02 RPM CHECK
8: SNAPSHOT REVIEW
9: SETUP
0: GAS ANALYSIS2: ENHANCED OBD II1: DATA LIST
2: DTC INFO
3: ACTIVE TEST
4: SNAPSHOT
5: SYSTEM CHECK
6: RESET MEMORY
7: MONITOR STATUS
8: CHECK MODE
6: RESET MEMORY
ONLY USE AFTER
REPLACING THE ENGINE,
AUTO TRANS, OR ECM
ON CERTAIN VEHICLES.EXECUTING THIS
FUNCTION WILL RESET
THE LEARNED VALUES
IN THE ECM.RESET MEMORY
RESETTING COMPLETE
PRESS
[ENTER]
Figure 3. ECM (PCM) Learned Values Reset
6. Follow the procedures outlined in TSIB No. EG012±04, ªEntering VIN During ECM
(PCM) Replacement and/or DTC P0630,º
and write the VIN to the ECM (PCM).
7. Start the engine and warm it up to normal operating temperature before test±driving.
8. Test drive vehicle to confirm proper vehicle operation.
9. Enter the required information on the Authorized Modifications Label and affix it to the
vehicle at the location shown in Figure 1 (page 4). The Authorized Modifications
Label is available through the MDC, P/N 00451±00001±LBL.
10. Calibration update is complete.
NOTE:
�Select premium unleaded gasoline with an Octane Rating of 91 (Research Octane
Number 96) or higher for optimum engine performance.
�The effect of the new calibration may become more apparent after several days
of driving as the ECM (PCM) ºlearned valuesº are re±established from the
customer 's driving. Repair
Procedure
(Continued)