2005 KIA Sportage height
[x] Cancel search: heightPage 31 of 354
Knowing your vehicle20 3
1
2
3
4
5
6
7
8
9
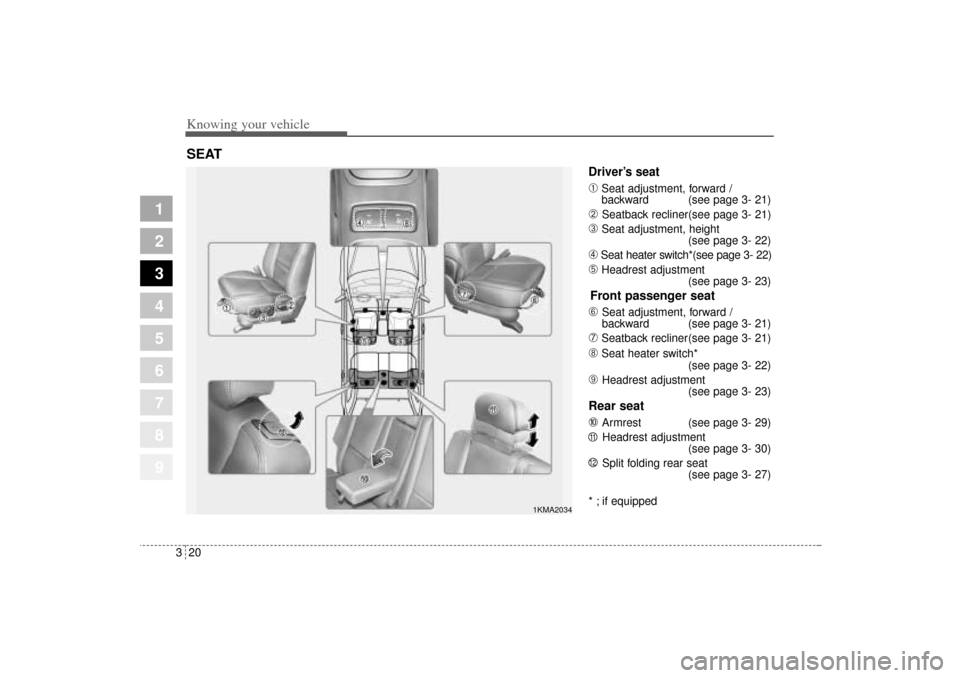
Driver’s seat➀
Seat adjustment, forward /
backward (see page 3- 21)
➁
Seatback recliner(see page 3- 21)
➂
Seat adjustment, height
(see page 3- 22)
➃
Seat heater switch*(see page 3- 22)
➄
Headrest adjustment
(see page 3- 23)Front passenger seat
➅
Seat adjustment, forward /
backward (see page 3- 21)
➆
Seatback recliner(see page 3- 21)
➇
Seat heater switch*
(see page 3- 22)
➈
Headrest adjustment
(see page 3- 23)
Rear seat
➉
Armrest (see page 3- 29)
Headrest adjustment
(see page 3- 30)
Split folding rear seat
(see page 3- 27)
* ; if equipped
SEAT
1KMA2034
1112
KM CAN (ENG) 3 (~57).qxd 9/13/2004 4:49 PM Page 20
Page 34 of 354
323
Knowing your vehicle
1
2
3
4
5
6
7
8
9
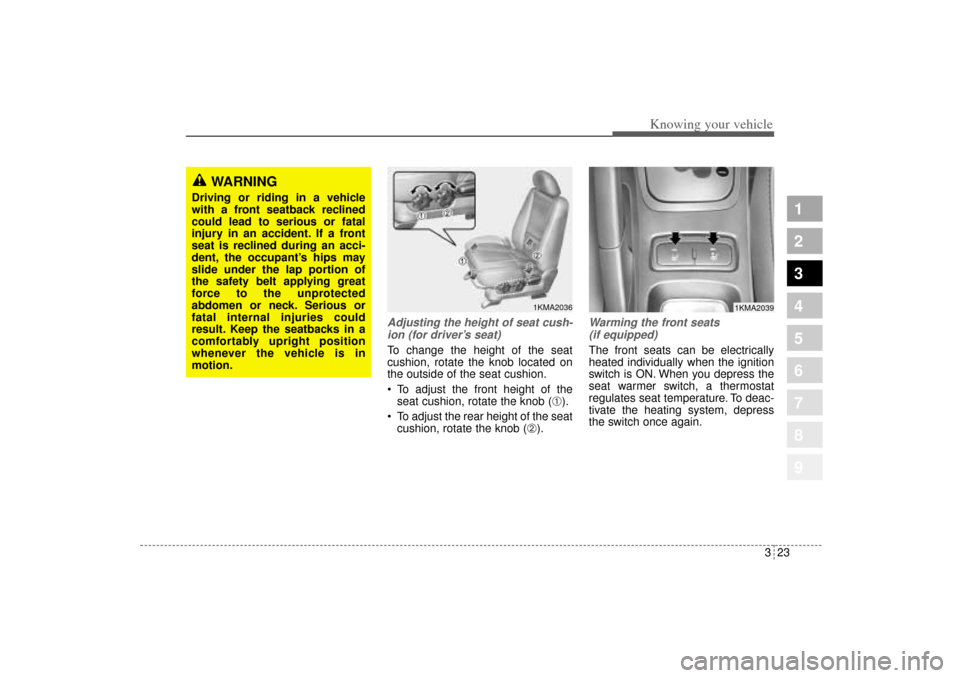
Adjusting the height of seat cush-
ion (for driver’s seat)To change the height of the seat
cushion, rotate the knob located on
the outside of the seat cushion.
To adjust the front height of the
seat cushion, rotate the knob (
➀).
To adjust the rear height of the seat
cushion, rotate the knob (
➁).
Warming the front seats
(if equipped)The front seats can be electrically
heated individually when the ignition
switch is ON. When you depress the
seat warmer switch, a thermostat
regulates seat temperature. To deac-
tivate the heating system, depress
the switch once again.
WARNING
Driving or riding in a vehicle
with a front seatback reclined
could lead to serious or fatal
injury in an accident. If a front
seat is reclined during an acci-
dent, the occupant’s hips may
slide under the lap portion of
the safety belt applying great
force to the unprotected
abdomen or neck. Serious or
fatal internal injuries could
result. Keep the seatbacks in a
comfortably upright position
whenever the vehicle is in
motion.
1KMA2036
1KMA2039
KM CAN (ENG) 3 (~57).qxd 9/13/2004 4:49 PM Page 23
Page 35 of 354
Knowing your vehicle24 3
1
2
3
4
5
6
7
8
9
✽ ✽
NOTICE• The seat warmer will not operate
if ambient temperature is above
37±3 °C (98.5±5.5 °F).
• If the seat warmer doesn't work
when the ambient temperature is
below 28±3.5 °C (82.5±5.5 °F),
have the system checked by an
authorized dealer.
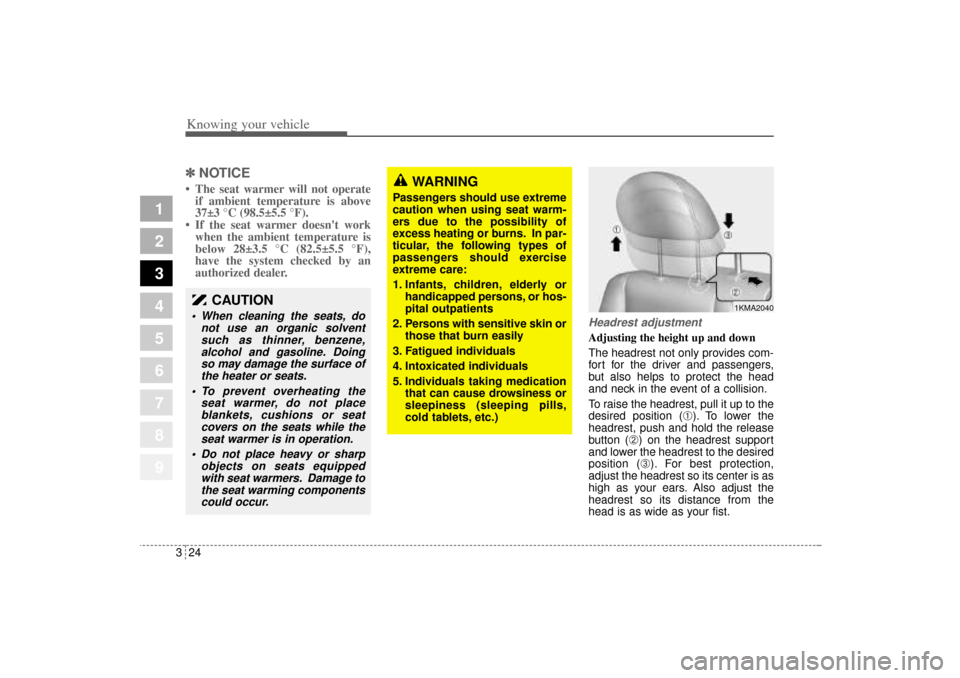
Headrest adjustmentAdjusting the height up and down
The headrest not only provides com-
fort for the driver and passengers,
but also helps to protect the head
and neck in the event of a collision.
To raise the headrest, pull it up to the
desired position (
➀). To lower the
headrest, push and hold the release
button (
➁) on the headrest support
and lower the headrest to the desired
position (➂). For best protection,
adjust the headrest so its center is as
high as your ears. Also adjust the
headrest so its distance from the
head is as wide as your fist.
WARNING
Passengers should use extreme
caution when using seat warm-
ers due to the possibility of
excess heating or burns. In par-
ticular, the following types of
passengers should exercise
extreme care:
1. Infants, children, elderly or
handicapped persons, or hos-
pital outpatients
2. Persons with sensitive skin or
those that burn easily
3. Fatigued individuals
4. Intoxicated individuals
5. Individuals taking medication
that can cause drowsiness or
sleepiness (sleeping pills,
cold tablets, etc.)
1KMA2040
CAUTION
When cleaning the seats, do
not use an organic solvent
such as thinner, benzene,
alcohol and gasoline. Doing
so may damage the surface of
the heater or seats.
To prevent overheating the
seat warmer, do not place
blankets, cushions or seat
covers on the seats while the
seat warmer is in operation.
Do not place heavy or sharp
objects on seats equipped
with seat warmers. Damage to
the seat warming components
could occur.
KM CAN (ENG) 3 (~57).qxd 9/13/2004 4:49 PM Page 24
Page 41 of 354
Knowing your vehicle30 3
1
2
3
4
5
6
7
8
9
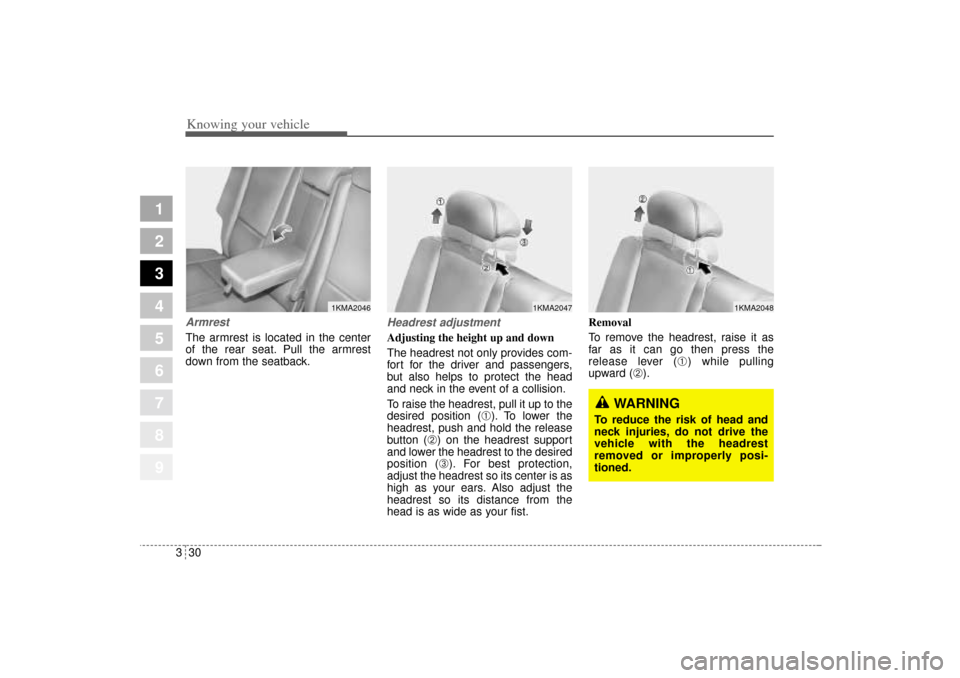
ArmrestThe armrest is located in the center
of the rear seat. Pull the armrest
down from the seatback.
Headrest adjustmentAdjusting the height up and down
The headrest not only provides com-
fort for the driver and passengers,
but also helps to protect the head
and neck in the event of a collision.
To raise the headrest, pull it up to the
desired position (
➀). To lower the
headrest, push and hold the release
button (
➁) on the headrest support
and lower the headrest to the desired
position (➂). For best protection,
adjust the headrest so its center is as
high as your ears. Also adjust the
headrest so its distance from the
head is as wide as your fist.Removal
To remove the headrest, raise it as
far as it can go then press the
release lever (
➀) while pulling
upward (
➁).
1KMA2046
1KMA2047
WARNING
To reduce the risk of head and
neck injuries, do not drive the
vehicle with the headrest
removed or improperly posi-
tioned.
1KMA2048
KM CAN (ENG) 3 (~57).qxd 9/13/2004 4:49 PM Page 30
Page 59 of 354
Knowing your vehicle48 3
1
2
3
4
5
6
7
8
9
WARNING
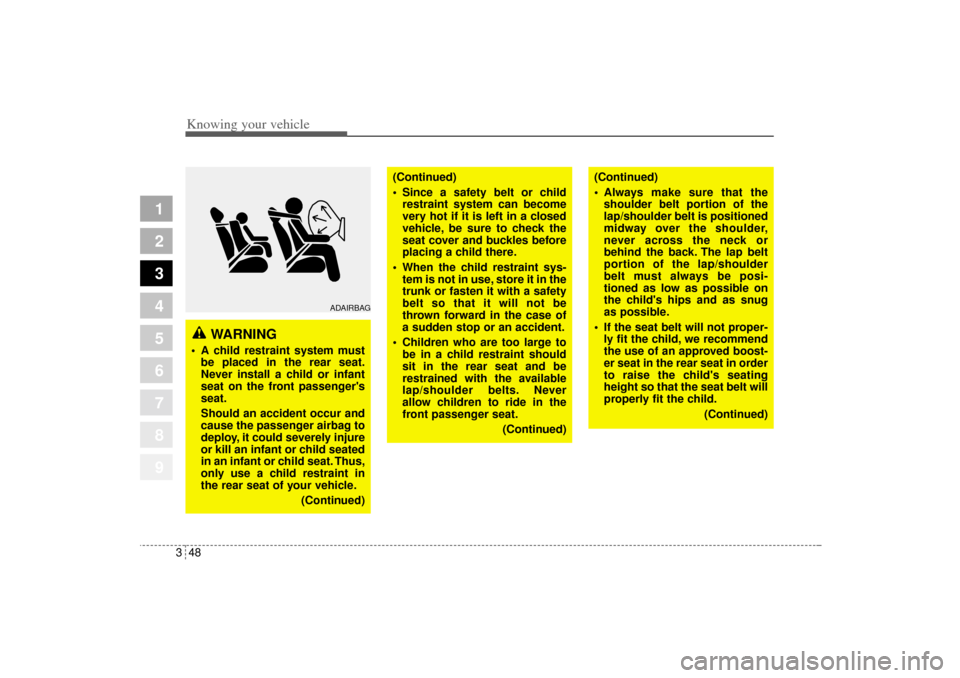
A child restraint system must
be placed in the rear seat.
Never install a child or infant
seat on the front passenger's
seat.
Should an accident occur and
cause the passenger airbag to
deploy, it could severely injure
or kill an infant or child seated
in an infant or child seat. Thus,
only use a child restraint in
the rear seat of your vehicle.
(Continued)
(Continued)
Always make sure that the
shoulder belt portion of the
lap/shoulder belt is positioned
midway over the shoulder,
never across the neck or
behind the back. The lap belt
portion of the lap/shoulder
belt must always be posi-
tioned as low as possible on
the child's hips and as snug
as possible.
If the seat belt will not proper-
ly fit the child, we recommend
the use of an approved boost-
er seat in the rear seat in order
to raise the child's seating
height so that the seat belt will
properly fit the child.
(Continued)
(Continued)
Since a safety belt or child
restraint system can become
very hot if it is left in a closed
vehicle, be sure to check the
seat cover and buckles before
placing a child there.
When the child restraint sys-
tem is not in use, store it in the
trunk or fasten it with a safety
belt so that it will not be
thrown forward in the case of
a sudden stop or an accident.
Children who are too large to
be in a child restraint should
sit in the rear seat and be
restrained with the available
lap/shoulder belts. Never
allow children to ride in the
front passenger seat.
(Continued)
ADAIRBAG
KM CAN (ENG) 3 (~57).qxd 9/13/2004 4:49 PM Page 48
Page 95 of 354
Knowing your vehicle84 3
1
2
3
4
5
6
7
8
9
Closing the hood1. Before closing the hood, check the
following:
All filler caps in engine compart-
ment must be correctly installed.
Gloves, rags or any other com-
bustible material must be
removed from the engine com-
partment.
2. Secure the support rod in its clip.
3. Lower the hood to about 30 cm
(12 inches) height and then let it
drop to properly lock in place.
Make sure the hood is properly
locked before driving.
CAUTION
Before closing the hood, make
sure that all engine parts and
tools have been removed from
the engine area and that no
one’s hands are near the hood
opening.
Do not leave gloves, rags or
any other combustible materi-
al in the engine compartment.
Doing so may cause a heat-
induced fire.
KM CAN (ENG) 3 (~112).qxd 9/13/2004 4:50 PM Page 84
Page 232 of 354
515
Driving tips
1
2
3
4
5
6
7
8
9
Traveling to remote areasIt makes sense to plan your trip,
especially when going to a remote
area. Know the terrain and plan your
route. You are much less likely to
encounter unwanted surprises. Get
accurate maps of trails.
It’s also a good idea to travel with at
least one other vehicle. If something
happens to one of them, the other
can quickly help.
WARNING -
Cargo
Cargo piled close to the height
of (or higher than) the seat
backs can be thrown forward
during a sudden stop or on
downhill slopes. You or your
passengers could be severely
injured. Keep cargo below the
top of the seat backs and, if
possible, do not pile separate
items.
Unsecured cargo in the cargo
area can be tossed about
when driving on the highways
or over rough terrain. You or
your passengers can be
struck by flying objects and
severely injured. Secure the
cargo properly.
(Continued)
(Continued)
Cargo should not be carried
on the roof without a proper
roof rack installed. The roof
rack will hold a maximum of
45 kg (100 lbs.). Heavy loads
in a roof rack raise the vehi-
cle’s center of gravity, making
it more likely to roll over. You
can be seriously or fatally
injured if the vehicle rolls
over. Do not load cargo on the
roof while driving off-road, if
at all possible. Put heavy
loads inside the cargo area,
not on the roof or in a roof
rack. Keep cargo in the cargo
area as far forward and low as
possible.
KM CAN (ENG) 5.qxd 9/13/2004 4:48 PM Page 15
Page 332 of 354
739
Maintenance
1
2
3
4
5
6
7
8
9
Wheel replacement When replacing the metal wheels for
any reason, make sure the new
wheels are equivalent to the original
factory units in diameter, rim width
and offset.
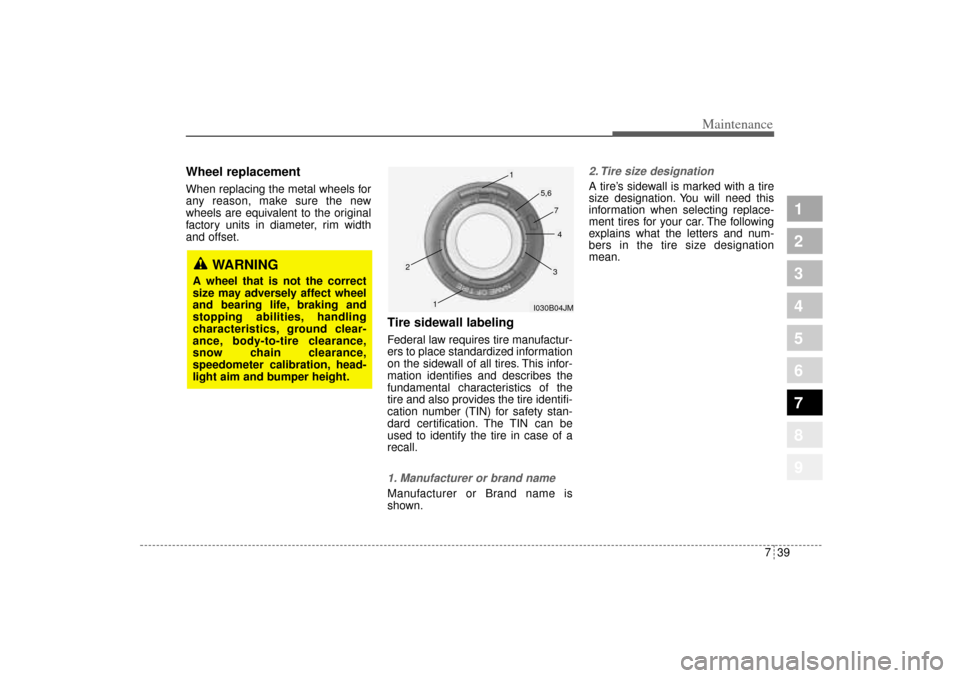
Tire sidewall labelingFederal law requires tire manufactur-
ers to place standardized information
on the sidewall of all tires. This infor-
mation identifies and describes the
fundamental characteristics of the
tire and also provides the tire identifi-
cation number (TIN) for safety stan-
dard certification. The TIN can be
used to identify the tire in case of a
recall.1. Manufacturer or brand nameManufacturer or Brand name is
shown.
2. Tire size designation A tire’s sidewall is marked with a tire
size designation. You will need this
information when selecting replace-
ment tires for your car. The following
explains what the letters and num-
bers in the tire size designation
mean.
WARNING
A wheel that is not the correct
size may adversely affect wheel
and bearing life, braking and
stopping abilities, handling
characteristics, ground clear-
ance, body-to-tire clearance,
snow chain clearance,
speedometer calibration, head-
light aim and bumper height.
I030B04JM
1
1
2
34
5,6
7
KM CAN (ENG) 7.qxd 9/13/2004 4:47 PM Page 39