2005 KIA Sportage lights
[x] Cancel search: lightsPage 234 of 354
517
Driving tips
1
2
3
4
5
6
7
8
9
Scanning the terrain
Off-road driving can take you over
many different kinds of terrain. You
need to be familiar with the terrain
and its many different features. Here
are some things to consider.Surface conditionsOff-roading can take you over hard-
packed dirt, gravel, rocks, grass,
sand, mud, snow or ice. Each of
these surfaces affects the steering,
acceleration, and braking of your
vehicle in different ways.
Depending upon the kind of surface
you are on, you may experience slip-
ping, sliding, wheel spinning,
delayed acceleration, poor traction,
and longer braking distances.
Surface obstaclesUnseen or hidden obstacles can be
hazardous. A rock, log, hole, rut, or
bump can startle you if you’re not
prepared. Often these obstacles are
hidden by grass, bushes, snow or
even the rise and fall of the terrain
itself. Here are some things to con-
stantly evaluate:
Is the path ahead clear?
Will the surface texture change
ahead?
Does the path take you uphill or
downhill?
Might you have to stop suddenly or
change direction quickly?
When you drive over obstacles or
rough terrain, it is critical that you
keep a firm grip on the steering
wheel. Ruts, troughs, or other sur-
face features can force the wheel out
of your hands if you’re not prepared.When you drive over bumps, rocks,
or other obstacles, your wheels can
leave the ground. If this happens,
even with one or two wheels, you
can’t control the vehicle as well or
perhaps at all. Because you will be
on an unpaved surface, it’s especial-
ly important to avoid sudden acceler-
ation, sudden turns, or sudden brak-
ing. Any of these actions could cause
the center of gravity of the vehicle to
shift and destabilize the vehicle,
leading to a collision or rollover acci-
dent.
Off-road driving requires a different
kind of alertness from driving on
paved roads and highways. There
are no road signs, posted speed lim-
its or signal lights. You have to use
your own judgment about what is
safe and what isn’t. Bad judgment in
this uncontrolled environment can be
fatal.
KM CAN (ENG) 5.qxd 9/13/2004 4:48 PM Page 17
Page 237 of 354
Driving tips20 5
1
2
3
4
5
6
7
8
9
Driving uphillOnce you decide you can safely
drive up the hill, you need to take
some special steps.
Use a low gear and get a firm grip
on the steering wheel.
Get a smooth start up the hill and
try to maintain your speed. Don’t
use more power than you need,
because you don’t want your
wheels to start spinning or sliding.
Try to drive straight up the hill, if at
all possible. If the path twists and
turns, you may have to find anoth-
er route. Slow down as you approach the
top of the hill.
Attach a flag to the vehicle to make
you more visible to approaching
traffic on trails or hills.
Sound the horn as you approach
the top of the hill to let opposing
traffic know you’re there.
Use your headlights even during
the day. They make you more visi-
ble to other drivers.
WARNING -
Driving
across hills
Turning or driving across steep
hills can be dangerous. You
could lose traction, slide side-
ways, or just reach an area too
steep to traverse. In any case, it
could cause you to roll over. You
could be seriously or fatally
injured. When driving up hills,
always try to go as straight up
as possible.
WARNING
- Driving over
hills
Driving to the top (crest) of a hill
at full speed can cause an acci-
dent and result in serious or
fatal injury. There could be a
drop-off, embankment, cliff,
another vehicle or people sitting
on the ground. As you near the
top of a hill, slow down and stay
alert.
KM CAN (ENG) 5.qxd 9/13/2004 4:48 PM Page 20
Page 249 of 354
Driving tips32 5
1
2
3
4
5
6
7
8
9
TRAILER TOWING
✽ ✽
NOTICEPulling a trailer improperly can
damage your vehicle and result in
costly repairs not covered by your
warranty. To pull a trailer correctly,
follow the advice in this section. Your vehicle can tow a trailer. To
identify what the vehicle trailering
capacity is for your vehicle, you
should read the information in
“Weight of the Trailer” that appears
later in this section.
Remember that trailering is different
than just driving your vehicle by itself.
Trailering means changes in han-
dling, durability, and fuel economy.
Successful, safe trailering requires
correct equipment, and it has to be
used properly.This section contains many time-
tested, important trailering tips and
safety rules. Many of these are
important for your safety and that of
your passengers. Please read this
section carefully before you pull a
trailer.
Load-pulling components such as
the engine, transaxle, wheel assem-
blies, and tires are forced to work
harder against the load of the added
weight. The engine is required to
operate at relatively higher speeds
and under greater loads. This addi-
tional burden generates extra heat.
The trailer also adds considerably to
wind resistance, increasing the
pulling requirements.
If you do decide to pull a trailerHere are some important points if
you decide to pull a trailer:
State, provincial, county and
municipal government have vary-
ing trailering laws. Make sure your
hitch, mirrors, lights and wiring
arrangements are legal, not only
where you live, but also where
you’ll be driving. A good source for
this information is provincial or
local law enforcement agencies.
Consider using a sway control. You
can ask a hitch dealer about sway
control.
After your odometer indicates 800
km (500 miles) or more, you can
tow a trailer. For the first 800 km
(500 miles) that you tow a trailer,
don’t drive over 80 km/h (50 mph)
and don’t make starts at full throt-
tle. This helps your engine and
other parts of your vehicle “wear” in
at the heavier loads.
Always drive your vehicle at a mod-
erate speed (less than 100 km/h).
The important considerations have
to do with weight:
KM CAN (ENG) 5.qxd 9/13/2004 4:48 PM Page 32
Page 252 of 354
535
Driving tips
1
2
3
4
5
6
7
8
9
Safety chains You should always attach chains
between your vehicle and your trail-
er. Cross the safety chains under the
tongue of the trailer so that the
tongue will not drop to the road if it
becomes separated from the hitch.
Instructions about safety chains may
be provided by the hitch manufactur-
er or by the trailer manufacturer.
Follow the manufacturer’s recom-
mendation for attaching safety
chains. Always leave just enough
slack so you can turn with your trail-
er. And, never allow safety chains to
drag on the ground.
Trailer brakes If your trailer weighs more than the
maximum trailer weight without trail-
er brakes loaded, then it needs its
own brakes and they must be ade-
quate. Be sure to read and follow the
instructions for the trailer brakes so
you’ll be able to install, adjust and
maintain them properly.
Don’t tap into your vehicle's brake
system.
Driving with a trailer Towing a trailer requires a certain
amount of experience. Before setting
out for the open road, you must get
to know your trailer. Acquaint your-
self with the feel of handling and
braking with the added weight of the
trailer. And always keep in mind that
the vehicle you are driving is now a
good deal longer and not nearly so
responsive as your vehicle is by
itself.
Before you start, check the trailer
hitch and platform, safety chains,
electrical connector(s), lights, tires
and mirror adjustment. If the trailer
has electric brakes, start your vehicle
and trailer moving and then apply the
trailer brake controller by hand to be
sure the brakes are working. This lets
you check your electrical connection
at the same time.
During your trip, check occasionally
to be sure that the load is secure,
and that the lights and any trailer
brakes are still working.
WARNING
Do not use a trailer with its own
brakes unless you are absolute-
ly certain that you have properly
set up the brake system. This is
not a task for amateurs. Use an
experienced, competent trailer
shop for this work.
KM CAN (ENG) 5.qxd 9/13/2004 4:48 PM Page 35
Page 253 of 354
Driving tips36 5
1
2
3
4
5
6
7
8
9
Following distance Stay at least twice as far behind the
vehicle ahead as you would when
driving your vehicle without a trailer.
This can help you avoid situations
that require heavy braking and sud-
den turns.Passing You’ll need more passing distance
up ahead when you’re towing a trail-
er. And, because you’re a good deal
longer, you’ll need to go much farther
beyond the passed vehicle before
you can return to your lane.
Backing up Hold the bottom of the steering
wheel with one hand. Then, to move
the trailer to the left, just move your
hand to the left. To move the trailer to
the right, move your hand to the
right. Always back up slowly and, if
possible, have someone guide you.Making turns When you’re turning with a trailer,
make wider turns than normal. Do
this so your trailer won’t strike soft
shoulders, curbs, road signs, trees,
or other objects. Avoid jerky or sud-
den maneuvers. Signal well in
advance.
Turn signals when towing a trailer When you tow a trailer, your vehicle
has to have a different turn signal
flasher and extra wiring. The green
arrows on your instrument panel will
flash whenever you signal a turn or
lane change. Properly connected,
the trailer lights will also flash to alert
other drivers you’re about to turn,
change lanes, or stop.
When towing a trailer, the green
arrows on your instrument panel will
flash for turns even if the bulbs on
the trailer are burned out. Thus, you
may think drivers behind you are
seeing your signals when, in fact,
they are not. It’s important to check
occasionally to be sure the trailer
bulbs are still working. You must also
check the lights every time you dis-
connect and then reconnect the
wires.
KM CAN (ENG) 5.qxd 9/13/2004 4:48 PM Page 36
Page 270 of 354
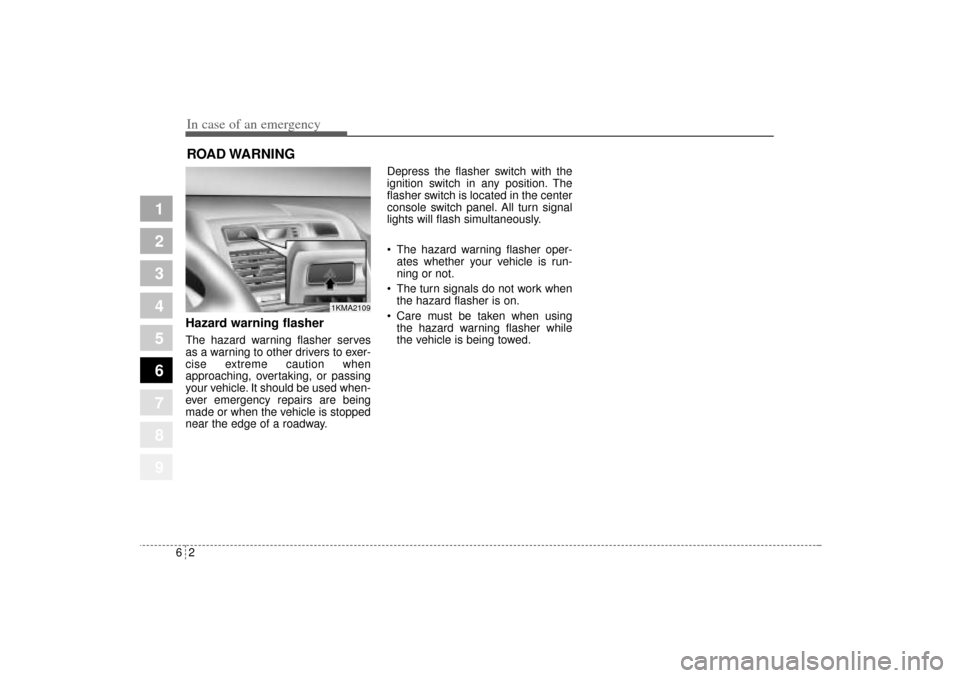
In case of an emergency2 6ROAD WARNING Hazard warning flasher The hazard warning flasher serves
as a warning to other drivers to exer-
cise extreme caution when
approaching, overtaking, or passing
your vehicle. It should be used when-
ever emergency repairs are being
made or when the vehicle is stopped
near the edge of a roadway.Depress the flasher switch with the
ignition switch in any position. The
flasher switch is located in the center
console switch panel. All turn signal
lights will flash simultaneously.
• The hazard warning flasher oper-
ates whether your vehicle is run-
ning or not.
The turn signals do not work when
the hazard flasher is on.
Care must be taken when using
the hazard warning flasher while
the vehicle is being towed.
1
2
3
4
5
6
7
8
9
1KMA2109
KM CAN (ENG) 6.qxd 9/13/2004 4:47 PM Page 2
Page 275 of 354
67
In case of an emergency
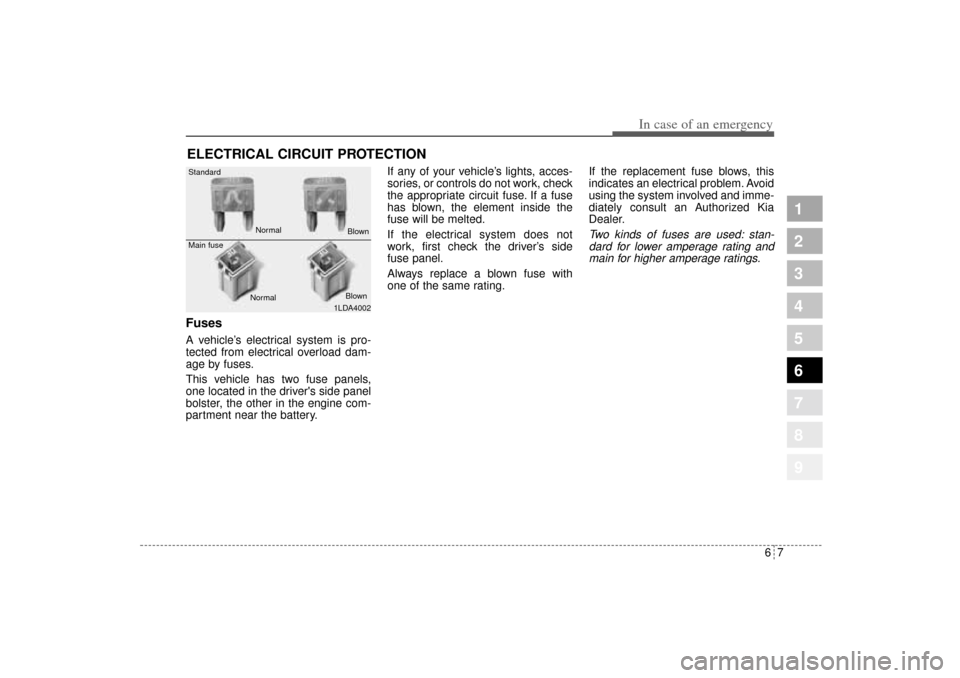
ELECTRICAL CIRCUIT PROTECTION Fuses A vehicle’s electrical system is pro-
tected from electrical overload dam-
age by fuses.
This vehicle has two fuse panels,
one located in the driver's side panel
bolster, the other in the engine com-
partment near the battery.If any of your vehicle’s lights, acces-
sories, or controls do not work, check
the appropriate circuit fuse. If a fuse
has blown, the element inside the
fuse will be melted.
If the electrical system does not
work, first check the driver’s side
fuse panel.
Always replace a blown fuse with
one of the same rating.If the replacement fuse blows, this
indicates an electrical problem. Avoid
using the system involved and imme-
diately consult an Authorized Kia
Dealer.
Two kinds of fuses are used: stan-
dard for lower amperage rating and
main for higher amperage ratings.
1
2
3
4
5
6
7
8
9
1LDA4002 Standard
Main fuse
NormalNormal
Blown
Blown
KM CAN (ENG) 6.qxd 9/13/2004 4:47 PM Page 7
Page 276 of 354
In case of an emergency8 6Fuse replacement
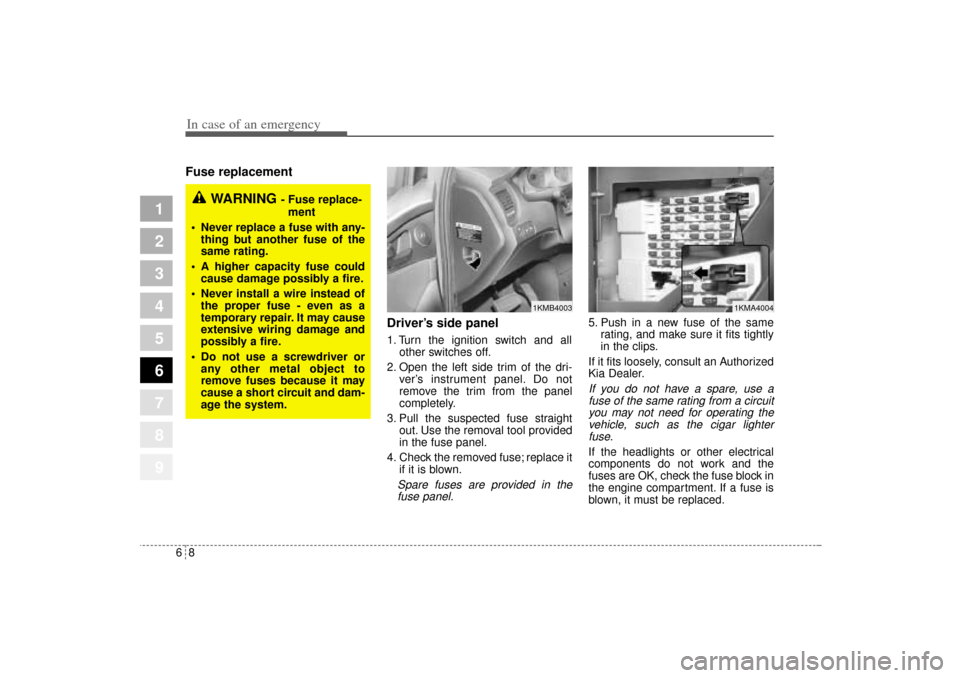
Driver’s side panel
1. Turn the ignition switch and all
other switches off.
2. Open the left side trim of the dri-
ver’s instrument panel. Do not
remove the trim from the panel
completely.
3. Pull the suspected fuse straight
out. Use the removal tool provided
in the fuse panel.
4. Check the removed fuse; replace it
if it is blown.Spare fuses are provided in the
fuse panel.
5. Push in a new fuse of the same
rating, and make sure it fits tightly
in the clips.
If it fits loosely, consult an Authorized
Kia Dealer.If you do not have a spare, use a
fuse of the same rating from a circuit
you may not need for operating the
vehicle, such as the cigar lighter
fuse.If the headlights or other electrical
components do not work and the
fuses are OK, check the fuse block in
the engine compartment. If a fuse is
blown, it must be replaced.
1
2
3
4
5
6
7
8
9
1KMB4003
1KMA4004
WARNING
- Fuse replace-
ment
Never replace a fuse with any-
thing but another fuse of the
same rating.
A higher capacity fuse could
cause damage possibly a fire.
Never install a wire instead of
the proper fuse - even as a
temporary repair. It may cause
extensive wiring damage and
possibly a fire.
Do not use a screwdriver or
any other metal object to
remove fuses because it may
cause a short circuit and dam-
age the system.
KM CAN (ENG) 6.qxd 9/13/2004 4:47 PM Page 8