Page 2774 of 3419
STEERING WHEEL
PS-7
C
D
E
F
H
I
J
K
L
MA
B
PS
Revision: October 20052005 QX56
STEERING WHEELPFP:48430
On-Vehicle Inspection and ServiceEGS000UC
CHECKING CONDITION OF INSTALLATION
�Check installation condition of steering gear assembly, front suspension, axle and steering column.
�Check if movement exists when steering wheel is moved up and down, to the left and right and to the axial
direction.
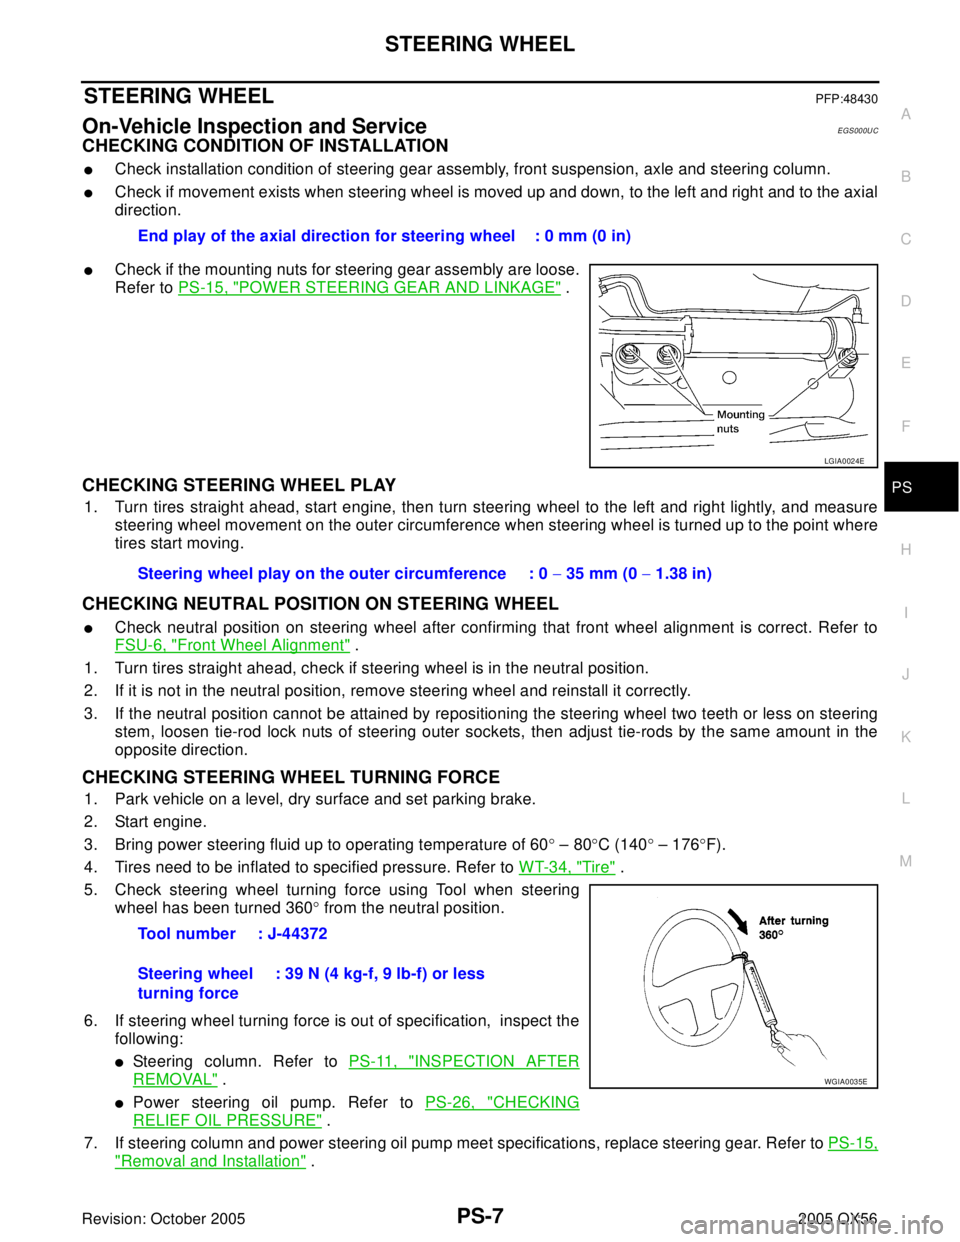
�Check if the mounting nuts for steering gear assembly are loose.
Refer to PS-15, "
POWER STEERING GEAR AND LINKAGE" .
CHECKING STEERING WHEEL PLAY
1. Turn tires straight ahead, start engine, then turn steering wheel to the left and right lightly, and measure
steering wheel movement on the outer circumference when steering wheel is turned up to the point where
tires start moving.
CHECKING NEUTRAL POSITION ON STEERING WHEEL
�Check neutral position on steering wheel after confirming that front wheel alignment is correct. Refer to
FSU-6, "
Front Wheel Alignment" .
1. Turn tires straight ahead, check if steering wheel is in the neutral position.
2. If it is not in the neutral position, remove steering wheel and reinstall it correctly.
3. If the neutral position cannot be attained by repositioning the steering wheel two teeth or less on steering
stem, loosen tie-rod lock nuts of steering outer sockets, then adjust tie-rods by the same amount in the
opposite direction.
CHECKING STEERING WHEEL TURNING FORCE
1. Park vehicle on a level, dry surface and set parking brake.
2. Start engine.
3. Bring power steering fluid up to operating temperature of 60° – 80°C (140° – 176°F).
4. Tires need to be inflated to specified pressure. Refer to WT-34, "
Tire" .
5. Check steering wheel turning force using Tool when steering
wheel has been turned 360° from the neutral position.
6. If steering wheel turning force is out of specification, inspect the
following:
�Steering column. Refer to PS-11, "INSPECTION AFTER
REMOVAL" .
�Power steering oil pump. Refer to PS-26, "CHECKING
RELIEF OIL PRESSURE" .
7. If steering column and power steering oil pump meet specifications, replace steering gear. Refer to PS-15,
"Removal and Installation" . End play of the axial direction for steering wheel : 0 mm (0 in)
LGIA0024E
Steering wheel play on the outer circumference : 0 − 35 mm (0 − 1.38 in)
Tool number : J-44372
Steering wheel
turning force: 39 N (4 kg-f, 9 lb-f) or less
WGIA0035E
Page 2778 of 3419
STEERING COLUMN
PS-11
C
D
E
F
H
I
J
K
L
MA
B
PS
Revision: October 20052005 QX56
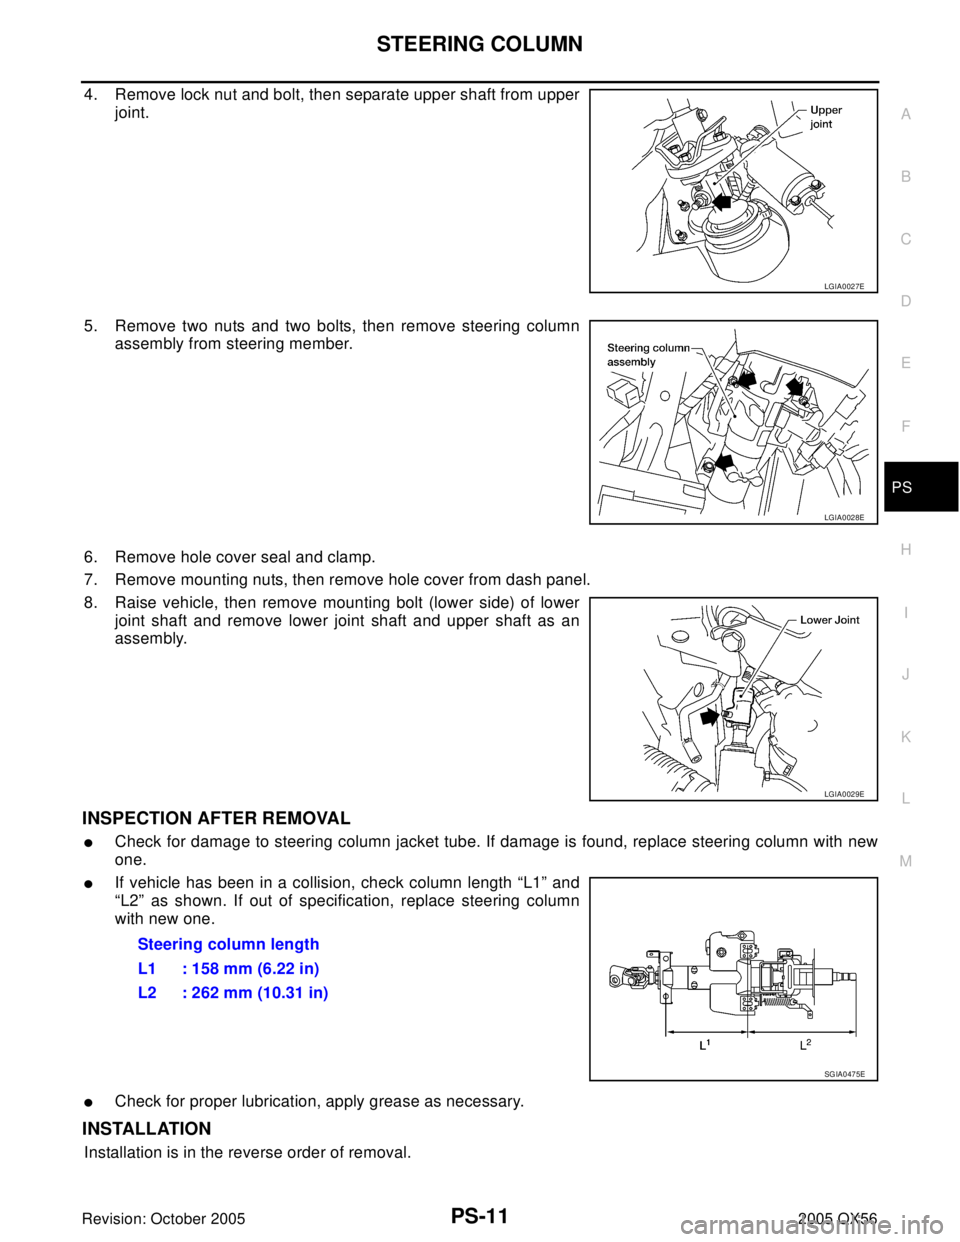
4. Remove lock nut and bolt, then separate upper shaft from upper
joint.
5. Remove two nuts and two bolts, then remove steering column
assembly from steering member.
6. Remove hole cover seal and clamp.
7. Remove mounting nuts, then remove hole cover from dash panel.
8. Raise vehicle, then remove mounting bolt (lower side) of lower
joint shaft and remove lower joint shaft and upper shaft as an
assembly.
INSPECTION AFTER REMOVAL
�Check for damage to steering column jacket tube. If damage is found, replace steering column with new
one.
�If vehicle has been in a collision, check column length “L1” and
“L2” as shown. If out of specification, replace steering column
with new one.
�Check for proper lubrication, apply grease as necessary.
INSTALLATION
Installation is in the reverse order of removal.
LGIA0027E
LGIA0028E
LGIA0029E
Steering column length
L1 : 158 mm (6.22 in)
L2 : 262 mm (10.31 in)
SGIA0475E
Page 2779 of 3419
PS-12
STEERING COLUMN
Revision: October 20052005 QX56
CAUTION:
�When installing the steering column, finger-tighten all of the lower bracket and joint retaining
bolts; then tighten them to specification. Do not apply undue stress to the steering column.
�The lower nut on the upper joint may not be reused.
NOTE:
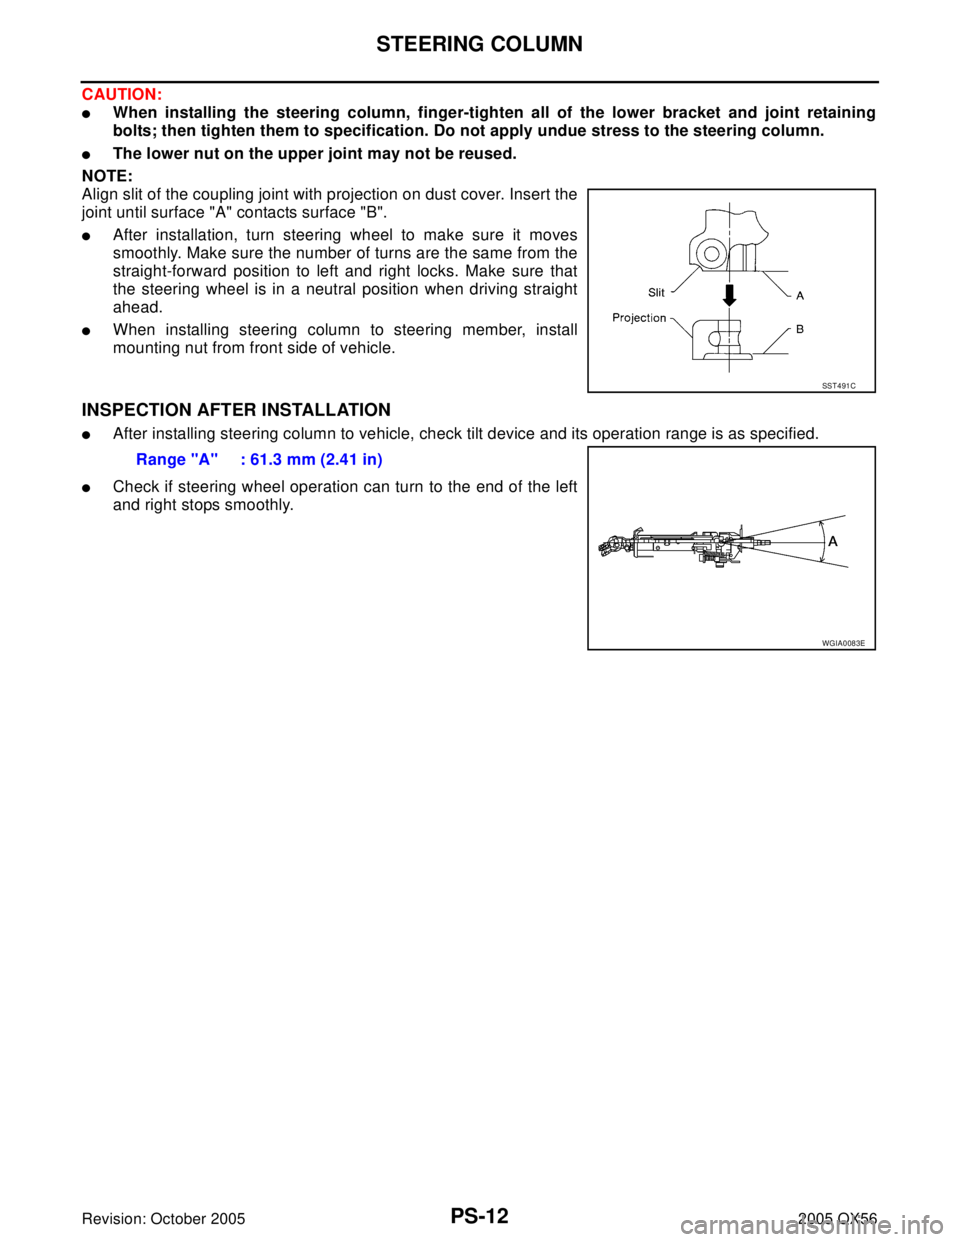
Align slit of the coupling joint with projection on dust cover. Insert the
joint until surface "A" contacts surface "B".
�After installation, turn steering wheel to make sure it moves
smoothly. Make sure the number of turns are the same from the
straight-forward position to left and right locks. Make sure that
the steering wheel is in a neutral position when driving straight
ahead.
�When installing steering column to steering member, install
mounting nut from front side of vehicle.
INSPECTION AFTER INSTALLATION
�After installing steering column to vehicle, check tilt device and its operation range is as specified.
�Check if steering wheel operation can turn to the end of the left
and right stops smoothly.
SST 4 91 C
Range "A" : 61.3 mm (2.41 in)
WGIA0083E
Page 2784 of 3419
POWER STEERING GEAR AND LINKAGE
PS-17
C
D
E
F
H
I
J
K
L
MA
B
PS
Revision: October 20052005 QX56
INSPECTION AFTER INSTALLATION
Check if steering wheel turns smoothly when it is turned several times fully to the left and right lock positions.
Disassembly and AssemblyEGS000UI
CAUTION:
�Secure steering gear assembly with a vise, using copper plates or something similar to prevent it
from being damaged. Do not grip cylinder with a vise.
�Before performing disassembly, clean steering gear assembly with kerosene. Be careful not to
bring any kerosene into contact with the discharge and return port connectors.
DISASSEMBLY
1. Remove cylinder tubes from gear housing assembly.
2. Remove rear cover cap from gear housing assembly.
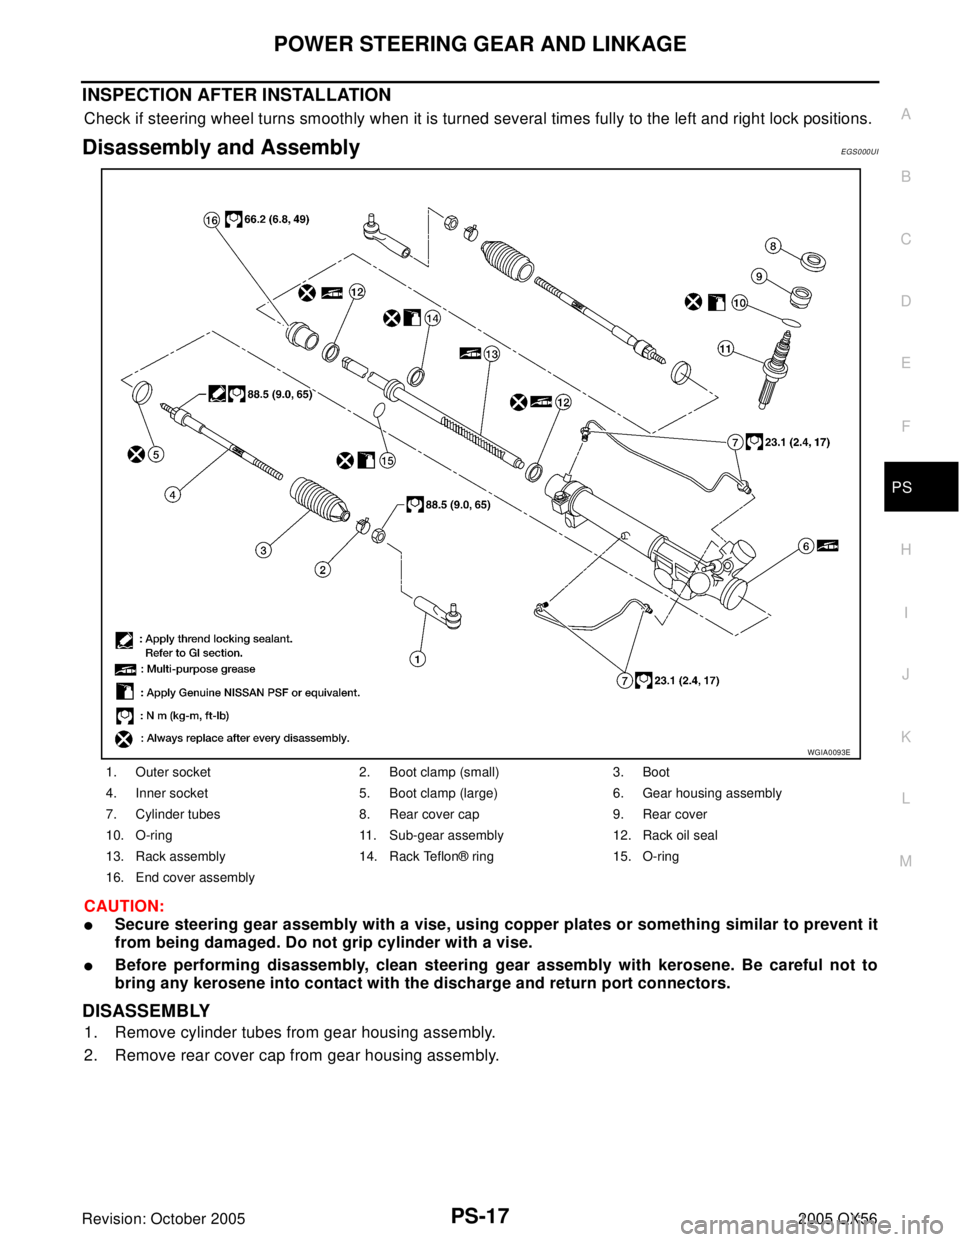
1. Outer socket 2. Boot clamp (small) 3. Boot
4. Inner socket 5. Boot clamp (large) 6. Gear housing assembly
7. Cylinder tubes 8. Rear cover cap 9. Rear cover
10. O-ring 11. Sub-gear assembly 12. Rack oil seal
13. Rack assembly 14. Rack Teflon® ring 15. O-ring
16. End cover assembly
WGIA0093E
Page 2785 of 3419
PS-18
POWER STEERING GEAR AND LINKAGE
Revision: October 20052005 QX56
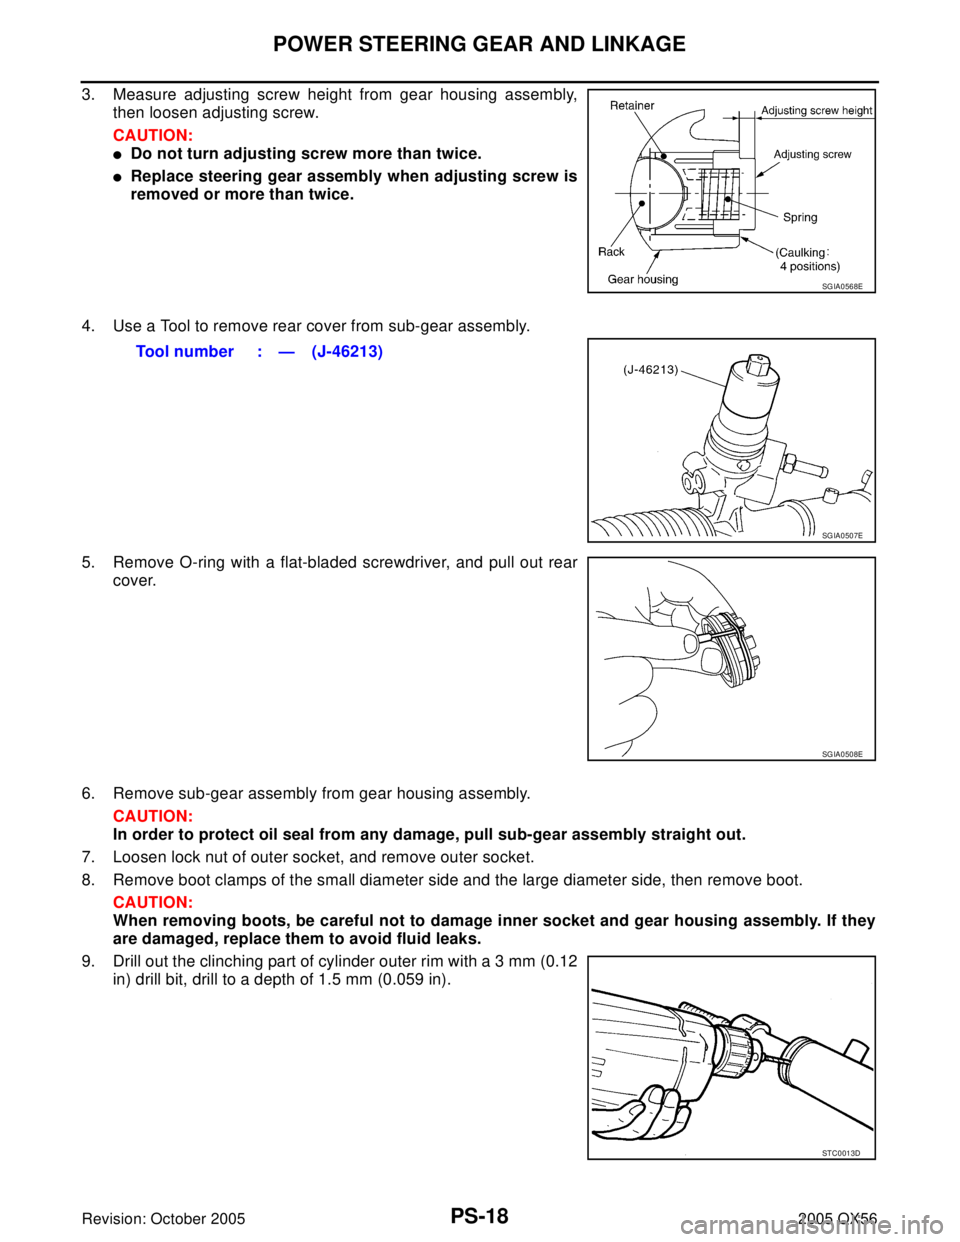
3. Measure adjusting screw height from gear housing assembly,
then loosen adjusting screw.
CAUTION:
�Do not turn adjusting screw more than twice.
�Replace steering gear assembly when adjusting screw is
removed or more than twice.
4. Use a Tool to remove rear cover from sub-gear assembly.
5. Remove O-ring with a flat-bladed screwdriver, and pull out rear
cover.
6. Remove sub-gear assembly from gear housing assembly.
CAUTION:
In order to protect oil seal from any damage, pull sub-gear assembly straight out.
7. Loosen lock nut of outer socket, and remove outer socket.
8. Remove boot clamps of the small diameter side and the large diameter side, then remove boot.
CAUTION:
When removing boots, be careful not to damage inner socket and gear housing assembly. If they
are damaged, replace them to avoid fluid leaks.
9. Drill out the clinching part of cylinder outer rim with a 3 mm (0.12
in) drill bit, drill to a depth of 1.5 mm (0.059 in).
SGIA0568E
Tool number : — (J-46213)
SGIA0507E
SGIA0508E
STC0013D
Page 2790 of 3419
POWER STEERING GEAR AND LINKAGE
PS-23
C
D
E
F
H
I
J
K
L
MA
B
PS
Revision: October 20052005 QX56
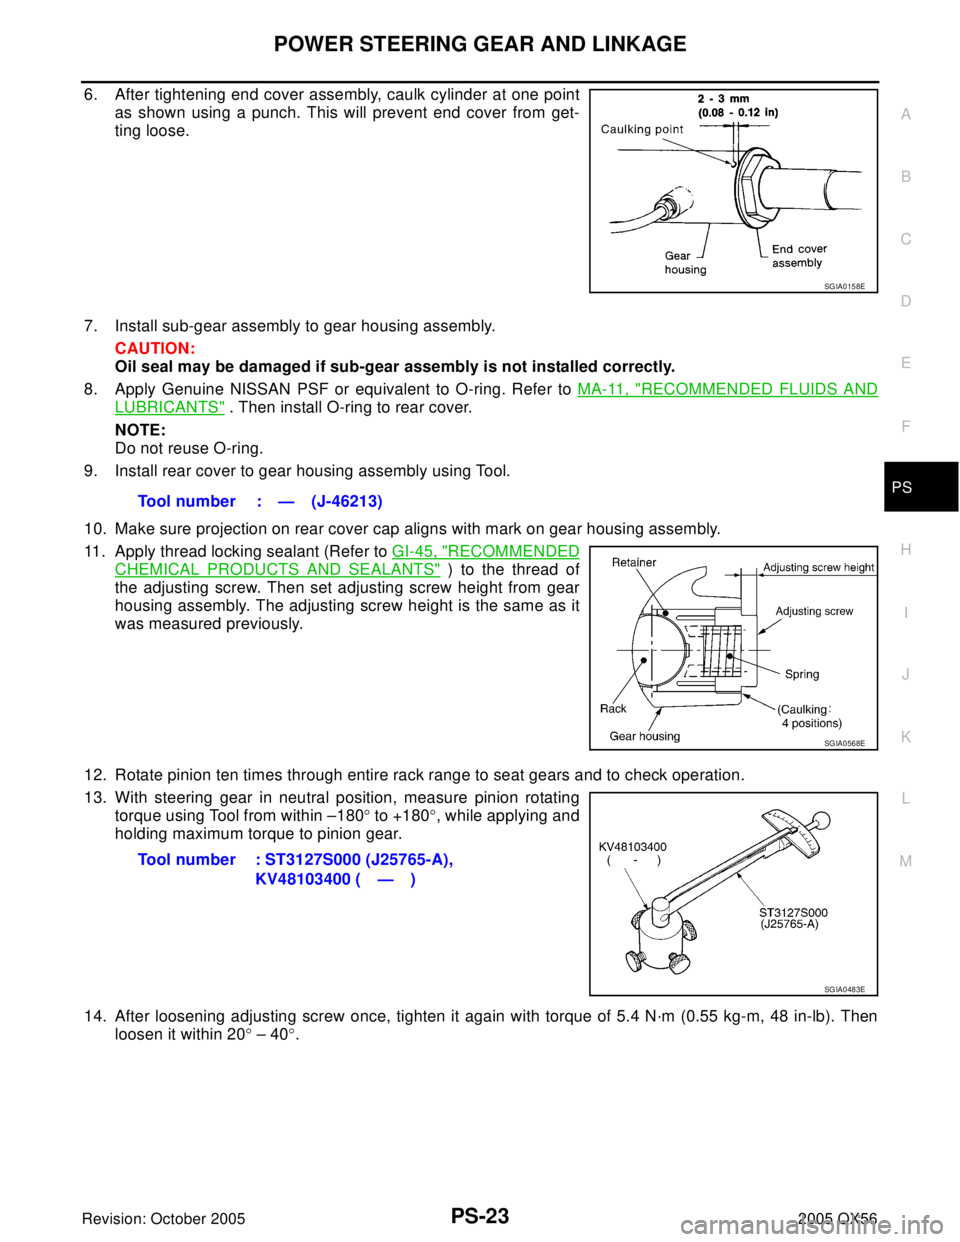
6. After tightening end cover assembly, caulk cylinder at one point
as shown using a punch. This will prevent end cover from get-
ting loose.
7. Install sub-gear assembly to gear housing assembly.
CAUTION:
Oil seal may be damaged if sub-gear assembly is not installed correctly.
8. Apply Genuine NISSAN PSF or equivalent to O-ring. Refer to MA-11, "
RECOMMENDED FLUIDS AND
LUBRICANTS" . Then install O-ring to rear cover.
NOTE:
Do not reuse O-ring.
9. Install rear cover to gear housing assembly using Tool.
10. Make sure projection on rear cover cap aligns with mark on gear housing assembly.
11. Apply thread locking sealant (Refer to GI-45, "
RECOMMENDED
CHEMICAL PRODUCTS AND SEALANTS" ) to the thread of
the adjusting screw. Then set adjusting screw height from gear
housing assembly. The adjusting screw height is the same as it
was measured previously.
12. Rotate pinion ten times through entire rack range to seat gears and to check operation.
13. With steering gear in neutral position, measure pinion rotating
torque using Tool from within –180° to +180°, while applying and
holding maximum torque to pinion gear.
14. After loosening adjusting screw once, tighten it again with torque of 5.4 N·m (0.55 kg-m, 48 in-lb). Then
loosen it within 20° – 40°.
SGIA0158E
Tool number : — (J-46213)
SGIA0568E
Tool number : ST3127S000 (J25765-A),
KV48103400 ( — )
SGIA0483E
Page 2791 of 3419
PS-24
POWER STEERING GEAR AND LINKAGE
Revision: October 20052005 QX56
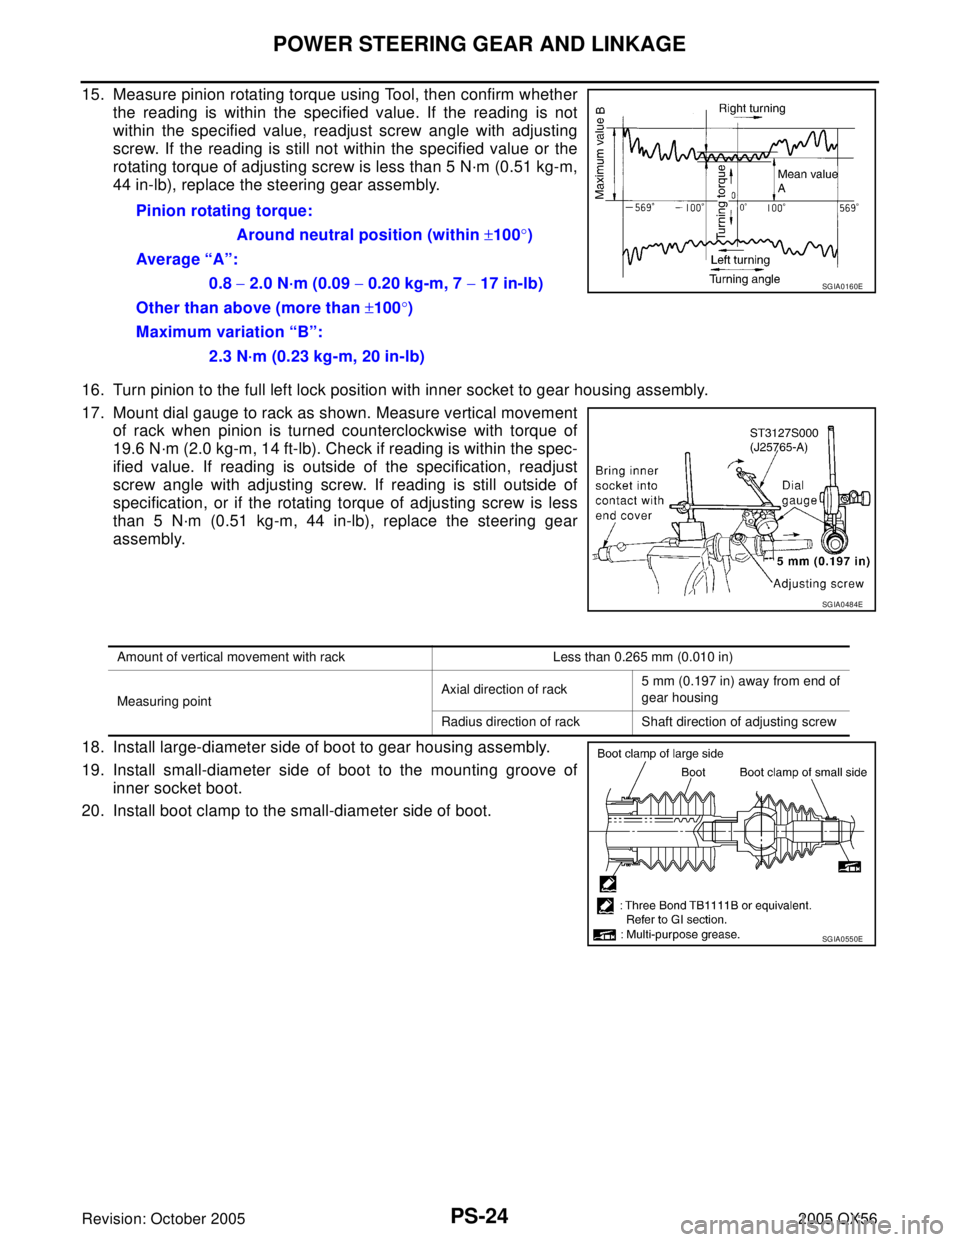
15. Measure pinion rotating torque using Tool, then confirm whether
the reading is within the specified value. If the reading is not
within the specified value, readjust screw angle with adjusting
screw. If the reading is still not within the specified value or the
rotating torque of adjusting screw is less than 5 N·m (0.51 kg-m,
44 in-lb), replace the steering gear assembly.
16. Turn pinion to the full left lock position with inner socket to gear housing assembly.
17. Mount dial gauge to rack as shown. Measure vertical movement
of rack when pinion is turned counterclockwise with torque of
19.6 N·m (2.0 kg-m, 14 ft-lb). Check if reading is within the spec-
ified value. If reading is outside of the specification, readjust
screw angle with adjusting screw. If reading is still outside of
specification, or if the rotating torque of adjusting screw is less
than 5 N·m (0.51 kg-m, 44 in-lb), replace the steering gear
assembly.
18. Install large-diameter side of boot to gear housing assembly.
19. Install small-diameter side of boot to the mounting groove of
inner socket boot.
20. Install boot clamp to the small-diameter side of boot.Pinion rotating torque:
Around neutral position (within ±100°)
Average “A”:
0.8 − 2.0 N·m (0.09 − 0.20 kg-m, 7 − 17 in-lb)
Other than above (more than ±100°)
Maximum variation “B”:
2.3 N·m (0.23 kg-m, 20 in-lb)
SGIA0160E
SGIA0484E
Amount of vertical movement with rack Less than 0.265 mm (0.010 in)
Measuring pointAxial direction of rack5 mm (0.197 in) away from end of
gear housing
Radius direction of rack Shaft direction of adjusting screw
SGIA0550E
Page 2792 of 3419
POWER STEERING GEAR AND LINKAGE
PS-25
C
D
E
F
H
I
J
K
L
MA
B
PS
Revision: October 20052005 QX56
21. Install new boot clamps and crimp securely.
CAUTION:
Do not reuse boot clamps.
22. Install cylinder tubes to gear housing assembly.
23. Install lock nut and outer socket to inner socket.
24. Tighten lightly tie-rod in specified length “L”, then tighten lock nut
at specified torque. Refer to PS-17, "
Disassembly and Assem-
bly" . Reconfirm if tie-rod length is within limit of specified length
“L”.
CAUTION:
Perform toe-in adjustment after this procedure. Length
achieved after toe-in adjustment is not necessarily the
value given here.
AST 1 39
Inner socket length “L” : 115.2 mm (4.54 in)
SGIA0167E