2005 INFINITI QX4 turn signal
[x] Cancel search: turn signalPage 2293 of 3419
![INFINITI QX4 2005 Factory Service Manual LAN-14
[CAN]
CAN COMMUNICATION
Revision: October 20052005 QX56
A/C switch/indicator signalTR
RT
Cooling fan speed request signal T R R
Position light request signal R T R
Low beam request signal T R
L INFINITI QX4 2005 Factory Service Manual LAN-14
[CAN]
CAN COMMUNICATION
Revision: October 20052005 QX56
A/C switch/indicator signalTR
RT
Cooling fan speed request signal T R R
Position light request signal R T R
Low beam request signal T R
L](/manual-img/42/57035/w960_57035-2292.png)
LAN-14
[CAN]
CAN COMMUNICATION
Revision: October 20052005 QX56
A/C switch/indicator signalTR
RT
Cooling fan speed request signal T R R
Position light request signal R T R
Low beam request signal T R
Low beam status signal RT
High beam request signal R T R
High beam status signal RT
Front fog light request signal T R
Day time running light request
signalTR
Vehicle speed signalR RRT
RRR R T R R R
Sleep wake up signal R T R
Door switch signal R R R T R
Turn indicator signal R T
Key fob ID signal R T
Key fob door unlock signal R T
Buzzer output signalRT
TR
Fuel level sensor signal R T
Malfunction indicator lamp signal T R
Fuel level low warning signal T R
Front wiper request signal R T R
Front wiper stop position signal R T
Rear window defogger switch sig-
nalTR R
Rear window defogger control
signalRRRT
Hood switch signalRT
Theft warning horn request signal T R
Horn chirp signalTR
Steering angle sensor signal T R
ABS warning lamp signal R T
VDC OFF indicator lamp signal R R T
SLIP indicator lamp signal R T
Brake warning lamp signal R T
VDC operation signal R T
ABS malfunction signal R TSignals ECM TCMICC
sen-
sorICC
unitDriver
seat
con-
trol
unitCom-
bina-
tion
mete
rDis-
play
con-
trol
unitBCMStee r-
ing
angle
sen-
sorFront
air
con-
trolTran s -
fer
con-
trol
unitABS
actu-
ator
and
elec-
tric
unit
(con-
trol
unit)IPD
M
E/R
Page 2449 of 3419

LT-2Revision: October 20052005 QX56 COMBINATION SWITCH READING FUNCTION ... 48
EXTERIOR LAMP BATTERY SAVER CONTROL ... 48
DELAY TIMER FUNCTION ................................. 48
CAN Communication System Description .............. 48
Major Components and Functions .......................... 48
Schematic ............................................................... 49
Wiring Diagram — AUTO/L — ................................ 50
Terminals and Reference Values for BCM .............. 53
Terminals and Reference Values for IPDM E/R ...... 54
How to Proceed With Trouble Diagnosis ................ 55
Preliminary Check .................................................. 55
SETTING CHANGE FUNCTIONS ....................... 55
CHECK POWER SUPPLY AND GROUND CIR-
CUIT .................................................................... 55
CONSULT-II Function (BCM) .................................. 57
CONSULT-II OPERATION ................................... 57
WORK SUPPORT ............................................... 58
DATA MONITOR .................................................. 58
ACTIVE TEST ..................................................... 59
SELF-DIAGNOSTIC RESULTS ........................... 59
CONSULT-II Function (IPDM E/R) .......................... 60
CONSULT-II OPERATION ................................... 60
DATA MONITOR .................................................. 61
ACTIVE TEST ..................................................... 61
Trouble Diagnosis Chart by Symptom .................... 62
Lighting Switch Inspection ...................................... 62
Optical Sensor System Inspection .......................... 63
Removal and Installation of Optical Sensor ............ 64
REMOVAL ........................................................... 64
INSTALLATION .................................................... 64
HEADLAMP AIMING CONTROL .............................. 65
System Description ................................................. 65
Wiring Diagram — H/AIM — ................................... 66
Removal and Installation of Headlamp Aiming
Switch ..................................................................... 68
REMOVAL ........................................................... 68
INSTALLATION ................................................... 68
Switch Circuit Inspection ........................................ 68
FRONT FOG LAMP .................................................. 69
Component Parts and Harness Connector Location ... 69
System Description ................................................. 69
OUTLINE ............................................................. 69
COMBINATION SWITCH READING FUNCTION ... 70
EXTERIOR LAMP BATTERY SAVER CONTROL ... 70
CAN Communication System Description .............. 70
Wiring Diagram — F/FOG — .................................. 71
Terminals and Reference Values for BCM .............. 73
Terminals and Reference Values for IPDM E/R ...... 74
How to Proceed With Trouble Diagnosis ................ 74
Preliminary Check .................................................. 75
CHECK POWER SUPPLY AND GROUND CIR-
CUIT .................................................................... 75
CONSULT-II Functions ........................................... 76
Front Fog Lamps Do Not Illuminate (Both Sides) ... 76
Front Fog Lamp Does Not Illuminate (One Side) ... 77
Aiming Adjustment .................................................. 78
Bulb Replacement .................................................. 79
Removal and Installation ........................................ 79
TURN SIGNAL AND HAZARD WARNING LAMPS ... 80Component Parts and Harness Connector Location ...80
System Description .................................................80
OUTLINE .............................................................80
TURN SIGNAL OPERATION ...............................80
HAZARD LAMP OPERATION .............................81
REMOTE KEYLESS ENTRY SYSTEM OPERA-
TION ....................................................................82
COMBINATION SWITCH READING FUNCTION ...82
CAN Communication System Description ..............82
Wiring Diagram — TURN — ...................................83
Terminals and Reference Values for BCM ..............85
How to Proceed With Trouble Diagnosis ................86
Preliminary Check ...................................................87
CHECK POWER SUPPLY AND GROUND CIR-
CUIT .....................................................................87
CONSULT-II Function (BCM) ..................................88
CONSULT-II OPERATION ...................................88
DATA MONITOR ..................................................89
ACTIVE TEST ......................................................89
Turn Signal Lamp Does Not Operate ......................90
Rear Turn Signal Lamp Does Not Operate .............91
Hazard Warning Lamp Does Not Operate But Turn
Signal Lamps Operate ............................................92
Turn Signal Indicator Lamp Does Not Operate .......93
Bulb Replacement (Front Turn Signal Lamp) ..........94
Bulb Replacement (Rear Turn Signal Lamp) ..........94
Removal and Installation of Front Turn Signal Lamp ...94
Removal and Installation of Rear Turn Signal Lamp ...94
LIGHTING AND TURN SIGNAL SWITCH ................95
Removal and Installation .........................................95
REMOVAL ............................................................95
INSTALLATION ....................................................95
HAZARD SWITCH .....................................................96
Removal and Installation .........................................96
REMOVAL ............................................................96
INSTALLATION ....................................................96
COMBINATION SWITCH ..........................................97
Wiring Diagram — COMBSW — ............................97
Combination Switch Reading Function ...................98
CONSULT-II Function (BCM) ..................................98
CONSULT-II OPERATION ...................................98
DATA MONITOR ..................................................99
Combination Switch Inspection ............................. 100
Removal and Installation ....................................... 102
Switch Circuit Inspection ....................................... 102
STOP LAMP ............................................................ 103
System Description ............................................... 103
Wiring Diagram — STOP/L — .............................. 104
High-Mounted Stop Lamp ..................................... 105
BULB REPLACEMENT ...................................... 105
REMOVAL AND INSTALLATION ....................... 105
Stop Lamp ............................................................. 105
BULB REPLACEMENT ...................................... 105
REMOVAL AND INSTALLATION ....................... 105
BACK-UP LAMP ..................................................... 106
Wiring Diagram — BACK/L — .............................. 106
Bulb Replacement ................................................. 107
Removal and Installation ....................................... 107
PARKING, LICENSE PLATE AND TAIL LAMPS .... 108
Page 2450 of 3419
LT-3
C
D
E
F
G
H
I
J
L
MA
B
LT
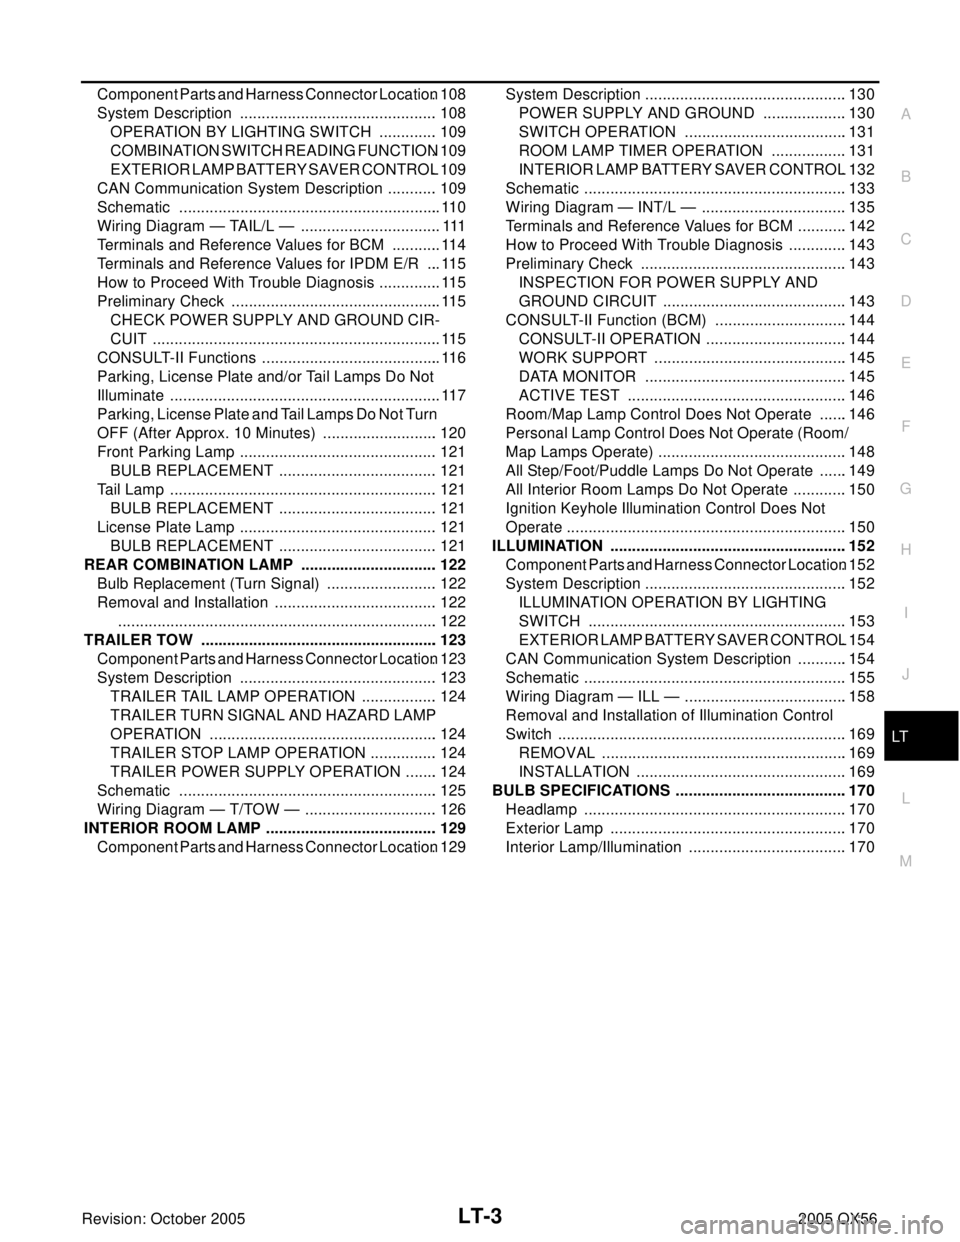
Revision: October 20052005 QX56 Component Parts and Harness Connector Location . 108
System Description .............................................. 108
OPERATION BY LIGHTING SWITCH .............. 109
COMBINATION SWITCH READING FUNCTION . 109
EXTERIOR LAMP BATTERY SAVER CONTROL . 109
CAN Communication System Description ............ 109
Schematic ............................................................. 110
Wiring Diagram — TAIL/L — ................................ . 111
Terminals and Reference Values for BCM ............ 114
Terminals and Reference Values for IPDM E/R .... 115
How to Proceed With Trouble Diagnosis ............... 115
Preliminary Check ................................................. 115
CHECK POWER SUPPLY AND GROUND CIR-
CUIT ................................................................... 115
CONSULT-II Functions .......................................... 116
Parking, License Plate and/or Tail Lamps Do Not
Illuminate ............................................................... 117
Parking, License Plate and Tail Lamps Do Not Turn
OFF (After Approx. 10 Minutes) ........................... 120
Front Parking Lamp .............................................. 121
BULB REPLACEMENT ..................................... 121
Tail Lamp .............................................................. 121
BULB REPLACEMENT ..................................... 121
License Plate Lamp .............................................. 121
BULB REPLACEMENT ..................................... 121
REAR COMBINATION LAMP ................................ 122
Bulb Replacement (Turn Signal) .......................... 122
Removal and Installation ...................................... 122
.......................................................................... 122
TRAILER TOW ....................................................... 123
Component Parts and Harness Connector Location . 123
System Description .............................................. 123
TRAILER TAIL LAMP OPERATION .................. 124
TRAILER TURN SIGNAL AND HAZARD LAMP
OPERATION ..................................................... 124
TRAILER STOP LAMP OPERATION ................ 124
TRAILER POWER SUPPLY OPERATION ........ 124
Schematic ............................................................ 125
Wiring Diagram — T/TOW — ............................... 126
INTERIOR ROOM LAMP ........................................ 129
Component Parts and Harness Connector Location . 129System Description ...............................................130
POWER SUPPLY AND GROUND ....................130
SWITCH OPERATION ......................................131
ROOM LAMP TIMER OPERATION ..................131
INTERIOR LAMP BATTERY SAVER CONTROL .132
Schematic .............................................................133
Wiring Diagram — INT/L — ..................................135
Terminals and Reference Values for BCM ............142
How to Proceed With Trouble Diagnosis ..............143
Preliminary Check ................................................143
INSPECTION FOR POWER SUPPLY AND
GROUND CIRCUIT ...........................................143
CONSULT-II Function (BCM) ...............................144
CONSULT-II OPERATION .................................144
WORK SUPPORT .............................................145
DATA MONITOR ...............................................145
ACTIVE TEST ...................................................146
Room/Map Lamp Control Does Not Operate .......146
Personal Lamp Control Does Not Operate (Room/
Map Lamps Operate) ............................................148
All Step/Foot/Puddle Lamps Do Not Operate .......149
All Interior Room Lamps Do Not Operate .............150
Ignition Keyhole Illumination Control Does Not
Operate .................................................................150
ILLUMINATION .......................................................152
Component Parts and Harness Connector Location .152
System Description ...............................................152
ILLUMINATION OPERATION BY LIGHTING
SWITCH ............................................................153
EXTERIOR LAMP BATTERY SAVER CONTROL .154
CAN Communication System Description ............154
Schematic .............................................................155
Wiring Diagram — ILL — ......................................158
Removal and Installation of Illumination Control
Switch ...................................................................169
REMOVAL .........................................................169
INSTALLATION .................................................169
BULB SPECIFICATIONS ........................................170
Headlamp .............................................................170
Exterior Lamp .......................................................170
Interior Lamp/Illumination .....................................170
Page 2461 of 3419
LT-14
HEADLAMP (FOR USA)
Revision: October 20052005 QX56
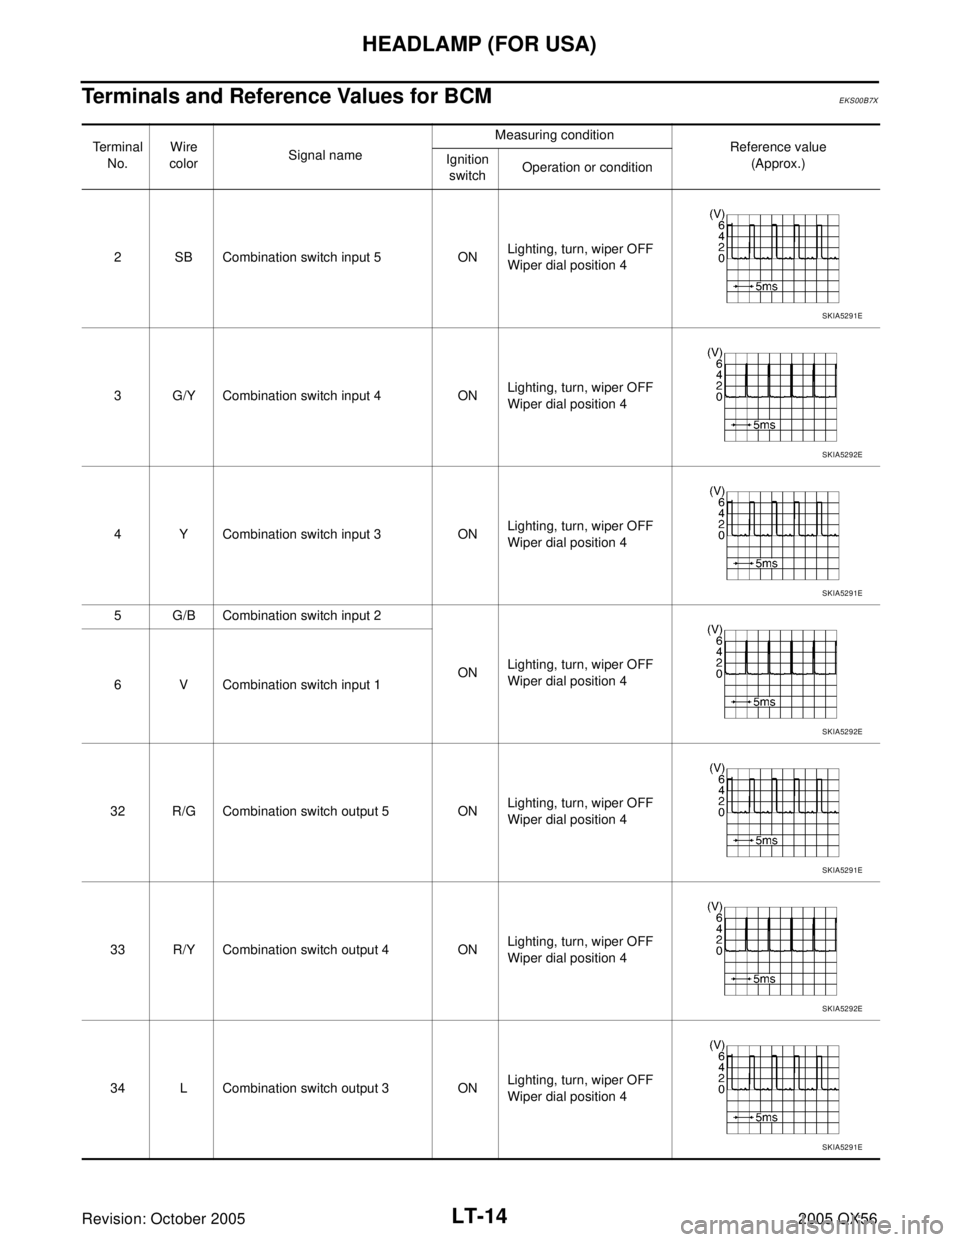
Terminals and Reference Values for BCMEKS00B7X
Terminal
No.Wire
colorSignal nameMeasuring condition
Reference value
(Approx.) Ignition
switchOperation or condition
2 SB Combination switch input 5 ONLighting, turn, wiper OFF
Wiper dial position 4
3 G/Y Combination switch input 4 ONLighting, turn, wiper OFF
Wiper dial position 4
4 Y Combination switch input 3 ONLighting, turn, wiper OFF
Wiper dial position 4
5 G/B Combination switch input 2
ONLighting, turn, wiper OFF
Wiper dial position 4
6 V Combination switch input 1
32 R/G Combination switch output 5 ONLighting, turn, wiper OFF
Wiper dial position 4
33 R/Y Combination switch output 4 ONLighting, turn, wiper OFF
Wiper dial position 4
34 L Combination switch output 3 ONLighting, turn, wiper OFF
Wiper dial position 4
SKIA5291E
SKIA5292E
SKIA5291E
SKIA5292E
SKIA5291E
SKIA5292E
SKIA5291E
Page 2462 of 3419
HEADLAMP (FOR USA)
LT-15
C
D
E
F
G
H
I
J
L
MA
B
LT
Revision: October 20052005 QX56
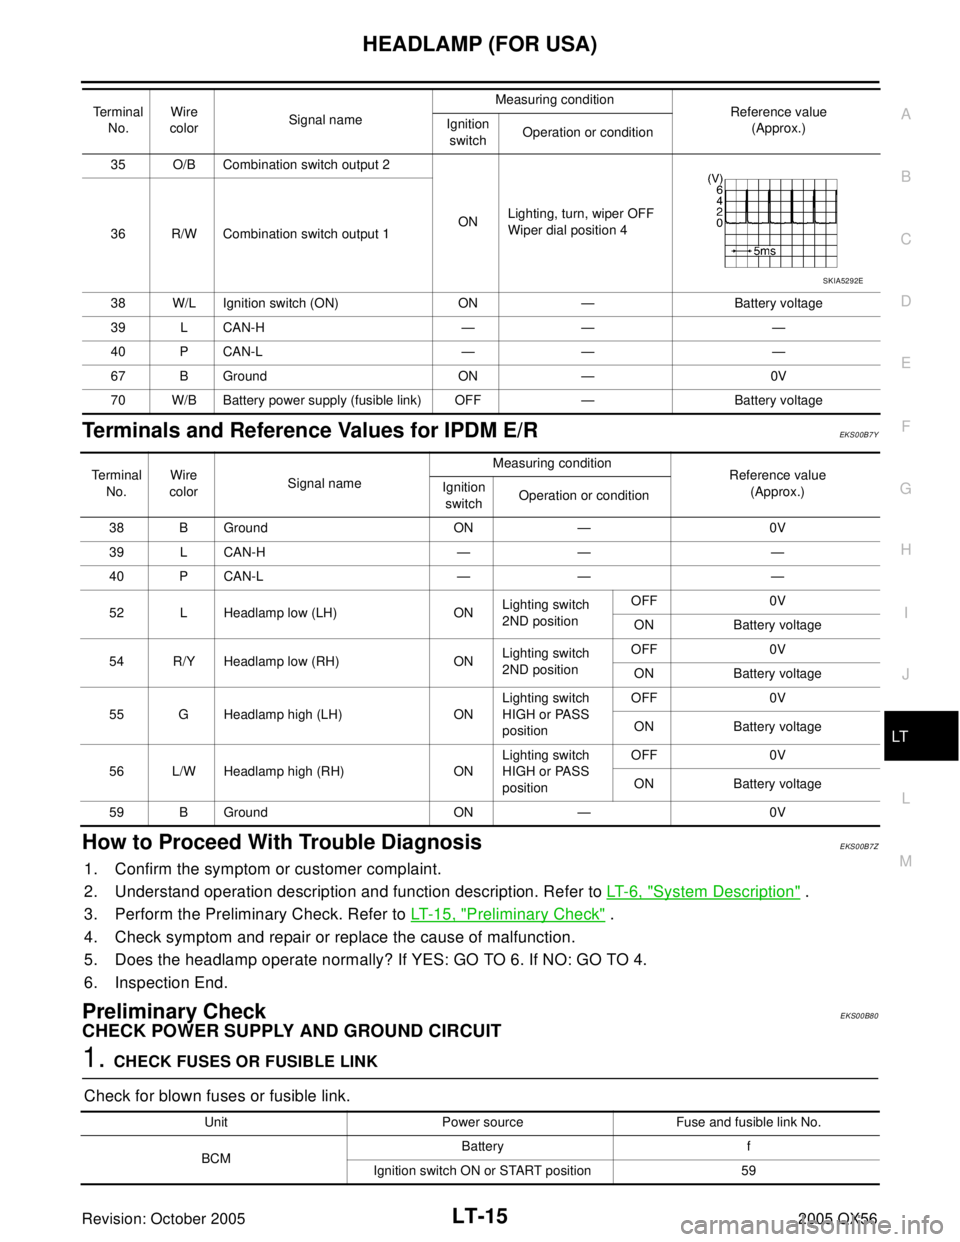
Terminals and Reference Values for IPDM E/REKS00B7Y
How to Proceed With Trouble DiagnosisEKS00B7Z
1. Confirm the symptom or customer complaint.
2. Understand operation description and function description. Refer to LT- 6 , "
System Description" .
3. Perform the Preliminary Check. Refer to LT- 1 5 , "
Preliminary Check" .
4. Check symptom and repair or replace the cause of malfunction.
5. Does the headlamp operate normally? If YES: GO TO 6. If NO: GO TO 4.
6. Inspection End.
Preliminary CheckEKS00B80
CHECK POWER SUPPLY AND GROUND CIRCUIT
1. CHECK FUSES OR FUSIBLE LINK
Check for blown fuses or fusible link.
35 O/B Combination switch output 2
ONLighting, turn, wiper OFF
Wiper dial position 4
36 R/W Combination switch output 1
38 W/L Ignition switch (ON) ON — Battery voltage
39 L CAN-H — — —
40 P CAN-L — — —
67 B Ground ON — 0V
70 W/B Battery power supply (fusible link) OFF — Battery voltage Terminal
No.Wire
colorSignal nameMeasuring condition
Reference value
(Approx.) Ignition
switchOperation or condition
SKIA5292E
Te r m i n a l
No.Wire
colorSignal nameMeasuring condition
Reference value
(Approx.) Ignition
switchOperation or condition
38 B Ground ON — 0V
39 L CAN-H — — —
40 P CAN-L — — —
52 L Headlamp low (LH) ONLighting switch
2ND positionOFF 0V
ON Battery voltage
54 R/Y Headlamp low (RH) ONLighting switch
2ND positionOFF 0V
ON Battery voltage
55 G Headlamp high (LH) ONLighting switch
HIGH or PASS
positionOFF 0V
ON Battery voltage
56 L/W Headlamp high (RH) ONLighting switch
HIGH or PASS
positionOFF 0V
ON Battery voltage
59 B Ground ON — 0V
Unit Power source Fuse and fusible link No.
BCMBattery f
Ignition switch ON or START position 59
Page 2464 of 3419
HEADLAMP (FOR USA)
LT-17
C
D
E
F
G
H
I
J
L
MA
B
LT
Revision: October 20052005 QX56
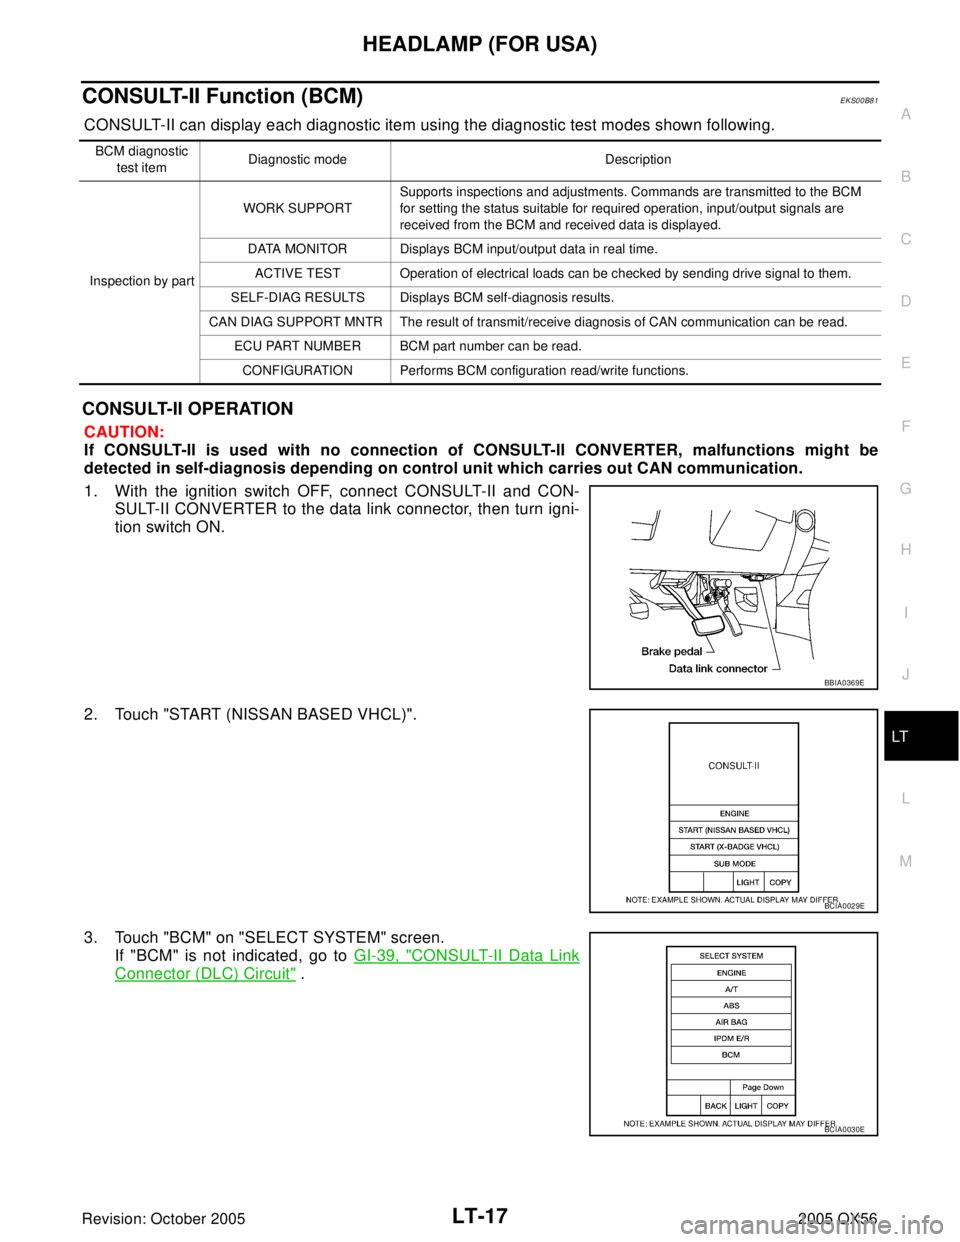
CONSULT-II Function (BCM)EKS00B81
CONSULT-II can display each diagnostic item using the diagnostic test modes shown following.
CONSULT-II OPERATION
CAUTION:
If CONSULT-II is used with no connection of CONSULT-II CONVERTER, malfunctions might be
detected in self-diagnosis depending on control unit which carries out CAN communication.
1. With the ignition switch OFF, connect CONSULT-II and CON-
SULT-II CONVERTER to the data link connector, then turn igni-
tion switch ON.
2. Touch "START (NISSAN BASED VHCL)".
3. Touch "BCM" on "SELECT SYSTEM" screen.
If "BCM" is not indicated, go to GI-39, "
CONSULT-II Data Link
Connector (DLC) Circuit" .
BCM diagnostic
test itemDiagnostic mode Description
Inspection by partWORK SUPPORTSupports inspections and adjustments. Commands are transmitted to the BCM
for setting the status suitable for required operation, input/output signals are
received from the BCM and received data is displayed.
DATA MONITOR Displays BCM input/output data in real time.
ACTIVE TEST Operation of electrical loads can be checked by sending drive signal to them.
SELF-DIAG RESULTS Displays BCM self-diagnosis results.
CAN DIAG SUPPORT MNTR The result of transmit/receive diagnosis of CAN communication can be read.
ECU PART NUMBER BCM part number can be read.
CONFIGURATION Performs BCM configuration read/write functions.
BBIA0369E
BCIA0029E
BCIA0030E
Page 2466 of 3419
HEADLAMP (FOR USA)
LT-19
C
D
E
F
G
H
I
J
L
MA
B
LT
Revision: October 20052005 QX56
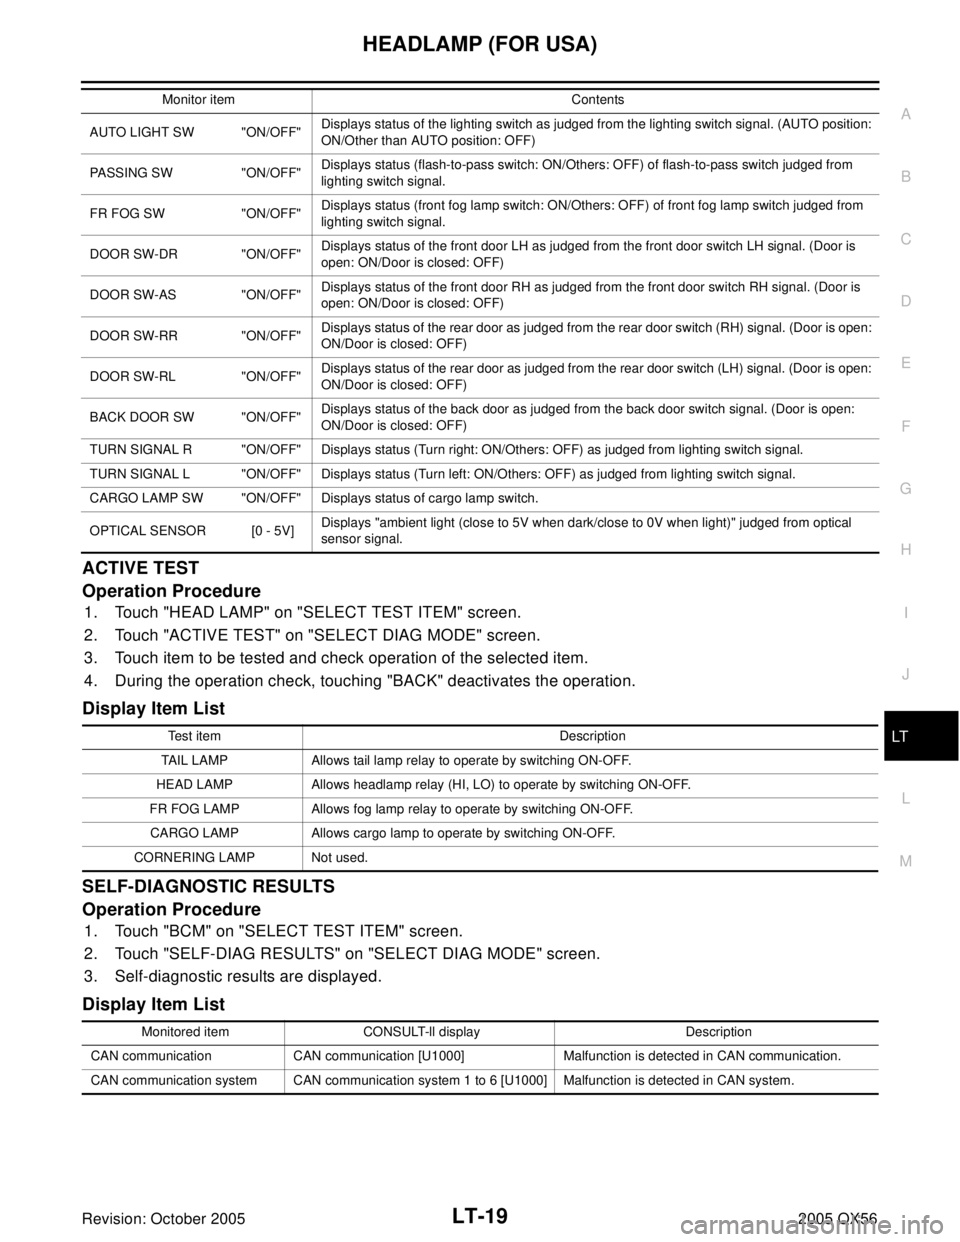
ACTIVE TEST
Operation Procedure
1. Touch "HEAD LAMP" on "SELECT TEST ITEM" screen.
2. Touch "ACTIVE TEST" on "SELECT DIAG MODE" screen.
3. Touch item to be tested and check operation of the selected item.
4. During the operation check, touching "BACK" deactivates the operation.
Display Item List
SELF-DIAGNOSTIC RESULTS
Operation Procedure
1. Touch "BCM" on "SELECT TEST ITEM" screen.
2. Touch "SELF-DIAG RESULTS" on "SELECT DIAG MODE" screen.
3. Self-diagnostic results are displayed.
Display Item List
AUTO LIGHT SW "ON/OFF"Displays status of the lighting switch as judged from the lighting switch signal. (AUTO position:
ON/Other than AUTO position: OFF)
PASSING SW "ON/OFF"Displays status (flash-to-pass switch: ON/Others: OFF) of flash-to-pass switch judged from
lighting switch signal.
FR FOG SW "ON/OFF"Displays status (front fog lamp switch: ON/Others: OFF) of front fog lamp switch judged from
lighting switch signal.
DOOR SW-DR "ON/OFF"Displays status of the front door LH as judged from the front door switch LH signal. (Door is
open: ON/Door is closed: OFF)
DOOR SW-AS "ON/OFF"Displays status of the front door RH as judged from the front door switch RH signal. (Door is
open: ON/Door is closed: OFF)
DOOR SW-RR "ON/OFF"Displays status of the rear door as judged from the rear door switch (RH) signal. (Door is open:
ON/Door is closed: OFF)
DOOR SW-RL "ON/OFF"Displays status of the rear door as judged from the rear door switch (LH) signal. (Door is open:
ON/Door is closed: OFF)
BACK DOOR SW "ON/OFF"Displays status of the back door as judged from the back door switch signal. (Door is open:
ON/Door is closed: OFF)
TURN SIGNAL R "ON/OFF" Displays status (Turn right: ON/Others: OFF) as judged from lighting switch signal.
TURN SIGNAL L "ON/OFF" Displays status (Turn left: ON/Others: OFF) as judged from lighting switch signal.
CARGO LAMP SW "ON/OFF" Displays status of cargo lamp switch.
OPTICAL SENSOR [0 - 5V] Displays "ambient light (close to 5V when dark/close to 0V when light)" judged from optical
sensor signal. Monitor item Contents
Te s t i t e m D e s c r i p t i o n
TAIL LAMP Allows tail lamp relay to operate by switching ON-OFF.
HEAD LAMP Allows headlamp relay (HI, LO) to operate by switching ON-OFF.
FR FOG LAMP Allows fog lamp relay to operate by switching ON-OFF.
CARGO LAMP Allows cargo lamp to operate by switching ON-OFF.
CORNERING LAMP Not used.
Monitored item CONSULT-ll display Description
CAN communication CAN communication [U1000] Malfunction is detected in CAN communication.
CAN communication system CAN communication system 1 to 6 [U1000] Malfunction is detected in CAN system.
Page 2467 of 3419
LT-20
HEADLAMP (FOR USA)
Revision: October 20052005 QX56
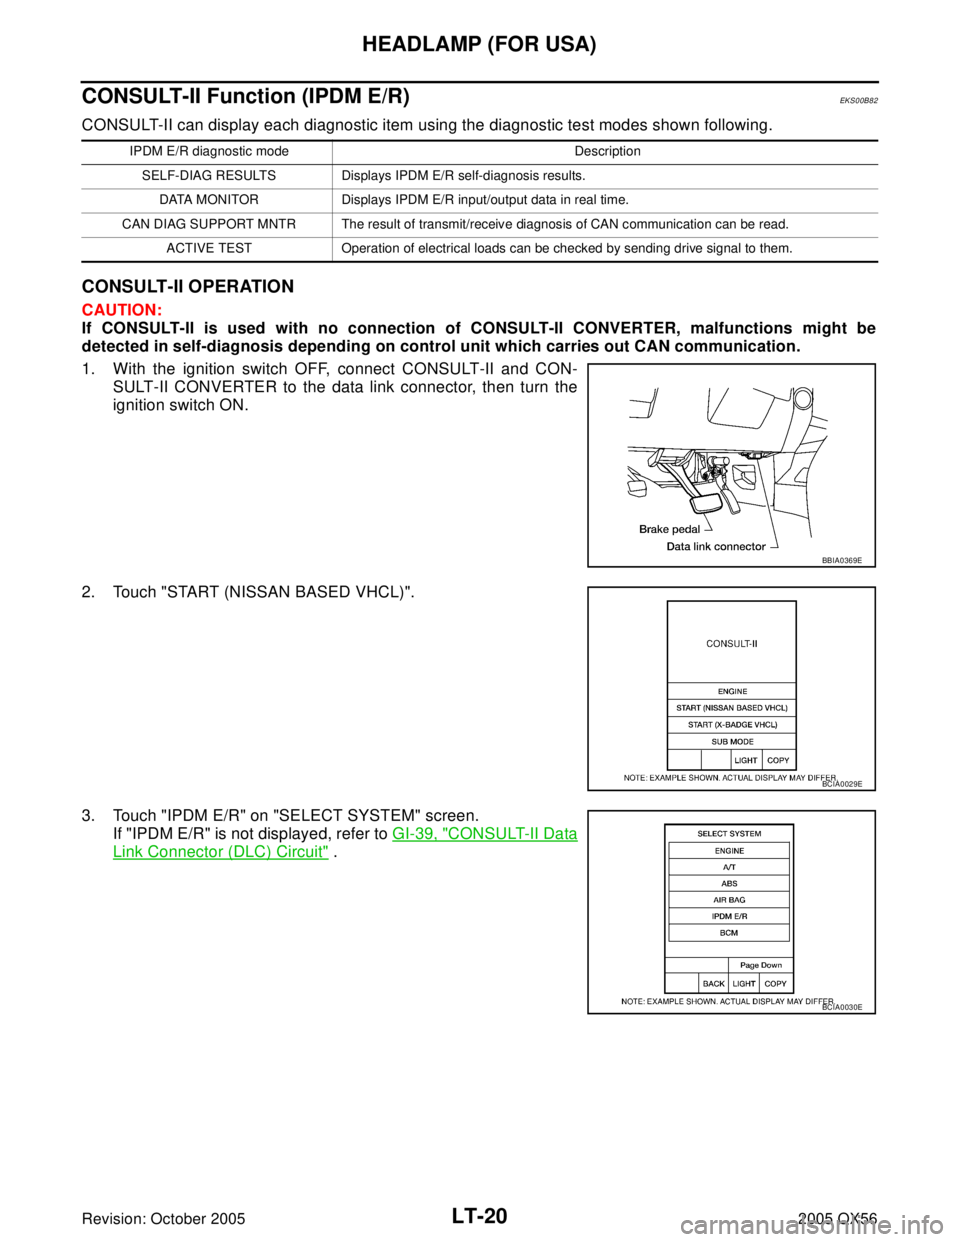
CONSULT-II Function (IPDM E/R)EKS00B82
CONSULT-II can display each diagnostic item using the diagnostic test modes shown following.
CONSULT-II OPERATION
CAUTION:
If CONSULT-II is used with no connection of CONSULT-II CONVERTER, malfunctions might be
detected in self-diagnosis depending on control unit which carries out CAN communication.
1. With the ignition switch OFF, connect CONSULT-II and CON-
SULT-II CONVERTER to the data link connector, then turn the
ignition switch ON.
2. Touch "START (NISSAN BASED VHCL)".
3. Touch "IPDM E/R" on "SELECT SYSTEM" screen.
If "IPDM E/R" is not displayed, refer to GI-39, "
CONSULT-II Data
Link Connector (DLC) Circuit" .
IPDM E/R diagnostic mode Description
SELF-DIAG RESULTS Displays IPDM E/R self-diagnosis results.
DATA MONITOR Displays IPDM E/R input/output data in real time.
CAN DIAG SUPPORT MNTR The result of transmit/receive diagnosis of CAN communication can be read.
ACTIVE TEST Operation of electrical loads can be checked by sending drive signal to them.
BBIA0369E
BCIA0029E
BCIA0030E