Page 583 of 4731
ATC-146
REFRIGERANT LINES
Revision: 2005 July 2005 FX
INSTALLATION
1. Install field coil.
Be sure to align coil’s pin with hole in compressor’s front head.
2. Install field coil harness clip using a screwdriver.
3. Install pulley assembly using pulley installer (SST) and a hand press, and then install snap ring using snap ring pliers.
4. Install clutch disc on drive shaft, together with original shim(s). Press clutch disc down by hand.
5. Using holder to prevent clutch disc rotation. After tightening bolt, make sure pulley rotates smoothly.
RHA142E
RHA143EA
RHA127F
Tightening torque : 14 N·m (1.4 kg-m, 10 ft-lb)
RHA086E
Page 584 of 4731
REFRIGERANT LINES ATC-147
C
D E
F
G H
I
K L
M A
B
AT C
Revision: 2005 July 2005 FX
6. Check clearance around entire periphery of clutch disc.
If specified clearance is not obtained, replace adjusting spacer
and readjust.
Break-in Operation
When replacing compressor clutch assembly, always carry out break-in operation. This is done by engaging
and disengaging the clutch about thirty-times. Break-in operation raises the level of transmitted torque. Disc to pulley clear-
ance : 0.25 - 0.6 mm (0.010 - 0.024 in)
RJIA0965E
Page 586 of 4731

REFRIGERANT LINES ATC-149
C
D E
F
G H
I
K L
M A
B
AT C
Revision: 2005 July 2005 FX
INSTALLATION
Installation is basically the reverse order of removal.
CAUTION:
�Replace O-rings of A/C piping with new ones, and then apply compressor oil to it when installing
it.
�Connection point for female-side piping is thin. So, when inserting male-side piping, take care not
to deform female-side piping. Slowly insert in axial direction.
�Insert one-touch joint connection point securely until it clicks.
�After piping has been connected, pull male-side piping by hand to make sure piping does not
come off.
�When recharging refrigerant, check for leaks.
Removal and Installation of High-Pressure Flexible HoseAJS0015U
REMOVAL
1. Use a refrigerant collecting equipment (for HFC-134a) to discharge the refrigerant.
2. Remove air cleaner case and air duct. Refer to EM-17, "
AIR CLEANER AND AIR DUCT" (VQ35DE) or
EM-176, "
AIR CLEANER AND AIR DUCT" (VK45DE).
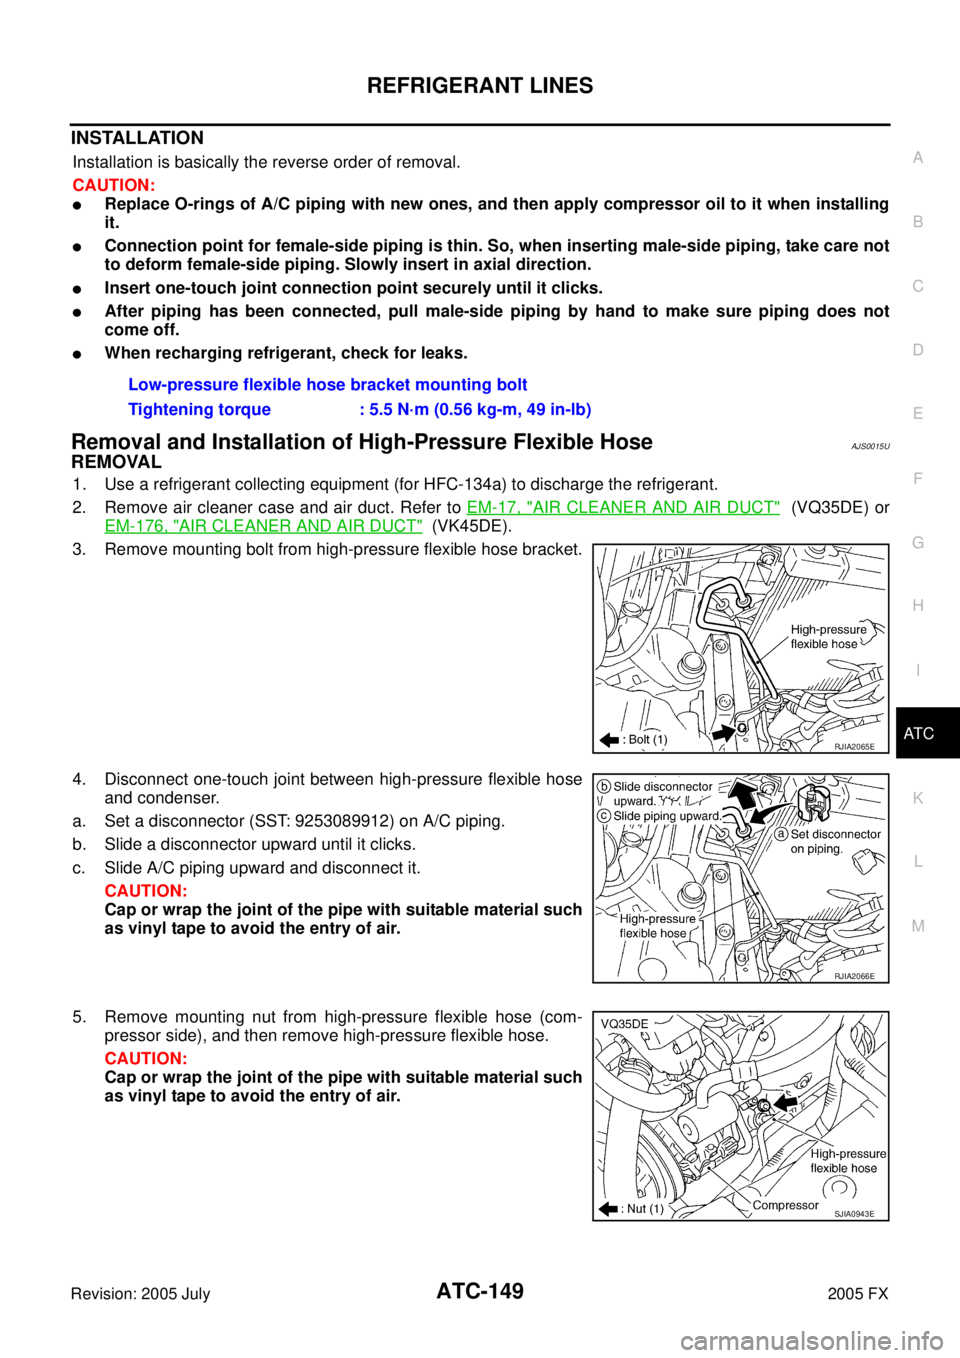
3. Remove mounting bolt from high-pressure flexible hose bracket.
4. Disconnect one-touch joint between high-pressure flexible hose and condenser.
a. Set a disconnector (SST: 9253089912) on A/C piping.
b. Slide a disconnector upward until it clicks.
c. Slide A/C piping upward and disconnect it. CAUTION:
Cap or wrap the joint of the pipe with suitable material such
as vinyl tape to avoid the entry of air.
5. Remove mounting nut from high-pressure flexible hose (com- pressor side), and then remove high-pressure flexible hose.
CAUTION:
Cap or wrap the joint of the pipe with suitable material such
as vinyl tape to avoid the entry of air. Low-pressure flexible hose bracket mounting bolt
Tightening torque : 5.5 N·m (0.56 kg-m, 49 in-lb)
RJIA2065E
RJIA2066E
SJIA0943E
Page 587 of 4731

ATC-150
REFRIGERANT LINES
Revision: 2005 July 2005 FX
INSTALLATION
Installation is basically the reverse order of removal.
CAUTION:
�Replace O-rings of high-pressure flexible hose with new ones, and then apply compressor oil to it
when installing it.
�Connection point for female-side piping is thin. So, when inserting male-side piping, take care not
to deform female-side piping. Slowly insert in axial direction.
�Insert one-touch joint connection point securely until it clicks.
�After piping has been connected, pull male-side piping by hand to make sure piping does not
come off.
�When recharging refrigerant, check for leaks.
Removal and Installation of Low-Pressure Pipe 1 (Engine Compartment)AJS0015V
REMOVAL
1. Use a refrigerant collecting equipment (for HFC-134a) to discharge the refrigerant.
2. Remove cowl top cover. Refer to EI-23, "
COWL TOP" .
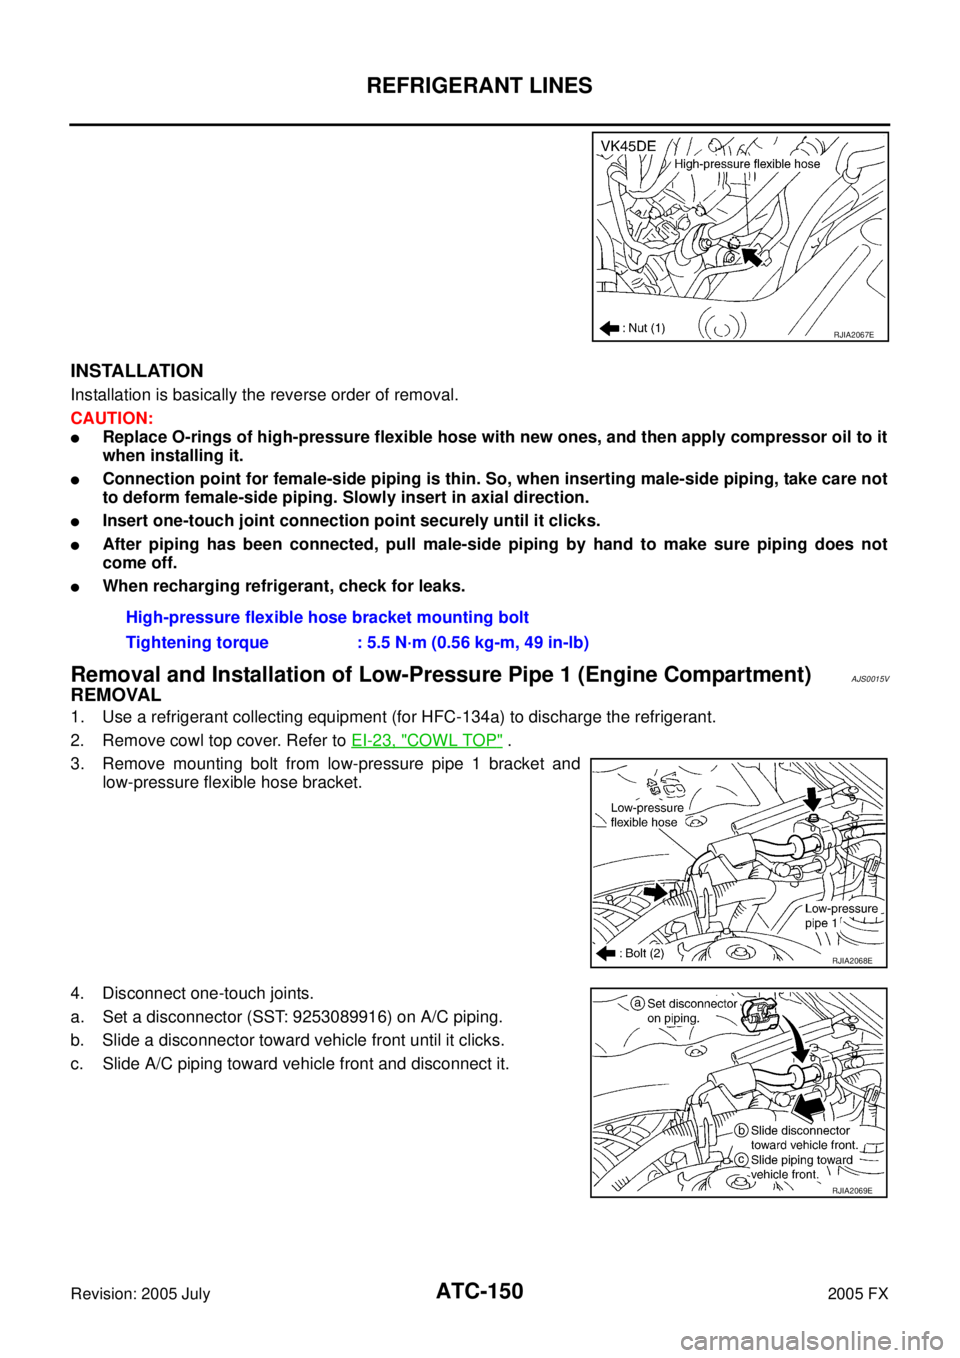
3. Remove mounting bolt from low-pressure pipe 1 bracket and low-pressure flexible hose bracket.
4. Disconnect one-touch joints.
a. Set a disconnector (SST: 9253089916) on A/C piping.
b. Slide a disconnector toward vehicle front until it clicks.
c. Slide A/C piping toward vehicle front and disconnect it.
RJIA2067E
High-pressure flexible hose bracket mounting bolt
Tightening torque : 5.5 N·m (0.56 kg-m, 49 in-lb)
RJIA2068E
RJIA2069E
Page 588 of 4731

REFRIGERANT LINES ATC-151
C
D E
F
G H
I
K L
M A
B
AT C
Revision: 2005 July 2005 FX
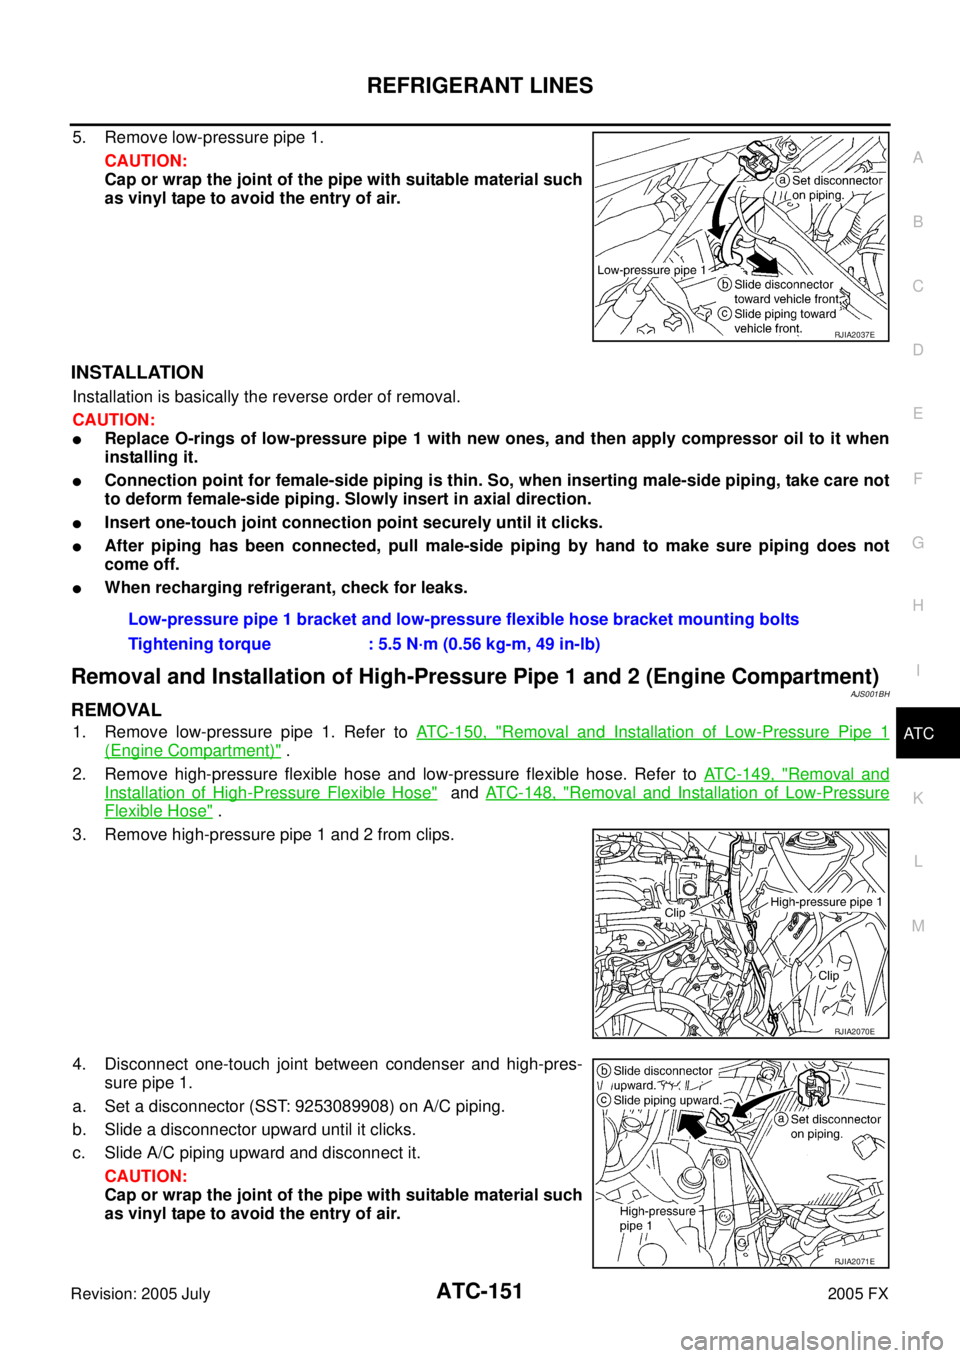
5. Remove low-pressure pipe 1.
CAUTION:
Cap or wrap the joint of the pipe with suitable material such
as vinyl tape to avoid the entry of air.
INSTALLATION
Installation is basically the reverse order of removal.
CAUTION:
�Replace O-rings of low-pressure pipe 1 with new ones, and then apply compressor oil to it when
installing it.
�Connection point for female-side piping is thin. So, when inserting male-side piping, take care not
to deform female-side piping. Slowly insert in axial direction.
�Insert one-touch joint connection point securely until it clicks.
�After piping has been connected, pull male-side piping by hand to make sure piping does not
come off.
�When recharging refrigerant, check for leaks.
Removal and Installation of High-Pressure Pipe 1 and 2 (Engine Compartment)AJS001BH
REMOVAL
1. Remove low-pressure pipe 1. Refer to ATC-150, "Removal and Installation of Low-Pressure Pipe 1
(Engine Compartment)" .
2. Remove high-pressure flexible hose and low-pressure flexible hose. Refer to ATC-149, "
Removal and
Installation of High-Pressure Flexible Hose" and ATC-148, "Removal and Installation of Low-Pressure
Flexible Hose" .
3. Remove high-pressure pipe 1 and 2 from clips.
4. Disconnect one-touch joint between condenser and high-pres- sure pipe 1.
a. Set a disconnector (SST: 9253089908) on A/C piping.
b. Slide a disconnector upward until it clicks.
c. Slide A/C piping upward and disconnect it.
CAUTION:
Cap or wrap the joint of the pipe with suitable material such
as vinyl tape to avoid the entry of air.
RJIA2037E
Low-pressure pipe 1 bracket and low-pressure flexible hose bracket mounting bolts
Tightening torque : 5.5 N·m (0.56 kg-m, 49 in-lb)
RJIA2070E
RJIA2071E
Page 591 of 4731

ATC-154
REFRIGERANT LINES
Revision: 2005 July 2005 FX
�When recharging refrigerant, check for leaks.
Removal and Installation of Liquid TankAJS0015Y
REMOVAL
1. Use a refrigerant collecting equipment (for HFC-134a) to discharge the refrigerant.
2. Remove front grille. Refer to EI-22, "
FRONT GRILLE" .
3. Clean liquid tank and its surrounding area, and remove dirt and rust from liquid tank. CAUTION:
Be sure to clean carefully.
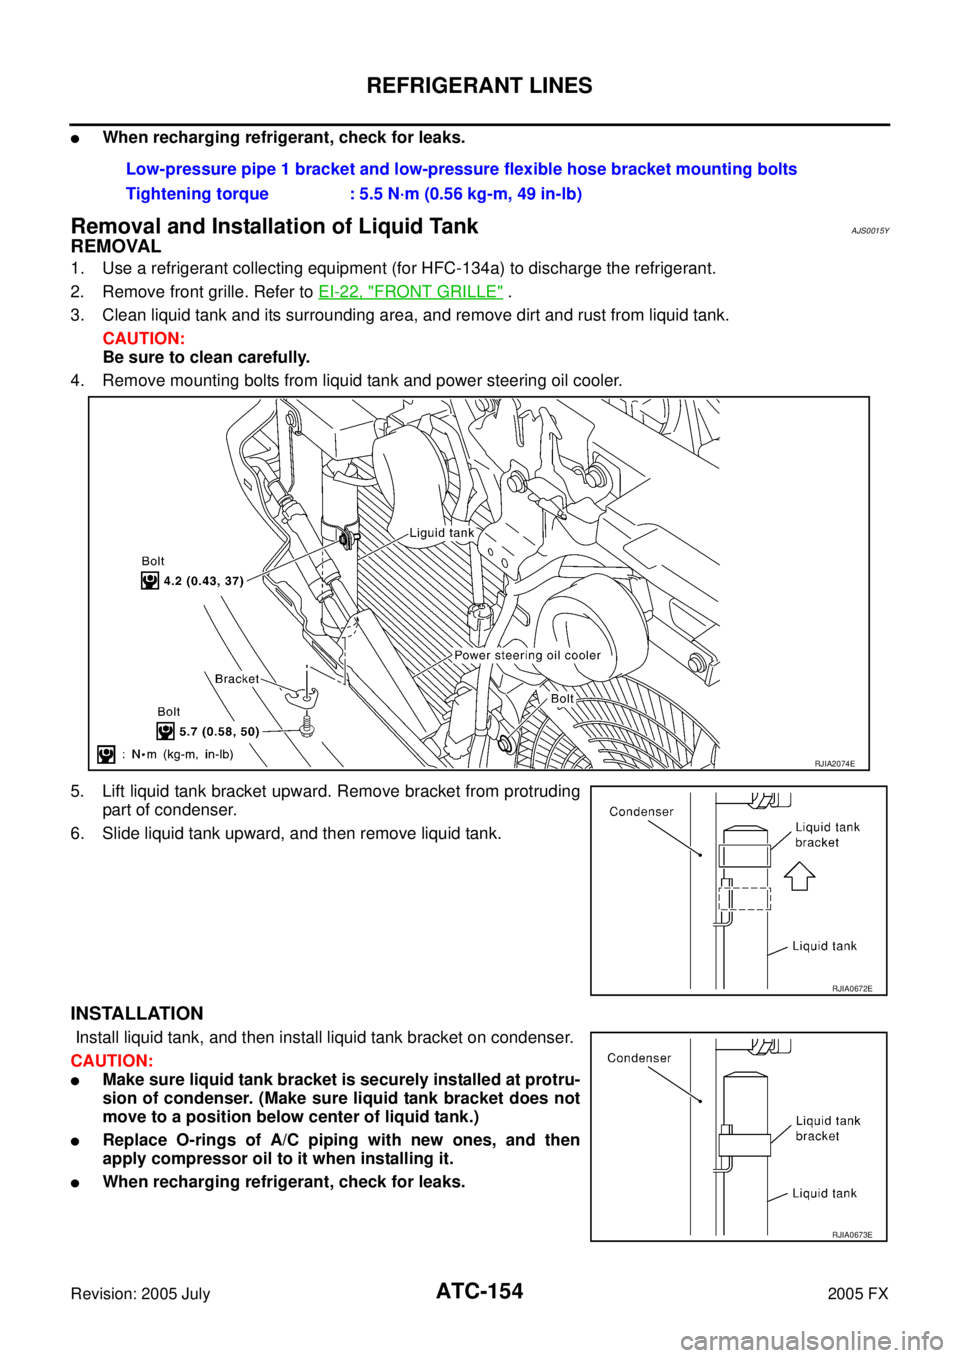
4. Remove mounting bolts from liquid tank and power steering oil cooler.
5. Lift liquid tank bracket upward. Remove bracket from protruding part of condenser.
6. Slide liquid tank upward, and then remove liquid tank.
INSTALLATION
Install liquid tank, and then install liquid tank bracket on condenser.
CAUTION:
�Make sure liquid tank bracket is securely installed at protru-
sion of condenser. (Make sure liquid tank bracket does not
move to a position below center of liquid tank.)
�Replace O-rings of A/C piping with new ones, and then
apply compressor oil to it when installing it.
�When recharging refrigerant, check for leaks. Low-pressure pipe 1 bracket and low-pressure flexible hose bracket mounting bolts
Tightening torque : 5.5 N·m (0.56 kg-m, 49 in-lb)
RJIA2074E
RJIA0672E
RJIA0673E
Page 593 of 4731

ATC-156
REFRIGERANT LINES
Revision: 2005 July 2005 FX
�After piping has been connected, pull male-side piping by hand to make sure piping does not
come off.
�When recharging refrigerant, check for leaks.
Removal and Installation of Refrigerant Pressure SensorAJS00160
REMOVAL
1. Remove condenser. Refer to ATC-155, "Removal and Installation of Condenser" .
2. Remove refrigerant pressure sensor from condenser. CAUTION:
When working, be careful not to damage the condenser.
INSTALLATION
Installation is basically the reverse order of removal.
CAUTION:
Apply compressor oil to O-ring of refrigerant pressure sensor when installing it.
Removal and Installation of EvaporatorAJS001BJ
REMOVAL
1. Remove low-pressure pipe 2 and high-pressure pipe 3. Refer to ATC-152, "Removal and Installation of
Low-Pressure Pipe 2 and High-Pressure Pipe 3" .
CAUTION:
Cap or wrap the joint of the pipe with suitable material such as vinyl tape to avoid the entry of air.
2. Slide evaporator, and then remove it from heater & cooling unit.
3. Remove intake sensor from evaporator, and then remove evap- orator.
INSTALLATION
Installation is basically the reverse order of removal.
CAUTION:
�Replace O-rings of A/C piping with new ones, and then apply compressor oil to it when installing
it.
�Connection point for female-side piping is thin. So, when inserting male-side piping, take care not
to deform female-side piping. Slowly insert in axial direction.
�Insert one-touch joint connection point securely until it clicks.
�After piping has been connected, pull male-side piping by hand to make sure piping does not
come off.
�O-rings are different from low-pressure pipe 1 (high-pressure pipe 2) and low-pressure pipe 2
(high-pressure pipe 3). High- pressure flexible hose bracket mounting bolt
Tightening torque : 5.5 N·m (0.56 kg-m, 49 in-lb)
RJIA2076E
RJIA0928E
Page 594 of 4731

REFRIGERANT LINES ATC-157
C
D E
F
G H
I
K L
M A
B
AT C
Revision: 2005 July 2005 FX
�Mark the mounting position of intake sensor bracket prior to removal so that the reinstalled sen-
sor can be located in the same position.
�When recharging refrigerant, check for leaks.
Removal and Installation of Expansion ValveAJS001BK
REMOVAL
1. Remove evaporator. Refer to ATC-156, "Removal and Installation of Evaporator" .
2. Remove mounting bolts, and then remove expansion valve. CAUTION:
Cap or wrap the joint of the pipe with suitable material such
as vinyl tape to avoid the entry of air.
INSTALLATION
Installation is basically the reverse order of removal.
CAUTION:
�Replace O-rings of evaporator with new ones, and then apply compressor oil to it when installing
it.
�O-rings are different from low-pressure pipe 1 (high-pressure pipe 2) and low-pressure pipe 2
(high-pressure pipe 3).
�When recharging refrigerant, check for leaks. Low-pressure pipe 1 bracket mounting bolt
Tightening torque : 5.5 N·m (0.56 kg-m, 49 in-lb)
RJIA1864E