Page 4286 of 4731

STEERING WHEEL PS-11
C
D E
F
H I
J
K L
M A
B
PS
Revision: 2005 July 2005 FX
CHECKING FRONT WHEEL TURNING ANGLE
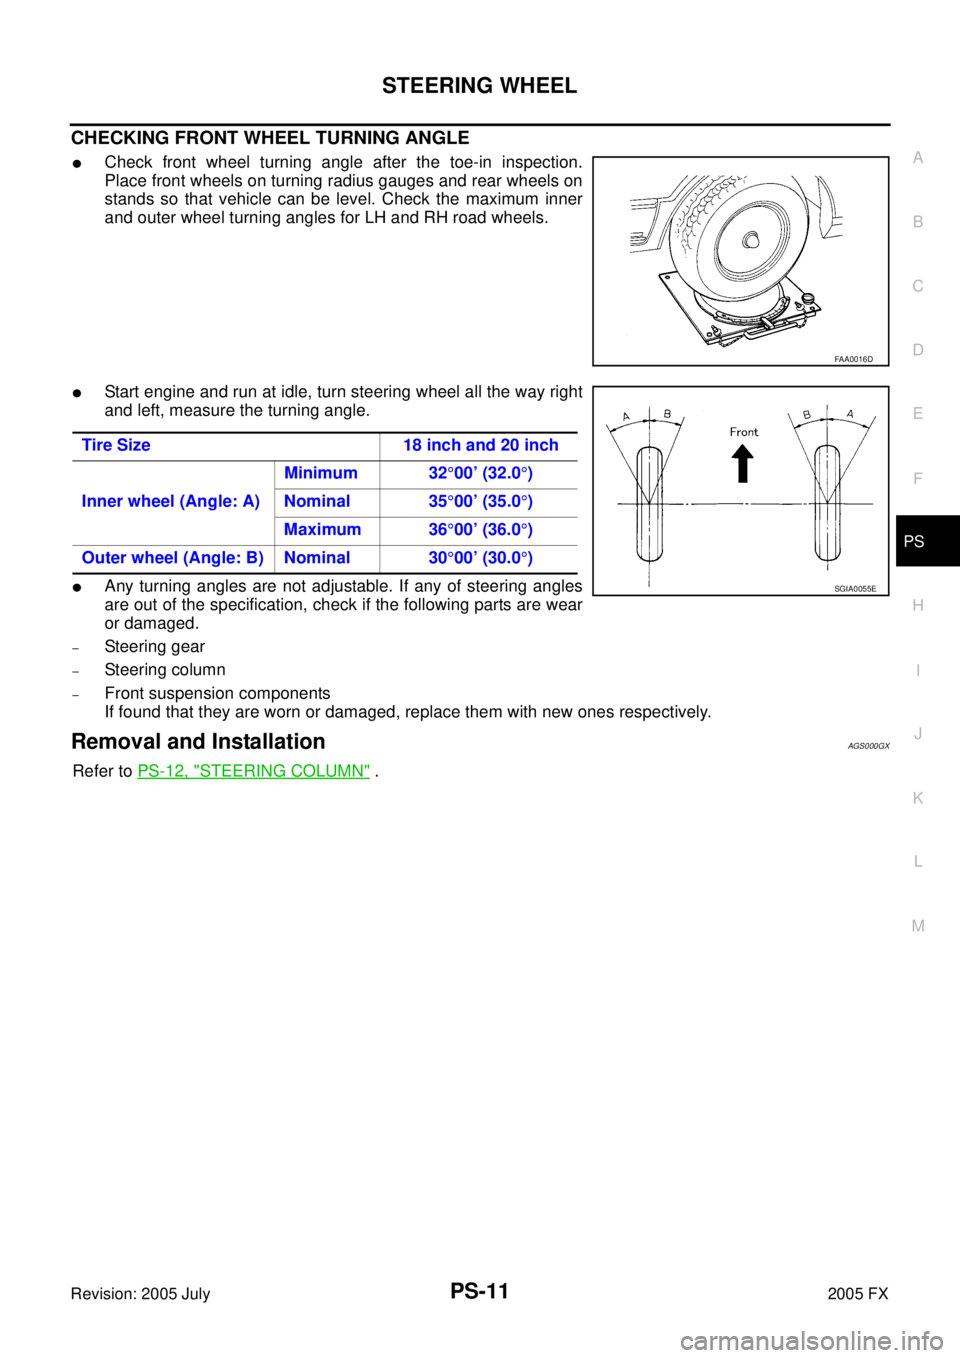
�Check front wheel turning angle after the toe-in inspection.
Place front wheels on turning radius gauges and rear wheels on
stands so that vehicle can be level. Check the maximum inner
and outer wheel turning angles for LH and RH road wheels.
�Start engine and run at idle, turn steering wheel all the way right
and left, measure the turning angle.
�Any turning angles are not adjustable. If any of steering angles
are out of the specification, check if the following parts are wear
or damaged.
–Steering gear
–St ee rin g c o lum n
–Front suspension components
If found that they are worn or damaged, replace them with new ones respectively.
Removal and InstallationAGS000GX
Refer to PS-12, "STEERING COLUMN" .
FAA0016D
Tire Size 18 inch and 20 inch
Inner wheel (Angle: A) Minimum 32
°00’ (32.0 °)
Nominal 35 °00’ (35.0 °)
Maximum 36 °00’ (36.0 °)
Outer wheel (Angle: B) Nominal 30 °00’ (30.0 °)
SGIA0055E
Page 4287 of 4731

PS-12
STEERING COLUMN
Revision: 2005 July 2005 FX
STEERING COLUMNPFP:48810
Removal and InstallationAGS000GY
CAUTION:
�Care must be taken not to give axial impact to steering column assembly during removal and
installation.
�Care must be taken not to move steering gear during removal of steering column assembly.
REMOVAL
1. Set vehicle to the straight ahead-direction.
2. Remove driver air bag module from steering wheel. Refer to SRS-35, "
DRIVER AIR BAG MODULE" .
3. Disconnect steering switch connector, remove steering wheel lock nut, then remove steering wheel. Refer to SRS-37, "
SPIRAL CABLE" .
4. Remove steering column cover. Refer to IP-10, "
INSTRUMENT PANEL ASSEMBLY" .
5. Remove combination switch & spiral cable from steering column assembly. Refer to SRS-37, "
SPIRAL
CABLE" .
6. Remove instrument lower panel (driver side). Refer to IP-10, "
INSTRUMENT PANEL ASSEMBLY" .
7. Remove combination meter. Refer to IP-10, "
INSTRUMENT PANEL ASSEMBLY" .
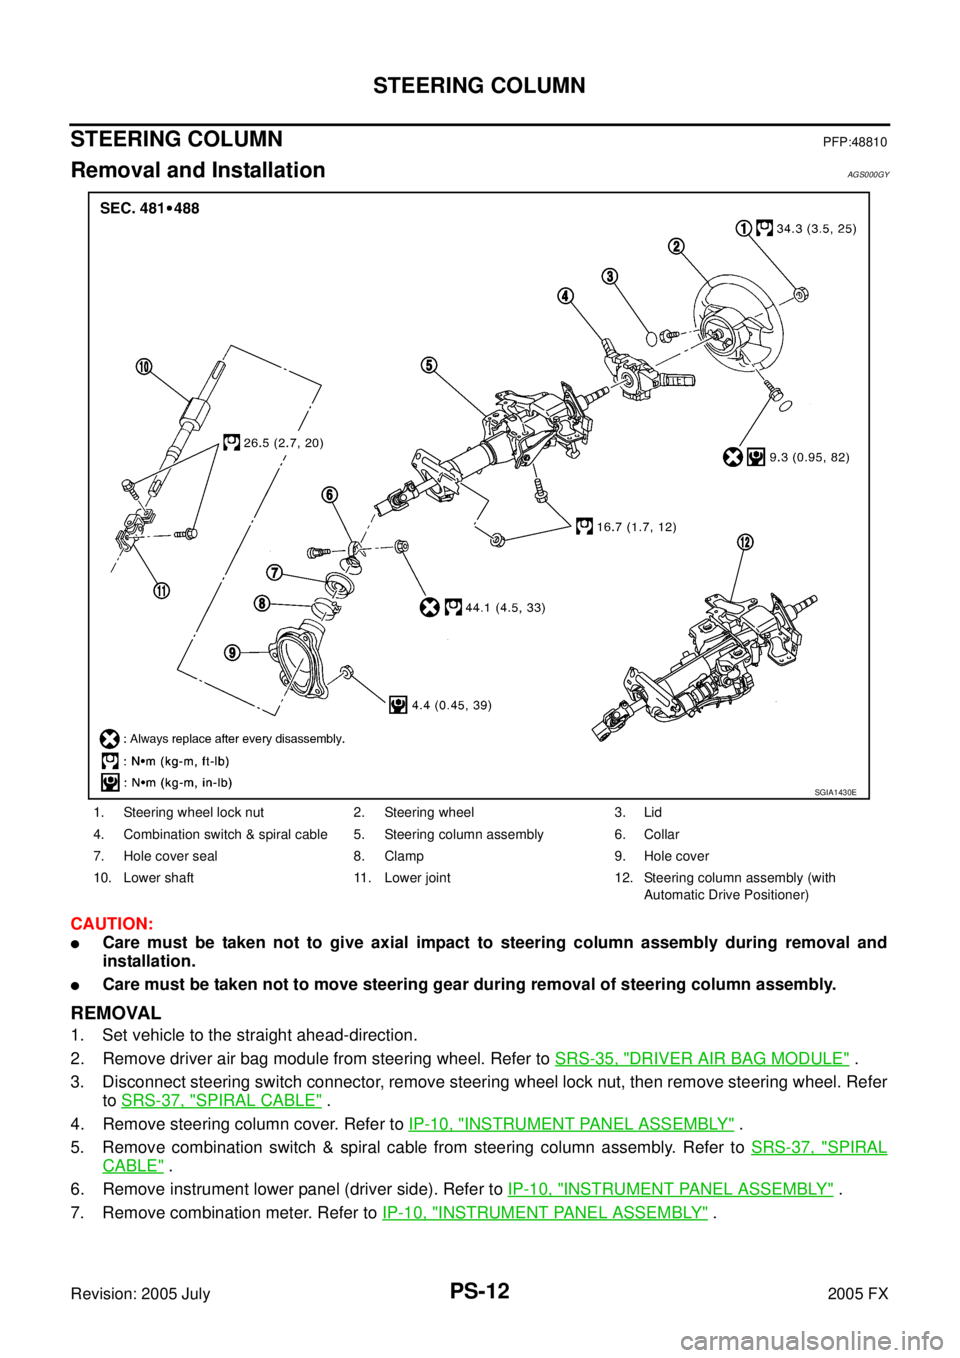
1. Steering wheel lock nut 2. Steering wheel 3. Lid
4. Combination switch & spiral cable 5. Steering column assembly 6. Collar
7. Hole cover seal 8. Clamp 9. Hole cover
10. Lower shaft 11. Lower joint 12. Steering column assembly (with Automatic Drive Positioner)
SGIA1430E
Page 4288 of 4731
STEERING COLUMN PS-13
C
D E
F
H I
J
K L
M A
B
PS
Revision: 2005 July 2005 FX
8. Remove fixing bolts of knee protector, then remove knee protec-
tor from vehicle.
9. Disconnect harness connector from each switch on steering col- umn shaft, then separate vehicle side harness from it.
10. Remove lock nut and bolt, then separate lower shaft from upper joint of steering column assembly.
11. Remove fixing bolts and nuts from steering member, remove steering column assembly from steering member.
12. Remove hole cover seal and clamp.
13. Remove mounting nuts, then remove hole cover from panel.
14. Raise vehicle, then remove mounting bolts of lower joint.
15. Remove lower joint and lower shaft from vehicle.
SGIA0552E
SGIA0554E
SGIA0555E
SGIA0557E
Page 4289 of 4731

PS-14
STEERING COLUMN
Revision: 2005 July 2005 FX
INSPECTION AFTER REMOVAL
�Check if there is something wrong with jacket tube of steering column assembly and collar etc. And then if
they are damaged, replace with new one.
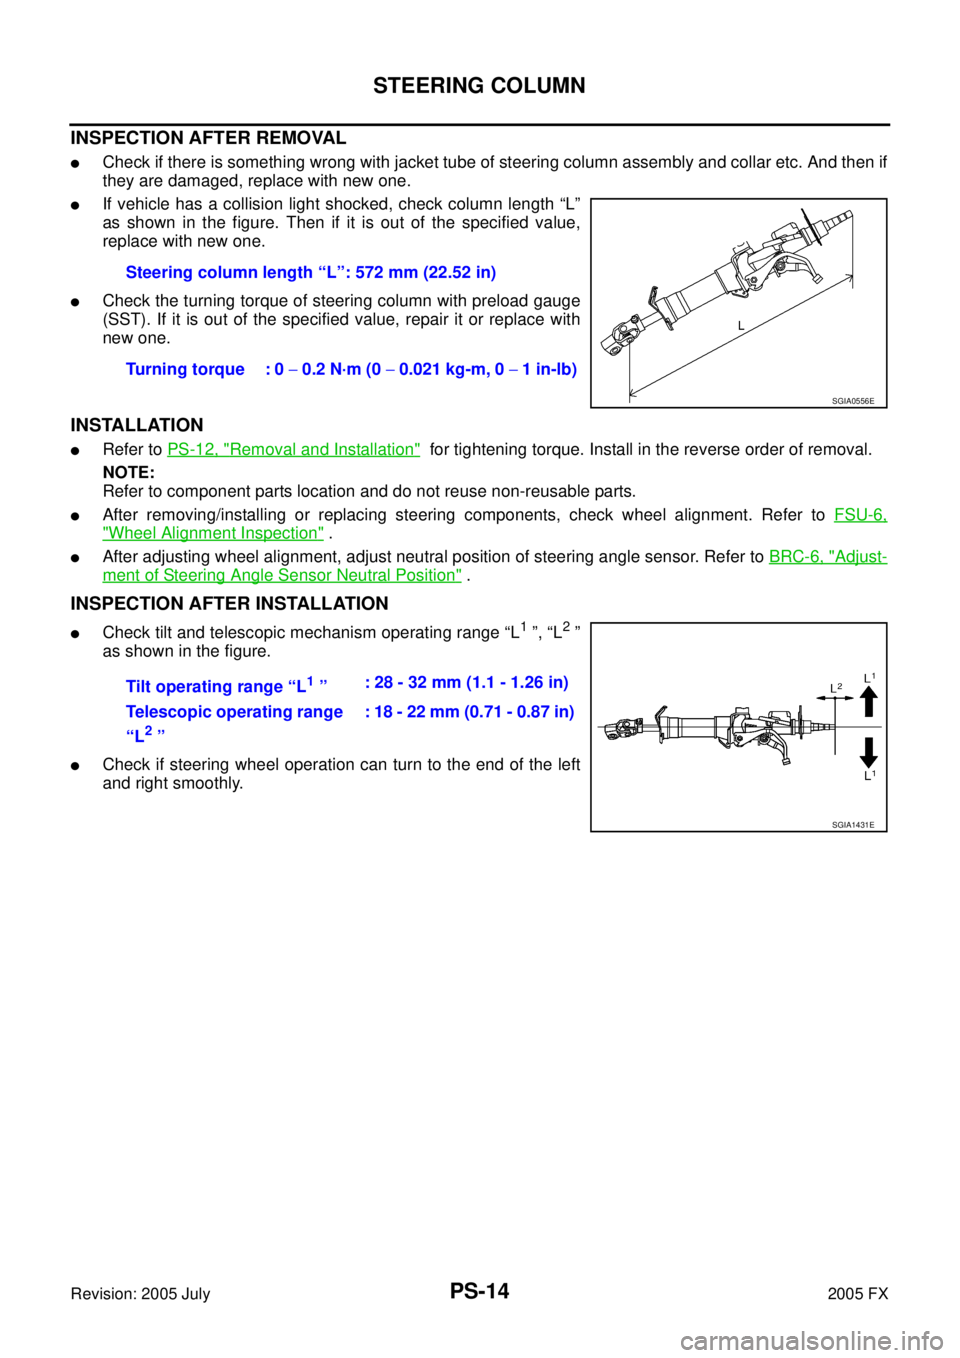
�If vehicle has a collision light shocked, check column length “L”
as shown in the figure. Then if it is out of the specified value,
replace with new one.
�Check the turning torque of steering column with preload gauge
(SST). If it is out of the specified value, repair it or replace with
new one.
INSTALLATION
�Refer to PS-12, "Removal and Installation" for tightening torque. Install in the reverse order of removal.
NOTE:
Refer to component parts location and do not reuse non-reusable parts.
�After removing/installing or replacing steering components, check wheel alignment. Refer to FSU-6,
"Wheel Alignment Inspection" .
�After adjusting wheel alignment, adjust neutral position of steering angle sensor. Refer to BRC-6, "Adjust-
ment of Steering Angle Sensor Neutral Position" .
INSPECTION AFTER INSTALLATION
�Check tilt and telescopic mechanism operating range “L1 ”, “L2 ”
as shown in the figure.
�Check if steering wheel operation can turn to the end of the left
and right smoothly. Steering column length “L”: 572 mm (22.52 in)
Turning torque : 0 − 0.2 N·m (0 − 0.021 kg-m, 0 − 1 in-lb)
SGIA0556E
Tilt operating range “L1 ” : 28 - 32 mm (1.1 - 1.26 in)
Telescopic operating range
“L
2 ” : 18 - 22 mm (0.71 - 0.87 in)
SGIA1431E
Page 4290 of 4731
STEERING COLUMN PS-15
C
D E
F
H I
J
K L
M A
B
PS
Revision: 2005 July 2005 FX
Components (Without Automatic Drive Positioner)AGS000GZ
Disassembly and AssemblyAGS000HK
DISASSEMBLY
Remove all parts from jacket tube assembly.
�When remove tilt lever, perform as shown in the figure.
1. Meter bracket 2. Steering column mounting clamp 3. Spring
4. Jacket tube assembly 5. Lock nut 6. Telescopic lock block
7. Telescopic lock guide 8. Telescopic lock bolt 9. Telescopic lever
10. Upper joint 11. Adjuster stopper 12. Steering adjust bolt
13. Tilt lever stopper 14. Tilt lever
SGIA0562E
SGIA0564E
Page 4291 of 4731
PS-16
STEERING COLUMN
Revision: 2005 July 2005 FX
�When remove telescopic lever, perform as shown in the figure.
ASSEMBLY
Refer to PS-15, "Components (Without Automatic Drive Positioner)" for tightening torque. Install in the
reverse order of disassembly.
SGIA0565E
Page 4292 of 4731
STEERING COLUMN PS-17
C
D E
F
H I
J
K L
M A
B
PS
Revision: 2005 July 2005 FX
Components (With Automatic Drive Positioner)AGS000HH
SGIA0592E
Page 4293 of 4731
PS-18
STEERING COLUMN
Revision: 2005 July 2005 FX
Disassembly and AssemblyAGS000HL
DISASSEMBLY
Disassemble the parts from jacket tube. The parts to be disassembled are shown in the figure.
ASSEMBLY
�Refer to PS-17, "Components (With Automatic Drive Positioner)" for tightening torque. Install in the
reverse order of disassembly.
1. Meter bracket 2. Jacket tube assembly 3. Upper joint
4. Spring 5. Lock nut 6. Lock block
7. Telescopic lock guide 8. Bush spacer 9. Tilt link assembly
10. Cooler 11. Tilt unit assembly 12. Tilt sensor assembly
13. Connector assembly 14. Clamp 15. Spring
16. Telescopic unit assembly 17. Telescopic sensor assembly