2005 INFINITI FX35 display
[x] Cancel search: displayPage 748 of 4731
NAVIGATION SYSTEM AV-149
C
D E
F
G H
I
J
L
M A
B
AV
Revision: 2005 July 2005 FX
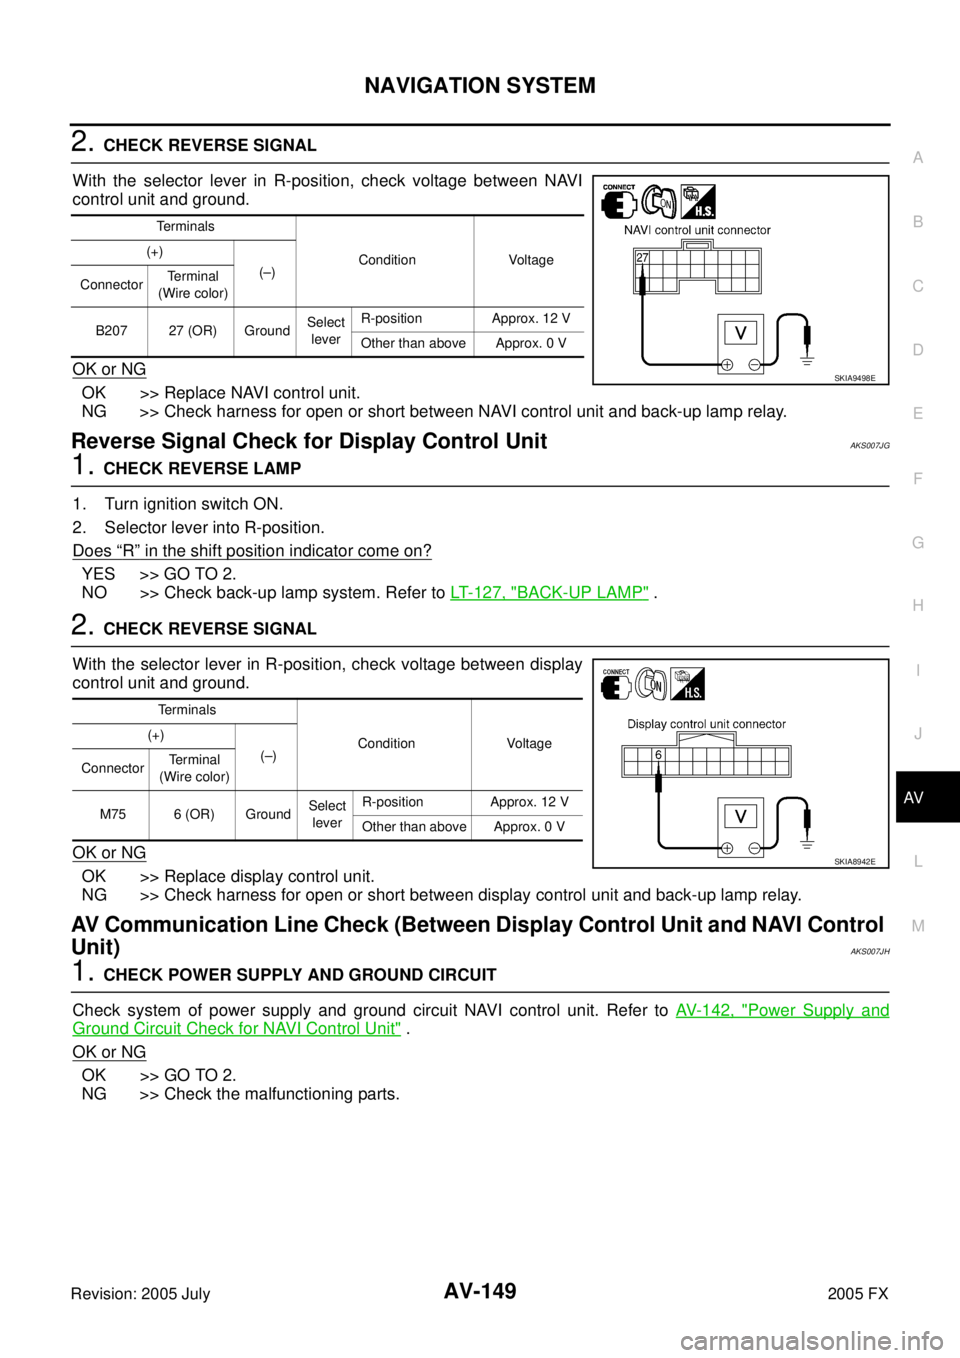
2. CHECK REVERSE SIGNAL
With the selector lever in R-position, check voltage between NAVI
control unit and ground.
OK or NG
OK >> Replace NAVI control unit.
NG >> Check harness for open or short between NAVI control unit and back-up lamp relay.
Reverse Signal Check for Display Control UnitAKS007JG
1. CHECK REVERSE LAMP
1. Turn ignition switch ON.
2. Selector lever into R-position.
Does
“R” in the shift position indicator come on?
YES >> GO TO 2.
NO >> Check back-up lamp system. Refer to LT- 1 2 7 , "
BACK-UP LAMP" .
2. CHECK REVERSE SIGNAL
With the selector lever in R-position, check voltage between display
control unit and ground.
OK or NG
OK >> Replace display control unit.
NG >> Check harness for open or short between display control unit and back-up lamp relay.
AV Communication Line Check (Between Display Control Unit and NAVI Control
Unit)
AKS007JH
1. CHECK POWER SUPPLY AND GROUND CIRCUIT
Check system of power supply and ground circuit NAVI control unit. Refer to AV- 1 4 2 , "
Power Supply and
Ground Circuit Check for NAVI Control Unit" .
OK or NG
OK >> GO TO 2.
NG >> Check the malfunctioning parts.
Terminals
Condition Voltage
(+)
(–)
Connector Terminal
(Wire color)
B207 27 (OR) Ground Select
lever R-position Approx. 12 V
Other than above Approx. 0 V
SKIA9498E
Terminals
Condition Voltage
(+)
(–)
Connector Te r m i n a l
(Wire color)
M75 6 (OR) Ground Select
lever R-position Approx. 12 V
Other than above Approx. 0 V
SKIA8942E
Page 749 of 4731
AV-150
NAVIGATION SYSTEM
Revision: 2005 July 2005 FX
2. CHECK HARNESS
1. Turn ignition switch OFF.
2. Disconnect NAVI control unit connector and display control unit connector.
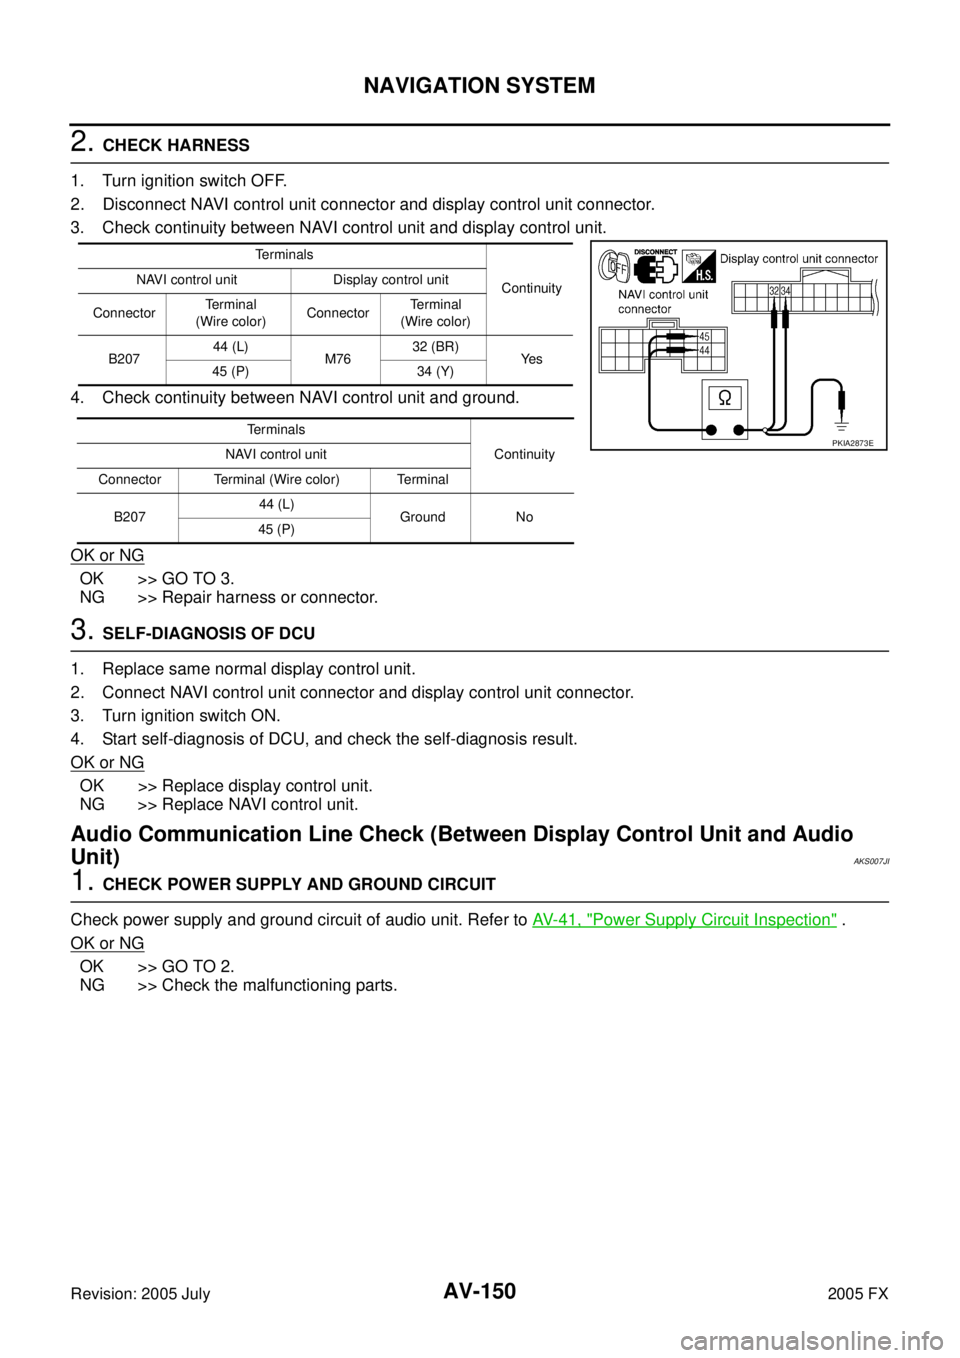
3. Check continuity between NAVI control unit and display control unit.
4. Check continuity between NAVI control unit and ground.
OK or NG
OK >> GO TO 3.
NG >> Repair harness or connector.
3. SELF-DIAGNOSIS OF DCU
1. Replace same normal display control unit.
2. Connect NAVI control unit connector and display control unit connector.
3. Turn ignition switch ON.
4. Start self-diagnosis of DCU, and check the self-diagnosis result.
OK or NG
OK >> Replace display control unit.
NG >> Replace NAVI control unit.
Audio Communication Line Check (Between Display Control Unit and Audio
Unit)
AKS007JI
1. CHECK POWER SUPPLY AND GROUND CIRCUIT
Check power supply and ground circuit of audio unit. Refer to AV- 4 1 , "
Power Supply Circuit Inspection" .
OK or NG
OK >> GO TO 2.
NG >> Check the malfunctioning parts.
Terminals
Continuity
NAVI control unit Display control unit
Connector Terminal
(Wire color) ConnectorTe r m i n a l
(Wire color)
B207 44 (L)
M76 32 (BR)
Ye s
45 (P) 34 (Y)
Te r m i n a l s Continuity
NAVI control unit
Connector Terminal (Wire color) Terminal
B207 44 (L)
Ground No
45 (P)
PKIA2873E
Page 750 of 4731
NAVIGATION SYSTEM AV-151
C
D E
F
G H
I
J
L
M A
B
AV
Revision: 2005 July 2005 FX
2. CHECK HARNESS
1. Turn ignition switch OFF.
2. Disconnect audio unit connector and display control unit connector.
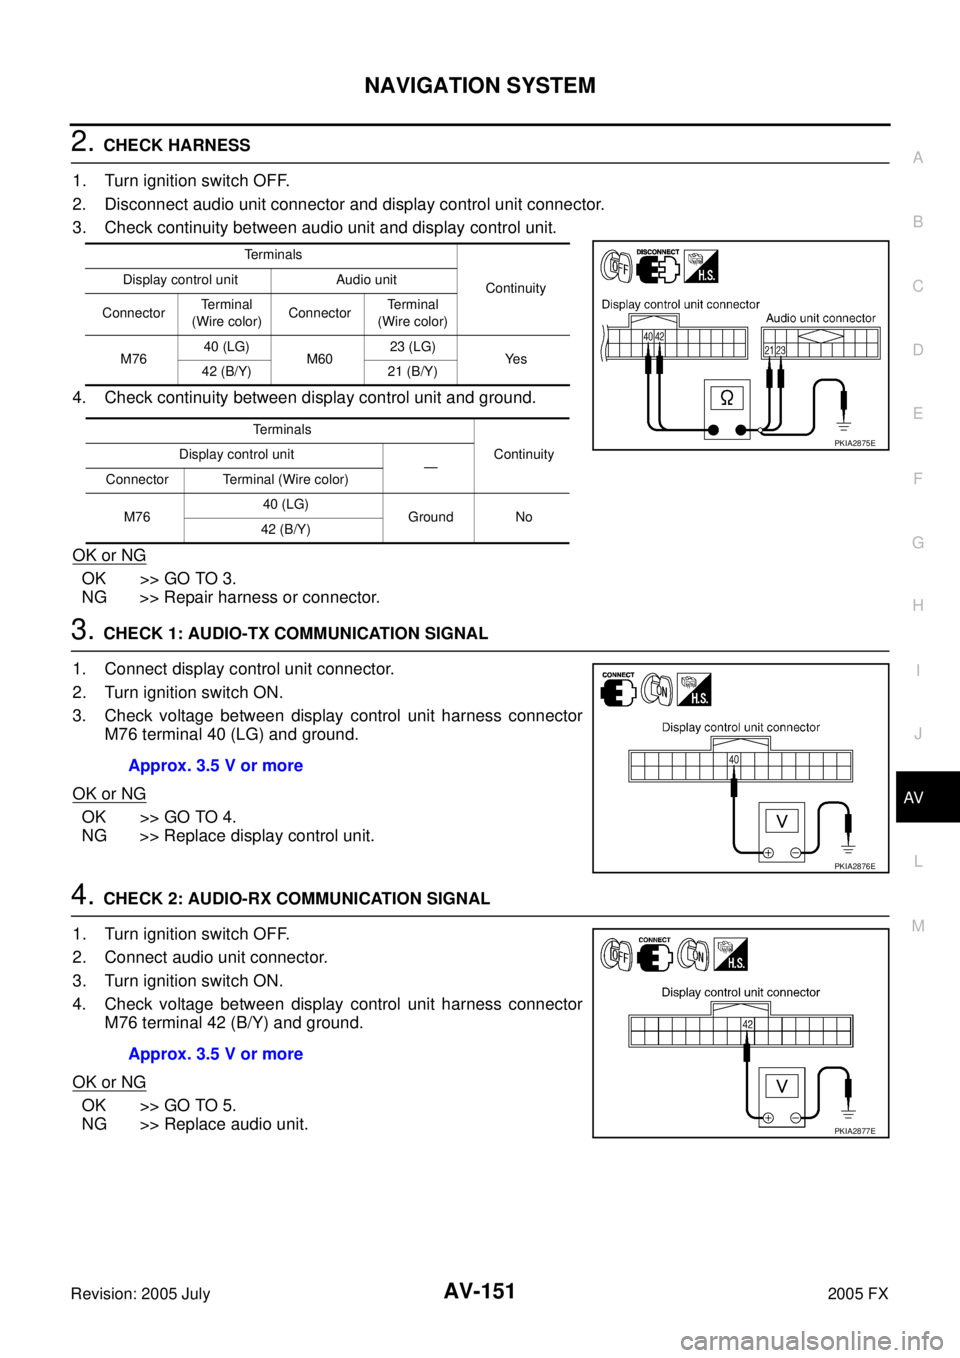
3. Check continuity between audio unit and display control unit.
4. Check continuity between display control unit and ground.
OK or NG
OK >> GO TO 3.
NG >> Repair harness or connector.
3. CHECK 1: AUDIO-TX COMMUNICATION SIGNAL
1. Connect display control unit connector.
2. Turn ignition switch ON.
3. Check voltage between display control unit harness connector M76 terminal 40 (LG) and ground.
OK or NG
OK >> GO TO 4.
NG >> Replace display control unit.
4. CHECK 2: AUDIO-RX COMMUNICATION SIGNAL
1. Turn ignition switch OFF.
2. Connect audio unit connector.
3. Turn ignition switch ON.
4. Check voltage between display control unit harness connector M76 terminal 42 (B/Y) and ground.
OK or NG
OK >> GO TO 5.
NG >> Replace audio unit.
Terminals
Continuity
Display control unit Audio unit
Connector Terminal
(Wire color) Connector Terminal
(Wire color)
M76 40 (LG)
M60 23 (LG)
Ye s
42 (B/Y) 21 (B/Y)
Te r m i n a l s Continuity
Display control unit
—
Connector Terminal (Wire color)
M76 40 (LG)
Ground No
42 (B/Y)
PKIA2875E
Approx. 3.5 V or more
PKIA2876E
Approx. 3.5 V or more
PKIA2877E
Page 751 of 4731
AV-152
NAVIGATION SYSTEM
Revision: 2005 July 2005 FX
5. CHECK 3: AUDIO-TX COMMUNICATION SIGNAL
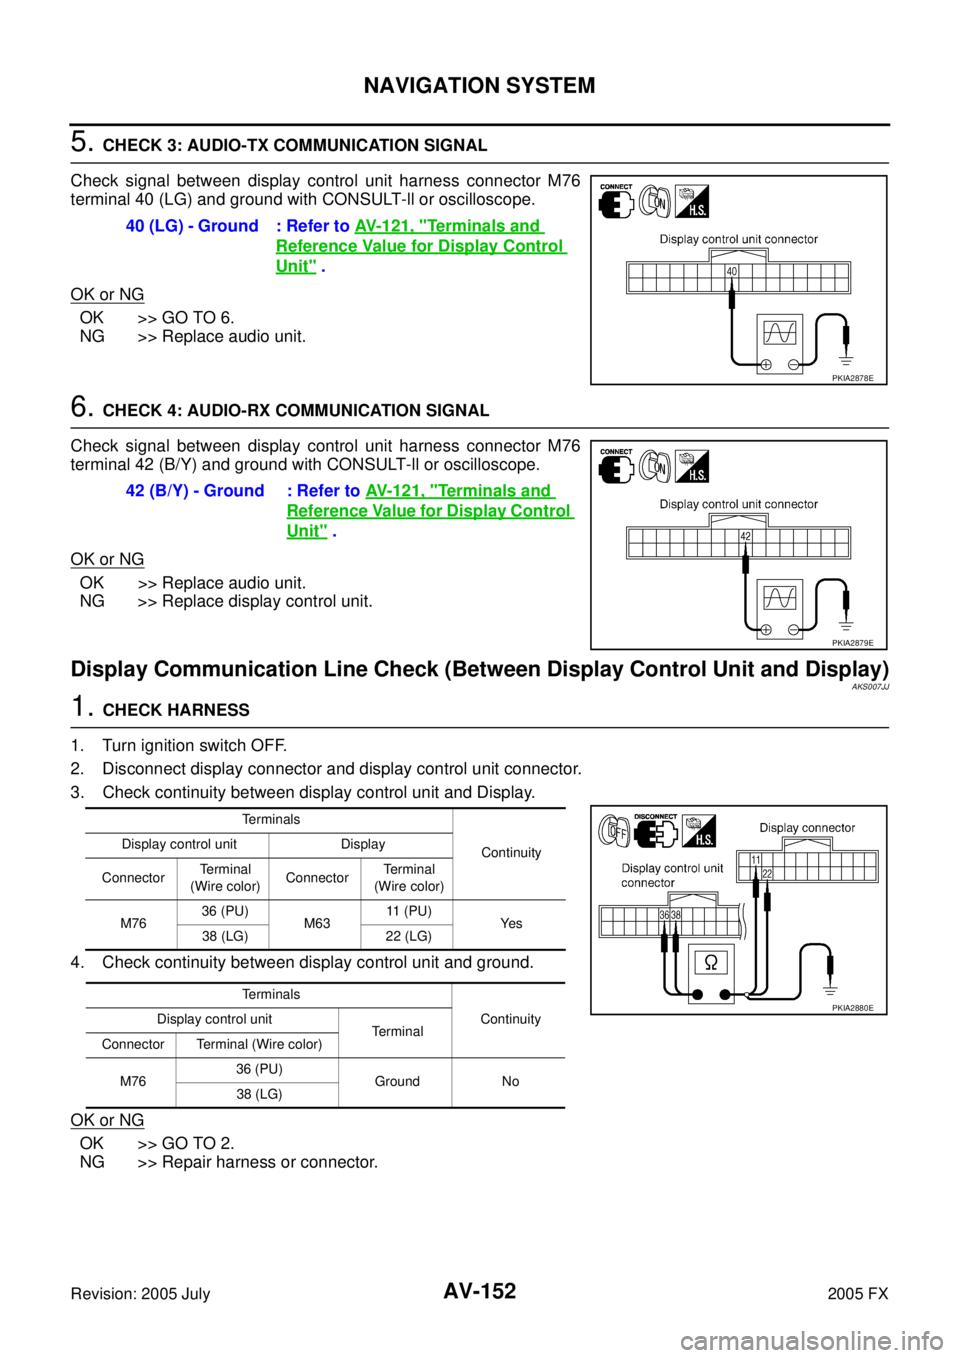
Check signal between display control unit harness connector M76
terminal 40 (LG) and ground with CONSULT-ll or oscilloscope.
OK or NG
OK >> GO TO 6.
NG >> Replace audio unit.
6. CHECK 4: AUDIO-RX COMMUNICATION SIGNAL
Check signal between display control unit harness connector M76
terminal 42 (B/Y) and ground with CONSULT-ll or oscilloscope.
OK or NG
OK >> Replace audio unit.
NG >> Replace display control unit.
Display Communication Line Check (Between Display Control Unit and Display)AKS007JJ
1. CHECK HARNESS
1. Turn ignition switch OFF.
2. Disconnect display connector and display control unit connector.
3. Check continuity between display control unit and Display.
4. Check continuity between display control unit and ground.
OK or NG
OK >> GO TO 2.
NG >> Repair harness or connector. 40 (LG) - Ground : Refer to
AV- 1 2 1 , "
Terminals and
Reference Value for Display Control
Unit" .
PKIA2878E
42 (B/Y) - Ground : Refer to AV- 1 2 1 , "Terminals and
Reference Value for Display Control
Unit" .
PKIA2879E
Terminals
Continuity
Display control unit Display
Connector Terminal
(Wire color) Connector Te r m i n a l
(Wire color)
M76 36 (PU)
M63 11 ( P U )
Ye s
38 (LG) 22 (LG)
Terminals Continuity
Display control unit
Te r m i n a l
Connector Terminal (Wire color)
M76 36 (PU)
Ground No
38 (LG)
PKIA2880E
Page 752 of 4731
NAVIGATION SYSTEM AV-153
C
D E
F
G H
I
J
L
M A
B
AV
Revision: 2005 July 2005 FX
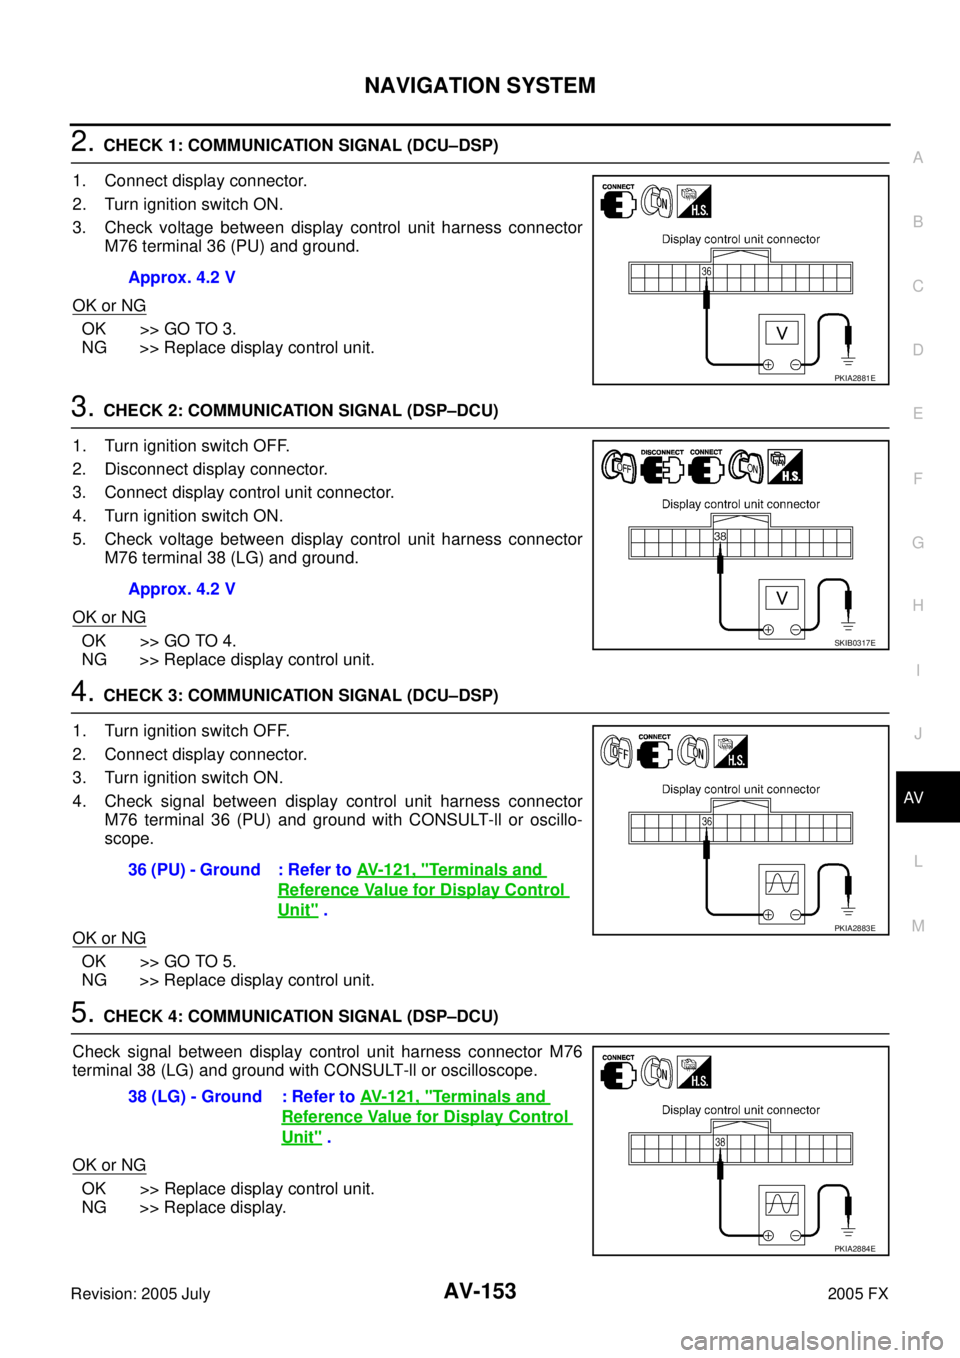
2. CHECK 1: COMMUNICATION SIGNAL (DCU–DSP)
1. Connect display connector.
2. Turn ignition switch ON.
3. Check voltage between display control unit harness connector M76 terminal 36 (PU) and ground.
OK or NG
OK >> GO TO 3.
NG >> Replace display control unit.
3. CHECK 2: COMMUNICATION SIGNAL (DSP–DCU)
1. Turn ignition switch OFF.
2. Disconnect display connector.
3. Connect display control unit connector.
4. Turn ignition switch ON.
5. Check voltage between display control unit harness connector M76 terminal 38 (LG) and ground.
OK or NG
OK >> GO TO 4.
NG >> Replace display control unit.
4. CHECK 3: COMMUNICATION SIGNAL (DCU–DSP)
1. Turn ignition switch OFF.
2. Connect display connector.
3. Turn ignition switch ON.
4. Check signal between display control unit harness connector M76 terminal 36 (PU) and ground with CONSULT-ll or oscillo-
scope.
OK or NG
OK >> GO TO 5.
NG >> Replace display control unit.
5. CHECK 4: COMMUNICATION SIGNAL (DSP–DCU)
Check signal between display control unit harness connector M76
terminal 38 (LG) and ground with CONSULT-ll or oscilloscope.
OK or NG
OK >> Replace display control unit.
NG >> Replace display. Approx. 4.2 V
PKIA2881E
Approx. 4.2 V
SKIB0317E
36 (PU) - Ground : Refer to
AV- 1 2 1 , "Terminals and
Reference Value for Display Control
Unit" .PKIA2883E
38 (LG) - Ground : Refer to AV- 1 2 1 , "Terminals and
Reference Value for Display Control
Unit" .
PKIA2884E
Page 753 of 4731
AV-154
NAVIGATION SYSTEM
Revision: 2005 July 2005 FX
AV Communication Line Check (Between Display Control Unit and A/C and AV
Switch)
AKS007JK
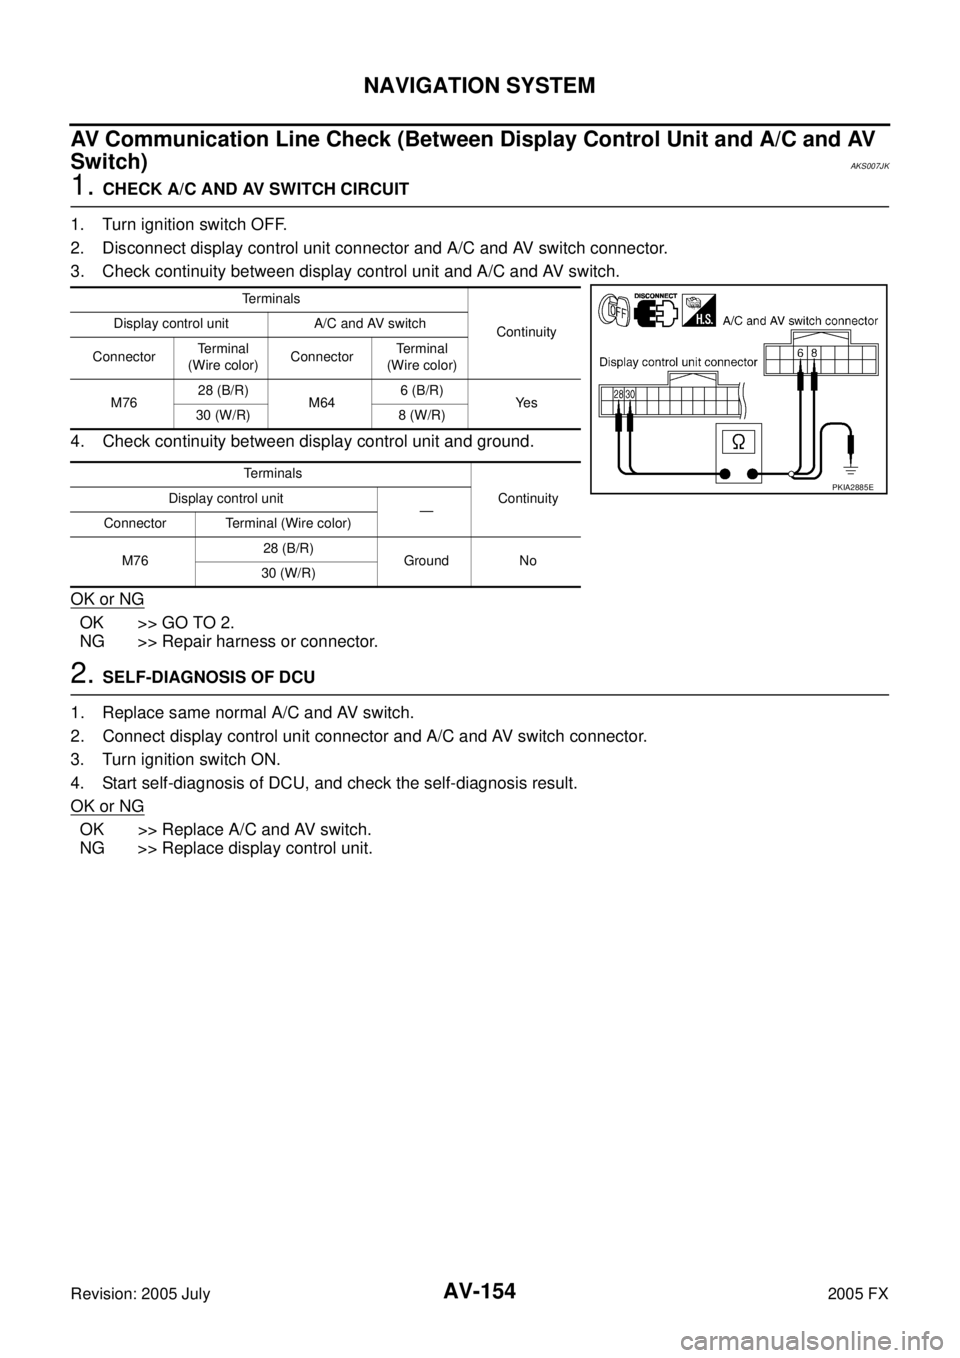
1. CHECK A/C AND AV SWITCH CIRCUIT
1. Turn ignition switch OFF.
2. Disconnect display control unit connector and A/C and AV switch connector.
3. Check continuity between display control unit and A/C and AV switch.
4. Check continuity between display control unit and ground.
OK or NG
OK >> GO TO 2.
NG >> Repair harness or connector.
2. SELF-DIAGNOSIS OF DCU
1. Replace same normal A/C and AV switch.
2. Connect display control unit connector and A/C and AV switch connector.
3. Turn ignition switch ON.
4. Start self-diagnosis of DCU, and check the self-diagnosis result.
OK or NG
OK >> Replace A/C and AV switch.
NG >> Replace display control unit.
Terminals
Continuity
Display control unit A/C and AV switch
Connector Te r m i n a l
(Wire color) Connector
Terminal
(Wire color)
M76 28 (B/R)
M64 6 (B/R)
Ye s
30 (W/R) 8 (W/R)
Terminals Continuity
Display control unit
—
Connector Terminal (Wire color)
M76 28 (B/R)
Ground No
30 (W/R)
PKIA2885E
Page 754 of 4731

NAVIGATION SYSTEM AV-155
C
D E
F
G H
I
J
L
M A
B
AV
Revision: 2005 July 2005 FX
CAN Communication Line CheckAKS007JL
1. CHECK MONITOR DESCRIPTION
1. Start display control unit self-diagnosis. Refer to AV- 1 2 9 , "
Self-Diagnosis Mode (DCU)"
2. Select “CAN DIAG SUPPORT MONITOR”. Refer to AV- 1 4 0 , "CAN Diag Support Monitor" .
3. Record each item display description (OK/NG/UNKWN) displayed on the following CAN DIAG SUPPORT MONITOR Check Sheet.
CAN DIAG SUPPORT MONITOR Check Sheet
>> After filling in CAN DIAG SUPPORT MONITOR Check Sheet. Go to LAN-5, "
Precautions When
Using CONSULT-II" .
If NAVI Control Unit Detects That DVD-ROM Map Is Not InsertedAKS007JM
1. CHECK DVD-ROM
Make sure identified DVD-ROM map is inserted.
OK or NG
OK >> Replace NAVI control unit.
NG >> Insert identified DVD-ROM map.
If NAVI Control Unit Detects That Inserted DVD-ROM Map Malfunctioning Or If It
Is Impossible to Load Data from DVD-ROM Map
AKS007JN
1. CHECK 1: DVD-ROM
Remove inserted DVD-ROM map to make sure it is identified.
OK or NG
OK >> GO TO 2.
NG >> Replace identified DVD-ROM map.
Item content
Error counter
(Reference value)
Normal condition Error (Example)
CANCOMM OK NG 0-50
CAN_CIRC_1 OK UNKWN 0-50
CAN_CIRC_2 OK UNKWN 0-50
CAN_CIRC_3 OK UNKWN 0-50
CAN_CIRC_4 OK UNKWN 0-50
CAN_CIRC_5 OK UNKWN 0-50
CAN_CIRC_6 OK UNKWN 0-50
CAN_CIRC_7 OK UNKWN 0-50
CAN_CIRC_8 OK UNKWN 0-50
CAN_CIRC_9 OK UNKWN 0-50
SKIA4288E
Diagnosis item Screen display Diagnosis item Screen display CANCOMM OK NG CAN_CIRC_5 OK UNKWN
CAN_CIRC_1 OK UNKWN CAN_CIRC_6 OK UNKWN
CAN_CIRC_2 OK UNKWN CAN_CIRC_7 OK UNKWN
CAN_CIRC_3 OK UNKWN CAN_CIRC_8 OK UNKWN
CAN_CIRC_4 OK UNKWN CAN_CIRC_9 OK UNKWN
Page 755 of 4731
AV-156
NAVIGATION SYSTEM
Revision: 2005 July 2005 FX
2. CHECK 2: DVD-ROM
Check removed DVD-ROM that there are dirt, scratch and warp.
OK or NG
OK >> GO TO 3.
NG >> Replace DVD-ROM map.
3. CHECK 3: DVD-ROM
Insert same DVD-ROM to make sure same diagnosis result is found as last self-diagnosis.
OK or NG
OK >> Replace NAVI control unit.
NG >> Replace DVD-ROM map.
If Connection Between NAVI Control Unit and GPS AntennaIs MalfunctioningAKS007JO
1. CHECK GPS ANTENNA
Check cable for GPS antenna by watching out to see that cable is malfunctioning.
OK or NG
OK >> GO TO 2.
NG >> Replace GPS antenna.
2. CHECK BY REPLACEMENT OF GPS ANTENNA
Replace other functional GPS antenna to try self-diagnosis again.
Result of self-diagnosis; Found same result?
YES >> Replace NAVI control unit.
NO >> Replace GPS antenna.
RGB Screen Is Not ShownAKS007JP
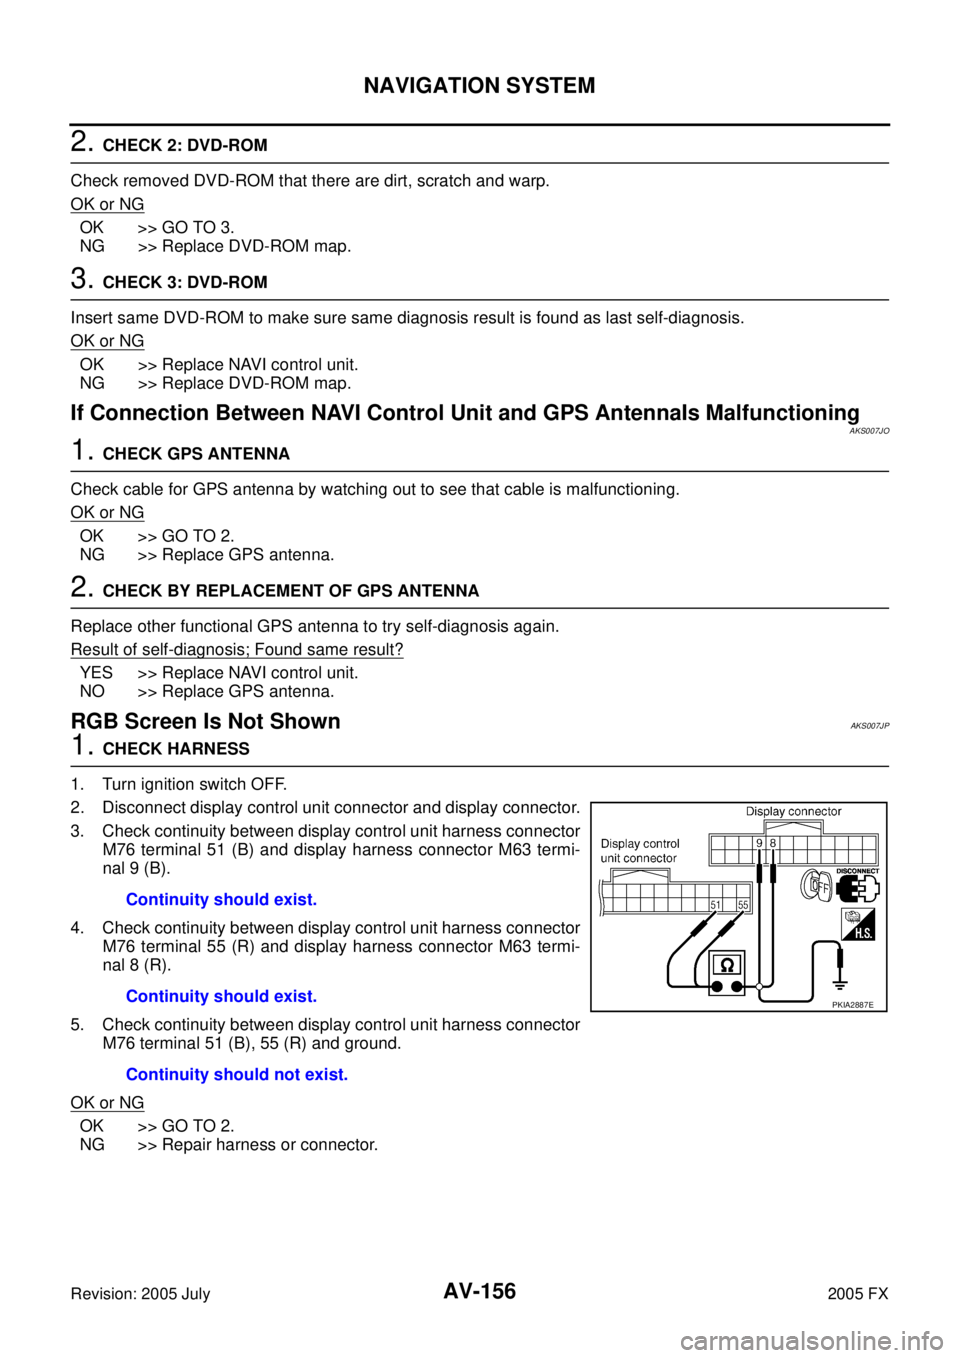
1. CHECK HARNESS
1. Turn ignition switch OFF.
2. Disconnect display control unit connector and display connector.
3. Check continuity between display control unit harness connector M76 terminal 51 (B) and display harness connector M63 termi-
nal 9 (B).
4. Check continuity between display control unit harness connector M76 terminal 55 (R) and display harness connector M63 termi-
nal 8 (R).
5. Check continuity between display control unit harness connector M76 terminal 51 (B), 55 (R) and ground.
OK or NG
OK >> GO TO 2.
NG >> Repair harness or connector. Continuity should exist.
Continuity should exist.
Continuity should not exist.
PKIA2887E