2005 HYUNDAI XG350 warning
[x] Cancel search: warningPage 147 of 247
DRIVING YOUR HYUNDAI
172
!
Trailer
2000 (907)
1000 (453)Maximum Towable Weight
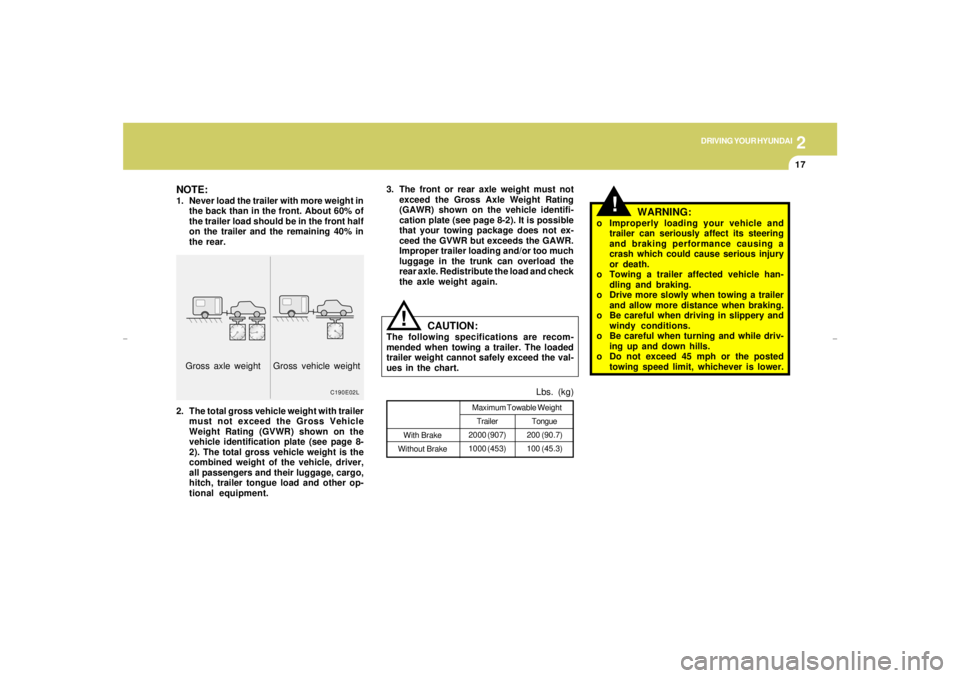
2. The total gross vehicle weight with trailer
must not exceed the Gross Vehicle
Weight Rating (GVWR) shown on the
vehicle identification plate (see page 8-
2). The total gross vehicle weight is the
combined weight of the vehicle, driver,
all passengers and their luggage, cargo,
hitch, trailer tongue load and other op-
tional equipment.Lbs. (kg)
Tongue
200 (90.7)
100 (45.3) With Brake
Without Brake
C190E02L
Gross axle weight Gross vehicle weight
!
NOTE:1. Never load the trailer with more weight in
the back than in the front. About 60% of
the trailer load should be in the front half
on the trailer and the remaining 40% in
the rear.3. The front or rear axle weight must not
exceed the Gross Axle Weight Rating
(GAWR) shown on the vehicle identifi-
cation plate (see page 8-2). It is possible
that your towing package does not ex-
ceed the GVWR but exceeds the GAWR.
Improper trailer loading and/or too much
luggage in the trunk can overload the
rear axle. Redistribute the load and check
the axle weight again.
CAUTION:
The following specifications are recom-
mended when towing a trailer. The loaded
trailer weight cannot safely exceed the val-
ues in the chart.
WARNING:
o Improperly loading your vehicle and
trailer can seriously affect its steering
and braking performance causing a
crash which could cause serious injury
or death.
o Towing a trailer affected vehicle han-
dling and braking.
o Drive more slowly when towing a trailer
and allow more distance when braking.
o Be careful when driving in slippery and
windy conditions.
o Be careful when turning and while driv-
ing up and down hills.
o Do not exceed 45 mph or the posted
towing speed limit, whichever is lower.
xgflhma-2.p656/16/04, 3:00 PM 17
Page 151 of 247

DRIVING YOUR HYUNDAI
212
Refer to your vehicle’s tire and loading
information label for specific informa-
tion about your vehicle’s capacity weight
and seating positions. The combined
weight of the driver, passengers and
cargo should never exceed your
vehicle’s capacity weight.
!
This label also tells you the maximum
weights that can be supported by the
front and rear axles, called Gross Axle
Weight Rating (GAWR). To find out the
actual loads on your front and rear
axles, you need to go to a weigh station
and weigh your vehicle. Your dealer can
help you with this. Be sure to spread out
your load equally on both sides of the
centerline.
WARNING:
o Never exceed the GVWR for your
vehicle, or the GAWR for either the
front or rear axle.
o Do not load your vehicle any
heavier than the GVWR, or either
the maximum front or rear GAWR.
If you do, parts on your vehicle
can break, and it can change the
way your vehicle handles. This
could cause you to lose control
and crash. Also, overloading can
shorten the life of your vehicle.
C190G01L-AATCompliance LabelThe compliance label is located on the
driver's side of the center piller outer
panel.
The label shows the size of your original
tires and the inflation pressures needed
to obtain the gross weight capacity of
your vehicle. This is called the GVWR
(Gross Vehicle Weight Rating). The
GVWR includes the weight of the ve-
hicle, all occupants, fuel and cargo.
C190G01JM
xgflhma-2.p656/16/04, 3:00 PM 21
Page 152 of 247
2
DRIVING YOUR HYUNDAI
22
!
NOTE:
o Overloading your vehicle may
cause damage. Repairs would not
be covered by your warranty. Do
not overload your vehicle.
o Using heavier suspension com-
ponents to get added durability
might not change your weight rat-
ings. Ask your dealer to help you
load your vehicle the right way.
The label will help you decide how much
cargo and installed equipment your
vehicle can carry.
If you carry items inside your vehicle –
like suitcases, tools, packages, or any-
thing else – they more as fast as the
vehicle goes. If you have to stop or turn
quickly, or if there is a crash, the items
will keep going and can cause an injury
if they strikes the driver or a passenger.WARNING:
Items you carry inside your vehicle
can strike and injure people in a
sudden stop or turn, or in a crash.
o Put things in the cargo area of
your vehicle. Try to spread the
weight evenly.
o Never stack items, like suitcases,
inside the vehicle above the tops
of the seats.
o Do not leave an unsecured child
restraint in your vehicle.
o When you carry something inside
the vehicle, secure it.
o Do not drive with a seat folded
down unless necessary.
xgflhma-2.p656/16/04, 3:00 PM 22
Page 154 of 247

32WHAT TO DO IN AN EMERGENCY
IF THE ENGINE WILL NOT START!
D010A01A-AAT D010B01L-AAT
If Engine Doesn't Turn Over or Turns
Over Slowly
D010C02A-AATIf Engine Turns Over Normally but Does
Not Start1. Check fuel level.
2. With the key in the "OFF" position, check all
connectors at ignition coil and spark plugs.
Reconnect any that may be disconnected or
loose.
3. Check the fuel line in the engine compart-
ment.
4. If the engine still does not start, call a Hyundai
dealer or seek other qualified assistance.D010D01A-AATIf Engine Stalls While Driving1. Reduce your speed gradually, keeping a
straight line. Move cautiously off the road to
a safe place.
2. Turn on your emergency flashers.
3. Try to start the engine again. If your vehicle
will not start, contact a Hyundai dealer or
seek other qualified assistance.
WARNING:
If the engine will not start, do not push or
pull the car to start it. This could result in a
collision or cause other damage. In addi-
tion, push or pull starting may cause the
catalytic converter to be overloaded and
create a fire hazard.
1. Be sure the gear selector lever is in "N" or "P"
and the emergency brake is set.
2. Check the battery connections to be sure
they are clean and tight.
3. Turn on the interior light. If the light dims or
goes out when you operate the starter, the
battery is discharged.
4. Check the starter connections to be sure
they are securely tightened.
5. Do not push or pull the vehicle to start it. See
instructions for "Jump Starting" on the fol-
lowing pages.
D010B01L
xgflhma-3.p656/16/04, 3:00 PM 2
Page 155 of 247
3
WHAT TO DO IN AN EMERGENCY
3
JUMP STARTINGD020A03A-AAT
WARNING:
The gas produced by the battery during the
jump-start operation is highly explosive. If
these instructions are not followed exactly,
serious personal injury and damage to the
vehicle may occur! If you are not sure how
to follow this procedure, seek qualified
assistance. Automobile batteries contain
sulfuric acid. This is poisonous and highly
corrosive. When jump starting, wear pro-
tective glasses and be careful not to get
acid on yourself, your clothing or on the car.
!
D020A01L-1
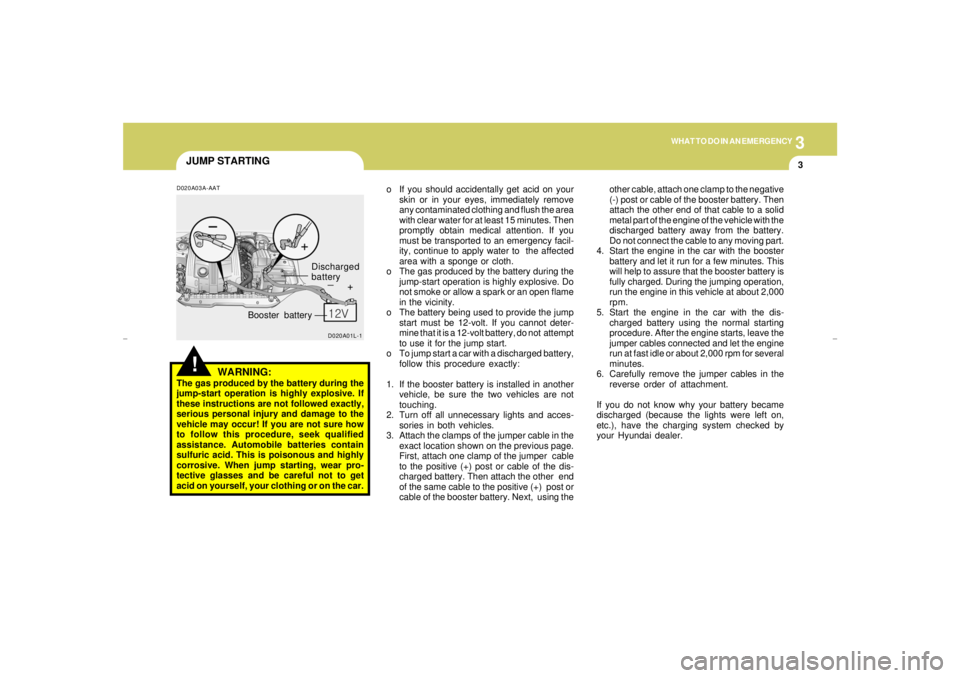
Booster batteryDischarged
battery
o If you should accidentally get acid on your
skin or in your eyes, immediately remove
any contaminated clothing and flush the area
with clear water for at least 15 minutes. Then
promptly obtain medical attention. If you
must be transported to an emergency facil-
ity, continue to apply water to the affected
area with a sponge or cloth.
o The gas produced by the battery during the
jump-start operation is highly explosive. Do
not smoke or allow a spark or an open flame
in the vicinity.
o The battery being used to provide the jump
start must be 12-volt. If you cannot deter-
mine that it is a 12-volt battery, do not attempt
to use it for the jump start.
o To jump start a car with a discharged battery,
follow this procedure exactly:
1. If the booster battery is installed in another
vehicle, be sure the two vehicles are not
touching.
2. Turn off all unnecessary lights and acces-
sories in both vehicles.
3. Attach the clamps of the jumper cable in the
exact location shown on the previous page.
First, attach one clamp of the jumper cable
to the positive (+) post or cable of the dis-
charged battery. Then attach the other end
of the same cable to the positive (+) post or
cable of the booster battery. Next, using theother cable, attach one clamp to the negative
(-) post or cable of the booster battery. Then
attach the other end of that cable to a solid
metal part of the engine of the vehicle with the
discharged battery away from the battery.
Do not connect the cable to any moving part.
4. Start the engine in the car with the booster
battery and let it run for a few minutes. This
will help to assure that the booster battery is
fully charged. During the jumping operation,
run the engine in this vehicle at about 2,000
rpm.
5. Start the engine in the car with the dis-
charged battery using the normal starting
procedure. After the engine starts, leave the
jumper cables connected and let the engine
run at fast idle or about 2,000 rpm for several
minutes.
6. Carefully remove the jumper cables in the
reverse order of attachment.
If you do not know why your battery became
discharged (because the lights were left on,
etc.), have the charging system checked by
your Hyundai dealer.
xgflhma-3.p656/16/04, 3:00 PM 3
Page 156 of 247

34WHAT TO DO IN AN EMERGENCY
IF THE ENGINE OVERHEATS
WARNING:
While the engine is running, keep hair,
hands and clothing away from moving parts
such as the fan and drive belts to prevent
injury.
5. If the water pump drive belt is broken or
engine coolant is leaking out, stop the engine
immediately and call the nearest Hyundai
dealer for assistance.
WARNING:
Do not remove the radiator cap when the
engine is hot. This can allow coolant to be
blown out of the opening and cause seri-
ous burns.
6. If you cannot find the cause of the overheat-
ing, wait until the engine temperature has
returned to normal. Then, if coolant has been
lost, carefully add coolant to the reservoir to
bring the fluid level in the reservoir up to the
halfway mark.
7. Proceed with caution, keeping alert for fur-
ther signs of overheating. If overheating
happens again, call a Hyundai dealer for
assistance.
CAUTION:
Serious loss of coolant indicates there is a
leak in the cooling system and this should
be checked as soon as possible by a Hyundai
dealer.
!!
!
D030A01L-AATIf your temperature gauge indicates overheat-
ing, you experience a loss of power, or hear loud
pinging or knocking, the engine is probably too
hot. If this happens, you should:
1. Pull off the road and stop as soon as it is safe
to do so.
2. Place the gear selector lever in "P" and set
the parking brake. If the air conditioning is on,
turn it off.
3. If engine coolant is running out under the car
or steam is coming out from the hood, stop
the engine. Do not open the hood until the
coolant has stopped running or the steaming
has stopped. If there is no visible loss of
engine coolant and no steam, leave the
engine running and check to be sure the
engine cooling fan is operating. If the fan is
not running, turn the engine off.
4. Check to see if the water pump drive belt is
missing. If it is not missing, check to see that
it is tight. If the drive belt seems to be
satisfactory, check for coolant leaking from
the radiator, hoses or under the car. (If the
air conditioning had been in use, it is normal
for cold water to be draining from it when you
stop).
xgflhma-3.p656/16/04, 3:00 PM 4
Page 160 of 247
38WHAT TO DO IN AN EMERGENCY
!
WARNING:
Do not get under the car when it is
supported by the jack! This is very
dangerous as the vehicle could fall
and cause serious injury or death.
No one should stay in the car while
the jack is being used.
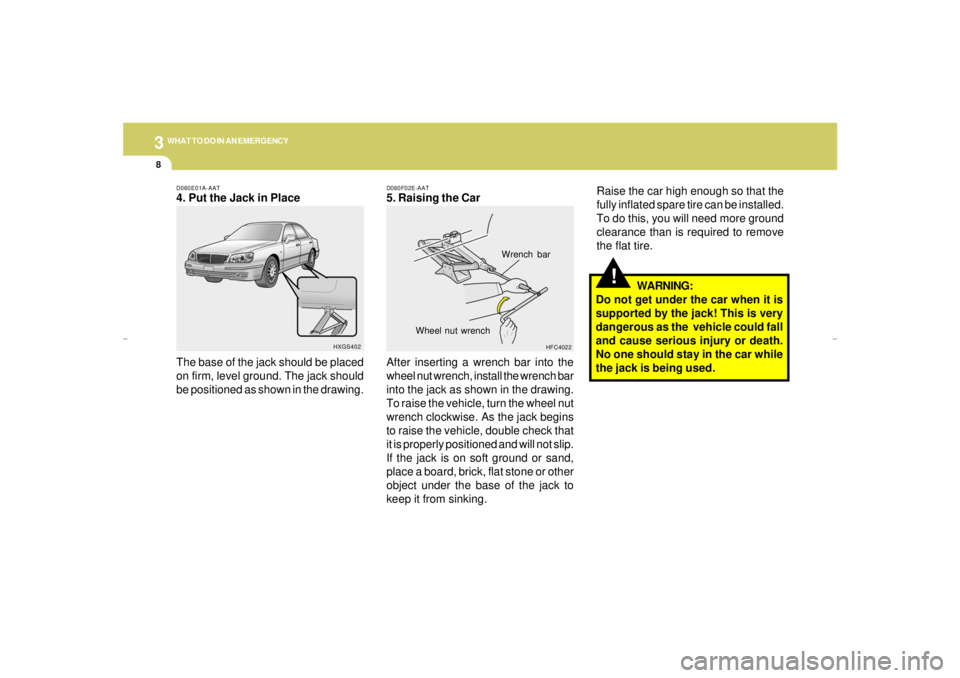
D060E01A-AAT4. Put the Jack in Place
The base of the jack should be placed
on firm, level ground. The jack should
be positioned as shown in the drawing.
HXGS402
D060F02E-AAT5. Raising the Car
After inserting a wrench bar into the
wheel nut wrench, install the wrench bar
into the jack as shown in the drawing.
To raise the vehicle, turn the wheel nut
wrench clockwise. As the jack begins
to raise the vehicle, double check that
it is properly positioned and will not slip.
If the jack is on soft ground or sand,
place a board, brick, flat stone or other
object under the base of the jack to
keep it from sinking.
HFC4022
Wrench bar
Wheel nut wrench
Raise the car high enough so that the
fully inflated spare tire can be installed.
To do this, you will need more ground
clearance than is required to remove
the flat tire.
xgflhma-3.p656/16/04, 3:00 PM 8
Page 161 of 247
3
WHAT TO DO IN AN EMERGENCY
9
!
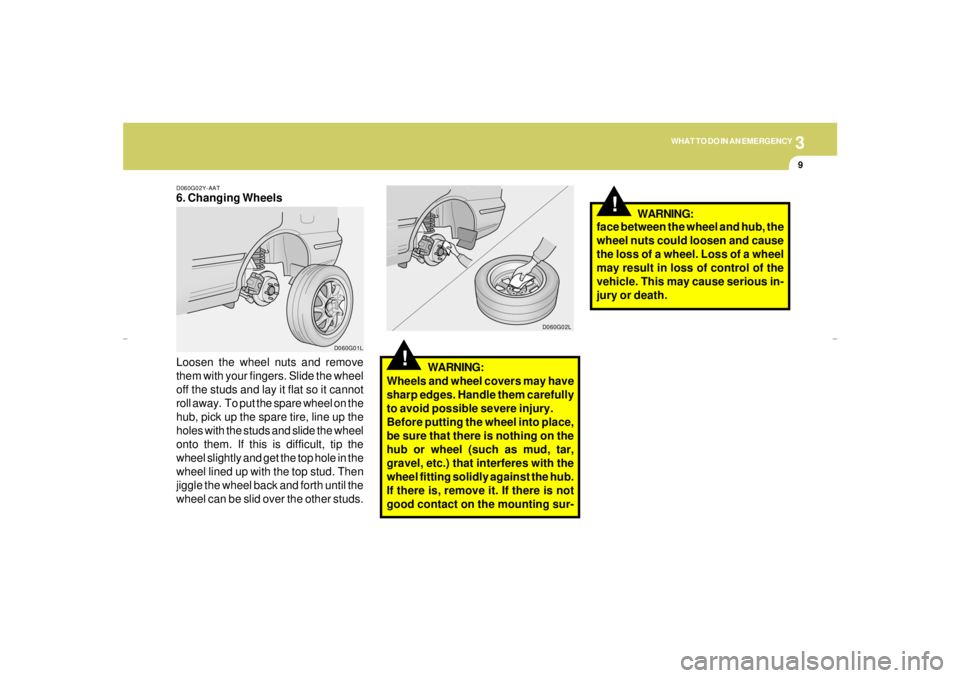
D060G02Y-AAT6. Changing Wheels
Loosen the wheel nuts and remove
them with your fingers. Slide the wheel
off the studs and lay it flat so it cannot
roll away. To put the spare wheel on the
hub, pick up the spare tire, line up the
holes with the studs and slide the wheel
onto them. If this is difficult, tip the
wheel slightly and get the top hole in the
wheel lined up with the top stud. Then
jiggle the wheel back and forth until the
wheel can be slid over the other studs.WARNING:
Wheels and wheel covers may have
sharp edges. Handle them carefully
to avoid possible severe injury.
Before putting the wheel into place,
be sure that there is nothing on the
hub or wheel (such as mud, tar,
gravel, etc.) that interferes with the
wheel fitting solidly against the hub.
If there is, remove it. If there is not
good contact on the mounting sur-
!
D060G01LD060G02L
face between the wheel and hub, the
wheel nuts could loosen and cause
the loss of a wheel. Loss of a wheel
may result in loss of control of the
vehicle. This may cause serious in-
jury or death.WARNING:
xgflhma-3.p656/16/04, 3:00 PM 9