Page 217 of 277
6
DO-IT-YOURSELF MAINTENANCE
6
G040A02L
Oil filter
Oil filler cap 3.5 V6
CHANGING THE OIL AND FILTERG040A04A-GATOil filler cap
Oil filter2.7 V6
G040A01B
!!
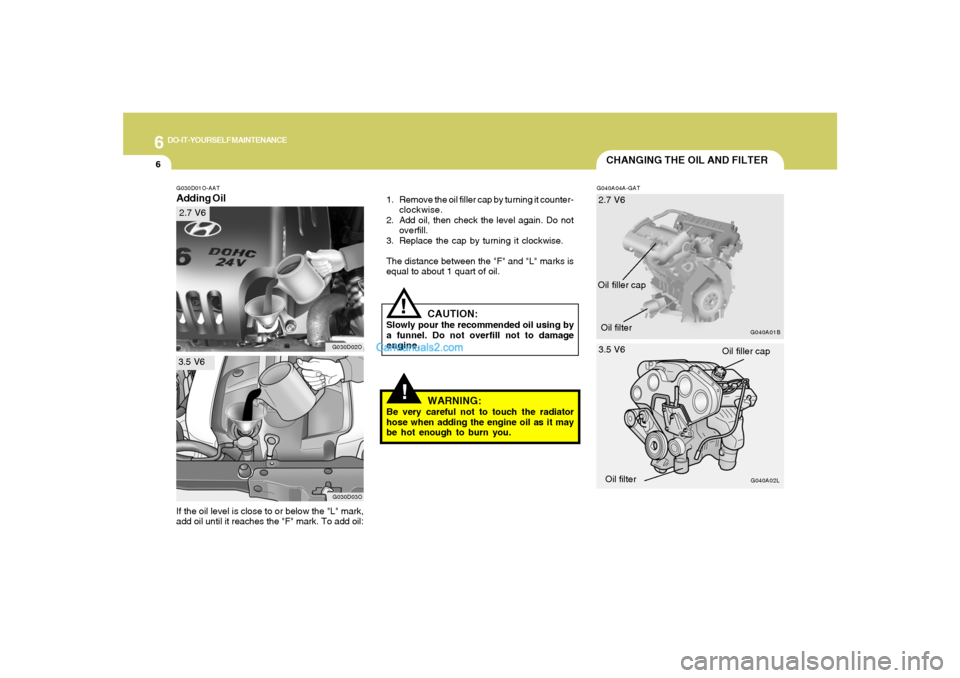
G030D01O-AATAdding Oil
1. Remove the oil filler cap by turning it counter-
clockwise.
2. Add oil, then check the level again. Do not
overfill.
3. Replace the cap by turning it clockwise.
The distance between the "F" and "L" marks is
equal to about 1 quart of oil.
G030D02O
G030D03O
3.5 V62.7 V6
CAUTION:
Slowly pour the recommended oil using by
a funnel. Do not overfill not to damage
engine.
WARNING:
Be very careful not to touch the radiator
hose when adding the engine oil as it may
be hot enough to burn you.
If the oil level is close to or below the "L" mark,
add oil until it reaches the "F" mark. To add oil:
Page 218 of 277

6
DO-IT-YOURSELF MAINTENANCE
7
!
The engine oil and filter should be changed at
those intervals specified in the maintenance
schedule in Section 5. If the car is being driven
in severe conditions, more frequent oil and filter
changes are required.
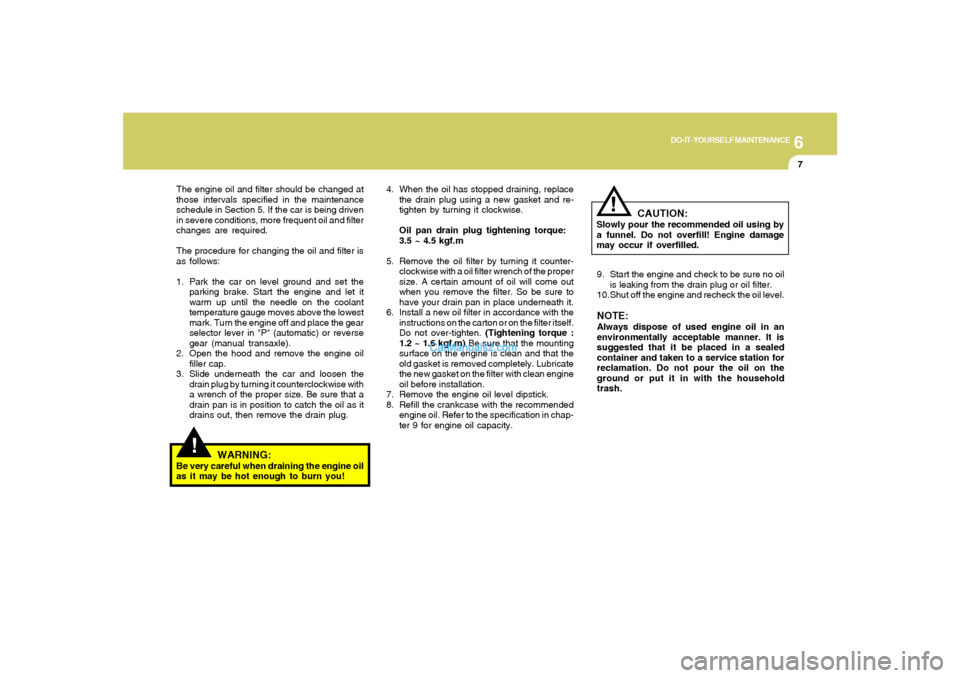
The procedure for changing the oil and filter is
as follows:
1. Park the car on level ground and set the
parking brake. Start the engine and let it
warm up until the needle on the coolant
temperature gauge moves above the lowest
mark. Turn the engine off and place the gear
selector lever in "P" (automatic) or reverse
gear (manual transaxle).
2. Open the hood and remove the engine oil
filler cap.
3. Slide underneath the car and loosen the
drain plug by turning it counterclockwise with
a wrench of the proper size. Be sure that a
drain pan is in position to catch the oil as it
drains out, then remove the drain plug.
WARNING:
Be very careful when draining the engine oil
as it may be hot enough to burn you!4. When the oil has stopped draining, replace
the drain plug using a new gasket and re-
tighten by turning it clockwise.
Oil pan drain plug tightening torque:
3.5 ~ 4.5 kgf.m
5. Remove the oil filter by turning it counter-
clockwise with a oil filter wrench of the proper
size. A certain amount of oil will come out
when you remove the filter. So be sure to
have your drain pan in place underneath it.
6. Install a new oil filter in accordance with the
instructions on the carton or on the filter itself.
Do not over-tighten. (Tightening torque :
1.2 ~ 1.6 kgf.m) Be sure that the mounting
surface on the engine is clean and that the
old gasket is removed completely. Lubricate
the new gasket on the filter with clean engine
oil before installation.
7. Remove the engine oil level dipstick.
8. Refill the crankcase with the recommended
engine oil. Refer to the specification in chap-
ter 9 for engine oil capacity.
!
CAUTION:
Slowly pour the recommended oil using by
a funnel. Do not overfill! Engine damage
may occur if overfilled.
9. Start the engine and check to be sure no oil
is leaking from the drain plug or oil filter.
10.Shut off the engine and recheck the oil level.NOTE:Always dispose of used engine oil in an
environmentally acceptable manner. It is
suggested that it be placed in a sealed
container and taken to a service station for
reclamation. Do not pour the oil on the
ground or put it in with the household
trash.
Page 219 of 277

6
DO-IT-YOURSELF MAINTENANCE
8
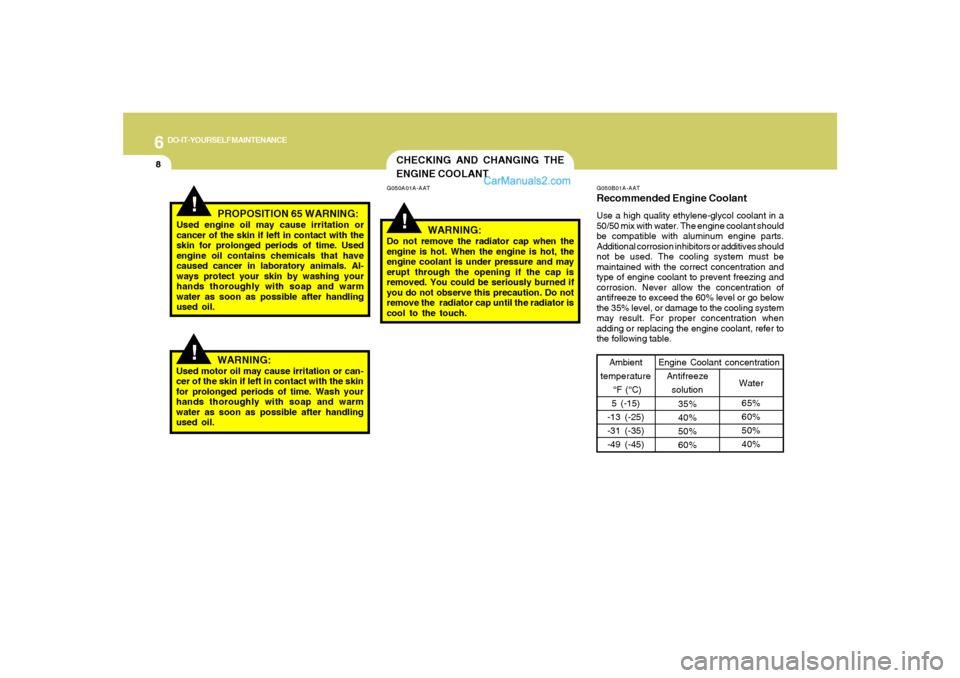
G050B01A-AATRecommended Engine CoolantUse a high quality ethylene-glycol coolant in a
50/50 mix with water. The engine coolant should
be compatible with aluminum engine parts.
Additional corrosion inhibitors or additives should
not be used. The cooling system must be
maintained with the correct concentration and
type of engine coolant to prevent freezing and
corrosion. Never allow the concentration of
antifreeze to exceed the 60% level or go below
the 35% level, or damage to the cooling system
may result. For proper concentration when
adding or replacing the engine coolant, refer to
the following table.
Ambient
temperature
°F (°C)
5 (-15)
-13 (-25)
-31 (-35)
-49 (-45)
65%
60%
50%
40% 35%
40%
50%
60%Water Antifreeze
solution Engine Coolant concentration
CHECKING AND CHANGING THE
ENGINE COOLANT!
!
G050A01A-AAT
WARNING:
Do not remove the radiator cap when the
engine is hot. When the engine is hot, the
engine coolant is under pressure and may
erupt through the opening if the cap is
removed. You could be seriously burned if
you do not observe this precaution. Do not
remove the radiator cap until the radiator is
cool to the touch.
!
PROPOSITION 65 WARNING:
Used engine oil may cause irritation or
cancer of the skin if left in contact with the
skin for prolonged periods of time. Used
engine oil contains chemicals that have
caused cancer in laboratory animals. Al-
ways protect your skin by washing your
hands thoroughly with soap and warm
water as soon as possible after handling
used oil.
WARNING:
Used motor oil may cause irritation or can-
cer of the skin if left in contact with the skin
for prolonged periods of time. Wash your
hands thoroughly with soap and warm
water as soon as possible after handling
used oil.
Page 220 of 277

6
DO-IT-YOURSELF MAINTENANCE
9
!
G050C01A-AATTo Check the Coolant LevelThe coolant level can be seen on the side of the
plastic coolant reservoir. The level of the cool-
ant should be between the "L" and "F" lines on
the reservoir when the engine is cool. If the level
is below the "L" mark, add engine coolant to
bring it up between "L" and "F". If the level is low,
inspect for coolant leaks and recheck the fluid
level frequently. If the level drops again, visit
your Hyundai dealer for an inspection and
diagnosis of the reason.
G050C01OG050D02A-AAT
To Change the Engine CoolantThe engine coolant should be changed at those
intervals specified in the vehicle maintenance
schedule in Section 5.
G050D01O
CAUTION:
Engine coolant can damage the finish of
your car. If you spill engine coolant on the
car, wash it off thoroughly with clean water.
1. Park the car on level ground, set the park-
ing brake and remove the radiator cap when
cool.2. Turn the radiator cap counterclockwise with-
out pressing down on it, until it stops. This
relieves any pressure remaining in the cool-
ing system. And remove the radiator cap by
pushing down and turning counterclock-
wise.
3. Be sure your drain receptacle is in place.
Open the drain cock on the radiator. Allow all
the engine coolant to drain from the cooling
system, then securely close the drain cock.
4. Check Section 9 for the capacity of the
cooling system in your car. Then, following
the manufacturer's directions on the engine
coolant container, add the appropriate quan-
tity of coolant to the radiator.
5. Fill the radiator with clean demineralized or
distilled water. Continue to add clean dem-
ineralized or distilled water in small quantities
until the fluid level stays up in the radiator
neck.
Page 221 of 277

6
DO-IT-YOURSELF MAINTENANCE
10
G060B02O-AATReplacing the Spark PlugsThe spark plugs should be changed at the
intervals specified in the vehicle maintenance
schedule in Section 5 or whenever engine
performance indicates they should be changed.
Symptoms that suggest poor spark plug perfor-
mance include engine misfiring under load, loss
of fuel economy, poor acceleration, etc. When
spark plugs are replaced, always use spark
plugs recommended by Hyundai. The use of
other spark plugs can result in loss of perfor-
mance, radio interference or engine damage.NOTE:o When replacing the spark plug, genuine
Hyundai replacement parts are recom-
mended.
o It is recommended that the spark plug
should be changed by an authorized
Hyundai dealer.
Recommended Spark Plugs:
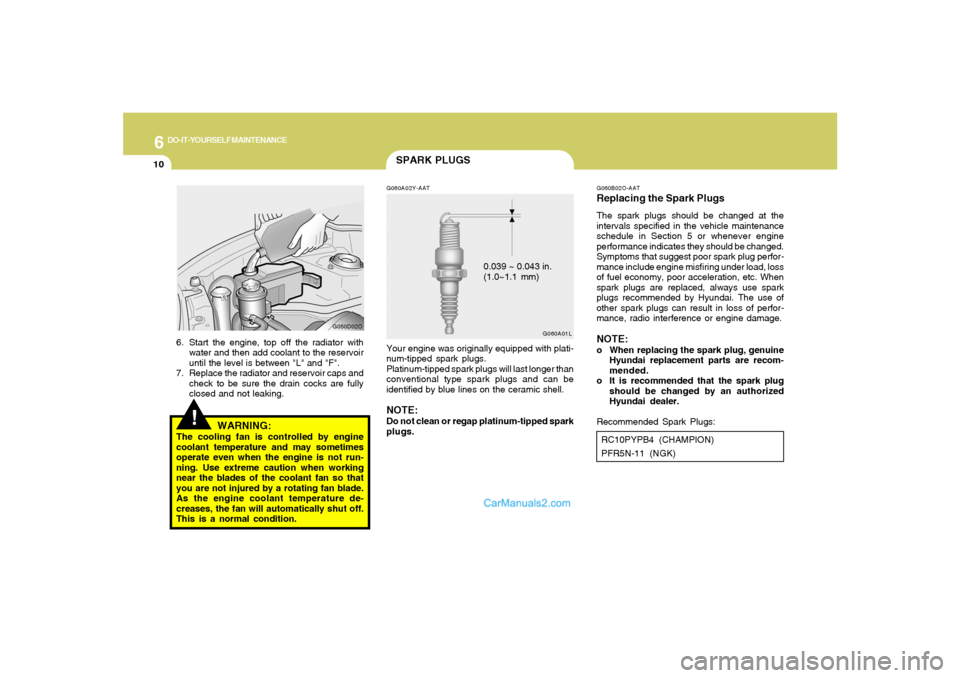
SPARK PLUGSG060A02Y-AATYour engine was originally equipped with plati-
num-tipped spark plugs.
Platinum-tipped spark plugs will last longer than
conventional type spark plugs and can be
identified by blue lines on the ceramic shell.NOTE:Do not clean or regap platinum-tipped spark
plugs.
G060A01L
0.039 ~ 0.043 in.
(1.0~1.1 mm)
!
G050D02O
6. Start the engine, top off the radiator with
water and then add coolant to the reservoir
until the level is between "L" and "F".
7. Replace the radiator and reservoir caps and
check to be sure the drain cocks are fully
closed and not leaking.
WARNING:
The cooling fan is controlled by engine
coolant temperature and may sometimes
operate even when the engine is not run-
ning. Use extreme caution when working
near the blades of the coolant fan so that
you are not injured by a rotating fan blade.
As the engine coolant temperature de-
creases, the fan will automatically shut off.
This is a normal condition.
RC10PYPB4 (CHAMPION)
PFR5N-11 (NGK)
Page 222 of 277

6
DO-IT-YOURSELF MAINTENANCE
11
WINDSHIELD WIPER BLADES
CHANGING THE AIR CLEANER
FILTER
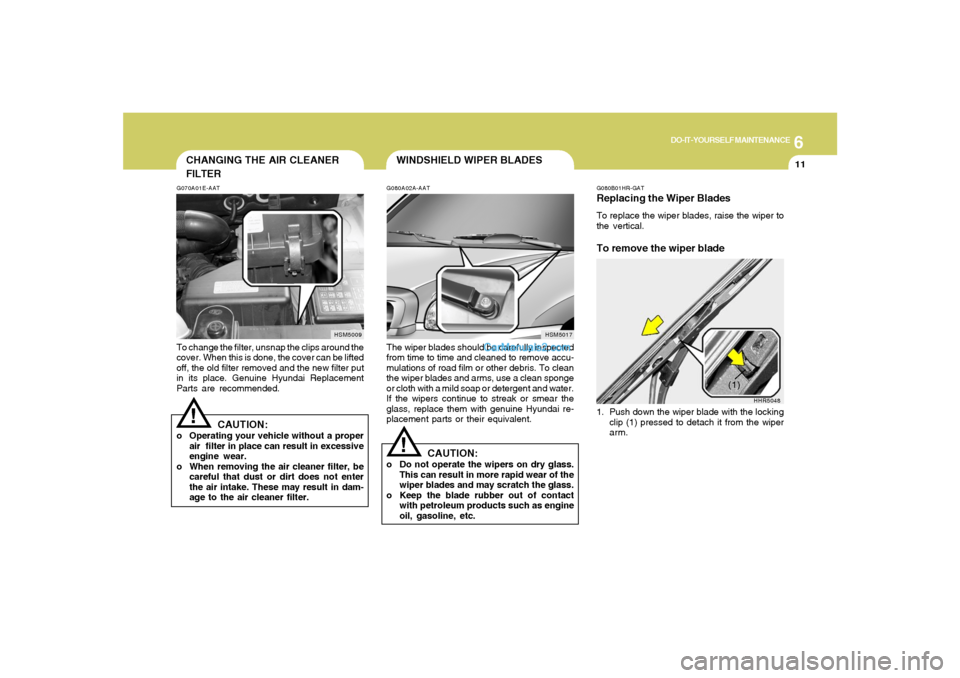
G080A02A-AATThe wiper blades should be carefully inspected
from time to time and cleaned to remove accu-
mulations of road film or other debris. To clean
the wiper blades and arms, use a clean sponge
or cloth with a mild soap or detergent and water.
If the wipers continue to streak or smear the
glass, replace them with genuine Hyundai re-
placement parts or their equivalent.
HSM5017 G070A01E-AAT
To change the filter, unsnap the clips around the
cover. When this is done, the cover can be lifted
off, the old filter removed and the new filter put
in its place. Genuine Hyundai Replacement
Parts are recommended.
CAUTION:
o Operating your vehicle without a proper
air filter in place can result in excessive
engine wear.
o When removing the air cleaner filter, be
careful that dust or dirt does not enter
the air intake. These may result in dam-
age to the air cleaner filter.
HSM5009
!
!
CAUTION:
o Do not operate the wipers on dry glass.
This can result in more rapid wear of the
wiper blades and may scratch the glass.
o Keep the blade rubber out of contact
with petroleum products such as engine
oil, gasoline, etc.
G080B01HR-GATReplacing the Wiper BladesTo replace the wiper blades, raise the wiper to
the vertical.To remove the wiper blade1. Push down the wiper blade with the locking
clip (1) pressed to detach it from the wiper
arm.
HHR5048
(1)
Page 223 of 277
6
DO-IT-YOURSELF MAINTENANCE
12
FILLING THE WASHER RESERVOIRG090A02O-AATThe washer fluid reservoir supplies fluid to the
windshield washer system.
A good quality washer fluid should be used to fill
the washer reservoir. The fluid level should be
checked more frequently during inclement
weather or whenever the washer system is in
more frequent use.
The capacity of the washer reservoir is 3.59
U.S. quarts (3.4 Liters).
G090A01O
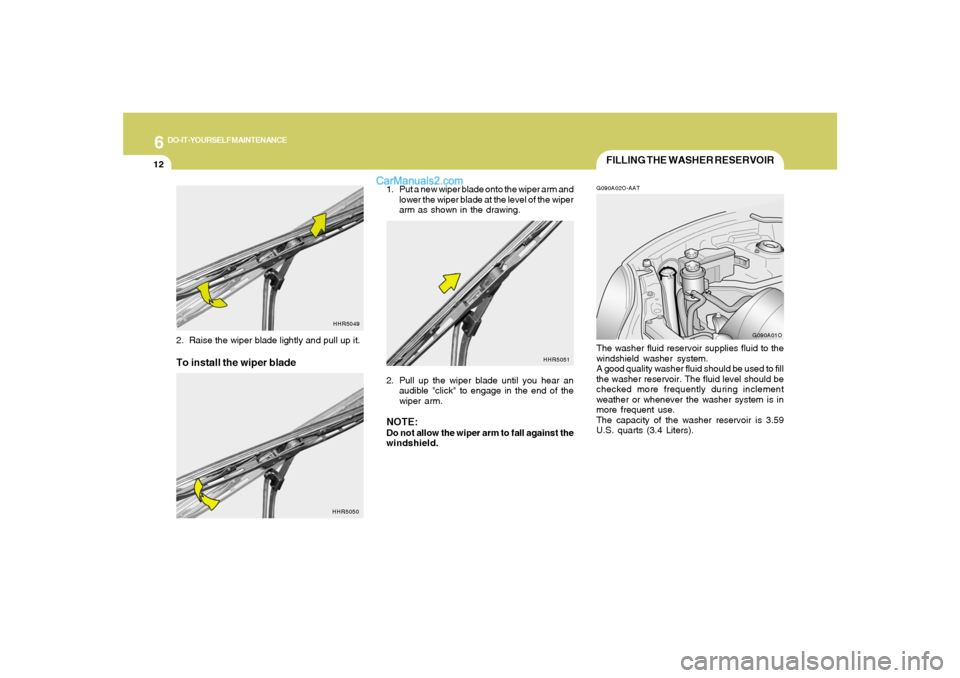
1. Put a new wiper blade onto the wiper arm and
lower the wiper blade at the level of the wiper
arm as shown in the drawing.
2. Pull up the wiper blade until you hear an
audible "click" to engage in the end of the
wiper arm.NOTE:Do not allow the wiper arm to fall against the
windshield.
HHR5051
2. Raise the wiper blade lightly and pull up it.To install the wiper blade
HHR5049
HHR5050
Page 224 of 277

6
DO-IT-YOURSELF MAINTENANCE
13
CAUTION:
o Radiator anti-freeze (engine coolant)
should not be used in the washer system
because it will damage the car's finish.
o The washer should not be operated if the
washer reservoir is empty. This can dam-
age the washer fluid pump.
!
CHECKING THE TRANSAXLE
FLUID (AUTOMATIC)G110A01E-AATTransaxle fluid in the automatic transaxle should
be checked at those intervals specified in the
vehicle maintenance schedule in Section 5.NOTE:Automatic transaxle fluid is basically red
color. As driving distance increases, the
fluid color turns darkish red gradually. It is
a normal condition and you should not
judge the need to replace based upon the
changing color.
You must replace the automatic transaxle
fluid in accordance with intervals specified
in the vehicle maintenance schedule in
section 5.
!
G110B04A-AATRecommended FluidYour Hyundai automatic transaxle is specially
designed to operate with HYUNDAI GENUINE
ATF SP III, DIAMOND ATF SP III, SK ATF SP
III or other brands approved by Hundai Motor
Co., Damage caused by a nonspecified fluid is
not covered by your new vehicle limited war-
ranty.
CAUTION:
Use of aftermarket ATF additives may cause
damage to the automatic transaxle. Only
use HYUNDAI GENUINE ATF SP III, DIA-
MOND ATF SP III, SK ATF SP III or other
brands approved by Hyundai Motor Co., If
you are having your vehicle serviced at a
facility other than a Hyundai dealer, verify
ATF is used for your vehicle.
!
WARNING:
o Windshield washer fluid agents contain
some amounts of alcohol and can be
flammable under certain circumstances.
Do not allow sparks or flame to contact
the washer fluid or the washer fluid
reservoir. Damage to the vehicle or its
occupants could occur.
o Windshield washer fluid is poisonous to
humans and animals. Do not drink wind-
shield washer fluid. Serious injury or
death could occur.