2005 Hyundai Santa Fe low beam
[x] Cancel search: low beamPage 11 of 277
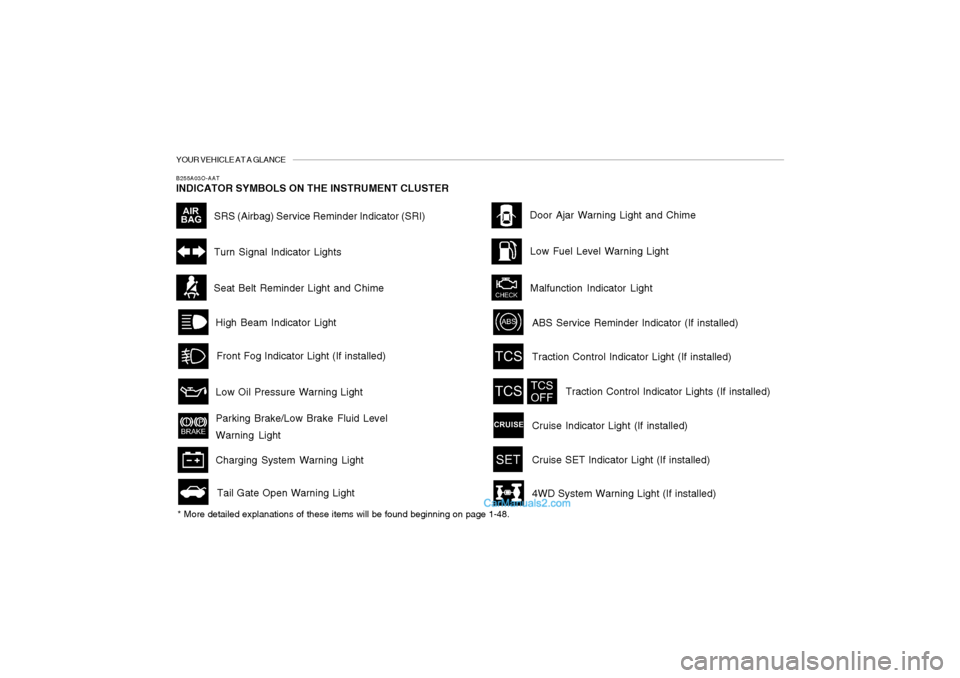
YOUR VEHICLE AT A GLANCEB255A03O-AATINDICATOR SYMBOLS ON THE INSTRUMENT CLUSTER* More detailed explanations of these items will be found beginning on page 1-48.
SRS (Airbag) Service Reminder Indicator (SRI)
Turn Signal Indicator Lights
High Beam Indicator Light
Low Oil Pressure Warning Light
Parking Brake/Low Brake Fluid Level
Warning Light
Charging System Warning Light
Tail Gate Open Warning LightDoor Ajar Warning Light and Chime
Low Fuel Level Warning Light
Malfunction Indicator Light Seat Belt Reminder Light and Chime
Traction Control Indicator Light (If installed)
Cruise Indicator Light (If installed)
ABS Service Reminder Indicator (If installed)4WD System Warning Light (If installed)
Traction Control Indicator Lights (If installed)
Cruise SET Indicator Light (If installed)
Front Fog Indicator Light (If installed)
Page 58 of 277
1
FEATURES OF YOUR HYUNDAI
47
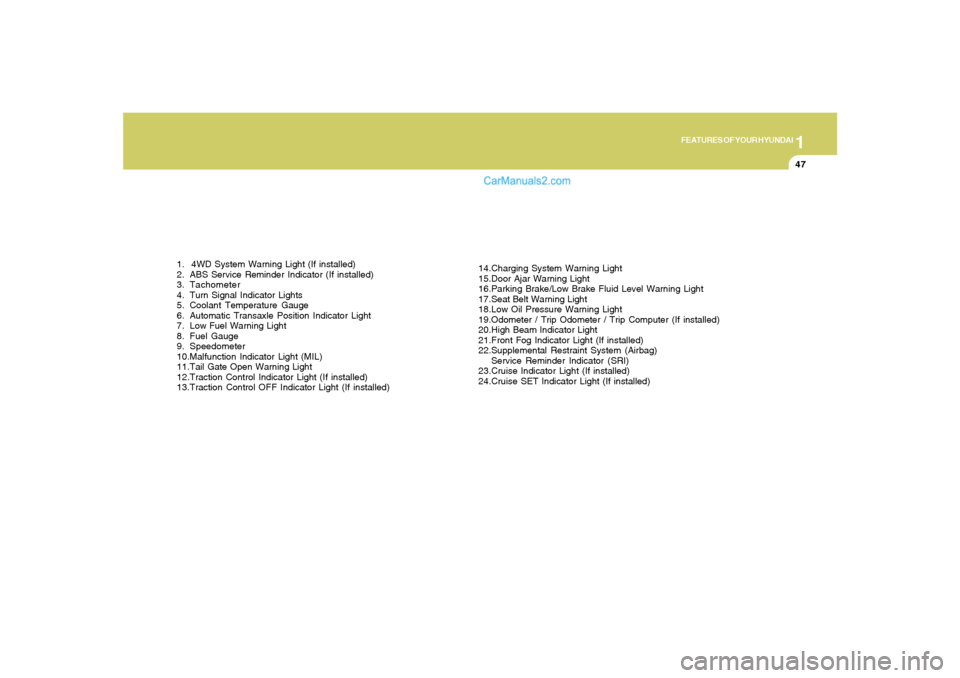
1. 4WD System Warning Light (If installed)
2. ABS Service Reminder Indicator (If installed)
3. Tachometer
4. Turn Signal Indicator Lights
5. Coolant Temperature Gauge
6. Automatic Transaxle Position Indicator Light
7. Low Fuel Warning Light
8. Fuel Gauge
9. Speedometer
10.Malfunction Indicator Light (MIL)
11.Tail Gate Open Warning Light
12.Traction Control Indicator Light (If installed)
13.Traction Control OFF Indicator Light (If installed)14.Charging System Warning Light
15.Door Ajar Warning Light
16.Parking Brake/Low Brake Fluid Level Warning Light
17.Seat Belt Warning Light
18.Low Oil Pressure Warning Light
19.Odometer / Trip Odometer / Trip Computer (If installed)
20.High Beam Indicator Light
21.Front Fog Indicator Light (If installed)
22.Supplemental Restraint System (Airbag)
Service Reminder Indicator (SRI)
23.Cruise Indicator Light (If installed)
24.Cruise SET Indicator Light (If installed)
Page 59 of 277
1FEATURES OF YOUR HYUNDAI48
WARNING AND INDICATOR LIGHTSB260B01JM-AAT
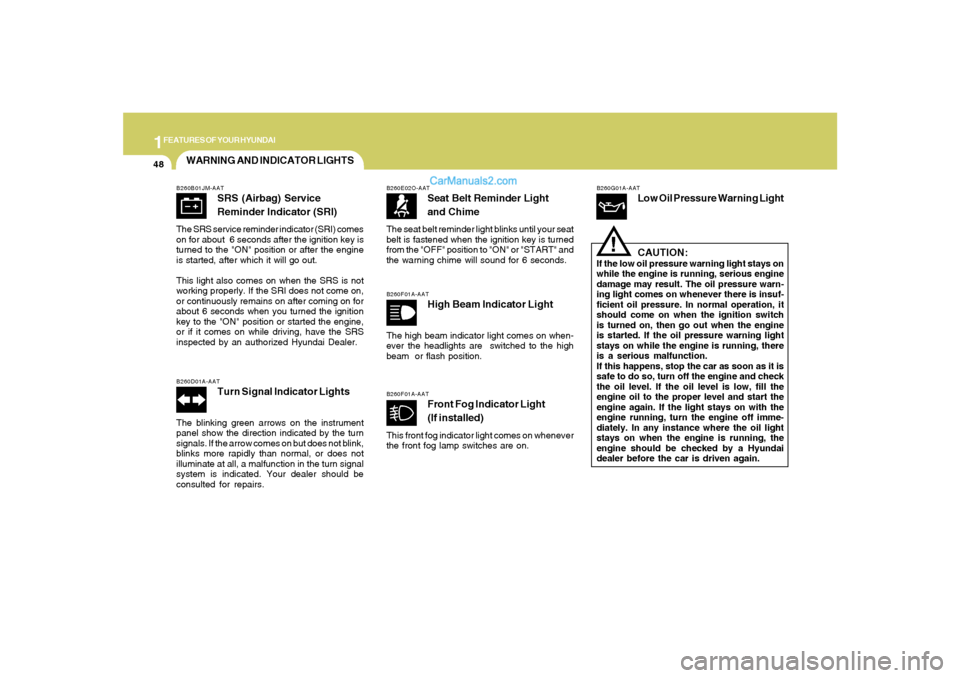
SRS (Airbag) Service
Reminder Indicator (SRI)
The SRS service reminder indicator (SRI) comes
on for about 6 seconds after the ignition key is
turned to the "ON" position or after the engine
is started, after which it will go out.
This light also comes on when the SRS is not
working properly. If the SRI does not come on,
or continuously remains on after coming on for
about 6 seconds when you turned the ignition
key to the "ON" position or started the engine,
or if it comes on while driving, have the SRS
inspected by an authorized Hyundai Dealer.B260D01A-AAT
Turn Signal Indicator Lights
The blinking green arrows on the instrument
panel show the direction indicated by the turn
signals. If the arrow comes on but does not blink,
blinks more rapidly than normal, or does not
illuminate at all, a malfunction in the turn signal
system is indicated. Your dealer should be
consulted for repairs.
B260E02O-AAT
Seat Belt Reminder Light
and Chime
The seat belt reminder light blinks until your seat
belt is fastened when the ignition key is turned
from the "OFF" position to "ON" or "START" and
the warning chime will sound for 6 seconds.B260F01A-AAT
High Beam Indicator Light
The high beam indicator light comes on when-
ever the headlights are switched to the high
beam or flash position.
B260G01A-AAT
Low Oil Pressure Warning Light
CAUTION:
If the low oil pressure warning light stays on
while the engine is running, serious engine
damage may result. The oil pressure warn-
ing light comes on whenever there is insuf-
ficient oil pressure. In normal operation, it
should come on when the ignition switch
is turned on, then go out when the engine
is started. If the oil pressure warning light
stays on while the engine is running, there
is a serious malfunction.
If this happens, stop the car as soon as it is
safe to do so, turn off the engine and check
the oil level. If the oil level is low, fill the
engine oil to the proper level and start the
engine again. If the light stays on with the
engine running, turn the engine off imme-
diately. In any instance where the oil light
stays on when the engine is running, the
engine should be checked by a Hyundai
dealer before the car is driven again.
!
B260F01A-AAT
Front Fog Indicator Light
(If installed)
This front fog indicator light comes on whenever
the front fog lamp switches are on.
Page 69 of 277
1FEATURES OF YOUR HYUNDAI58
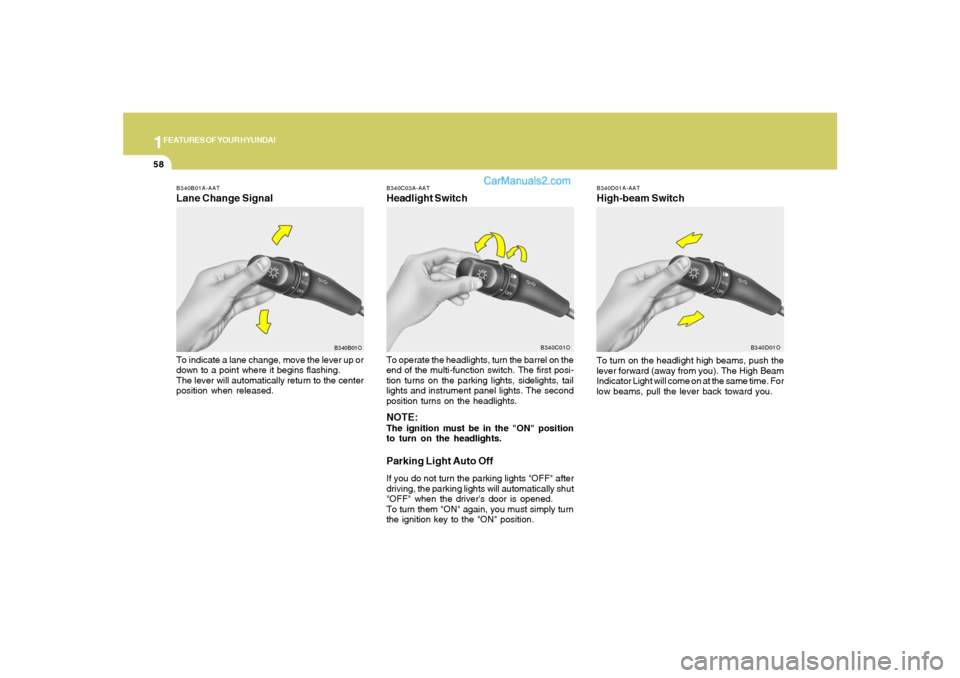
B340D01A-AATHigh-beam Switch
B340B01A-AATLane Change SignalTo indicate a lane change, move the lever up or
down to a point where it begins flashing.
The lever will automatically return to the center
position when released.
B340C03A-AATHeadlight SwitchTo operate the headlights, turn the barrel on the
end of the multi-function switch. The first posi-
tion turns on the parking lights, sidelights, tail
lights and instrument panel lights. The second
position turns on the headlights.NOTE:The ignition must be in the "ON" position
to turn on the headlights.Parking Light Auto OffIf you do not turn the parking lights "OFF" after
driving, the parking lights will automatically shut
"OFF" when the driver's door is opened.
To turn them "ON" again, you must simply turn
the ignition key to the "ON" position.
B340B01OB340C01O
To turn on the headlight high beams, push the
lever forward (away from you). The High Beam
Indicator Light will come on at the same time. For
low beams, pull the lever back toward you.
B340D01O
Page 174 of 277
2
DRIVING YOUR HYUNDAI
24
C190B01S-AATTrailer HitchesSelect the proper hitch and ball combination,
making sure that its location is compatible with
that of the trailer or vehicle being towed.
Use a quality non-equalizing hitch which distrib-
utes the tongue load uniformly throughout the
chassis.
The hitch should be bolted securely to the car
and installed by a qualified technician. DO NOT
USE A HITCH DESIGNED FOR TEMPORARY
INSTALLATION AND NEVER USE ONE THAT
ATTACHES ONLY TO THE BUMPER.C190C01Y-AATTrailer BrakesIf your trailer is equipped with a braking system,
make sure it conforms to federal and/or local
regulations and that it is properly installed and
operating correctly.NOTE:If you tow a trailer or vehicle, your car will
require more frequent maintenance due to
the additional load. See Maintenance Under
Severe Usage Conditions" on page 5-6.
TRAILER OR VEHICLE TOWING!
C190A01S-AATIf you are considering towing with your car, you
should first check with your State's Department
of Motor Vehicles to determine their legal re-
quirements.
Since laws vary from State to State the require-
ments for towing trailers, cars, or other types of
vehicles or apparatus may differ. Ask your
Hyundai dealer for further details before towing.
CAUTION:
Do not do any towing with your car during
its first 1,200 miles (2,000 km) in order to
allow the engine to properly break in. Fail-
ure to heed this caution may result in seri-
ous engine or transaxle damage.
USE OF LIGHTSC180A01A-AATCheck your lights regularly for correct opera-
tion and always keep them clean. When driving
during the day in conditions of poor visibility, it
is helpful to drive with headlights on low beam.
This enables you to be seen as well as to see.
Page 235 of 277
6
DO-IT-YOURSELF MAINTENANCE
24
G250A01A-AATFOR MORE INFORMATION ABOUT
YOUR HYUNDAIIf you desire additional information about main-
taining and servicing your Hyundai, you may
purchase a factory Shop Manual at your Hyundai
dealer's parts department. This is the same
manual used by dealership technicians and
while it is highly technical it can be useful in
obtaining a better understanding of your car and
how it works.
G240A01A-AATPOWER STEERING HOSESIt is suggested that you check the power steer-
ing hose connections for fluid leakage at those
intervals specified in the vehicle maintenance
schedule in Section 5.
The power steering hoses should be replaced
if there is severe surface cracking, pulling,
scuffing or worn spots. Deterioration of the hose
could cause premature failure. Recommended Fluid
Use PSF-3 type fluidNOTE:Do not start the engine when the power
steering oil reservoir is empty.
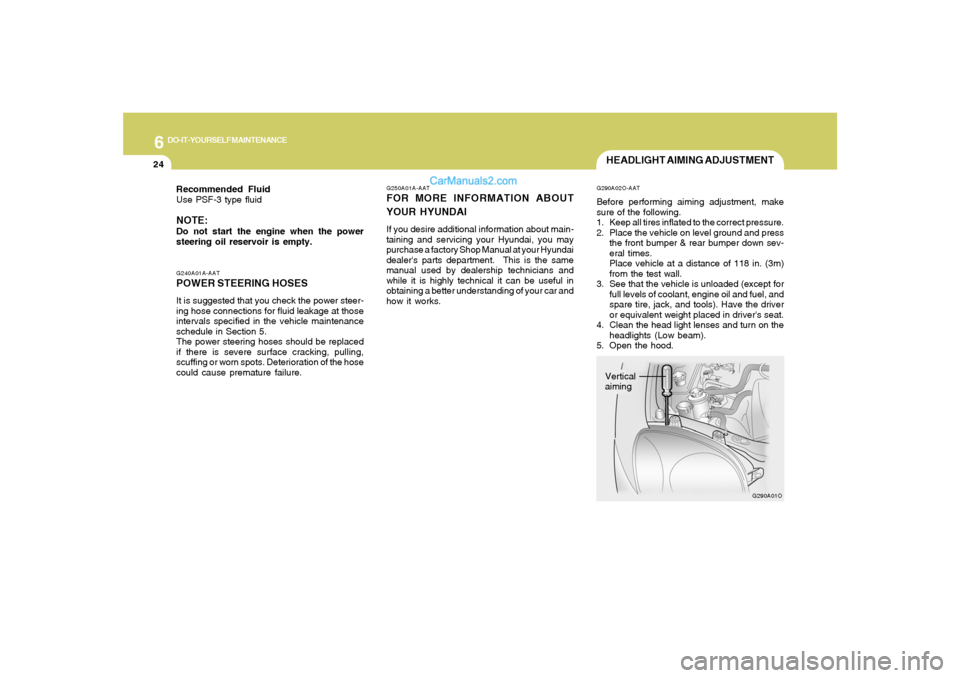
HEADLIGHT AIMING ADJUSTMENTG290A02O-AATBefore performing aiming adjustment, make
sure of the following.
1. Keep all tires inflated to the correct pressure.
2. Place the vehicle on level ground and press
the front bumper & rear bumper down sev-
eral times.
Place vehicle at a distance of 118 in. (3m)
from the test wall.
3. See that the vehicle is unloaded (except for
full levels of coolant, engine oil and fuel, and
spare tire, jack, and tools). Have the driver
or equivalent weight placed in driver's seat.
4. Clean the head light lenses and turn on the
headlights (Low beam).
5. Open the hood.
G290A01O
Vertical
aiming
Page 236 of 277
6
DO-IT-YOURSELF MAINTENANCE
25
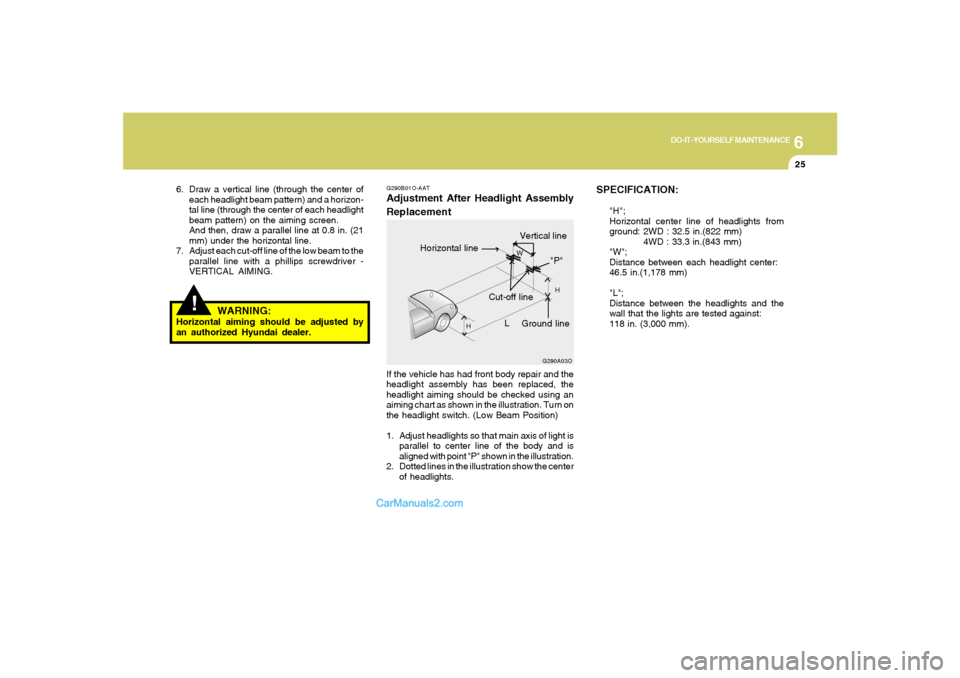
SPECIFICATION:
"H";
Horizontal center line of headlights from
ground: 2WD : 32.5 in.(822 mm)
4WD : 33.3 in.(843 mm)
"W";
Distance between each headlight center:
46.5 in.(1,178 mm)
"L";
Distance between the headlights and the
wall that the lights are tested against:
118 in. (3,000 mm).
Vertical line
G290B01O-AATAdjustment After Headlight Assembly
ReplacementIf the vehicle has had front body repair and the
headlight assembly has been replaced, the
headlight aiming should be checked using an
aiming chart as shown in the illustration. Turn on
the headlight switch. (Low Beam Position)
1. Adjust headlights so that main axis of light is
parallel to center line of the body and is
aligned with point "P" shown in the illustration.
2. Dotted lines in the illustration show the center
of headlights.
G290A03O
L
W
H
H
Cut-off line
Ground line
"P"
Horizontal line
!
6. Draw a vertical line (through the center of
each headlight beam pattern) and a horizon-
tal line (through the center of each headlight
beam pattern) on the aiming screen.
And then, draw a parallel line at 0.8 in. (21
mm) under the horizontal line.
7. Adjust each cut-off line of the low beam to the
parallel line with a phillips screwdriver -
VERTICAL AIMING.
WARNING:
Horizontal aiming should be adjusted by
an authorized Hyundai dealer.