2005 Hyundai Azera headrest
[x] Cancel search: headrestPage 39 of 297
1FEATURES OF YOUR HYUNDAI
22
!
!
WARNING:
WARNING:
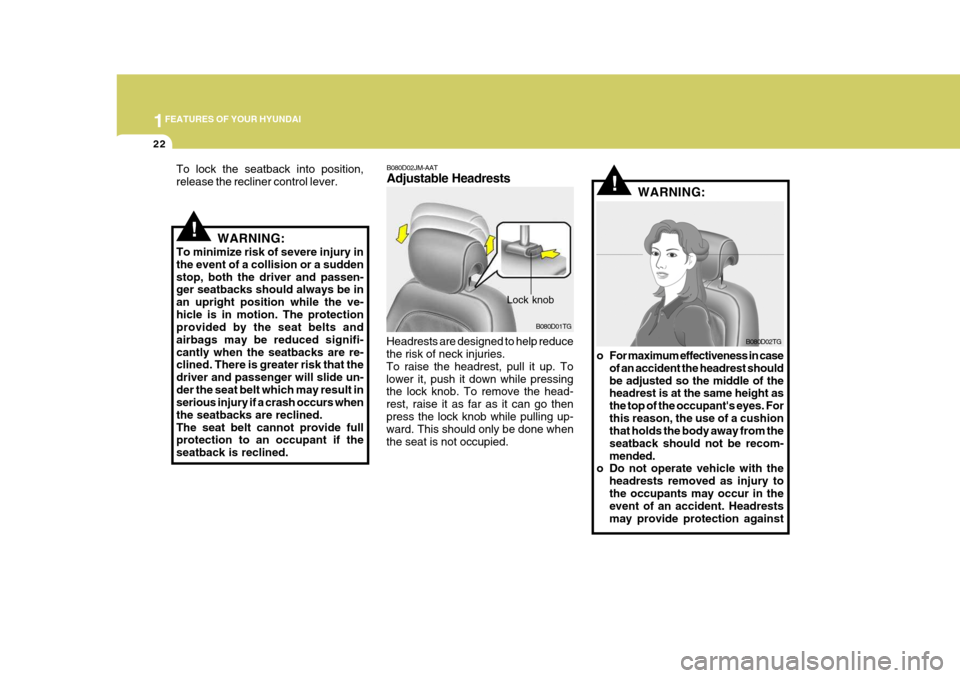
To minimize risk of severe injury in the event of a collision or a suddenstop, both the driver and passen- ger seatbacks should always be in an upright position while the ve-hicle is in motion. The protection provided by the seat belts and airbags may be reduced signifi-cantly when the seatbacks are re- clined. There is greater risk that the driver and passenger will slide un-der the seat belt which may result in serious injury if a crash occurs when the seatbacks are reclined.The seat belt cannot provide full protection to an occupant if the seatback is reclined. B080D02JM-AAT Adjustable Headrests
Headrests are designed to help reduce the risk of neck injuries. To raise the headrest, pull it up. Tolower it, push it down while pressing the lock knob. To remove the head- rest, raise it as far as it can go thenpress the lock knob while pulling up-
ward. This should only be done when the seat is not occupied. B080D02TG
To lock the seatback into position,release the recliner control lever.
B080D01TGo For maximum effectiveness in caseof an accident the headrest shouldbe adjusted so the middle of the headrest is at the same height as the top of the occupant's eyes. Forthis reason, the use of a cushion that holds the body away from the seatback should not be recom-mended.
o Do not operate vehicle with the
headrests removed as injury tothe occupants may occur in the event of an accident. Headrests may provide protection against
Lock knob
Page 40 of 297
1
FEATURES OF YOUR HYUNDAI
23
neck injuries when properly ad- justed.
o Do not adjust the headrest height
while the vehicle is in motion.
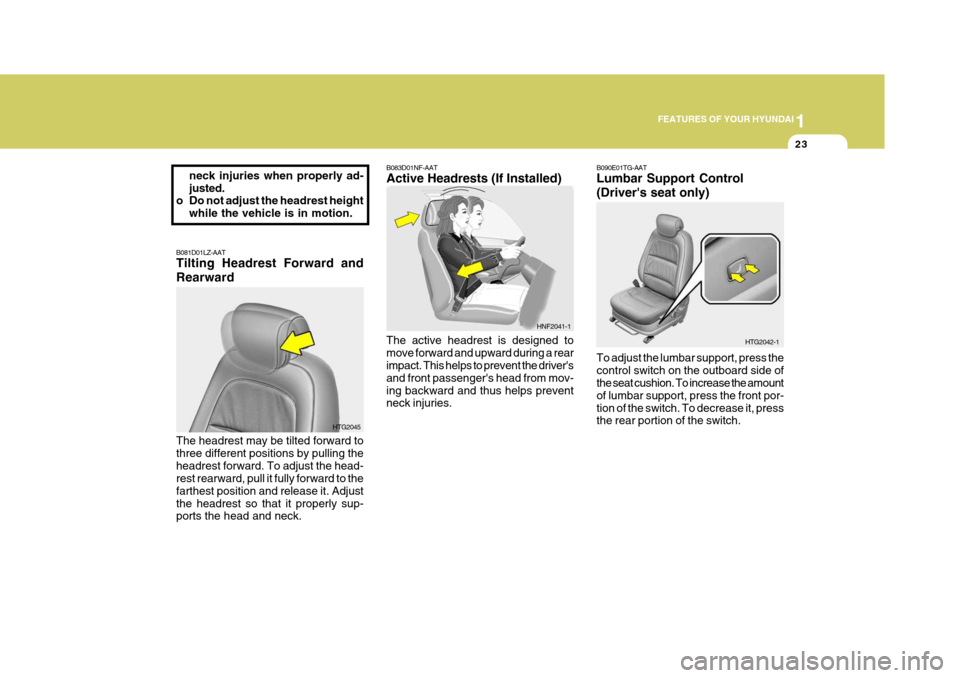
B081D01LZ-AAT Tilting Headrest Forward and Rearward The headrest may be tilted forward to three different positions by pulling theheadrest forward. To adjust the head- rest rearward, pull it fully forward to the farthest position and release it. Adjustthe headrest so that it properly sup- ports the head and neck. HTG2045B090E01TG-AAT Lumbar Support Control (Driver's seat only) To adjust the lumbar support, press the control switch on the outboard side of the seat cushion. To increase the amount of lumbar support, press the front por-tion of the switch. To decrease it, press the rear portion of the switch.
HTG2042-1B083D01NF-AAT Active Headrests (If Installed) The active headrest is designed to move forward and upward during a rear impact. This helps to prevent the driver's and front passenger's head from mov-ing backward and thus helps prevent neck injuries.
HNF2041-1
Page 46 of 297
1
FEATURES OF YOUR HYUNDAI
29
!WARNING:
The purpose of the folding rear seatbacks is to allow you to carry longer objects than could other-wise be accommodated. Do not al- low passengers to sit on top of the folded down seatback, while thecar is moving as this is not a proper seating position and no seat belts are available for use. This couldresult in serious injury or death in case of an accident or sudden stop. Objects carried on the folded downseatback should not extend higher than the top of the front seats. This could allow cargo to slide forwardand cause injury or damage during sudden stops.
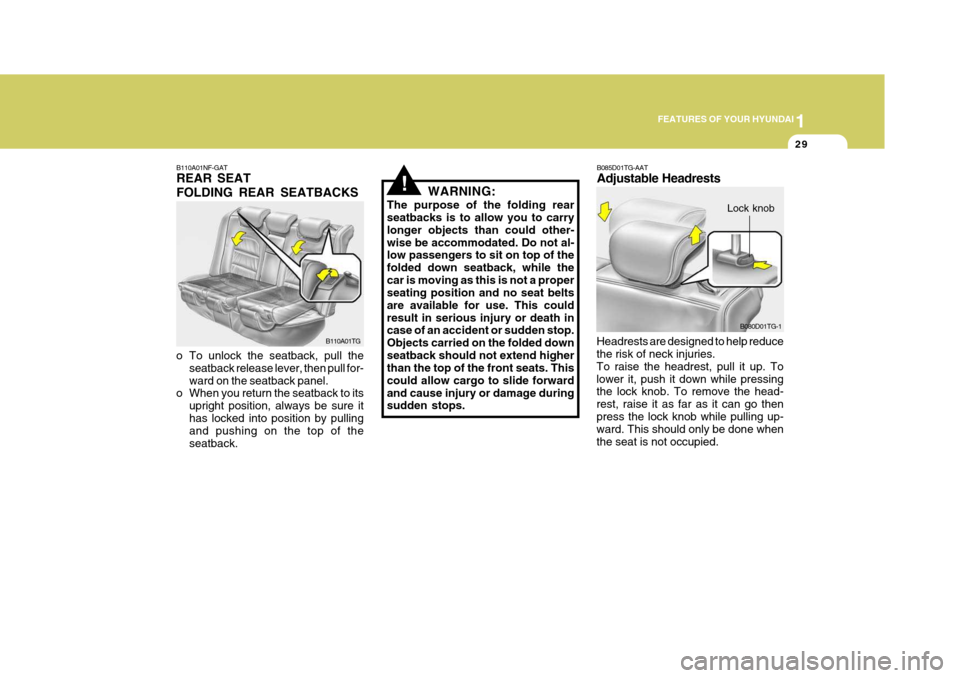
B110A01NF-GAT REAR SEAT FOLDING REAR SEATBACKS
o To unlock the seatback, pull the seatback release lever, then pull for- ward on the seatback panel.
o When you return the seatback to its
upright position, always be sure ithas locked into position by pulling and pushing on the top of the seatback. B110A01TGB085D01TG-AAT Adjustable Headrests
Headrests are designed to help reduce the risk of neck injuries. To raise the headrest, pull it up. Tolower it, push it down while pressing the lock knob. To remove the head- rest, raise it as far as it can go thenpress the lock knob while pulling up- ward. This should only be done when the seat is not occupied. B080D01TG-1
Lock knob
Page 47 of 297
1FEATURES OF YOUR HYUNDAI
30
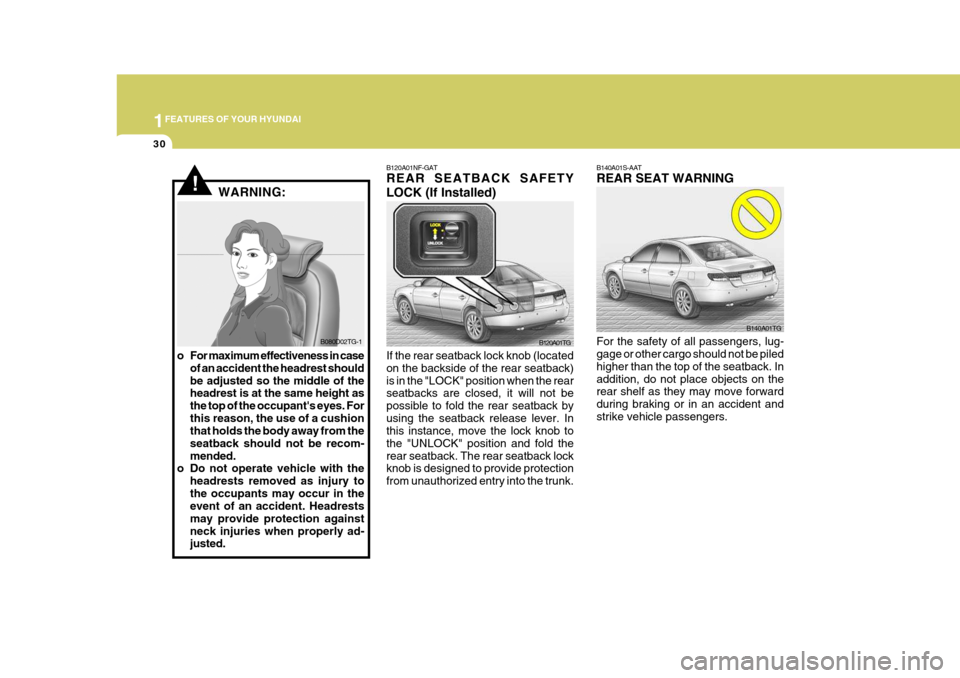
B140A01S-AAT REAR SEAT WARNING For the safety of all passengers, lug- gage or other cargo should not be piled higher than the top of the seatback. Inaddition, do not place objects on the rear shelf as they may move forward during braking or in an accident andstrike vehicle passengers. B140A01TGB120A01NF-GAT REAR SEATBACK SAFETY LOCK (If Installed) If the rear seatback lock knob (located on the backside of the rear seatback)is in the "LOCK" position when the rear seatbacks are closed, it will not be possible to fold the rear seatback byusing the seatback release lever. In this instance, move the lock knob to the "UNLOCK" position and fold therear seatback. The rear seatback lock knob is designed to provide protection from unauthorized entry into the trunk. B120A01TG
!WARNING:
B080D02TG-1
o For maximum effectiveness in case of an accident the headrest should be adjusted so the middle of the headrest is at the same height as the top of the occupant's eyes. Forthis reason, the use of a cushion that holds the body away from the seatback should not be recom-mended.
o Do not operate vehicle with the
headrests removed as injury tothe occupants may occur in the event of an accident. Headrests may provide protection againstneck injuries when properly ad- justed.
Page 57 of 297
1FEATURES OF YOUR HYUNDAI
40
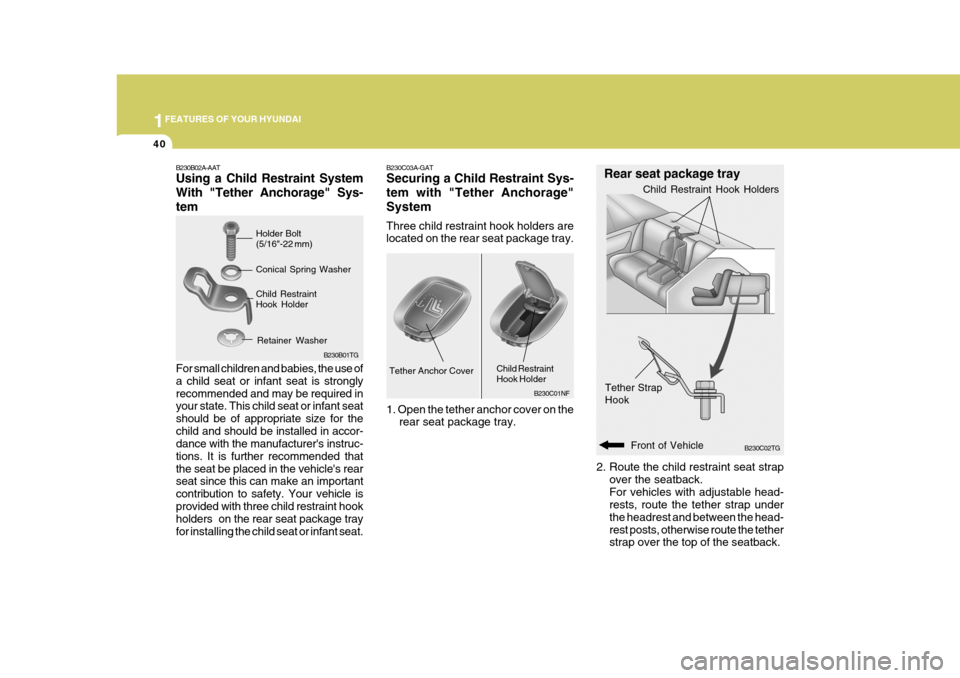
B230C02TG
Rear seat package tray
Tether Strap Hook
Front of Vehicle
2. Route the child restraint seat strap
over the seatback. For vehicles with adjustable head- rests, route the tether strap under the headrest and between the head-rest posts, otherwise route the tether strap over the top of the seatback. Child Restraint Hook Holders
B230C03A-GAT Securing a Child Restraint Sys- tem with "Tether Anchorage"System Three child restraint hook holders are located on the rear seat package tray.
B230C01NF
Tether Anchor Cover
1. Open the tether anchor cover on therear seat package tray. Child Restraint Hook Holder
B230B02A-AAT Using a Child Restraint System With "Tether Anchorage" Sys-tem For small children and babies, the use of a child seat or infant seat is stronglyrecommended and may be required in your state. This child seat or infant seat should be of appropriate size for thechild and should be installed in accor- dance with the manufacturer's instruc- tions. It is further recommended thatthe seat be placed in the vehicle's rear seat since this can make an important contribution to safety. Your vehicle isprovided with three child restraint hook holders on the rear seat package tray for installing the child seat or infant seat.Holder Bolt (5/16"-22 mm)
B230B01TG
Conical Spring Washer Child Restraint Hook HolderRetainer Washer
Page 60 of 297
1
FEATURES OF YOUR HYUNDAI
43
L3 : Suitable for Bebe confort iSEOS (E2 039014) approved for the use in this mass group
NOTE: Use it after adjusting the headrest to the lowest level.
L4 : Suitable for GRACO Autobaby (E11 03. 44.160/E11 03.44.161) approved for the use in this mass group
L5 : Suitable for Romer Lord Plus (E1 03301136) approved for the use inthis mass group
L6 : Suitable for Euro Kids Star (E1 03301128/E1 03301129)approved for the use in this mass group
L7 : Suitable for BeSafe iZi COMFORT (E4 03443206) approved for thisuse in this mass group
NOTE: Use it after removing the headrest or adjusting the headrest to thelowest level. L8 : Suitable for MAXI-COSI Priori XP
(E1 03301153) approved for theuse in this mass group
L9 : Suitable for Bebe confort HiPSOS
(E2 031011) approved for this usein this mass group
NOTE: Use it after removing the headrest.
X : Seat position not suitable for chil- dren in this mass group
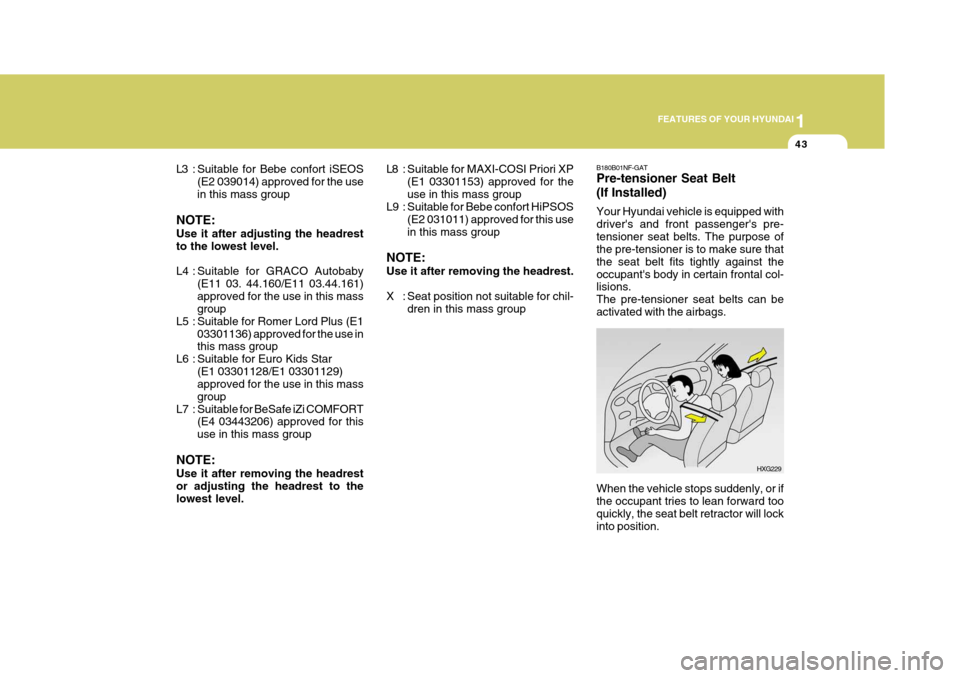
When the vehicle stops suddenly, or if the occupant tries to lean forward tooquickly, the seat belt retractor will lock into position.
HXG229
B180B01NF-GAT Pre-tensioner Seat Belt (If Installed) Your Hyundai vehicle is equipped with driver's and front passenger's pre-tensioner seat belts. The purpose of the pre-tensioner is to make sure that the seat belt fits tightly against theoccupant's body in certain frontal col- lisions. The pre-tensioner seat belts can beactivated with the airbags.
Page 187 of 297
2
DRIVING YOUR HYUNDAI
3BEFORE STARTING THE ENGINE
C020A01A-AAT Before you start the engine, you should always:
1. Look around the vehicle to be sure
there are no flat tires, puddles of oil, water or other indications of pos- sible trouble.
2. After entering the car, check to be sure the parking brake is engaged.
3. Check that all windows and lights are clean.
4. Check that the interior and exterior
mirrors are clean and in position.
5. Check your seat, seatback and headrest to be sure they are in theirproper positions.
6. Lock all the doors.
7. Fasten your seat belt and be sure
that all other occupants have fas- tened theirs.
8. Turn off all lights and accessories
that are not needed. C030A01TG-GAT COMBINATION IGNITION SWITCH
o Place the shift lever in "P" (park) and
depress the brake pedal fully.
o To start the engine, insert the ignition key and turn it to the "START" posi- tion. Release it as soon as the en-gine starts. Do not hold the key in the "START" position for more than 15 seconds.
NOTE: For safety, the engine will not start if the shift lever is not in "P" or "N" position.
9. When you turn the ignition switch to
"ON", check that all appropriatewarning lights are operating and that you have sufficient fuel.
10.Check the operation of warning
lights and all bulbs when key is inthe "ON" position. TO START THE ENGINE
Page 294 of 297

10
INDEX
3
Console Box .............................................................. 1-96
Cooling Fans ............................................................. 6-25
Corrosion protection
Cleaning the interior .................................................. 4-5
Protecting your Hyundai from corrosion ................... 4-2
Washing and waxing ................................................. 4-4
Cruise Control .......................................................... 1-109
D Defrosting/Defogging ................................................ 1-119
Door
Central door locks .................................................. 1-12
Door edge warning light ........ ................................1-107
Door locks ................................................................ 1-9
Locking and unlocking front door with a key .......... 1-10
Drink Holder ............................................................... 1-87
Drive Belt ................................................................... 6-21
Driving Driving for economy ............................................... 2-14
Smooth corneri ng .................................................... 2-16
Winter driving .......................................................... 2-16
E Electronic Stability Program (ESP) ...........................2-11
Emission Contro l System ............................................ 7-2
Engine Before starting the engine ........................................ 2-3Compartment ............................................................ 6-2
Coolant ..................................................................... 6-7 Coolant temperature gauge
.....................................1-71
If the engine overheats ............................................. 3-4
Number ..................................................................... 8-2
Oil ............................................................................. 6-4 Starting ..................................................................... 2-5
Engine Exhaust Can Be Dangerous ............................ 2-2
F
Fan Speed Control ............. ...........................1-115, 1-125
Fog Light Switch Front ....................................................................... 1-79
Rear ........................................................................ 1-80
Front Seats
Active headrests ..................................................... 1-23
Adjustable front seats ............................................. 1-21
Adjustable headrests .............................................. 1-22
Adjusting seat forward and rearward .......................1-21
Adjusting seatback angle ....................................... 1-21
Power seat ............................................................. 1-24
Fuel Capacity ................................................................... 9-2
Gauge ..................................................................... 1-70
Recommendations .................................................... 1-2
Fuel Filler Lid Remote release .................................................... 1-103
Fuse Panel Description ............................................. 6-37
Fuses ........................................................................ 6-21