Page 184 of 414

The individual map lights in the
second and third rows cannot be
turned on.
The cargo area light can be turned
on with the switch in the light.Door
Activated
The light control switch has three
positions: OFF, Door Activated, and
ON. OFF
None of the lights come on when a
door or the tailgate is opened.
The individual map lights in the
f ront can be turned on and of f by
pressing the lenses.
The maximum capacity f or this
power outlet is 115 volt AC at 100
watts or less. If you use an appliance
which requires more than 100 watts,
it automatically stops supplying the
power. If this happens, turn the
ignition switch of f and turn it on
again.
The AC power outlet is not
designed f or electric appliances
which require high initial peak
wattage such as cathode-ray tube
type televisions, ref rigerators,
electric pumps, etc. It is also not
suitable f or devices that process
precise data such as medical
equipment or measuring instruments.
Any appliances that require an
extremely stable power supply such
as microcomputer-controlled electric
blankets, touch sensor lamps, etc.,
should not be connected to this
outlet. The individual map lights in the
f ront come on when any door is
opened. When the doors are
closed, each light can be turned on
and of f by pressing the lenses.
The individual map lights in the
second and third rows come on
when any door is opened. When
the doors are closed, each light
canbeturnedonandoff by
pushingonthelens.
When the switch is in the
position:
When this switch is in the position:
CONT INUED
L ight Control Switch
Interior Convenience Items, Interior L ights
Inst rument s and Cont rols
183
NOTE:
ON DOOR ACTIVATED
POSITION
OFF
LIGHT CONTROL
SWITCH
Page 185 of 414
Turn on the f ront and rear individual
map lights by pushing the lens of
each light. Push the lens again to
turn it of f . You can also operate
these lights with the light control
switch (see page ).
The lights go out about 30 seconds
after all the doors and the tailgate
are closed. They go out immediately
af ter all doors are locked.
With the light control switch in the
Door Activated position, all the
individual map lights come on when
you unlock the door with the remote
transmitter (see page ).
Withanydoororthetailgateleft
open, the lights stay on about 3
minutes, then go out.
ON
All the individual map lights come
onandstayonaslongasthe
switch remains in the ON position.
183
133
When the light control switch is in the
position: On EX and Touring modelsIndividual Map L ights
Interior Lights
184
FRONT
Page 187 of 414
The courtesy lights in the f ront
doors come on when you open any
door.The courtesy light between the map
lights comes on when you turn the
parking lights on. To adjust its
brightness, turn the Select/Reset
knob on the instrument panel.
Interior Lights
Courtesy Lights
186
Page 188 of 414

The standard audio system has
many f eatures. This section de-
scribes those f eatures and how to
use them. (If you selected an
optional audio system, ref er to the
operating instructions that came
with it.) The heating and air conditioning
systems in your vehicle provide a
comf ortable driving environment in
all weather conditions.
The security system helps to dis-
courage vandalism and thef t of your
vehicle. Your vehicle has an anti-theft audio
system that requires a code number
to enable it..............
Vents, Heating, and A/C . 188
Using Automatic Climate ...................................
Control .193
.........
Using the Rear A/C Unit . 194
...................
Rear Climate Control . 197
..............
Climate Control Sensors . 198
..........
Playing the AM/FM Radio . 199
............
AM/FM Radio Reception . 205
...
Playing the XM Satellite Radio . 207
..................................
Playing a CD .212
...................................
CD Changer .215
....................
Protecting Your CDs .221
.....
CD Changer Error Messages . 222
...............................
Playing a Tape .223
.............
Steering Wheel Controls . 228
.................
Radio Thef t Protection . 229
........
Rear Entertainment System . 230
..............................
Playable DVDs .258
............................
Security System .263
...............................
Cruise Control .264
HomeLink Universal ................................
Transceiver .267
................
Parking Sensor System . 271
.
Rear View Camera and Monitor . 275
Features
Features
187
Page 190 of 414

�Û
�Ý
�Û�Ý
Turn the dial clockwise to increase
the fan speed and airflow. Turn the
dial counterclockwise to decrease it.
Press the button to increase
the fan speed and airflow. Press the button to decrease it.
Turning this dial clockwise increases
the temperature of the airflow.
The driver’s side temperature and
the passenger’s side temperature can
be set separately. On the Touring
model, the rear passenger
compartment temperature can also
be set separately. Press the top ( )
of the appropriate temperature
control button to increase the
temperature of airflow. Press the bottom ( ) of the button to
decrease it. Each set temperature is
shown in the display. When you turn
the A/C off, the system cannot
regulate the inside temperature if
you set the temperature control
below the outside temperature.
When you set the temperature to its
lower limit or its upper limit, it will be
displayed as ‘‘Lo’’ or ‘‘Hi’’.
When you press this button, the
indicator in the button comes on, and
the passenger’s side temperature
(and the temperature of the rear
passenger compartment on the
Touring model) is synchronized to
the driver’s side set temperature.
Changing the passenger’s side
temperature (or the temperature of
the rear passenger compartment on
the Touring model) makes the
indicator to go of f , and takes thesystem out of SYNC mode.
This button turns the air
conditioning on and of f . On the LX
model, the indicator in the button is
on when the A/C is on. On the EX
and Touring models, you will see
A/C ON or A/C OFF in the display.
The outside air intakes f or the
heating and cooling system are at
the base of the windshield. Keep this
area clear of leaves and other debris. When the indicator in the button is
on, air f rom the vehicle’s interior is
sent throughout the system again.
When the indicator is off, air is
brought in f rom the outside of the
vehicle (fresh air mode).
CONT INUED
LX model
LX modelEX and Touring models
EX and Touring models
On EX and Touring models
Vents, Heating, and A/C
Fan Control
T emperature Control Air Conditioning (A/C) Button
Recirculation Button
SYNC Button
Features
189
Page 191 of 414

Air flows from the center
and corner vents in the dashboard.
Airf low is divided between
the vents in the dashboard and the
f loor vents.
Air f lows f rom the f loor
vents.
Airf low is divided between
the f loor vents and the def roster
vents at the base of the windshield. This button turns the rear window
def ogger on and of f (see page ).
Use the mode control dial or button
to select the vents the air flows from.
Some air will flow from the
dashboard vents in all modes.
Air f lows f rom the def roster
vents at the base of the windshield. When you select , the system
automatically switches to f resh air
mode and turns on the A/C.
The passenger’s temperature cannot
be set separately f rom the driver’s.
When you want to change the
temperature of the rear passenger
compartment, press the REAR
button. The indicator in the button
comes on, and you can change the
temperature using the rear
temperature control button. When
you press the REAR LOCK button,
the indicator in the button comes on,
the rear A/C passenger control
panel is disabled, and you cannotchange any settings f rom it.
See page f or how to operate the
rear passenger control panel.
You can change the fan speed of the
rear system f rom the f ront control
panel. Press the REAR button, the
indicator in the button comes on.
Push the rear fan control button up
or down to increase or decrease the
rear f an speed. When you press the
REAR LOCK button, the indicator in
the button comes on, and the rear
passenger control panel is disabled.
The system automatically
turns on the A/C and switches to
recirculation mode. Air f lows f rom
the center and side vents in the
dashboard.
See page f or how to operate the
rear passenger control panel.196 197
126
On Touring model only
On LX model only
On EX model
Vents, Heating, and A/C
Rear Window Def ogger Button
Mode Control
REAR/REAR LOCK Button
190
Page 195 of 414
�µ�µ
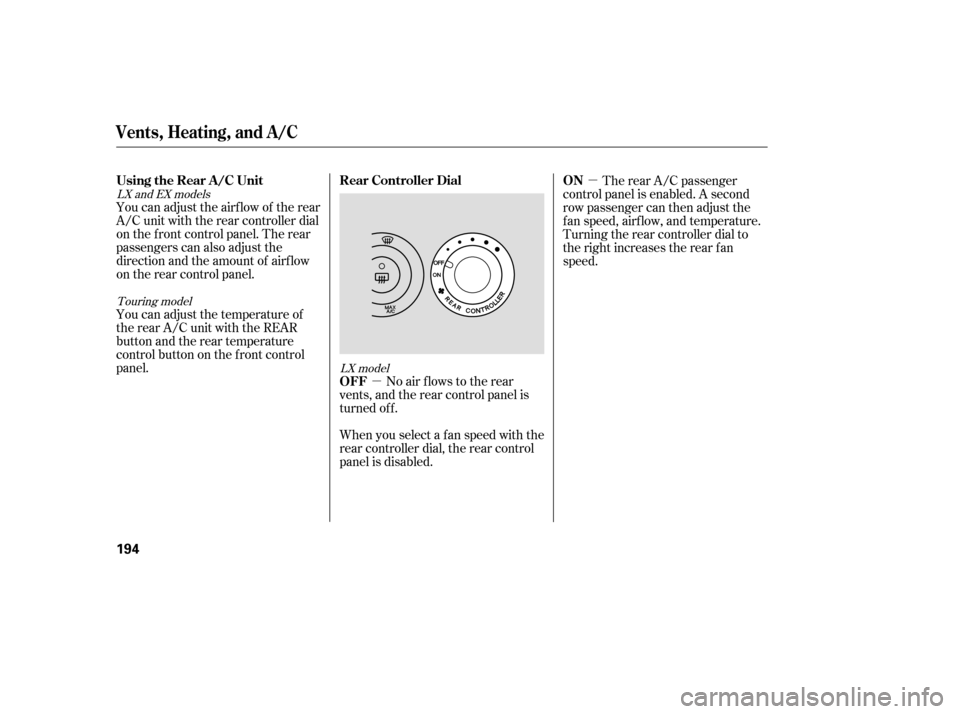
You can adjust the airflow of the rear
A/C unit with the rear controller dial
on the f ront control panel. The rear
passengers can also adjust the
direction and the amount of airf low
on the rear control panel.
No air flows to the rear
vents, and the rear control panel is
turned off. The rear A/C passenger
control panel is enabled. A second
row passenger can then adjust the
f an speed, airf low, and temperature.
Turning the rear controller dial to
the right increases the rear f an
speed.
When you select a f an speed with the
rear controller dial, the rear control
panel is disabled.
You can adjust the temperature of
the rear A/C unit with the REAR
button and the rear temperature
control button on the f ront control
panel.
LX model
LX and EX models
Touring model
Vents, Heating, and A/C
Using the Rear A /C Unit
OFF Rear Controller Dial ON
194
Page 196 of 414
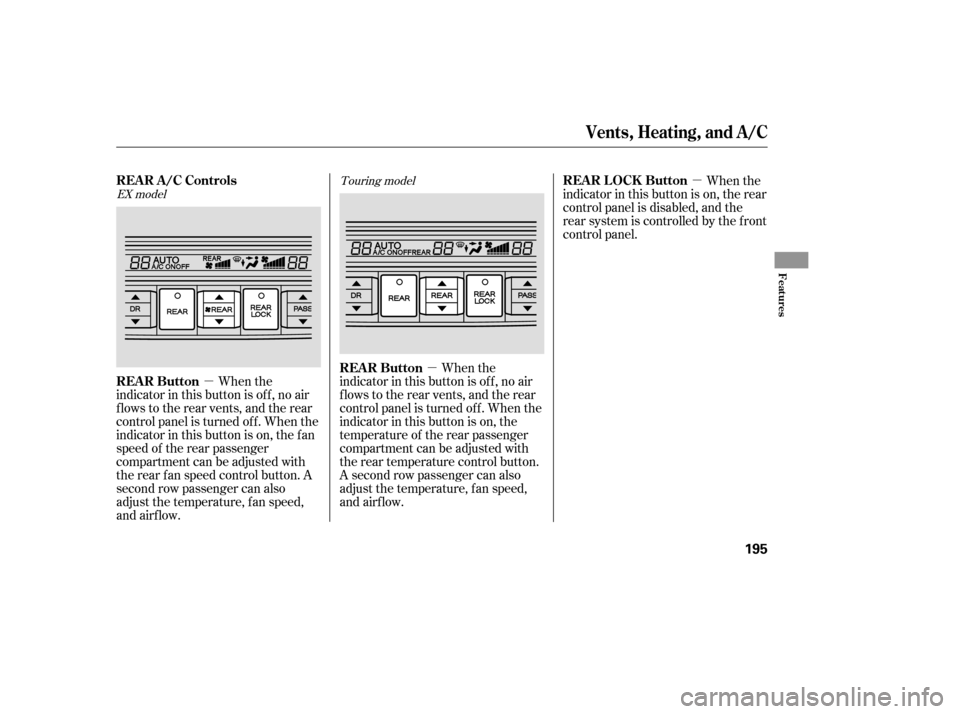
�µ�µ
�µ When the
indicator in this button is of f , no air
flows to the rear vents, and the rear
control panel is turned of f . When the
indicator in this button is on, the
temperature of the rear passenger
compartment can be adjusted with
the rear temperature control button.
A second row passenger can also
adjust the temperature, f an speed,
and airflow. When the
indicator in this button is on, the rear
control panel is disabled, and the
rear system is controlled by the f ront
control panel.
When the
indicator in this button is of f , no air
flows to the rear vents, and the rear
control panel is turned of f . When the
indicator in this button is on, the f an
speed of the rear passenger
compartment can be adjusted with
the rear f an speed control button. A
second row passenger can also
adjust the temperature, f an speed,
and airflow.
Touring model
EX model
Vents, Heating, and A/C
REAR Button REAR LOCK Button
REAR A/C Controls
REAR Button
Features
195
.")