2005 CHRYSLER VOYAGER Frame
[x] Cancel search: FramePage 1946 of 2339
(6) Install fully the entire A-pillar glass run sec-
tion by indexing the molded corner detail into the
roll frame. Slide the glass run up the A-pillar until
the rubber molded joint just touches the roll frame.
(7) Verify that the tertiary seal is on the correct
side of the roll frame prior to seating the glass run
fully onto the frame. Verify the glass runs is fully
seated for the header, and A-pillar and B-pillar
(8) Install screw attaching glass run weatherstrip
to inner door panel.
(9) Install inner belt weatherstrip.
(10) Install watershed.
(11) Push weatherstrip groove onto lip along top of
door frame.
(12) Engage clip into slot in door frame.
(13) Push weatherstrip into channel at rear of door
frame, working from the top to bottom.
(14) Install door frame closeout moldings.
(15) Install door speaker, if equipped.
(16) Install door trim panel.FRONT DOOR OUTER BELT
MOLDING
REMOVAL
(1) Remove the side view mirror. (Refer to 23 -
BODY/EXTERIOR/SIDE VIEW MIRROR -
REMOVAL)
(2) Remove door trim panel.
(3) Roll door glass down.
(4) Using a hook tool, disengage interlocking lip at
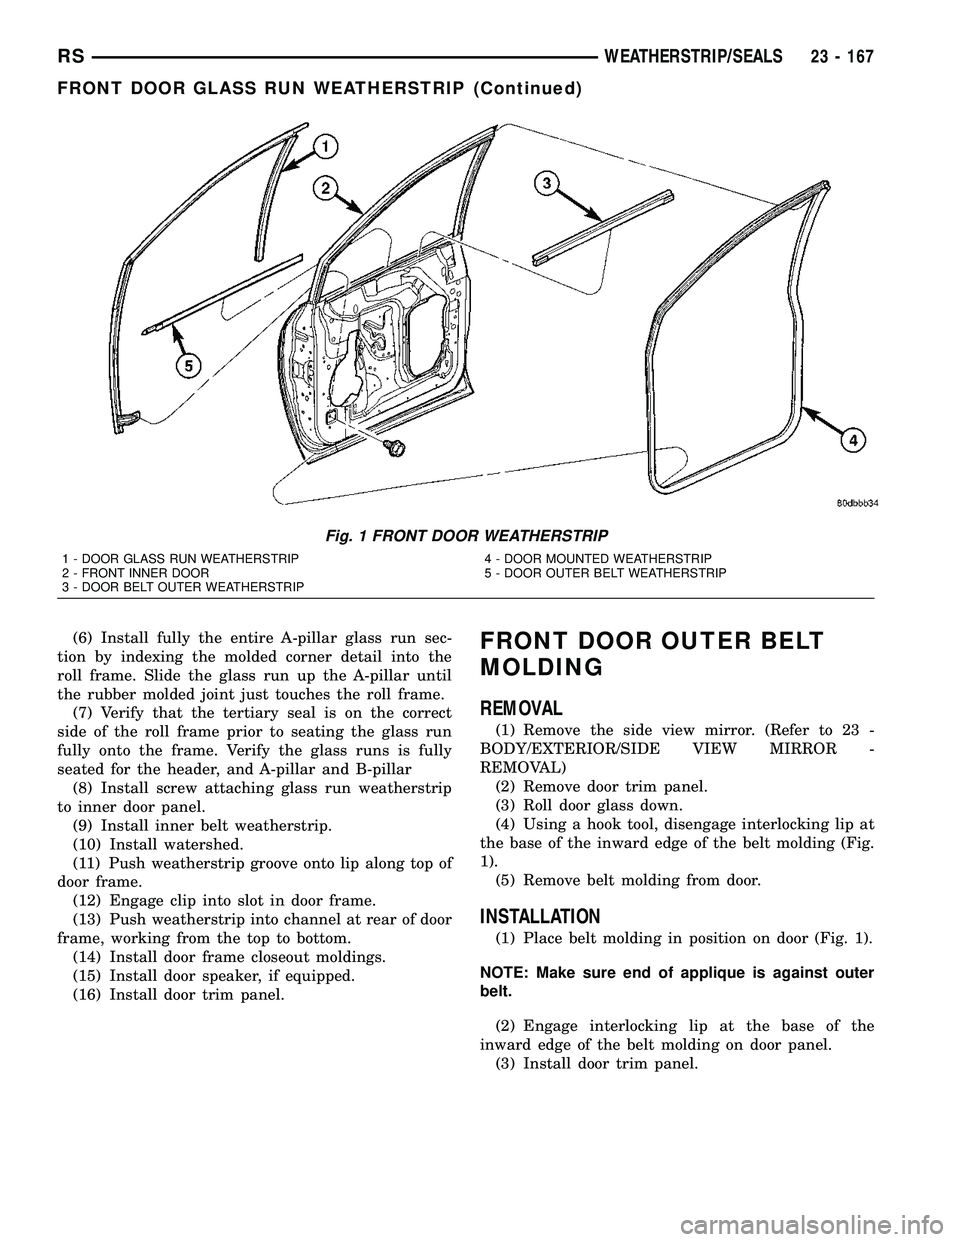
the base of the inward edge of the belt molding (Fig.
1).
(5) Remove belt molding from door.
INSTALLATION
(1) Place belt molding in position on door (Fig. 1).
NOTE: Make sure end of applique is against outer
belt.
(2) Engage interlocking lip at the base of the
inward edge of the belt molding on door panel.
(3) Install door trim panel.
Fig. 1 FRONT DOOR WEATHERSTRIP
1 - DOOR GLASS RUN WEATHERSTRIP
2 - FRONT INNER DOOR
3 - DOOR BELT OUTER WEATHERSTRIP4 - DOOR MOUNTED WEATHERSTRIP
5 - DOOR OUTER BELT WEATHERSTRIP
RSWEATHERSTRIP/SEALS23 - 167
FRONT DOOR GLASS RUN WEATHERSTRIP (Continued)
Page 1947 of 2339
FRONT DOOR WEATHERSTRIP
REMOVAL
(1) Open front door.
(2) Using fork tool (C-4829), remove push pin fas-
teners attaching front door weatherstrip to end
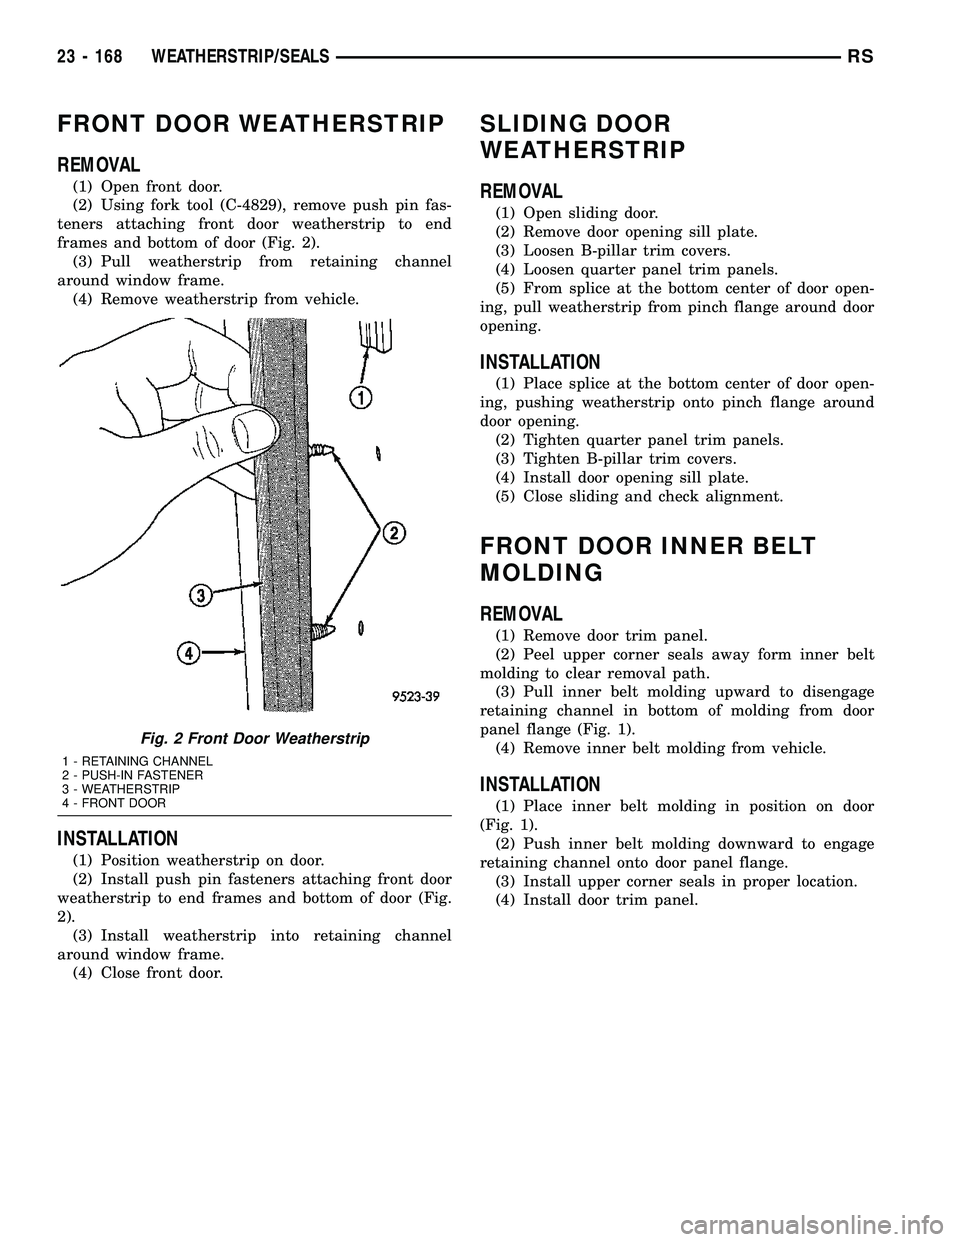
frames and bottom of door (Fig. 2).
(3) Pull weatherstrip from retaining channel
around window frame.
(4) Remove weatherstrip from vehicle.
INSTALLATION
(1) Position weatherstrip on door.
(2) Install push pin fasteners attaching front door
weatherstrip to end frames and bottom of door (Fig.
2).
(3) Install weatherstrip into retaining channel
around window frame.
(4) Close front door.
SLIDING DOOR
WEATHERSTRIP
REMOVAL
(1) Open sliding door.
(2) Remove door opening sill plate.
(3) Loosen B-pillar trim covers.
(4) Loosen quarter panel trim panels.
(5) From splice at the bottom center of door open-
ing, pull weatherstrip from pinch flange around door
opening.
INSTALLATION
(1) Place splice at the bottom center of door open-
ing, pushing weatherstrip onto pinch flange around
door opening.
(2) Tighten quarter panel trim panels.
(3) Tighten B-pillar trim covers.
(4) Install door opening sill plate.
(5) Close sliding and check alignment.
FRONT DOOR INNER BELT
MOLDING
REMOVAL
(1) Remove door trim panel.
(2) Peel upper corner seals away form inner belt
molding to clear removal path.
(3) Pull inner belt molding upward to disengage
retaining channel in bottom of molding from door
panel flange (Fig. 1).
(4) Remove inner belt molding from vehicle.
INSTALLATION
(1) Place inner belt molding in position on door
(Fig. 1).
(2) Push inner belt molding downward to engage
retaining channel onto door panel flange.
(3) Install upper corner seals in proper location.
(4) Install door trim panel.
Fig. 2 Front Door Weatherstrip
1 - RETAINING CHANNEL
2 - PUSH-IN FASTENER
3 - WEATHERSTRIP
4 - FRONT DOOR
23 - 168 WEATHERSTRIP/SEALSRS
Page 1949 of 2339
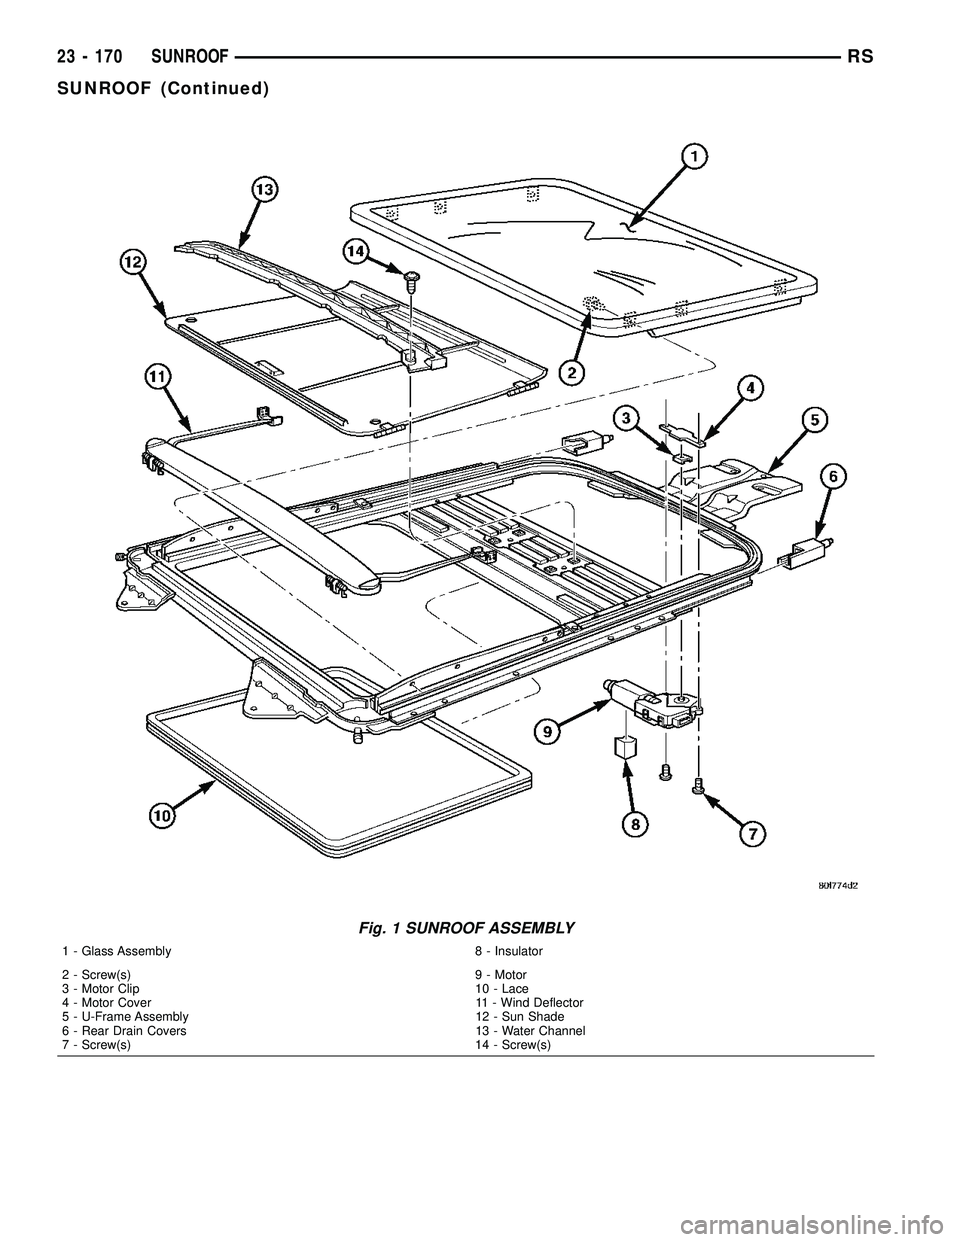
Fig. 1 SUNROOF ASSEMBLY
1 - Glass Assembly 8 - Insulator
2 - Screw(s) 9 - Motor
3 - Motor Clip 10 - Lace
4 - Motor Cover 11 - Wind Deflector
5 - U-Frame Assembly 12 - Sun Shade
6 - Rear Drain Covers 13 - Water Channel
7 - Screw(s) 14 - Screw(s)
23 - 170 SUNROOFRS
SUNROOF (Continued)
Page 1952 of 2339
(5) Verify sunroof operation and alignment.
REAR HOUSING HOSE
(1) Connect the new drain hose to the sunroof
housing and test drainage (Fig. 1).
(2) Install headliner(Refer to 23 - BODY/INTERI-
OR/HEADLINER - INSTALLATION).
(3) Install sunroof opening trim lace.
(4) Connect the control switch wire connector and
install control switch.
(5) Verify sunroof operation and alignment.
GLASS PANEL
REMOVAL
(1) Move the glass panel to the vent position.
(2) Slide sunshade rearward to the open position.
(3) Remove the glass panel screws (Fig. 1).
(4) Lift off glass panel and remove from vehicle.
INSTALLATION
(1) Position glass panel on to mechanism lift arms.
(2) Start the attaching screws, and hand tighten
(Fig. 1).
(3) Adjust sunroof glass to fit flush with roof
line(Refer to 23 - BODY/SUNROOF/GLASS PANEL -
ADJUSTMENTS).
(4) Verify sunroof operation and alignment.
ADJUSTMENTS
SUNROOF GLASS PANEL ADJUSTMENT
(1) Move the sunshade rearward to the open posi-
tion.
(2) Move the sunroof glass panel to the fully closed
position.
(3) Loosen the forward attaching screws on each
side enough to make the front of the glass to adjust
up or down.
(4) Adjust the front surface of the sunroof glass
panel 0.00 mm to 1.75 mm (0.00 in. to 0.07 in.) below
the top surface of the roof.
(5) Tighten the front glass panel attaching screws
to 3.5 N´m (31 in. lbs.) torque (Fig. 1).
(6) Loosen the rear screws on each side enough to
make the rear adjustment (Fig. 1).
(7) Adjust the rear surface of the sunroof glass
panel 0.00 mm to 1.75 mm (0.03 in. to 0.07 in.) above
the top surface of the roof.
(8) Tighten the rear glass panel attaching screws
to 3.5 N´m (31 in. lbs.) torque (Fig. 1).
(9) Check for proper fit. If not OK, repeat glass
panel adjustment.
SUNROOF ASSEMBLY
REMOVAL
(1) Move glass panel to the fully closed position.
(2) Disconnect battery negative cable.
(3) Remove headliner (Refer to 23 - BODY/INTE-
RIOR/HEADLINER - REMOVAL).
(4) Disconnect the four drain tubes from sunroof
housing (Fig. 1).
(5) Loosen fasteners attaching sunroof assembly
(Fig. 1).
(6) With the aid of a helper, support the sunroof
and remove the fasteners attaching sunroof assembly
to roof panel (Fig. 1).
(7) Remove sunroof from vehicle.
INSTALLATION
(1) Raise sunroof module assembly and guide it
carefully into position.
(2) While supporting the sunroof assembly tighten
the attaching screws (Fig. 1). Tighten to 6 N´m (53
in. lbs.) torque.
(3) Connect the drain tubes to the sunroof (Fig. 1).
(4) Connect battery negative cable.
(5) Test sunroof operation, adjust as necessary(Re-
fer to 23 - BODY/SUNROOF/GLASS PANEL -
ADJUSTMENTS).
(6) Install headliner (Refer to 23 - BODY/INTERI-
OR/HEADLINER - INSTALLATION).
(7) Install sunroof opening trim lace position(Refer
to 23 - BODY/SUNROOF/OPENING TRIM LACE -
INSTALLATION).
SUNSHADE
REMOVAL
(1) Place the sunroof glass panel in the vent posi-
tion.
(2) Remove glass panel (Refer to 23 - BODY/SUN-
ROOF/GLASS PANEL - REMOVAL).
(3) Remove water channel (Fig. 1).
(4) Cycle sunroof motor to the open position.
(5) Move sunshade towards the closed position
stopping three to four inches from the closed position.
(6) Depress the spring feet clips on one side of the
sun shade.
(7) Remove sunshade.
INSTALLATION
(1) Place one side of the sunshade spring feet clips
into the top track U-frame.
(2) Depress the both releasing clips on the other
side to allow them to go into the top track U-frame.
(3) Move sunshade to the open position.
(4) Install water channel (Fig. 1).
RSSUNROOF23 - 173
DRAIN TUBE (Continued)
Page 1953 of 2339
(5) Verify that the sunshade move back and forth
properly.
(6) Cycle sunroof towards the closed position.
(7) Install glass panel (Refer to 23 - BODY/SUN-
ROOF/GLASS PANEL - INSTALLATION).
WIND DEFLECTOR
REMOVAL
(1) Fully open sunroof glass panel.
(2) Disconnect negative battery cable.
(3) Remove sunroof assembly (Refer to 23 - BODY/
SUNROOF/MODULE ASSEMBLY - REMOVAL).
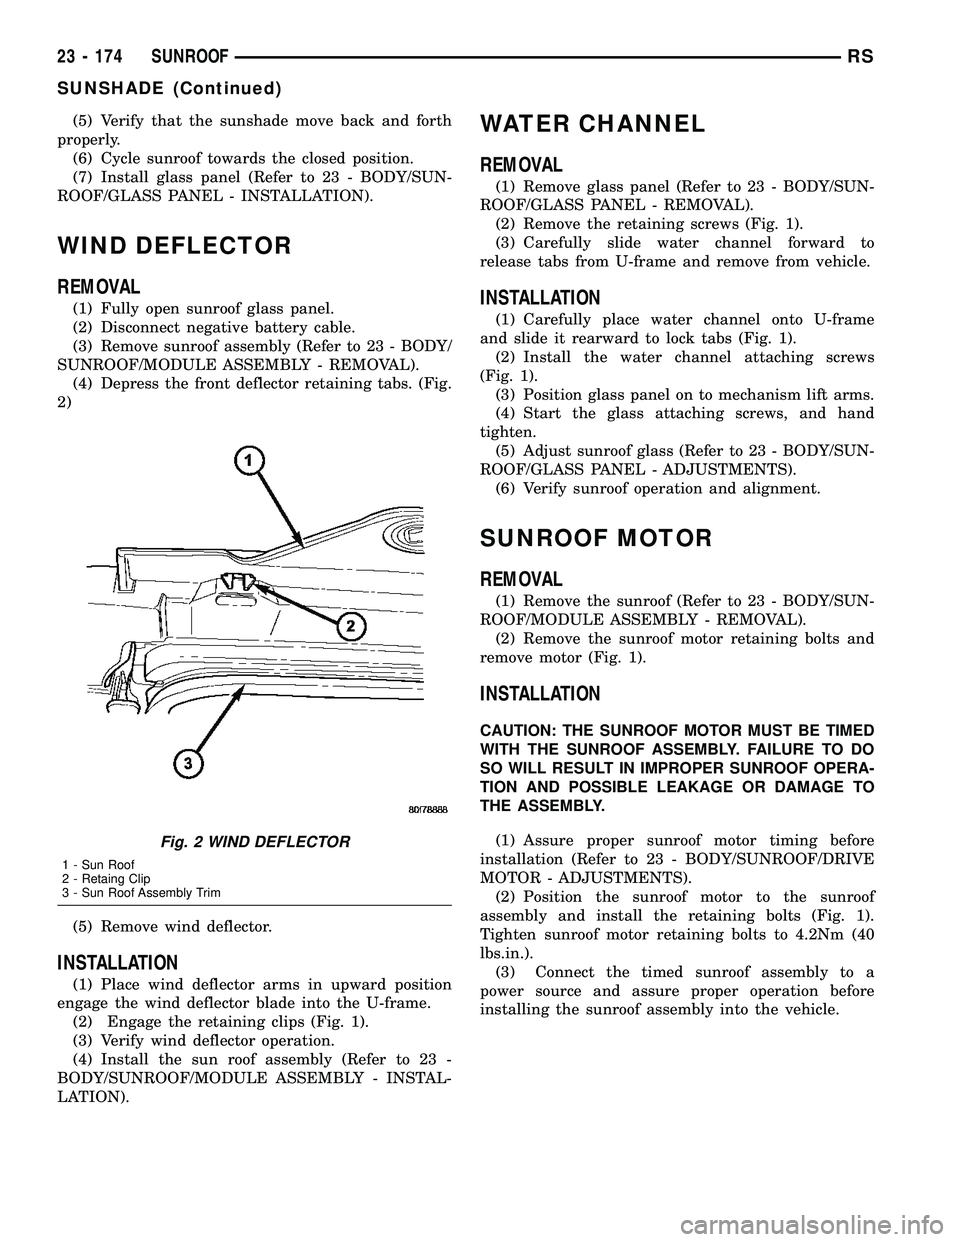
(4) Depress the front deflector retaining tabs. (Fig.
2)
(5) Remove wind deflector.
INSTALLATION
(1) Place wind deflector arms in upward position
engage the wind deflector blade into the U-frame.
(2) Engage the retaining clips (Fig. 1).
(3) Verify wind deflector operation.
(4) Install the sun roof assembly (Refer to 23 -
BODY/SUNROOF/MODULE ASSEMBLY - INSTAL-
LATION).
WATER CHANNEL
REMOVAL
(1) Remove glass panel (Refer to 23 - BODY/SUN-
ROOF/GLASS PANEL - REMOVAL).
(2) Remove the retaining screws (Fig. 1).
(3) Carefully slide water channel forward to
release tabs from U-frame and remove from vehicle.
INSTALLATION
(1) Carefully place water channel onto U-frame
and slide it rearward to lock tabs (Fig. 1).
(2) Install the water channel attaching screws
(Fig. 1).
(3) Position glass panel on to mechanism lift arms.
(4) Start the glass attaching screws, and hand
tighten.
(5) Adjust sunroof glass (Refer to 23 - BODY/SUN-
ROOF/GLASS PANEL - ADJUSTMENTS).
(6) Verify sunroof operation and alignment.
SUNROOF MOTOR
REMOVAL
(1) Remove the sunroof (Refer to 23 - BODY/SUN-
ROOF/MODULE ASSEMBLY - REMOVAL).
(2) Remove the sunroof motor retaining bolts and
remove motor (Fig. 1).
INSTALLATION
CAUTION: THE SUNROOF MOTOR MUST BE TIMED
WITH THE SUNROOF ASSEMBLY. FAILURE TO DO
SO WILL RESULT IN IMPROPER SUNROOF OPERA-
TION AND POSSIBLE LEAKAGE OR DAMAGE TO
THE ASSEMBLY.
(1) Assure proper sunroof motor timing before
installation (Refer to 23 - BODY/SUNROOF/DRIVE
MOTOR - ADJUSTMENTS).
(2) Position the sunroof motor to the sunroof
assembly and install the retaining bolts (Fig. 1).
Tighten sunroof motor retaining bolts to 4.2Nm (40
lbs.in.).
(3) Connect the timed sunroof assembly to a
power source and assure proper operation before
installing the sunroof assembly into the vehicle.
Fig. 2 WIND DEFLECTOR
1 - Sun Roof
2 - Retaing Clip
3 - Sun Roof Assembly Trim
23 - 174 SUNROOFRS
SUNSHADE (Continued)
Page 1954 of 2339
ADJUSTMENTS
ADJUSTMENT
CAUTION: THE IS NO ADJUSTMENT AVAILABLE
FOR A NORMALLY OPERATING SUNROOF. THIS
PROCEDURE IS USE TO SET SUNROOF MOTOR TO
SUNROOF ASSEMBLY TIMING.
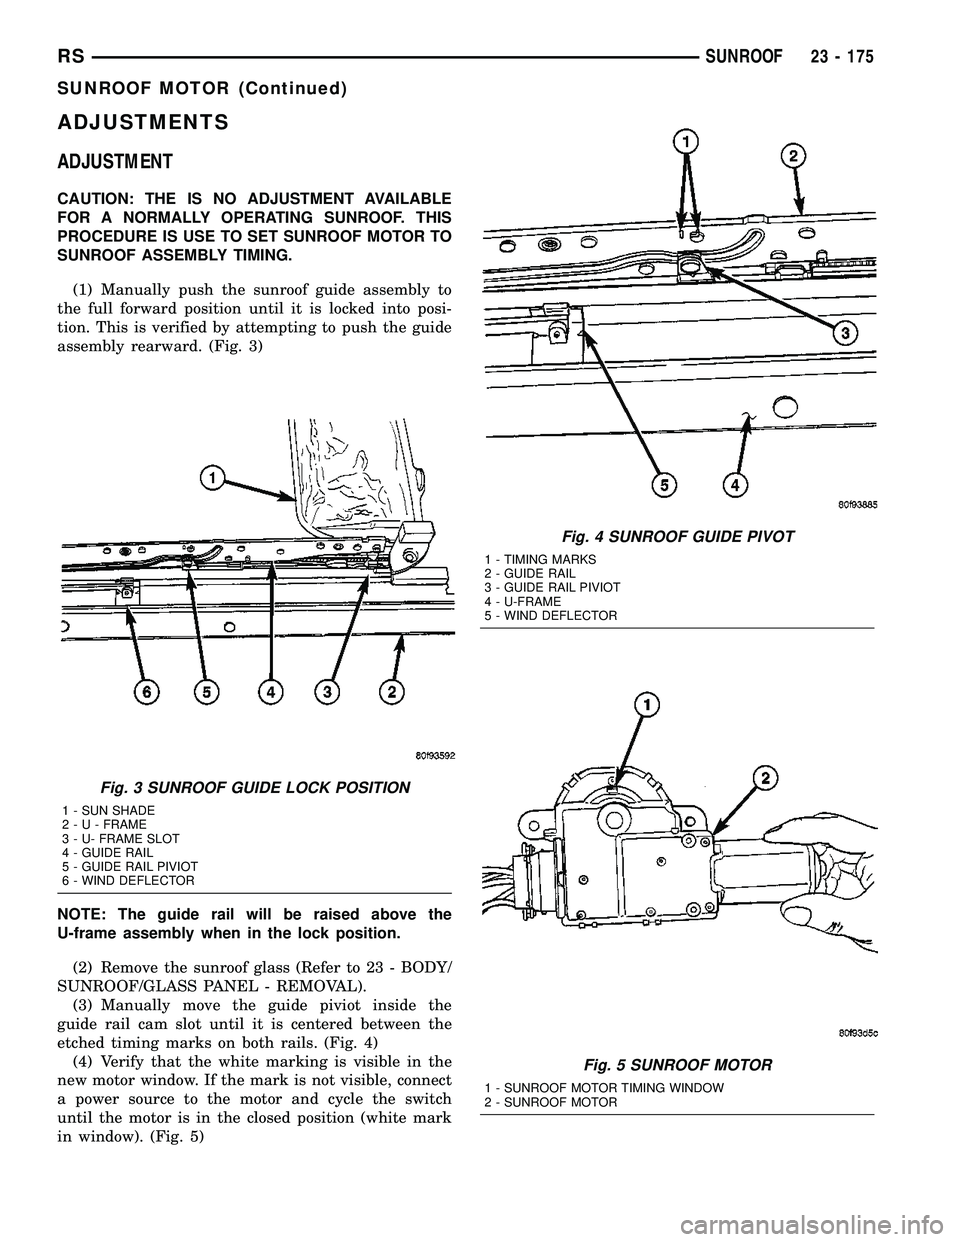
(1) Manually push the sunroof guide assembly to
the full forward position until it is locked into posi-
tion. This is verified by attempting to push the guide
assembly rearward. (Fig. 3)
NOTE: The guide rail will be raised above the
U-frame assembly when in the lock position.
(2) Remove the sunroof glass (Refer to 23 - BODY/
SUNROOF/GLASS PANEL - REMOVAL).
(3) Manually move the guide piviot inside the
guide rail cam slot until it is centered between the
etched timing marks on both rails. (Fig. 4)
(4) Verify that the white marking is visible in the
new motor window. If the mark is not visible, connect
a power source to the motor and cycle the switch
until the motor is in the closed position (white mark
in window). (Fig. 5)
Fig. 3 SUNROOF GUIDE LOCK POSITION
1 - SUN SHADE
2-U-FRAME
3 - U- FRAME SLOT
4 - GUIDE RAIL
5 - GUIDE RAIL PIVIOT
6 - WIND DEFLECTOR
Fig. 4 SUNROOF GUIDE PIVOT
1 - TIMING MARKS
2 - GUIDE RAIL
3 - GUIDE RAIL PIVIOT
4 - U-FRAME
5 - WIND DEFLECTOR
Fig. 5 SUNROOF MOTOR
1 - SUNROOF MOTOR TIMING WINDOW
2 - SUNROOF MOTOR
RSSUNROOF23 - 175
SUNROOF MOTOR (Continued)
Page 1988 of 2339
SPECIFICATIONS - BODY SEALING LOCATIONS
- FOLD-IN-FLOOR ONLY
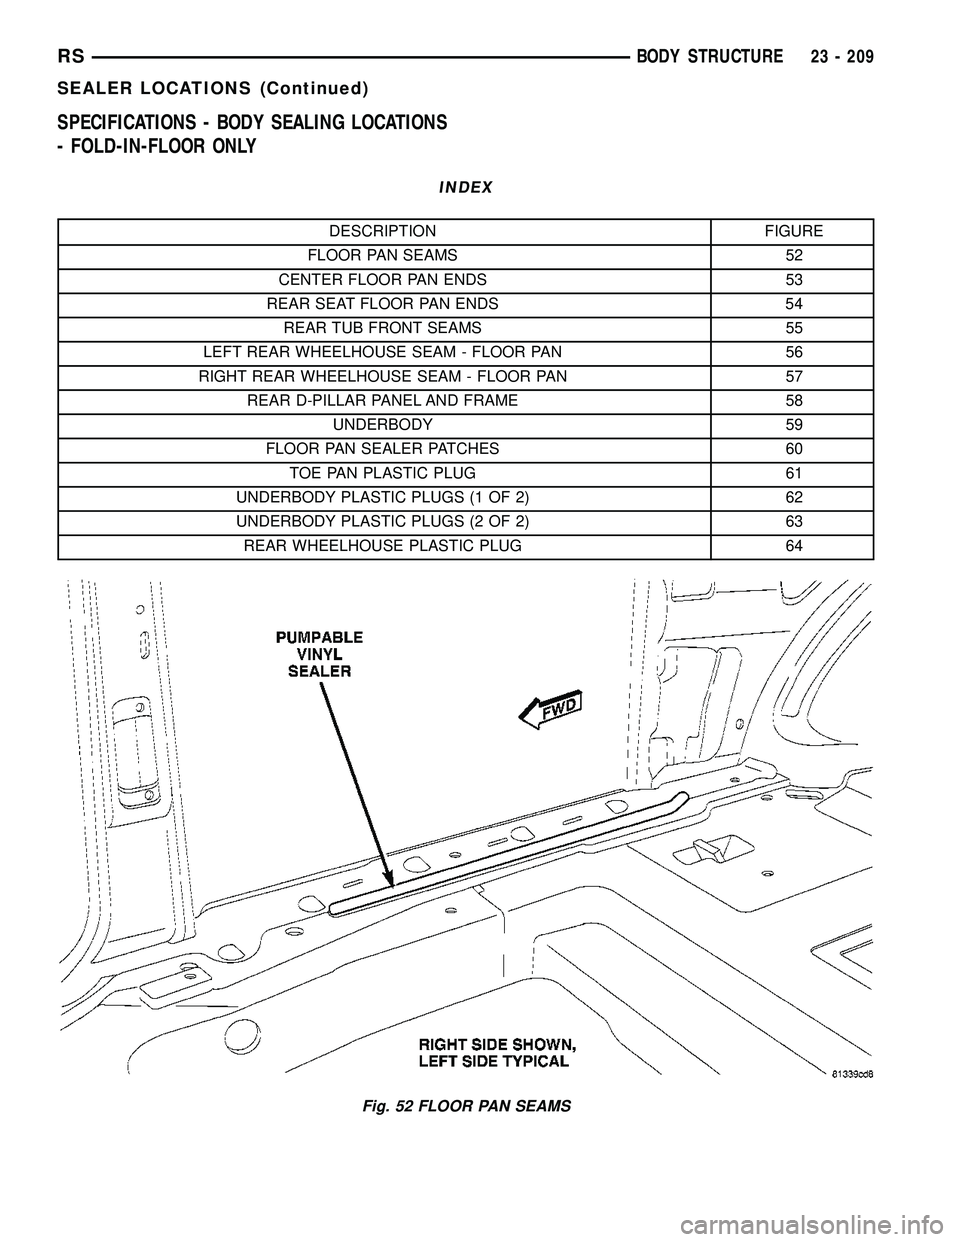
INDEX
DESCRIPTION FIGURE
FLOOR PAN SEAMS 52
CENTER FLOOR PAN ENDS 53
REAR SEAT FLOOR PAN ENDS 54
REAR TUB FRONT SEAMS 55
LEFT REAR WHEELHOUSE SEAM - FLOOR PAN 56
RIGHT REAR WHEELHOUSE SEAM - FLOOR PAN 57
REAR D-PILLAR PANEL AND FRAME 58
UNDERBODY 59
FLOOR PAN SEALER PATCHES 60
TOE PAN PLASTIC PLUG 61
UNDERBODY PLASTIC PLUGS (1 OF 2) 62
UNDERBODY PLASTIC PLUGS (2 OF 2) 63
REAR WHEELHOUSE PLASTIC PLUG 64
Fig. 52 FLOOR PAN SEAMS
RSBODY STRUCTURE23 - 209
SEALER LOCATIONS (Continued)
Page 1993 of 2339
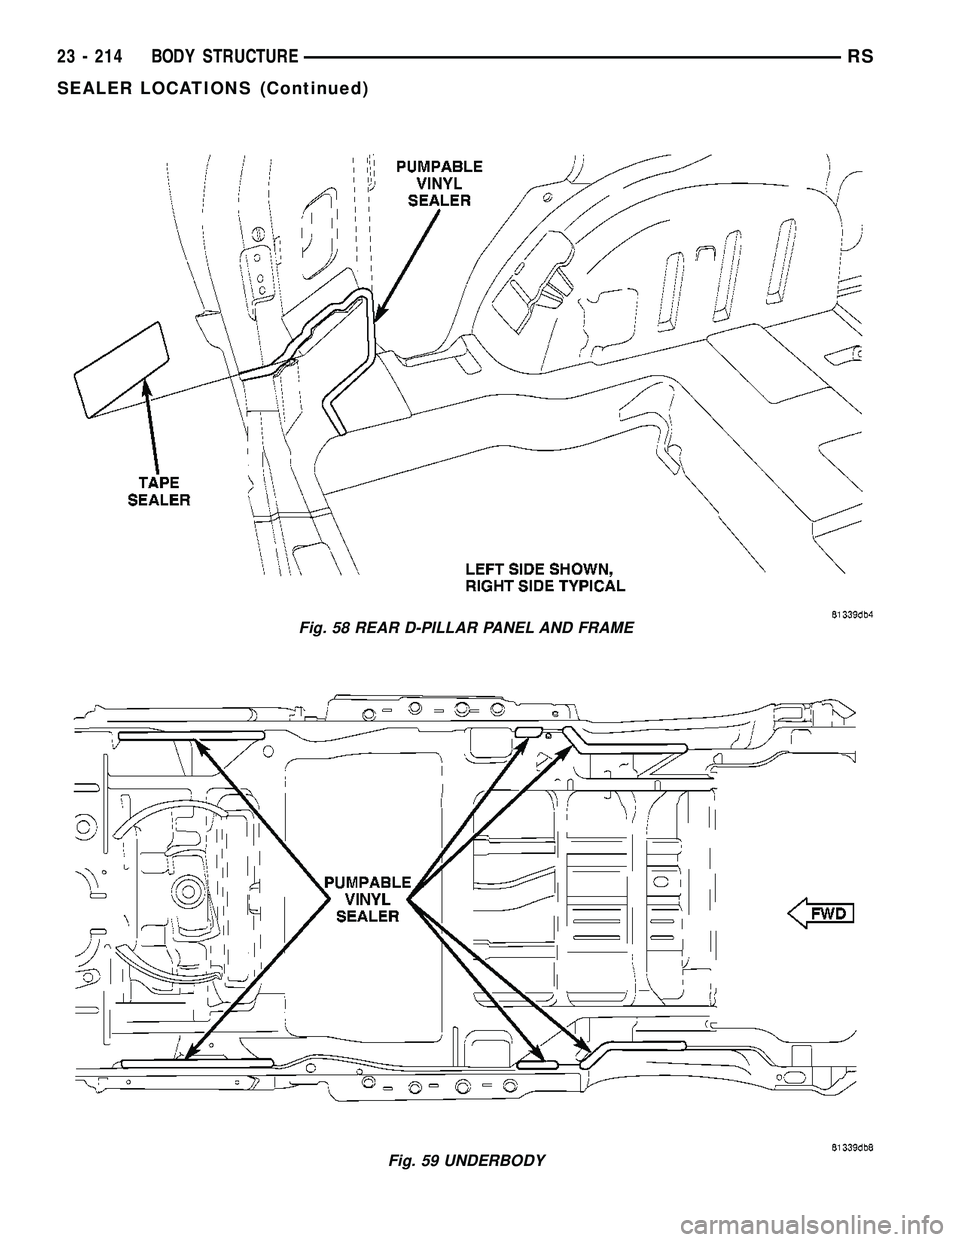
Fig. 58 REAR D-PILLAR PANEL AND FRAME
Fig. 59 UNDERBODY
23 - 214 BODY STRUCTURERS
SEALER LOCATIONS (Continued)