2005 CHRYSLER 300 brake
[x] Cancel search: brakePage 261 of 374

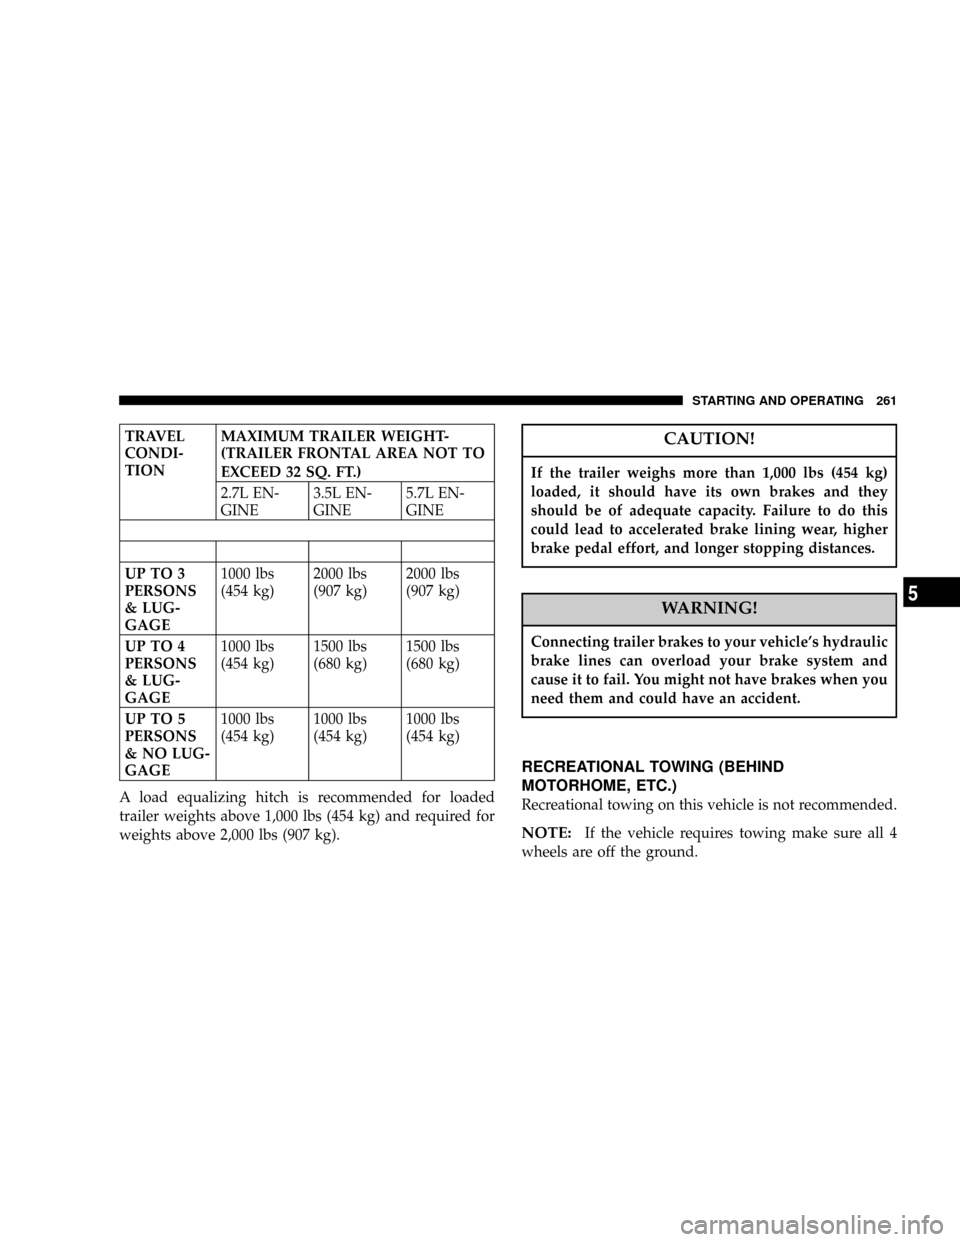
TRAVEL
CONDI-
TIONMAXIMUM TRAILER WEIGHT-
(TRAILER FRONTAL AREA NOT TO
EXCEED 32 SQ. FT.)
2.7L EN-
GINE3.5L EN-
GINE5.7L EN-
GINE
UP TO 3
PERSONS
& LUG-
GAGE1000 lbs
(454 kg)2000 lbs
(907 kg)2000 lbs
(907 kg)
UP TO 4
PERSONS
& LUG-
GAGE1000 lbs
(454 kg)1500 lbs
(680 kg)1500 lbs
(680 kg)
UP TO 5
PERSONS
& NO LUG-
GAGE1000 lbs
(454 kg)1000 lbs
(454 kg)1000 lbs
(454 kg)
A load equalizing hitch is recommended for loaded
trailer weights above 1,000 lbs (454 kg) and required for
weights above 2,000 lbs (907 kg).CAUTION!
If the trailer weighs more than 1,000 lbs (454 kg)
loaded, it should have its own brakes and they
should be of adequate capacity. Failure to do this
could lead to accelerated brake lining wear, higher
brake pedal effort, and longer stopping distances.
WARNING!
Connecting trailer brakes to your vehicle's hydraulic
brake lines can overload your brake system and
cause it to fail. You might not have brakes when you
need them and could have an accident.
RECREATIONAL TOWING (BEHIND
MOTORHOME, ETC.)
Recreational towing on this vehicle is not recommended.
NOTE:If the vehicle requires towing make sure all 4
wheels are off the ground.
STARTING AND OPERATING 261
5
Page 266 of 374

WARNING!
Getting under a jacked-up vehicle is dangerous. The
vehicle could slip off the jack and fall on you. You
could be crushed. Never get any part of your body
under a vehicle that is on a jack. Never start or run
the engine while the vehicle is on a jack. If you need
to get under a raised vehicle, take it to a service
center where it can be raised on a lift.
Preparations For Jacking
²
Park the vehicle on a firm level surface, avoid ice or
slippery areas,set the parking brakeand place the
gear selector in PARK. Turn OFF the ignition.
²Turn on the Hazard Warning Flasher.
²Passengers should not remain in the vehicle when the
vehicle is being jacked.
²Block both the front and rear of the wheel diagonally
opposite the jacking position. For example, if changing
the right front tire, block the left rear wheel.
Hazard Warning Flasher
266 WHAT TO DO IN EMERGENCIES
Page 274 of 374

WARNING!
²Do not attempt to push or tow your vehicle to get it
started. Vehicles equipped with an automatic trans-
mission cannot be started this way. Unburned fuel
could enter the catalytic converter and once the
engine has started, ignite and damage the converter
and vehicle. If the vehicle has a discharged battery,
booster cables may be used to obtain a start from
another vehicle. This type of start can be dangerous
if done improperly, so follow this procedure care-
fully.
²Battery fluid is a corrosive acid solution; do not
allow battery fluid to contact eyes, skin or clothing.
Don't lean over battery when attaching clamps or
allow the clamps to touch each other. If acid splashes
in eyes or on skin, flush contaminated area immedi-
ately with large quantities of water.
²A battery generates hydrogen gas which is flam-
mable and explosive. Keep flame or spark away from
the vent holes. Do not use a booster battery or any
other booster source with an output that exceeds 12
volts.
NOTE:The battery is stored under an access cover in
the trunk. Remote battery terminals are located in the
engine compartment for jump starting.
NOTE:The battery in this vehicle has a vent hose that
should not be disconnected and should only be replaced
with a battery of the same type (vented).
1. Wear eye protection and remove any metal jewelry
such as watch bands or bracelets that might make an
inadvertent electrical contact.
2. When boost is provided by a battery in another
vehicle, park that vehicle within booster cable reach and
without letting the vehicles touch. Set the parking brake,
place the automatic transmission in PARK and turn the
ignition switch to the OFF (or LOCK) position for both
vehicles.
3. Turn off the heater, radio and all unnecessary electrical
loads.
274 WHAT TO DO IN EMERGENCIES
Page 282 of 374

NSteering Linkage......................301
NDrive Shaft Universal Joints..............301
NBody Lubrication.....................301
NWindshield Wiper Blades................301
NWindshield Washers...................302
NExhaust System......................302
NCooling System.......................303
NHoses And Vacuum/Vapor Harnesses.......307
NBrakes.............................307
NBrake Fluid Level Check................309
NFuel System Hoses....................310
NAutomatic Transmission................310
NFront And Rear Wheel Bearings...........311
NAppearance Care And Protection From
Corrosion...........................311NCleaning The Center Console Cup
Holders Ð 300.......................315
NCleaning The Center Console Cup Holders Ð
300C, 300 Touring.....................315
mPower Distribution Centers...............315
NFront Power Distribution Center...........315
NRear Power Distribution Center...........318
mVehicle Storage........................321
mReplacement Light Bulbs................322
mBulb Replacement......................323
NLow Beam Headlamp, High Beam Headlamp,
Park/Turn Lamp, Inner Park Lamp, And Outer
Park Lamp ± 300......................323
NLow Beam Headlamp, High Beam Headlamp,
And Park/Turn Lamp ± 300C.............324
NBackup Lamp, Side Marker Lamp, And
Tail/Stop Turn Lamp Ð 300..............326
282 MAINTAINING YOUR VEHICLE
Page 307 of 374

²Make sure that the radiator and coolant bottle hoses
are not kinked or obstructed.
²Keep the front of the radiator and the front of the A/C
condenser clean.
²Do not change the thermostat for summer or winter
operation. If replacement is ever necessary, install
ONLY the correct type thermostat. Other designs may
result in unsatisfactory cooling performance.
²Increasing engine speed at idle does not reduce cool-
ant temperature! Put transmission in NEUTRAL and
let engine idle at normal engine idle speed.
Hoses And Vacuum/Vapor Harnesses
Inspect surfaces of hoses and nylon tubing for evidence
of heat and mechanical damage. Hard or soft spots,
brittle rubber, cracking, tears, cuts, abrasions, and exces-
sive swelling indicate deterioration of the rubber.Pay particular attention to those hoses nearest to high
heat sources such as the exhaust manifold. Inspect hose
routing to be sure hoses do not come in contact with any
heat source or moving component which may cause heat
damage or mechanical wear.
Insure nylon tubing in these areas has not melted or
collapsed.
Inspect all hose connections such as clamps and cou-
plings to make sure they are secure and no leaks are
present.
Components should be replaced immediately if there is
any evidence of wear or damage that could cause failure.Brakes
In order to assure brake system performance, all brake
system components should be inspected periodically.
Suggested service intervals can be found in the Mainte-
nance Schedules section of this manual.
MAINTAINING YOUR VEHICLE 307
7
Page 308 of 374

WARNING!
Riding the brakes can lead to brake failure and
possibly an accident. Driving with your foot resting
or riding on the brake pedal can result in abnormally
high brake temperatures, excessive lining wear, and
possible brake damage. You wouldn't have your full
braking capacity in an emergency.
Brake And Power Steering Hoses
When the vehicle is serviced for scheduled maintenance,
inspect surface of hoses and nylon tubing for evidence of
heat and mechanical damage. Hard and brittle rubber,
cracking, tears, cuts, abrasion, and excessive swelling
indicate deterioration of the rubber. Particular attention
should be made to examining those hose surfaces nearest
to high heat sources, such as the exhaust manifold.
Insure nylon tubing in these areas has not melted or
collapsed.Inspect all hose connections such as clamps and cou-
plings to make sure they are secure and no leaks are
present.
NOTE:Often, fluid such as oil, power steering fluid,
and brake fluid are used during assembly plant opera-
tions to facilitate the assembly of hoses to couplings.
Therefore, oil wetness at the hose-coupling area is not
necessarily an indication of leakage. Actual dripping of
hot fluid when systems are under pressure (during
vehicle operation), should be noted before a hose is
replaced based on leakage.
NOTE:Inspection of brake hoses should be performed
whenever the brake system is serviced and at every
engine oil change. Inspect hydraulic brake hoses for
surface cracking, scuffing, or worn spots. If there is any
evidence of cracking, scuffing, or worn spots, the hose
should be replaced immediately! Eventual deterioration
of the hose can take place resulting in a possibility of a
burst failure.
308 MAINTAINING YOUR VEHICLE
Page 309 of 374

WARNING!
Worn brake hoses can burst and cause brake failure.
You could have an accident. If you see any signs of
cracking, scuffing, or worn spots, have the brake
hoses replaced immediately.
Brake Fluid Level Check
The fluid level in the master cylinder should be checked
when performing underhood services, or immediately if
the brake system warning light indicates system failure.
Clean the top of the master cylinder area before removing
the cap. Add fluid to bring the level up to the top of the
ªFULLº mark on the side of the master cylinder reservoir.
Overfilling of fluid is not recommended because it may
cause leaking in the system.
Add enough fluid to bring the level up to the require-
ments described on the brake fluid reservoir. With disc
brakes, fluid level can be expected to fall as the brake
pads wear. However, low fluid level may be caused by a
leak and a checkup may be needed.Use only manufacturers recommended brake fluid, refer
to Recommended Fluids, Lubricants and Genuine Parts
for correct fluid type.
WARNING!
²Overfilling the brake fluid reservoir can result in
spilling brake fluid on hot engine parts and the
brake fluid catching fire.
²Use of a brake fluid that has a lower initial boiling
point than the recommended MOPAR DOT 3
product or a brake fluid that is unidentified as to
FMVSS specification may result in sudden brake
failure during hard prolonged braking. You could
have an accident.
Use only brake fluid that has been in a tightly closed
container to avoid contamination from foreign matter or
moisture.
MAINTAINING YOUR VEHICLE 309
7
Page 310 of 374

CAUTION!
Do not allow petroleum base fluid to contaminate
the brake fluid, all brake seal components could be
damaged causing partial or complete brake failure.
Fuel System Hoses
Electronic Fuel Injection high pressure fuel systems are
designed with hoses and quick connect fittings which
have unique material characteristics to provide adequate
sealing and resist attack by deteriorated gasoline.
You are urged to use only the manufacture specified
hoses with quick connect fittings, or their equivalent in
material and specification, in any fuel system servicing. It
is mandatory to replace any damaged hoses or quick
connect fittings that have been removed during service.
Care should be taken in installing quick connect fittings
to insure they are properly installed and fully connected.
See your authorized dealer for service.
Automatic Transmission
Fluid Level Check
Regular automatic transmission fluid level checks are not
required. For this reason the dipstick is omitted.
If you notice fluid loss or gear shift malfunction, have
your authorized dealer check the transmission fluid level.
CAUTION!
Using a transmission fluid other than the manufac-
turer's recommended fluid may cause deterioration
in transmission shift quality and/or torque converter
shudder. Using a transmission fluid other than that
recommended by the manufacturer will result in
more frequent fluid and filter changes. Refer to the
Recommended Fluids, Lubricants and Genuine Parts
section for correct fluid type.
310 MAINTAINING YOUR VEHICLE