2005 CHEVROLET SILVERADO ECO mode
[x] Cancel search: ECO modePage 309 of 580
4:In this mode, all four wheels will help steer the
vehicle. If you want to use 4, and your vehicle is not in
this mode, press the button, until the 4 indicator,
located to the right of the 4-Wheel Steer button, comes
on and stays on. If the 4 indicator is �ashing, you
will have to center the steering wheel by turning it to the
left or right.
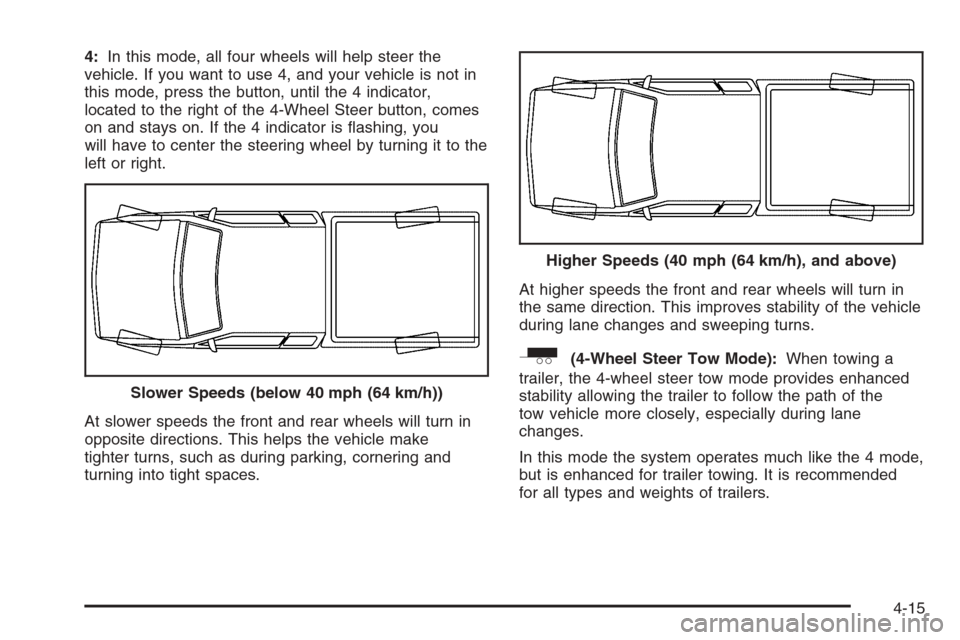
At slower speeds the front and rear wheels will turn in
opposite directions. This helps the vehicle make
tighter turns, such as during parking, cornering and
turning into tight spaces.At higher speeds the front and rear wheels will turn in
the same direction. This improves stability of the vehicle
during lane changes and sweeping turns.
_(4-Wheel Steer Tow Mode):When towing a
trailer, the 4-wheel steer tow mode provides enhanced
stability allowing the trailer to follow the path of the
tow vehicle more closely, especially during lane
changes.
In this mode the system operates much like the 4 mode,
but is enhanced for trailer towing. It is recommended
for all types and weights of trailers. Slower Speeds (below 40 mph (64 km/h))
Higher Speeds (40 mph (64 km/h), and above)
4-15
Page 342 of 580
If Your Vehicle is Stuck in Sand,
Mud, Ice or Snow
In order to free your vehicle when it is stuck, you will
need to spin the wheels, but you do not want to
spin your wheels too fast. The method known as rocking
can help you get out when you are stuck, but you
must use caution.
{CAUTION:
If you let your tires spin at high speed, they can
explode, and you or others could be injured.
And, the transmission or other parts of the
vehicle can overheat. That could cause an
engine compartment �re or other damage.
When you are stuck, spin the wheels as little as
possible. Do not spin the wheels above 35 mph
(55 km/h) as shown on the speedometer.
Notice:Spinning your wheels can destroy parts of
your vehicle as well as the tires. If you spin the
wheels too fast while shifting your transmission back
and forth, you can destroy your transmission.
For more information about using tire chains on your
vehicle, seeTire Chains on page 5-89.
Rocking Your Vehicle to Get It Out
First, turn your steering wheel left and right. That will
clear the area around your front wheels. If you have a
four-wheel-drive vehicle, shift into 4HI. If your vehicle
has the traction assist system, you should turn it off by
pressing the TAS on/off button. Then shift back and
forth between REVERSE (R) and a forward gear,
or with a manual transmission, between FIRST (1) or
SECOND (2) and REVERSE (R), spinning the wheels as
little as possible. Release the accelerator pedal while
you shift, and press lightly on the accelerator pedal
when the transmission is in gear. By slowly spinning
your wheels in the forward and reverse directions,
you will cause a rocking motion that may free your
vehicle. If that does not get you out after a few tries,
you may need to be towed out. If your vehicle is not an
SS model, you can use your recovery hooks if your
vehicle has them. If you do need to be towed out,
seeTowing Your Vehicle on page 4-63.
4-48
Page 343 of 580
Recovery Hooks (Except SS Model)
Notice:SS Models have recovery hooks that are
concealed by the front bumper trim covering. Use of
the recovery hooks could cause damage to your
vehicle. If you have the SS Model, do not use the
recovery hooks.
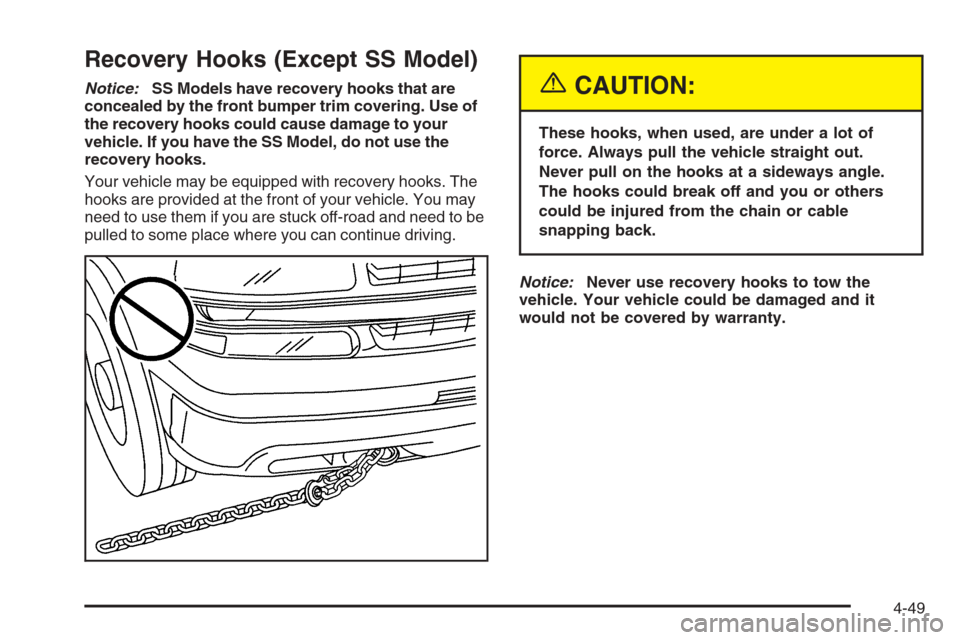
Your vehicle may be equipped with recovery hooks. The
hooks are provided at the front of your vehicle. You may
need to use them if you are stuck off-road and need to be
pulled to some place where you can continue driving.{CAUTION:
These hooks, when used, are under a lot of
force. Always pull the vehicle straight out.
Never pull on the hooks at a sideways angle.
The hooks could break off and you or others
could be injured from the chain or cable
snapping back.
Notice:Never use recovery hooks to tow the
vehicle. Your vehicle could be damaged and it
would not be covered by warranty.
4-49
Page 350 of 580
Add-On Equipment
When you carry removable items, you may need to put
a limit on how many people you carry inside your
vehicle. Be sure to weigh your vehicle before you buy
and install the new equipment.
Notice:Overloading your vehicle may cause
damage. Repairs would not be covered by your
warranty. Do not overload your vehicle.
Remember not to exceed the Gross Axle Weight Rating
(GAWR) of the front or rear axle.
*Equipment Maximum Weight
Ladder Rack and Cargo 750 lbs (340 kg)
Cross Toolbox and Cargo 400 lbs (181 kg)
Side Boxes and Cargo 250 lbs per side
(113 kg per side)
*The combined weight for all rail-mounted equipment
should not exceed 1,000 lbs (454 kg), excluded
1500 crew cab models with 5 ft 8 in (173 cm) box
length. A reinforcement kit for rail-mounted add-on
equipment is recommended. See your dealer.
Ladder racks are not recommended for 1500 crew
cab models with 5 ft 8 in (173 cm) pick-up box length.
Maximum recommended cross-mounted toolbox and
cargo weight is 300 lbs (136 kg) for the 1500 crew
cab with 5 ft 8 in (173 cm) pick-up box length.
Adding a Snow Plow or Similar
Equipment
Before installing a snow plow on your vehicle, here are
some things you will need to know:
Notice:If your vehicle does not have the snow
plow prep package, adding a plow can damage your
vehicle, and the repairs would not be covered by
warranty. Unless your vehicle was built to carry
a snow plow, do not add one to your vehicle. If your
vehicle has the snow plow option called RPO VYU
(snow plow prep package), then the payload
your vehicle can carry will be reduced when a snow
plow is installed. Your vehicle can be damaged if
either the front or rear axle ratings or the gross
vehicle weight (GVW) are exceeded.
Q:How do I know if my vehicle can handle a
snow plow?
A:Some vehicles are built with a special package,
called RPO VYU (snow plow prep package).
If your vehicle has this option, you can add a
plow to it, provided certain weights, such as the
weights on the vehicle’s axles and the GVW,
are not exceeded.
4-56
Page 364 of 580
If your vehicle was built with trailering options, as many
are, it’s ready for heavier trailers. But trailering is different
than just driving your vehicle by itself. Trailering means
changes in acceleration, braking, handling, durability and
fuel economy. Successful, safe trailering takes correct
equipment, and it has to be used properly.
That’s the reason for this part. In it are many time-tested,
important trailering tips and safety rules. Many of
these are important for your safety and that of your
passengers. So please read this section carefully before
you pull a trailer.
If You Do Decide To Pull A Trailer
Notice:Pulling a �fth-wheel trailer with a vehicle
that is equipped with the SS trim package could
damage the vehicle. Do not pull a �fth-wheel trailer
with a vehicle equipped with the SS trim package.
If you do, here are some important points:
There are many different laws, including speed limit
restrictions, having to do with trailering. Make sure
your rig will be legal, not only where you live
but also where you’ll be driving. A good source for
this information can be state or provincial police.
Consider using a sway control. See “Hitches” later
in this section.
Don’t tow a trailer at all during the �rst 500 miles
(800 km) your new vehicle is driven. Your engine,
axle or other parts could be damaged.
Then, during the �rst 500 miles (800 km) that you
tow a trailer, don’t drive over 50 mph (80 km/h)
and don’t make starts at full throttle. This helps your
engine and other parts of your vehicle wear in at
the heavier loads.
If you have an automatic transmission, you can
tow in DRIVE (D). You may want to shift the
transmission to THIRD (3) or, if necessary, a lower
gear selection if the transmission shifts too often,
such as under heavy loads and/or hilly conditions.
If you have a manual transmission and you are
towing a trailer, it’s better not to use the highest
gear. SeeTow/Haul Mode Light on page 3-48.
Three important considerations have to do with weight:
The weight of the trailer
The weight of the trailer tongue
The weight on your vehicle’s tires
4-70
Page 365 of 580
Tow/Haul Mode
Tow/Haul is a feature on automatic transmission
equipped vehicles that assists when pulling a heavy
trailer or a large or heavy load. Tow/Haul mode adjusts
the transmission’s shift pattern to reduce shift cycling
(rapid up and downshifts/gear hunting), providing
increased performance, vehicle control, and transmission
cooling when towing or hauling heavy loads.
Automatic transmission equipped vehicles are provided
with a button at the end of the shift lever which when
pressed enables Tow/Haul. When the button is pressed,
a light on the instrument panel will illuminate to
indicate that Tow/Haul has been selected. Tow/Haul
may be turned off by pressing the button again, at which
time the indicator light on the instrument panel will
turn off. The vehicle will automatically turn off Tow/Haul
every time it is started.Tow/Haul is designed to be most effective when the
vehicle and trailer combined weight is at least 75% of
the vehicle’s Gross Combined Weight Rating (GCWR).
See “Weight of the Trailer” later in the section.
Tow/Haul is most useful under the following driving
conditions:
When pulling a heavy trailer or a large or heavy
load through rolling terrain.
When pulling a heavy trailer or a large or heavy
load in stop and go traffic.
When pulling a heavy trailer or a large or heavy
load in busy parking lots where improved low
speed control of the vehicle is desired.
Operating the vehicle in Tow/Haul when lightly loaded
or with no trailer at all will not cause damage. However,
there is no bene�t to the selection of Tow/Haul when
the vehicle is unloaded. Such a selection when unloaded
may result in unpleasant engine and transmission
driving characteristics and reduced fuel economy.
Tow/Haul is recommended only when pulling a heavy
trailer or a large or heavy load.
4-71
Page 476 of 580
Intended Outboard Sidewall:The side of an
asymmetrical tire, that must always face outward when
mounted on a vehicle.
Kilopascal (kPa):The metric unit for air pressure.
Light Truck (LT-Metric) Tire:A tire used on light duty
trucks and some multipurpose passenger vehicles.
Load Index:An assigned number ranging from
1 to 279 that corresponds to the load carrying capacity
of a tire.
Maximum In�ation Pressure:The maximum air
pressure to which a cold tire may be in�ated. The
maximum air pressure is molded onto the sidewall.
Maximum Load Rating:The load rating for a tire at the
maximum permissible in�ation pressure for that tire.
Maximum Loaded Vehicle Weight:The sum of curb
weight; accessory weight; vehicle capacity weight;
and production options weight.
Normal Occupant Weight:The number of occupants a
vehicle is designed to seat multiplied by 150 lbs (68 kg).
SeeLoading Your Vehicle on page 4-50.Occupant Distribution:Designated seating positions.
Outward Facing Sidewall:The side of an
asymmetrical tire that has a particular side that faces
outward when mounted on a vehicle. The side of the
tire that contains a whitewall, bears white lettering
or bears manufacturer, brand, and/or model name
molding that is higher or deeper than the same moldings
on the other sidewall of the tire.
Passenger (P-Metric) Tire:A tire used on passenger
cars and some light duty trucks and multipurpose
vehicles.
Recommended In�ation Pressure:Vehicle
manufacturer’s recommended tire in�ation pressure and
shown on the tire placard. SeeIn�ation - Tire Pressure
on page 5-80andLoading Your Vehicle on page 4-50.
Radial Ply Tire:A pneumatic tire in which the ply cords
that extend to the beads are laid at 90 degrees to the
centerline of the tread.
Rim:A metal support for a tire and upon which the tire
beads are seated.
Sidewall:The portion of a tire between the tread and
the bead.
5-78
Page 492 of 580
For regular cab models, the equipment you will need is
behind the passenger’s seat. For extended and crew
cab models, the equipment is on the shelf behind
the passenger’s side second row seat.
1. If there is a cover, move the seats forward and turn
the wing nut on the cover counterclockwise to
remove it. For crew cab models, pull up the second
row seat with the loop at the base of the seat
cushion to access the tools.
2. Turn the knob on the jack counterclockwise to lower
the jack head to release the jack from its holder.
3. Remove the wheel blocks and the wheel block
retainer by turning the wing nut counterclockwise.
4. Remove the wing nut used to retain the storage
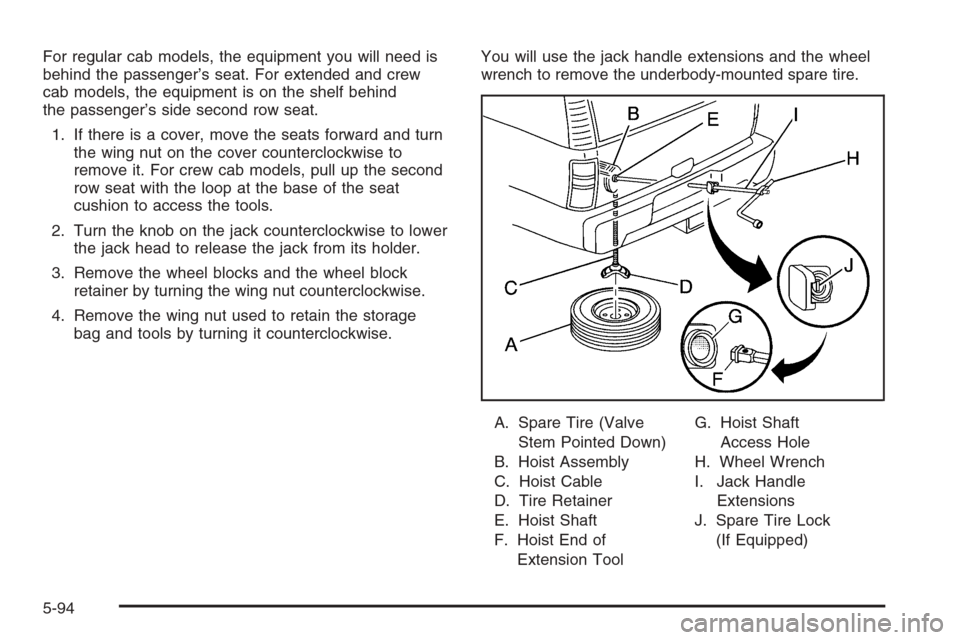
bag and tools by turning it counterclockwise.You will use the jack handle extensions and the wheel
wrench to remove the underbody-mounted spare tire.
A. Spare Tire (Valve
Stem Pointed Down)
B. Hoist Assembly
C. Hoist Cable
D. Tire Retainer
E. Hoist Shaft
F. Hoist End of
Extension ToolG. Hoist Shaft
Access Hole
H. Wheel Wrench
I. Jack Handle
Extensions
J. Spare Tire Lock
(If Equipped)
5-94