2005 BUICK LACROSSE set time
[x] Cancel search: set timePage 128 of 410

<(Parking Lamps):Turn the control to this
position to turn on the parking lamps together with
the following:
Taillamps
License Plate Lamps
Sidemarker Lamps
Instrument Panel Lights
2(Headlamps):Turn the control to this position to
turn your headlamps on, together with the previously
listed lamps and lights.
A warning chime will sound if the driver’s door is
opened when the ignition switch is turned to OFF or
ACCESSORY and the headlamps are on.
-(Foglamps):Press this button to turn the
foglamps on and off. SeeFog Lamps on page 3-15
for additional information.
Daytime Running Lamps
(DRL)/Automatic Headlamp System
Daytime Running Lamps (DRL) can make it easier
for others to see the front of your vehicle during the day.
DRL can be helpful in many different driving conditions,
but they can be especially helpful in the short periods
after dawn and before sunset. Daytime running
lamps are required to function at all times on all vehicles
�rst sold in Canada.
A light sensor on top of the instrument panel makes the
DRL work, so be sure it is not covered.
The DRL system will make the low-beam headlamps
come on at reduced brightness when the following
conditions are met:
The ignition is on.
The exterior lamps control is off.
The parking brake is released.
While the DRL are on, only the vehicle’s low-beam
headlamps will be on at reduced brightness. The turn
signal, taillamps, sidemarker and other lamps will not be
on. The instrument panel will not be lit up either.
When it is dark enough outside, the DRL will turn off
and the vehicle’s headlamps and parking lamps will turn
on. The other lamps that come on with the headlamps
will also come on.
3-14
Page 130 of 410

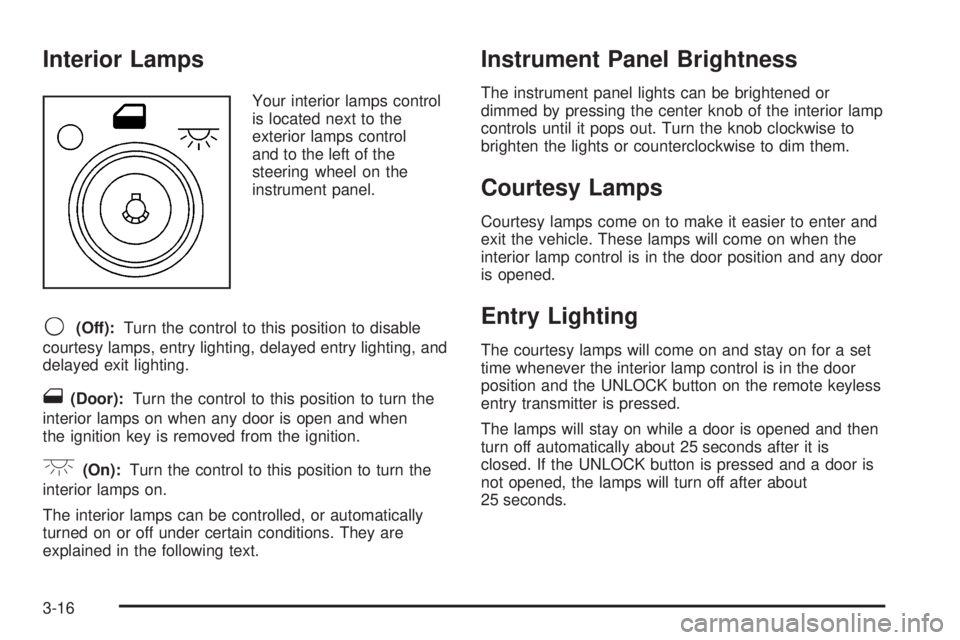
Interior Lamps
Your interior lamps control
is located next to the
exterior lamps control
and to the left of the
steering wheel on the
instrument panel.
9(Off):Turn the control to this position to disable
courtesy lamps, entry lighting, delayed entry lighting, and
delayed exit lighting.
1(Door):Turn the control to this position to turn the
interior lamps on when any door is open and when
the ignition key is removed from the ignition.
+(On):Turn the control to this position to turn the
interior lamps on.
The interior lamps can be controlled, or automatically
turned on or off under certain conditions. They are
explained in the following text.
Instrument Panel Brightness
The instrument panel lights can be brightened or
dimmed by pressing the center knob of the interior lamp
controls until it pops out. Turn the knob clockwise to
brighten the lights or counterclockwise to dim them.
Courtesy Lamps
Courtesy lamps come on to make it easier to enter and
exit the vehicle. These lamps will come on when the
interior lamp control is in the door position and any door
is opened.
Entry Lighting
The courtesy lamps will come on and stay on for a set
time whenever the interior lamp control is in the door
position and the UNLOCK button on the remote keyless
entry transmitter is pressed.
The lamps will stay on while a door is opened and then
turn off automatically about 25 seconds after it is
closed. If the UNLOCK button is pressed and a door is
not opened, the lamps will turn off after about
25 seconds.
3-16
Page 139 of 410

2. Press the PASS button or the up or down arrows
on the passenger side to turn the passenger
temperature set on and off. When turned on, the
passenger temperature will be the same as
the driver setting. Press the up or down arrow on
passenger side to adjust the passenger temperature
setting.
When the passenger temperature set is off, the
passenger display will be off and the driver’s
set temperature will be for the driver and passenger.
In cold weather, the system will start at reduced
fan speeds to avoid blowing cold air into the vehicle
until warmer air is available. The system will start
out blowing air at the �oor but may change
modes automatically as the vehicle warms up to
maintain the chosen temperature setting. The length
of time needed for warm up will depend on the
outside temperature and the length of time that has
elapsed since the vehicle was last driven.
3. Wait for the system to regulate. This may take from
10 to 30 minutes. Then, adjust the temperature, if
necessary.
Do not cover the solar sensor located in the center
of the instrument panel, near the windshield. For
more information on the solar sensor, see “Sensors”
later in this section.4. Press OFF to turn the climate control system off.
Only the rear defog and heated seats will function.
Press AUTO or any other button except the
heated seats or rear defog to turn the climate
control system back on.
This control has 4 types of operation.
Automatic can set/change the temperature
only. AUTO and temperature only will appear
on the display.
Semi-Automatic Fan can set/change the
temperature and mode. The fan operates
automatically. The temperature and mode will
appear on the display.
Semi-Automatic Mode can set/change the
temperature and fan speed. The mode operates
automatically. The fan speed and temperature will
appear on the display.
Manual can set/change the temperature, mode and
fan. The fan speed, temperature and mode will
appear on the display.
If your vehicle has the remote start feature, the climate
control system will automatically regulate the inside
temperature of your vehicle when the remote start
system is activated. Normal operation and the last
setting of the climate control system will return after the
key is turned to the ON position.
3-25
Page 162 of 410

DIC Buttons
TRIP/ODO (Trip/Odometer):Press this button on
the base level vehicle to display the odometer and
trip distance.
Press this button on the uplevel vehicle to display
the odometer, trip distance, time elapsed, and
average speed.
E/M (English/Metric)**:Press this button on the base
level vehicle to select between English or Metric units.
To select between English or Metric units on the uplevel
vehicle, see “Units” later in this section.
.(Fuel)*:Press this button to display the fuel range,
average fuel economy, and instantaneous fuel economy.
2(Gages)*:Press this button to display the battery
voltage and oil life.
r(Set/Reset)*:Press this button to set or reset
certain functions and to turn off or acknowledge
messages on the DIC.
4(Option)*:Press this button to display the units,
language, personalization, compass zone, and compass
calibration. SeeDIC Vehicle Personalization on
page 3-71for more information.
t(Traction Control)*:If your vehicle has the traction
control system, press this button to turn traction
control on or off. SeeTraction Control System (TCS) on
page 4-8for more information.
|(Hazard):Press this button to turn the hazard
warning �ashers on and off. SeeHazard Warning
Flashers on page 3-6for more information.
*These buttons are available on uplevel vehicles only.
**This button is available on base level vehicles only. Uplevel shown
3-48
Page 163 of 410

Trip/Odometer Menu Items
TRIP/ODO (Trip Odometer):Press this button to scroll
through the following menu items:
Odometer
Press the trip/odometer button until the odometer
displays. This mode shows the distance the vehicle has
been driven in either miles or kilometers.
Trip A and Trip B
Press the trip/odometer button until A or B displays. This
mode shows the current distance traveled in either
miles or kilometers since the last reset for each
trip odometer. Both trip odometers can be used at the
same time.
Each trip odometer can be reset to zero separately by
pressing the set/reset button on the uplevel vehicle or by
pressing and holding the trip odometer button on the
base level vehicle while the desired trip odometer
is displayed.
The display will show the odometer on the top line and
the trip odometer information, either A or B, on the
bottom line.
Time Elapsed (Uplevel Only)
Press the trip/odometer button until TIME ELAPSED :00
displays. This mode is like a stopwatch, in that you
can clock the time it takes to get from one point
to another. Each of the �elds for the hours, minutes,
and seconds are two numeric digits.
Once TIME ELAPSED :00 is displayed, press the
set/reset button on the uplevel vehicle to start the timing
feature. Press the set/reset button again to stop it. If
you will be starting and stopping your vehicle, during a
trip for instance, the TIME ELAPSED feature will
automatically start timing where it left off when you last
stopped. To reset it, press and hold the set/reset
button for approximately 1.5 seconds. The display will
return to zero. Press the trip/odometer button to
exit from the TIME ELAPSED display.
Average Speed (Uplevel Only)
Press the trip/odometer button until AVERAGE SPEED
displays. This mode shows the average speed of
the vehicle in miles per hour (mph) or kilometers per
hour (km/h). This average is calculated based on
the various vehicle speed recorded since the last reset
of this value. To reset the value, press the trip/odometer
button to display AVERAGE SPEED, then press and
hold the set/reset button on the uplevel vehicle.
The display will return to zero.
3-49
Page 164 of 410

Fuel Menu Items (Uplevel Only)
.
(Fuel):Press this button to scroll through the
following menu items:
Fuel Range
Press the fuel button until FUEL RANGE displays.
This mode shows the approximate number of
remaining miles or kilometers the vehicle can be
driven without refueling.
Fuel range is based on several factors, including
distance travelled, fuel used, fuel capacity, etc. This
estimate will change if driving conditions change.
For example, if driving in traffic and making frequent
stops, this mode may read one number, but if the vehicle
is driven on a freeway, the number may change even
though the same amount of fuel is in the fuel tank. This
is because different driving conditions produce
different fuel economies. Generally, freeway driving
produces better fuel economy than city driving.
Fuel range cannot be reset.
If your vehicle is low on fuel, FUEL RANGE LOW will
display followed by the LOW FUEL message. See “LOW
FUEL” underDIC Warnings and Messages on
page 3-53for more information.
Average Fuel Economy
Press the fuel button until AVG ECONOMY displays.
This mode shows the approximate average miles per
gallon (mpg) or liters per 100 kilometers (L/100 km). This
number is calculated based on the number of mpg
(L/100 km) recorded since the last time this menu item
was reset. To reset AVG ECONOMY, press and hold the
set/reset button. The display will return to zero.
Instantaneous Fuel Economy
Press the fuel button until INST ECONOMY displays.
This mode shows the current fuel economy at a
particular moment and will change frequently as driving
conditions change. This mode shows the instantaneous
fuel economy in miles per gallon (mpg) or liters per
100 kilometers (L/100 km). Unlike average fuel
economy, this screen cannot be reset.
Gages Menu Items (Uplevel Only)
2
(Gages):Press this button to scroll through the
following menu items:
Battery
Press the gages button until BATTERY displays. This
mode shows the current battery voltage.
3-50
Page 165 of 410

If there is a problem with the battery charging system, a
DIC message will display. SeeDIC Warnings and
Messages on page 3-53for more information.
Your vehicle’s charging system regulates voltage based
on the state of the battery. The battery voltage may
�uctuate when viewing this information on the DIC. This
is normal.
Oil Life
Press the gages button until OIL LIFE displays. This
mode shows an estimate of the oil’s remaining useful
life. If you see OIL LIFE 99% on the display, that means
99% of the current oil life remains. The engine oil life
system will alert you to change your oil on a schedule
consistent with your driving conditions.
When the remaining oil life is low, the CHANGE OIL
SOON message will appear on the display. You should
change your oil as soon as possible. SeeEngine Oil
on page 5-15. In addition to the engine oil life system
monitoring the oil life, additional maintenance is
recommended in the Maintenance Schedule in this
manual. SeeScheduled Maintenance on page 6-4for
more information.
Remember, you must reset the OIL LIFE yourself after
each oil change. It will not reset itself. Also, be
careful not to reset the OIL LIFE accidentally at any
time other than when the oil has just been changed. It
cannot be reset accurately until the next oil change.To reset the engine oil life system, press and hold the
set/reset button while OIL LIFE is displayed. The display
will show 100% when the system is reset. SeeEngine
Oil Life System on page 5-18for more information.
Option Menu Items (Uplevel Only)
4
(Option):Press this button to scroll through the
following menu items:
Units
Press the option button until UNITS displays. This mode
allows you to select between English or Metric units
of measurement. Once in this mode, press the set/reset
button to select between ENGLISH or METRIC units.
Language
Press the option button until the language screen
displays. This mode allows you to select the language
in which the DIC messages will appear. Once in
this mode, press the set/reset button to select among
the following choices:
English
Francais (French)
Espanol (Spanish)
3-51
Page 186 of 410

3. Press the set/reset button to begin.
4. The DIC will then display an instruction screen.
Press the option button to display the features
that are available to program.
Press the set/reset button to change the setting of
each feature.
Customization Menu Items
The following are customization features that allow you
to program settings to the vehicle:
FACTORY DEFAULTS
This feature allows you to set all of the customization
and personalization features back to their factory
default settings.
Press the option button until FACTORY DEFAULTS
appears on the DIC display. Press the set/reset button
to scroll through the following choices:
NO (default):The customization and personalization
features will not be set to their factory default settings.
YES:The customization and personalization features
will be set to their factory default settings.
Select one of the available choices and press the option
button while it is displayed on the DIC to select it and
move on to the next feature.
ALL KEYS WILL BE RESET
This screen will only display if YES was selected on the
FACTORY DEFAULTS screen.
Press the set/reset button to scroll through the
following choices:
CANCEL (default):The features will not be set to their
factory default settings and the DIC will return to the
PERSONAL PROGRAM menu.
OK:The features will be set to their factory default
settings, the DIC will exit the personal program menu,
and PERSONAL OPTIONS SAVED will display.
EXT LIGHT DELAY
This feature allows you to set the amount of time the
exterior lamps remain on after the key is removed from
the ignition or the vehicle is unlocked using the
remote keyless entry transmitter.
Press the option button until EXT LIGHT DELAY
appears on the DIC display. Press the set/reset button
to scroll through the following choices:
OFF:The exterior lamps will not turn on.
15 seconds:The exterior lamps will stay on for
15 seconds.
30 seconds (default):The exterior lamps will stay on
for 30 seconds.
3-72