2005 BUICK LACROSSE set time
[x] Cancel search: set timePage 11 of 410

Heated Seats
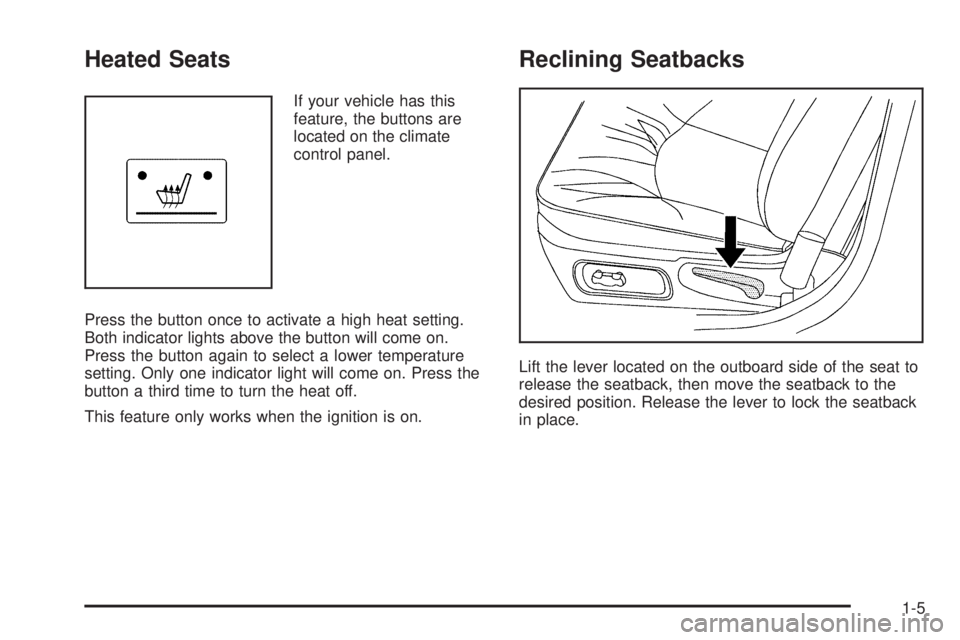
If your vehicle has this
feature, the buttons are
located on the climate
control panel.
Press the button once to activate a high heat setting.
Both indicator lights above the button will come on.
Press the button again to select a lower temperature
setting. Only one indicator light will come on. Press the
button a third time to turn the heat off.
This feature only works when the ignition is on.
Reclining Seatbacks
Lift the lever located on the outboard side of the seat to
release the seatback, then move the seatback to the
desired position. Release the lever to lock the seatback
in place.
1-5
Page 77 of 410

The following functions may be available if your vehicle
has the remote keyless entry system:
/(Remote Vehicle Start):If your vehicle has this
feature, it may be started from outside the vehicle using
the remote keyless entry transmitter. See “Remote
Vehicle Start” at the end of this section for more detailed
information.
Q(Lock):Press the lock button to lock all the doors.
If enabled through the Driver Information Center
(DIC), the parking lamps may �ash once to indicate
locking has occurred, or the horn may chirp when the
lock button is pressed again within 5 seconds from
the previous press of the lock button. See “FOB LOCK
FEEDBACK” underDIC Vehicle Personalization on
page 3-71for additional information. Pressing the lock
button may also arm the content theft-deterrent system,
if equipped. SeeContent Theft-Deterrent on page 2-17.
K(Unlock):Press the unlock button to unlock the
driver’s door. If the button is pressed again within
�ve seconds, all remaining doors will unlock. The interior
lamps will come on and stay on for 20 seconds or
until the ignition is turned on. If enabled through the DIC,
the parking lamps can be programmed to come on for
a set amount of time when the vehicle is unlocked using
the remote keyless entry transmitter. See “EXT LIGHT
DELAY” underDIC Vehicle Personalization on
page 3-71. Pressing the unlock button on the remote
keyless entry transmitter may disarm the content
theft-deterrent system, if equipped. SeeContent
Theft-Deterrent on page 2-17. Remote Keyless Entry
with Remote Start
Remote Keyless Entry
without Remote Start
2-5
Page 80 of 410

Do not use the remote start feature if your vehicle is low
on fuel. Your vehicle may run out of fuel.
Your vehicle’s remote keyless entry transmitter, with the
remote start button, provides an increased range of
operation. However, the range may be less while
the vehicle is running and as a result, you may need to
be closer to your vehicle to turn it off, than you were
to turn it on.
There are other conditions which can affect the
performance of the transmitter, seeRemote Keyless
Entry System on page 2-3for additional information.
The remote vehicle start feature needs to be reset after
your vehicle’s engine is started two times using the
transmitter’s remote start button. The remote start
system is reset by Inserting the vehicle’s key into the
ignition lock cylinder and turning it to RUN and then to
OFF. SeeIgnition Positions on page 2-21for
information regarding the ignition positions on
your vehicle.
/(Remote Start):If your vehicle has the remote start
feature, the keyless entry transmitter will have a
button with this symbol on it.To start the vehicle using the remote start feature, do
the following:
1. Aim the transmitter at the vehicle.
2. Press and release the transmitter’s lock button,
then immediately press and hold the transmitter’s
remote start button until the turn signal lamps �ash
or for four seconds, if the vehicle’s lights are not
visible. The vehicle’s doors will lock.
3. When the vehicle starts, the parking lamps will turn
on and remain on while the engine is running.
The engine will shut off automatically after
10 minutes, unless a time extension has been done
or the vehicle’s key is inserted into the ignition
lock cylinder and turned to RUN.
4. To manually shut off a remote start, do any of the
following:
Aim the remote keyless entry transmitter at the
vehicle and press the remote start button until
the parking lamps turn off.
Turn on the hazard warning �ashers.
Turn the ignition switch to RUN and then to OFF.
2-8
Page 81 of 410

If you enter the vehicle after a remote start, and the
engine is still running, insert the key into the ignition lock
cylinder and turn it to the RUN position to drive the
vehicle.
Your vehicle’s engine can be started two times using
the transmitter’s remote start feature.
If only one remote start procedure has been done, since
last driving the vehicle or resetting the remote start
system, the engine may be started again remotely
following the remote start procedure a second time.
If the remote start procedure is used again before the
�rst ten minute time frame has ended, 10 minutes will be
added to the remaining minutes. The added
10 minutes are considered a second remote start.
The remote vehicle start feature will not operate if:
The remote start system is disabled.
The vehicle’s key is in the ignition.
A door is open or the vehicle’s hood is not closed.
The hazard warning �ashers are on.
There is an emission control system malfunction.
The engine coolant temperature is too high.
The oil pressure is low.
Two remote vehicle starts have already been
provided. The maximum number of remote starts or
remote start attempts between ignition cycles
with the key is two.
If a remote start is attempted and is unsuccessful, the
Driver Information Center (DIC) will display REMOTE
START DISABLED.
Vehicles equipped with the remote vehicle start feature
are shipped from the factory with the remote vehicle
start system enabled. The system may be disabled
through the DIC. See “REMOTE START” under
DIC Vehicle Personalization on page 3-71for additional
information.
2-9
Page 116 of 410

Engine Coolant Temperature Gage..................3-38
Low Coolant Warning Light............................3-39
Malfunction Indicator Lamp.............................3-39
Oil Pressure Light.........................................3-42
Change Engine Oil Light................................3-43
Security Light...............................................3-43
Cruise Control Light......................................3-43
Reduced Engine Power Light.........................3-44
Highbeam On Light.......................................3-44
Headlamps Suggested Light...........................3-44
Low Washer Fluid Warning Light.....................3-45
Door Ajar Light.............................................3-45
Trunk Ajar Light............................................3-45
Service Vehicle Soon Light............................3-45
Fuel Gage...................................................3-46
Low Fuel Warning Light.................................3-46
Check Gas Cap Light....................................3-46Driver Information Center (DIC).......................3-47
DIC Operation and Displays...........................3-47
DIC Warnings and Messages.........................3-53
DIC Vehicle Personalization............................3-71
Audio System(s).............................................3-79
Setting the Time...........................................3-79
Radio with CD (Base)...................................3-79
Radio with CD (UpLevel)...............................3-84
Radio with CD (MP3)....................................3-92
Radio with Six-Disc CD................................3-105
Theft-Deterrent Feature................................3-117
Audio Steering Wheel Controls......................3-118
Radio Reception.........................................3-119
Care of Your CDs.......................................3-119
Care of Your CD Player...............................3-119
Backglass Antenna......................................3-120
Chime Level Adjustment...............................3-120
Section 3 Instrument Panel
3-2
Page 123 of 410

Windshield Wipers
You control the windshield wipers by turning the band
with the wiper symbol on it.
8(Mist):For a single wiping cycle, turn the band to
mist. Hold it there until the wipers start. Then let go. The
wipers will stop after one wipe. If you want more
wipes, hold the band on mist longer.
N(Delay):You can set the wiper speed for a long or
short delay between wipes. This can be very useful
in light rain or snow. Turn the band to choose the delay
time. The closer to the top of the lever, the shorter
the delay.
6(Low Speed):For steady wiping at low speed,
turn the band away from you to the �rst solid band past
the delay settings. For high-speed wiping, turn the
band further, to the second solid band past the delay
settings. To stop the wipers, move the band to off.
1(High Speed):For high-speed wiping, turn
the band further, to the second solid band past the
delay settings.
9(Off):To stop the wipers, move the band to off.
Be sure to clear ice and snow from the wiper blades
before using them. If they’re frozen to the windshield,
carefully loosen or thaw them. If your blades do become
worn or damaged, get new blades or blade inserts.
Windshield Washer
LQ(Washer Fluid):There is a paddle marked
with the windshield washer symbol at the top of
the multifunction lever. To spray washer �uid on the
windshield, push the paddle. The wipers will clear
the window and then either stop or return to your
preset speed.
{CAUTION:
In freezing weather, do not use your washer
until the windshield is warmed. Otherwise the
washer �uid can form ice on the windshield,
blocking your vision.
3-9
Page 125 of 410

Setting Cruise Control
{CAUTION:
If you leave your cruise control on when you
are not using cruise, you might hit a button
and go into cruise when you do not want to.
You could be startled and even lose control.
Keep the cruise control switch off until you
want to use cruise control.
1. Press the cruise on/off button. The indicator light in
the button will come on.
2. Get up to the speed you want.
3. Press the SET−button. The cruise symbol will
display in the instrument panel cluster when the
system is engaged.
4. Take your foot off the accelerator pedal.
Resuming a Set Speed
Suppose you set your cruise control at a desired speed
and then you apply the brake. This, of course,
disengages the cruise control. The cruise symbol in the
instrument panel cluster will go out, indicating cruise
control is no longer engaged.To return to your previously set speed, press the
RES + button once you are going about 25 mph
(40 km/h) or more.
You will go right back up to your chosen speed and
stay there.
If you hold the RES + button, the vehicle will keep
going faster until you release the button or apply the
brake. So unless you want to go faster, do not hold the
RES + button.
Increasing Speed While Using Cruise
Control
There are two ways to go to a higher speed:
Use the accelerator pedal to get to the higher
speed. Press the SET−button, then release
the button and the accelerator pedal. You’ll now
cruise at the higher speed.
Press the RES + button. Hold it there until you get
up to the speed you want, and then release the
button. To increase your speed in very small
amounts, press the button brie�y. Each time you do
this, your vehicle will go about 1 mph (1.6 km/h)
faster.
3-11
Page 126 of 410

Reducing Speed While Using Cruise
Control
There are two ways to reduce your speed while using
cruise control:
Press the SET−button until you reach the lower
speed you want, then release it.
To slow down in very small amounts, brie�y press
the SET−button. Each time you do this, you will
go about 1 mph (1.6 km/h) slower.
Passing Another Vehicle While Using
Cruise Control
Use the accelerator pedal to increase the vehicle’s
speed. When you take your foot off the pedal, the
vehicle will slow down to the cruise control speed you
set earlier.
Using Cruise Control on Hills
How well the cruise control will work on hills depends
upon the speed and load of the vehicle, and the
steepness of the hills. When going up steep hills, you
may have to step on the accelerator pedal to maintain
the vehicle’s speed. When going downhill, you may have
to brake or shift to a lower gear to keep the vehicle’s
speed down. Of course, applying the brake takes
the vehicle out of cruise control. Many drivers �nd this
to be too much trouble and do not use cruise control on
steep hills.
Ending Cruise Control
To end a cruise control session, step lightly on the
brake pedal.
Stepping on the brake will end the current cruise control
session only. Press the cruise on/off button to turn off
the system completely.
Erasing Speed Memory
When you turn off the cruise control or the ignition, your
cruise control set speed memory is erased.
3-12