Page 49 of 120

Reference
At a glance
Controls
Driving tips
Mobility
47
Between the blue and red zones
Normal operating range. The needle may rise as
far as the edge of the red sector during normal
operation.
Red
When you switch on the ignition, warning
lamp1 comes on briefly to indicate an opera-
tional check.
Comes on while driving:
The engine has overheated. Stop and switch
the engine off immediately and allow it to cool
down.
For checking the coolant level, refer to page87.
Service interval display
Remaining distance to next service
The displays shown in the illustration appear for
a few seconds when the ignition key is in
position 1 or after the engine is started.
The next service due appears with the message
OIL SERVICE or INSPECTION, together with
the distance remaining in miles – in kilometers
in Canada – before the next scheduled service.
The computer bases its calculations of the
remaining distance on the preceding driving
style.
A flashing message and a minus sign in front of
the number mean that the service interval has
already been exceeded by the distance shown
on the display. Please contact your BMW center
for an appointment.
Outside temperature
If the vehicle is not equipped with a computer,
the display in the instrument cluster always
shows the outside temperature.
Clock
If you wish to have a permanent time display,
you can have it appear in the car radio display,
refer to the Owner's Manual for Radio.
You can set the clock and the time display in the
car radio as follows.
To set
Ignition key in position 1 or higher:
Hours
1.Keep button2 pressed for several seconds
until the hours are displayed and the colon
flashes
2.Press button1 repeatedly until the required
hour is set
Minutes
3.Press button2 to switch to the minutes dis-
play
Page 50 of 120

Everything under control
48 4.Press button1 repeatedly until the required
minutes are set
5.Press button2 to confirm the settings.
The set time of day is transferred to the car
radio display or appears in the instrument clus-
ter display.
Display mode
In ignition key position 0:
Press button1.
The time of day is displayed for several sec-
onds.
Computer*
Mode selection
With the ignition key in position 1 or higher, you
can use the onboard computer button BC in the
turn signal lever to retrieve information from the
computer for display in the instrument cluster.
Every time you tap the onboard computer but-
ton BC, another function is displayed.
The order of the displays:
>Time
>Outside temperature
>Average fuel consumption
>Cruising range
>Average speed.
With the ignition key in position 1 or higher, the
last active setting is displayed.
If you wish, you can have all the displays
of the following functions shown in
another unit of measure.<
Outside temperature
To change the unit of measure, °F/°C
While the temperature display is active, keep
the onboard computer button BC in the turn
signal lever pressed until the display changes.
Ice warning
If the outside temperature drops to approx.
37.57/36, the computer automatically
switches to the outside temperature display.
A signal also sounds and the display flashes for
a short time.
Clock
Setting the 12-hour or 24-hour mode*
If the vehicle is equipped with a computer, you
can have the time displayed in either a 12-hour
or 24-hour mode.
While the time display is active, press the
onboard computer button BC in the turn signal
lever until the display changes.
Page 51 of 120
Reference
At a glance
Controls
Driving tips
Mobility
49
Average fuel consumption
If you press the onboard computer button BC in
the turn signal lever for longer while the average
fuel consumption is being displayed, a new
consumption value is calculated from that point
in time.
Any time spent when the vehicle is stationary
and the engine shut off is ignored in the calcula-
tion.
Cruising range
The computer bases its calculations of the
cruising range on the preceding driving style
and on the remaining fuel in the tank.
It is important that you refuel when the
cruising range falls below approx.
30 miles/50 km. Otherwise, the engine cannot
be guaranteed to operate properly and damage
may result.<
Average speed
If you press the onboard computer button BC in
the turn signal lever for longer while the average
speed is being displayed, a new average speed
value is calculated from that point in time.
Page 52 of 120

Technology for safety and driving convenience
50
Technology for safety and driving
convenience
Driving stability control
systems
Your BMW is equipped with a series of systems
that help maintain driving stability even in
adverse driving situations.
Antilock Brake System ABS
ABS keeps the wheels from locking during
braking. Steering stability is maintained even
during full brake applications. In this way, active
safety is enhanced.
ABS is operational each time the engine is
started. Braking safely, refer to page69.
Electronic brake-force distribution
The system controls brake-force application at
the rear wheels in order to obtain increased sta-
bility in the vehicle's braking response.
Dynamic Brake Control DBC
When the brake pedal is depressed quickly, this
system automatically supplies maximum brake-
servo boost, thereby helping to keep the vehi-
cle's braking distance as short as possible dur-
ing full brake applications. At the same time, the
benefits of the ABS are also exploited.
As long as you are braking, do not reduce pres-
sure on the brake pedal. When the brake pedal
is released, the DBC is switched off.
Dynamic Stability Control DSC
DSC prevents slip at the drive wheels while
starting off and accelerating the vehicle. DSC
also recognizes unstable vehicle conditions,
such as fishtailing or nose-diving. In these
cases, and subject to physical limits, DSC helps
to keep the vehicle on a steady course by
reducing engine speed and by applying brakes
at individual wheels.The laws of physics cannot be repealed
even with DSC. It will always be the
driver's responsibility to drive in a manner that
matches road conditions. Therefore, do not
limit the additional safety margin by practicing
risky driving.<
Dynamic Traction Control DTC
DTC is a variant of the DSC in which forward
momentum is optimized for special road condi-
tions, e.g. snow-covered roads that have not
yet been cleared. The system ensures maxi-
mum forward momentum, but driving stability is
limited. Therefore, drive carefully in accordance
with conditions.
In the following exceptional circumstances, it
may be effective to activate the DTC for a short
period:
>When driving on snow-covered grades, in
slush or on uncleared, snow-covered roads
>When rocking the vehicle or starting off in
deep snow or on loose surfaces
>When driving with snow chains.
Activating DTC
Press the button briefly; the DTC indicator lamp
lights up in the instrument cluster.
Reactivating DTC
Press the button again; the DTC indicator lamp
goes out in the instrument cluster.
Page 53 of 120

Reference
At a glance
Controls
Driving tips
Mobility
51
Deactivating DTC and DSC at the same
time
Press and hold the button for at least
3 seconds; the DSC indicator lamp lights up in
the instrument cluster. No more interventions
to increase stability and forward momentum are
carried out.
To enhance vehicle stability, reactivate DSC as
soon as possible.
Reactivating DSC
Press the button briefly; the indicator lamp goes
out in the instrument cluster.
Checking
The indicator lamp flashes:
DSC or DTC is regulating drive torque
and braking forces.
The indicator lamp lights up:
DTC and DSC have been deactivated together
by pressing the DTC button.
The indicator lamp lights up:
DTC has been activated by pressing
the DTC button.
The DSC indicator lamp flashes and the
DTC indicator lamp is lit:
DTC is actively regulating drive torque
and braking forces.
Malfunction in the driving stability
control systems
The warning lamp for the brake system
lights up in red, together with the yellow
indicator lamps for ABS and DSC:
The driving stability control systems
have failed.
Continue driving cautiously and defensively.
Avoid hard brake applications. Have the system
checked immediately.
Indication of the above-described mal-
function in Canadian models.
The DSC warning lamp lights up
together with the yellow warning lamp
for the brake system:
DSC, including DTC and DBC, are mal-
functioning.
The stabilizing interventions are no longer avail-
able. The vehicle remains operational. Have the
system checked as soon as possible.
Indication of the above-described mal-
function in Canadian models.
Page 54 of 120

Technology for safety and driving convenience
52
Brake force display
The Brake force display lights up in two stages
depending on how strongly you are braking.
>Normal braking:
The brake lamps and the center brake lamp
light up
>Hard braking or braking with ABS:
In addition, the illuminated surface of the
brake lamps is extended, refer to the pic-
ture.
Flat Tire Monitor
The concept
As you drive, the Flat Tire Monitor keeps track
of pressure levels in all four tires. The system
alerts you whenever the inflation pressure of a
tire falls significantly below the pressure of
another tire.
In the event of tire pressure loss, the rolling
radius of the tire changes, thereby affecting the
rotational speed of the wheels. This change is
detected, and a flat tire warning is issued to the
driver.
System requirements
To ensure a reliable flat tire warning, the system
must be initialized with the correct tire inflation
pressures.
Each time you correct the pressure in a
tire, or change a wheel or tire, the system
must be re-initialized.<
System limitations
The Flat Tire Monitor cannot provide you
with advance warning of sudden and
severe tire damage caused by external factors
and does not detect the balanced and very
gradual pressure loss that takes place in all four
tires over an extended period of time.<
The system could issue a false warning or func-
tion in a delayed manner in the following situa-
tions:
>System was not initialized
>You are driving on a snow-covered or slip-
pery road surface
>Performance-oriented driving: slip at the
drive wheels, high levels of lateral accelera-
tion
>You are driving with snow chains.
Initializing the system
The initialization is completed while you
are driving, and can be interrupted at any
time. Initialization is automatically continued
when you continue driving.
When driving with snow chains, do not initialize
the system.<
1.Start the engine, but do not drive off
2.Press the button as long as you need to until
the yellow indicator lamp in the instrument
cluster lights up for a few seconds
3.Drive off.
Initialization is completed during the drive,
without any feedback issued.
Page 55 of 120

Reference
At a glance
Controls
Driving tips
Mobility
53
Flat tire warning
The warning lamp in the instrument
cluster lights up in red. This visual alert
is accompanied by an acoustic warning
signal. There is a flat tire or a signficant loss of
tire pressure.
1.Carefully reduce your speed to under
50 mph / 80 km/h. Avoid strong braking and
steering maneuvers. Do not exceed a maxi-
mum speed of 50 mph / 80 km/h.
Do not continue driving if the vehicle
is not equipped with Run Flat tires,
refer to page82. If you continue to drive
with a flat tire, a serious accident could
result.<
2.Check the inflation pressure in all four tires
as soon as possible.
If the inflation pressure is correct in all
four tires, it is possible that the Flat
Tire Monitor was not initialized. In this case,
initialize the system.<
3.If there is a total loss of tire inflation pres-
sure, 0 psi/0 kilopascal, or obvious tire dam-
age, you can gauge the mileage for contin-
ued driving on the basis of the following
indications:
>With a light load:
1 person without luggage:
approx. 155 miles/250 km
>With a medium load:
1 person, luggage compartment full,
or
2 persons with luggage:
approx. 90 miles/150 km
>With a full load:
2 persons, luggage compartment full:
approx. 30 miles/50 km.
Drive cautiously. Do not exceed a speed
of 50 mph / 80 km/h. Driving characteris-
tics change if there is a loss of tire pressure.
This includes diminished track stability during
braking, longer braking distances and modified
steering. If unusual vibrations occur while driv-
ing, this can indicate a complete failure of the
damaged tire. Reduce your speed and pull over as soon as possible. Do not continue driving
and contact a BMW center.<
Malfunction
The indicator lamp in the instrument
cluster lights up yellow. The Flat Tire
Monitor is malfunctioning or out of
order. Have the system checked as soon as
possible.
Airbags
The following airbags are located under the
marked covers:
1Front airbags for driver and passenger
2Side airbags for driver and passenger
3Knee airbags for driver and passenger
Protective effect
Comply with the instructions on page27,
or the occupants' personal safety will be
diminished.<
The front airbags help protect the driver and
passenger in the event of a head-on collision
where the protection provided by the safety belt
alone would not be adequate. The side airbags
help provide protection in the event of a colli-
sion from the side. Each of the side airbags is
designed to help support the seat occupant's
upper body. The knee airbags help provide
additional protection in the event of a head-on
collision.
The airbags are deliberately not triggered in
every impact situation, e. g. not in less severe
accidents, certain roll-over conditions, or rear-
end collisions.
Page 56 of 120

Technology for safety and driving convenience
54 For information on the correct seating position,
refer to page27.
Do not apply adhesive materials to the
cover panels of the airbags, cover them or
modify them in any other way. Do not attempt to
remove the airbag retention system from the
vehicle. Never modify or tamper with either the
wiring or the individual components in the air-
bag system. This category includes the uphol-
stery in the center of the steering wheel, on the
instrument panel, and the side trim panels on
the doors. Do not attempt to remove or disman-
tle the steering wheel.
Do not touch the individual components
directly after the system has been triggered,
because there is a danger of burns.
If you note any indication of system malfunc-
tion, if you desire to have an airbag deactivated,
or if the airbag retention system is triggered in
response to an accident, you should always
entrust all inspection, repair and dismantling
operations to your BMW center.
Unprofessional attempts to service the system
could lead to failure in an emergency or to
undesired airbag activation, either of which
could result in personal injury.
To ensure compliance with official safety regu-
lations, please also entrust disposal of airbag
generators to a BMW center.<
Airbag warning information is also provided on
the sun visors.
Automatic deactivation of the
passenger airbags
Before transporting a child on the pas-
senger seat be sure to observe the infor-
mation/instructions under Transporting chil-
dren safely, refer to page33.<
Your BMW has a seat occupation detection
system. By evaluating the weight on the pas-
senger's seat, the system detects whether or
not the seat is occupied by a child in the child-
restraint system or an adult.
>When a child is seated in the child-restraint
system or in an empty seat, the front, side
and knee airbags are automatically deacti-
vated on the passenger's side>When an adult is traveling in the passen-
ger's seat, the front, side and knee airbags
remain active on the passenger's side.
Although not desired, it can occur in the
case of heavier children that the passen-
ger airbags remain active or, in the case of very
light adults or young persons, that the passen-
ger airbags are deactivated. The condition of
the passenger airbag system will be shown by
the indicator lamp in the central console, refer
to Passenger airbag status lamp below. If the
indicator lamp indicates that the passenger air-
bags are active and you want them to be deac-
tivated, the airbags have to be deactivated with
the vehicle ignition key and the key switch on
the outer passenger's side of the instrument
panel. Apart from passengers, do not place any
additional objects on the passenger seat. Do
not fit seat covers, seat cushion padding, ball
mats or other items to the passenger seat
unless they are specifically recommended by
BMW. Do not place any items under the seat.
Otherwise, the function of the seat occupation
detection could be impaired.<
Operational readiness of the airbag
system
The airbag indicator lamp in the instrument
cluster indicates the operational readiness of
the entire airbag system and the safety belt ten-
sioners as of ignition key position 1.
The indicator lamp goes out after a few sec-
onds.
Airbag system malfunction
>The indicator lamp does not light up as of
ignition key position 1
>The warning lamp lights up continuously.
 1
1 2
2 3
3 4
4 5
5 6
6 7
7 8
8 9
9 10
10 11
11 12
12 13
13 14
14 15
15 16
16 17
17 18
18 19
19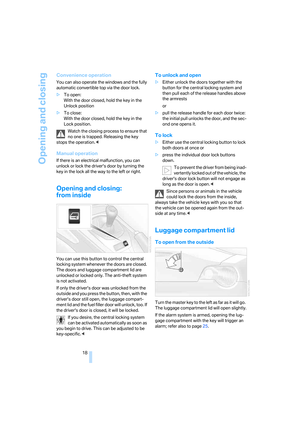 20
20 21
21 22
22 23
23 24
24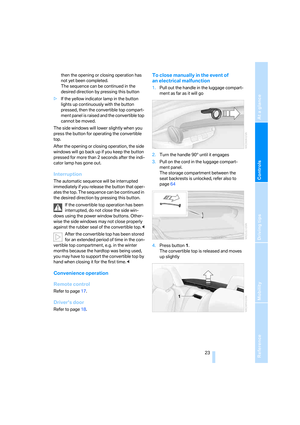 25
25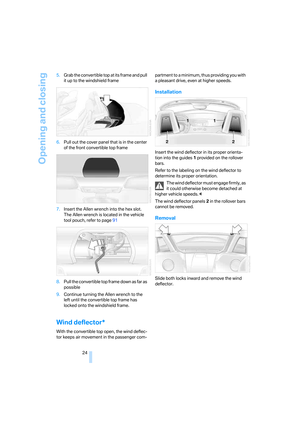 26
26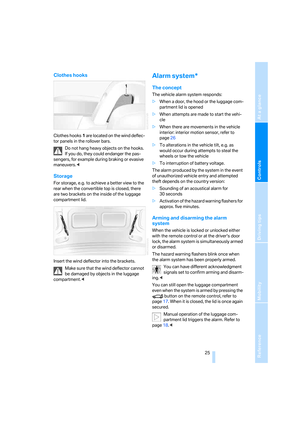 27
27 28
28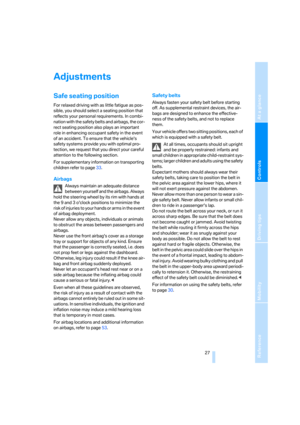 29
29 30
30 31
31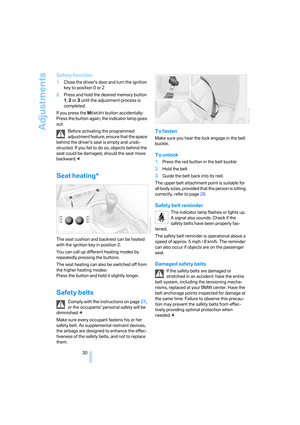 32
32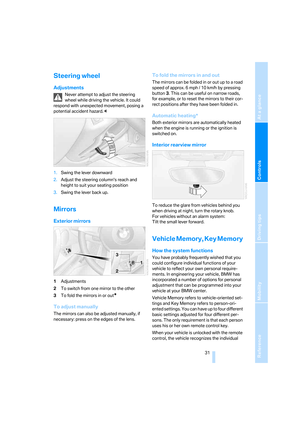 33
33 34
34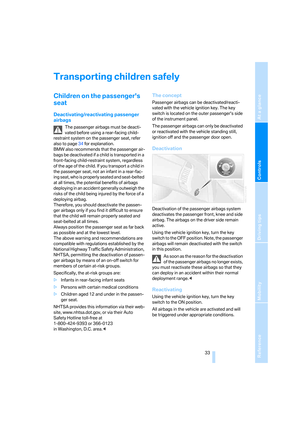 35
35 36
36 37
37 38
38 39
39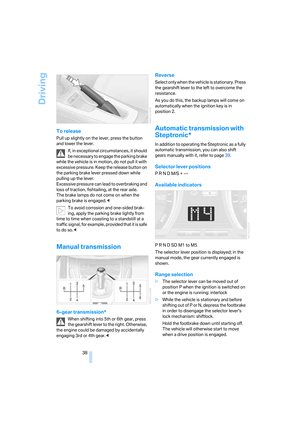 40
40 41
41 42
42 43
43 44
44 45
45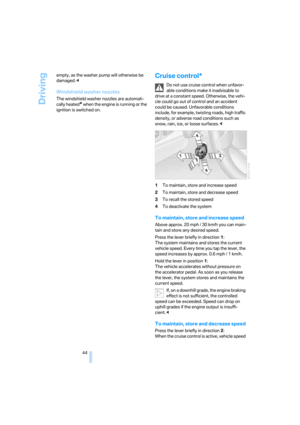 46
46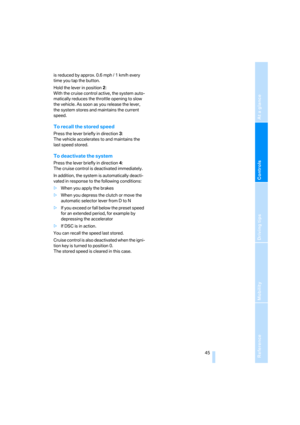 47
47 48
48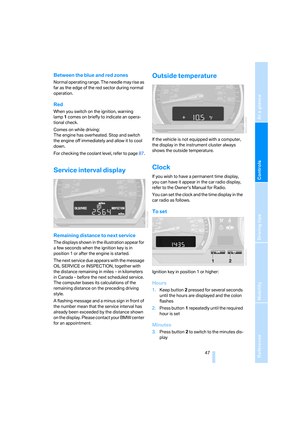 49
49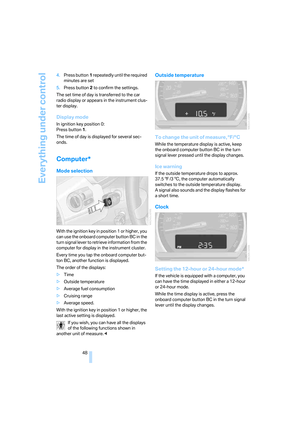 50
50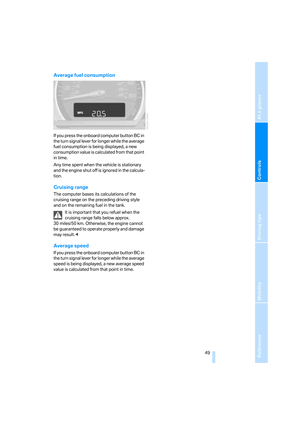 51
51 52
52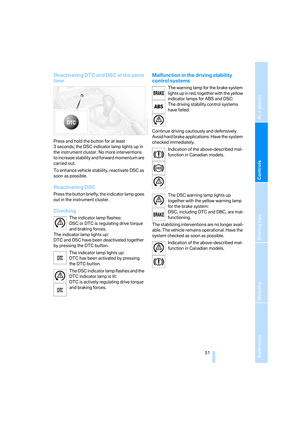 53
53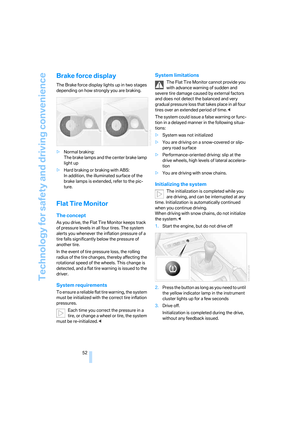 54
54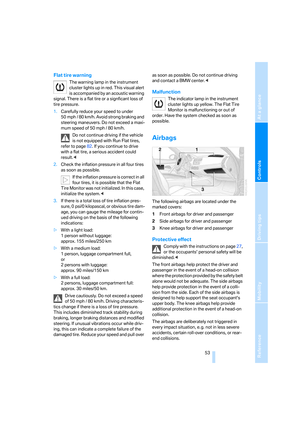 55
55 56
56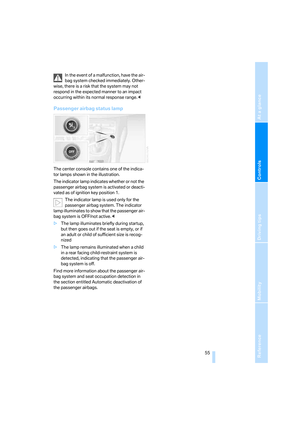 57
57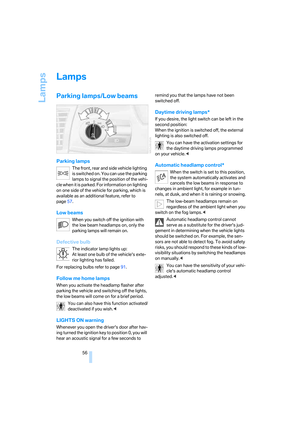 58
58 59
59 60
60 61
61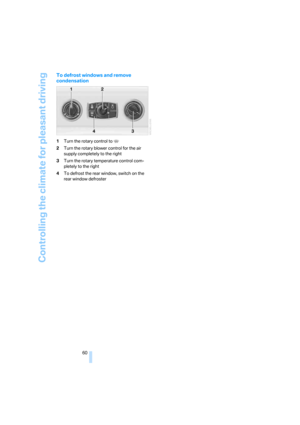 62
62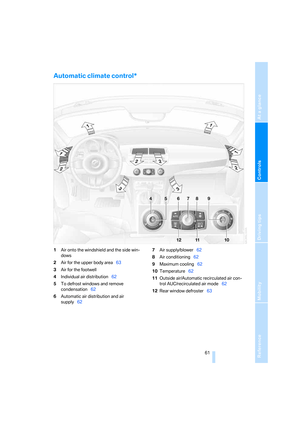 63
63 64
64 65
65 66
66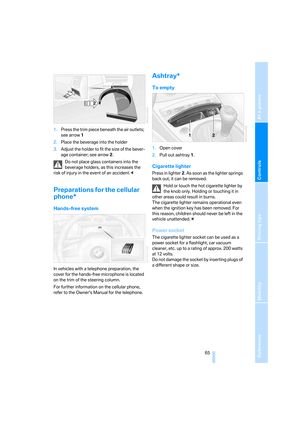 67
67 68
68 69
69 70
70 71
71 72
72 73
73 74
74 75
75 76
76 77
77 78
78 79
79 80
80 81
81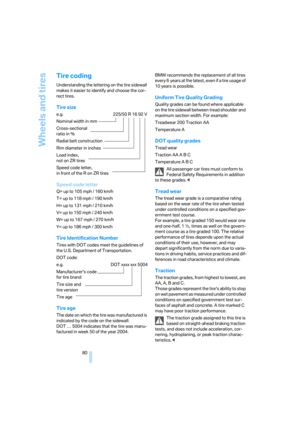 82
82 83
83 84
84 85
85 86
86 87
87 88
88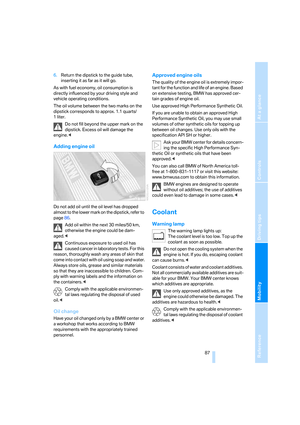 89
89 90
90 91
91 92
92 93
93 94
94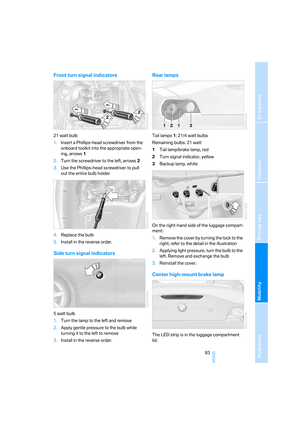 95
95 96
96 97
97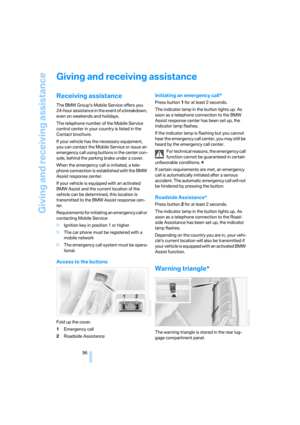 98
98 99
99 100
100 101
101 102
102 103
103 104
104 105
105 106
106 107
107 108
108 109
109 110
110 111
111 112
112 113
113 114
114 115
115 116
116 117
117 118
118 119
119