2005 BMW Z4 ROADSTER 2.5I lights
[x] Cancel search: lightsPage 14 of 120

Cockpit
12
Instrument cluster
1Speedometer
2Indicator and warning lamps12
3Tachometer46
with indicator and warning lamps12
4Engine coolant temperature gauge46
5Fuel gauge46
6Button for
>Time47
>Service interval display47
7Display field for selector lever and program
indicator
>Automatic transmission
*38
>Sequential manual gearbox SMG
*40
8Button for
>Trip odometer, reset to zero46
>Setting time47
9Display for
>Trip odometer/Odometer46
>Clock47
>Service interval47
>Computer
*48
Indicator and warning lamps
Technology that monitors itself
Indicator and warning lamps that are identified
by
+ are tested for proper functioning whenever
the ignition key is turned. They each light up
once for different periods of time.
If a malfunction occurs in one of the monitored
systems, the corresponding light does not go
out after the engine has started, or it lights up
again while the vehicle is in motion. You can find
more information about each system on the
specified pages.
Safety belt reminder +30
Airbags
+53
Battery charge current
+94
Page 25 of 120

Reference
At a glance
Controls
Driving tips
Mobility
23
then the opening or closing operation has
not yet been completed.
The sequence can be continued in the
desired direction by pressing this button
>If the yellow indicator lamp in the button
lights up continuously with the button
pressed, then the convertible top compart-
ment panel is raised and the convertible top
cannot be moved.
The side windows will lower slightly when you
press the button for operating the convertible
top.
After the opening or closing operation, the side
windows will go back up if you keep the button
pressed for more than 2 seconds after the indi-
cator lamp has gone out.
Interruption
The automatic sequence will be interrupted
immediately if you release the button that oper-
ates the top. The sequence can be continued in
the desired direction by pressing this button.
If the convertible top operation has been
interrupted, do not close the side win-
dows using the power window buttons. Other-
wise the side windows may not close properly
against the rubber seal of the convertible top.<
After the convertible top has been stored
for an extended period of time in the con-
vertible top compartment, e.g. in the winter
months because the hardtop was being used,
you may have to support the convertible top by
hand when closing it for the first time.<
Convenience operation
Remote control
Refer to page17.
Driver's door
Refer to page18.
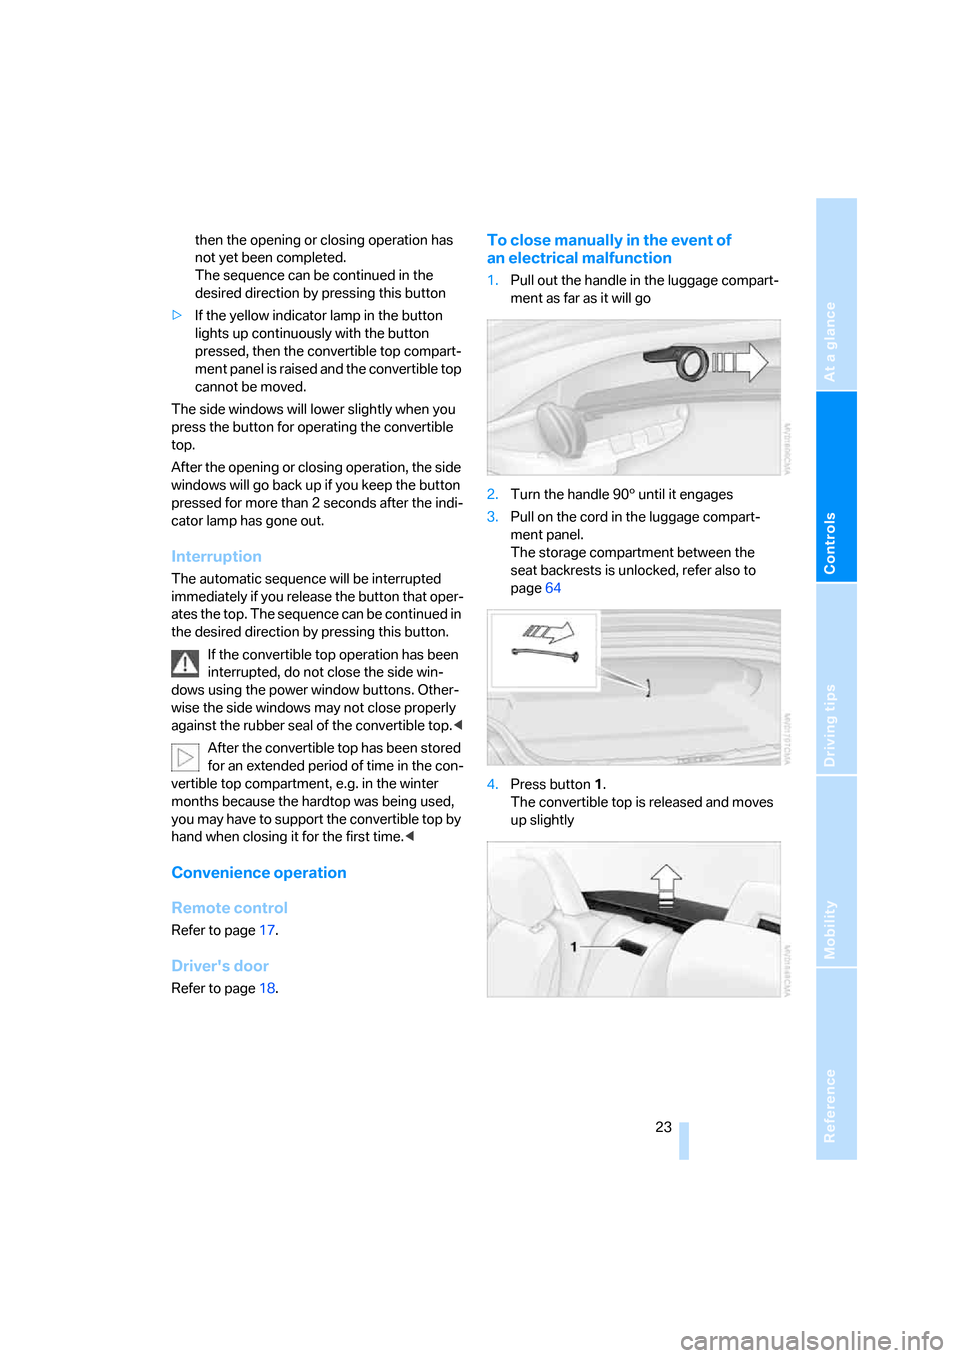
To close manually in the event of
an electrical malfunction
1.Pull out the handle in the luggage compart-
ment as far as it will go
2.Turn the handle 903 until it engages
3.Pull on the cord in the luggage compart-
ment panel.
The storage compartment between the
seat backrests is unlocked, refer also to
page64
4.Press button1.
The convertible top is released and moves
up slightly
Page 28 of 120

Opening and closing
26
Stopping the alarm
>Unlock the vehicle with the remote control,
refer to page16
>or turn the ignition key to position 1, refer to
page36.
Indicator lamp displays
>The indicator lamp beneath the interior mir-
ror flashes continuously:
The system is armed
>The indicator lamp flashes immediately
after the vehicle is locked:
Doors or luggage compartment lid are not
completely closed. Even if you do not close
the area causing the alert, the remaining
areas are secured and the indicator lamp
flashes continuously after 10 seconds.
However, the interior motion sensor is not
activated
>If the indicator lamp goes out immediately
after the vehicle is unlocked:
No manipulation or attempted intrusions
have been detected in the period since the
system was armed
>If the indicator lamp flashes for 10 seconds
immediately after the vehicle is unlocked:
An attempted entry has been detected in
the period since the system was armed.
After an alarm has been triggered, the indicator
lamp will flash continuously.
Tilt alarm sensor and interior motion
sensor
Tilt alarm sensor
The inclination of the vehicle is monitored. The
alarm system reacts, e.g. to attempts to steal
the wheels or tow the vehicle.
Interior motion sensor*
The system monitors the footwells and the
seating areas of the driver and passenger. Even
when the convertible top is open, the alarm sys-
tem including the interior motion sensor is
armed. Objects falling into the vehicle, e.g.
leaves, can trigger unintentional alarms, refer to
Avoiding unintentional alarms.
Avoiding unintentional alarms
The tilt alarm sensor and interior motion sensor
can be deactivated at the same time. In this way
you can avoid unintentional alarms, e.g. in the
following situations:
>In duplex garages
>When the vehicle is being transported on a
car-carrying train
>If animals are to be left in the vehicle.
To deactivate the tilt alarm and interior
motion sensors
Press the button on the remote control
a second time immediately after locking.
The indicator lamp lights up briefly and then
flashes continuously. The tilt alarm sensor and
the interior motion sensor are deactivated until
the vehicle is again unlocked and locked.
Page 31 of 120

Reference
At a glance
Controls
Driving tips
Mobility
29
Seat adjustment: M Sports seat*
You can also adjust the tilt and the thigh sup-
port.
1 Tilt upward
Pull the lever repeatedly until the desired tilt has
been reached.
2 Tilt downward
Push the lever repeatedly until the desired tilt
has been reached.
3 Thigh support
Pull the lever and adjust the position of the
cushion for thigh support as desired.
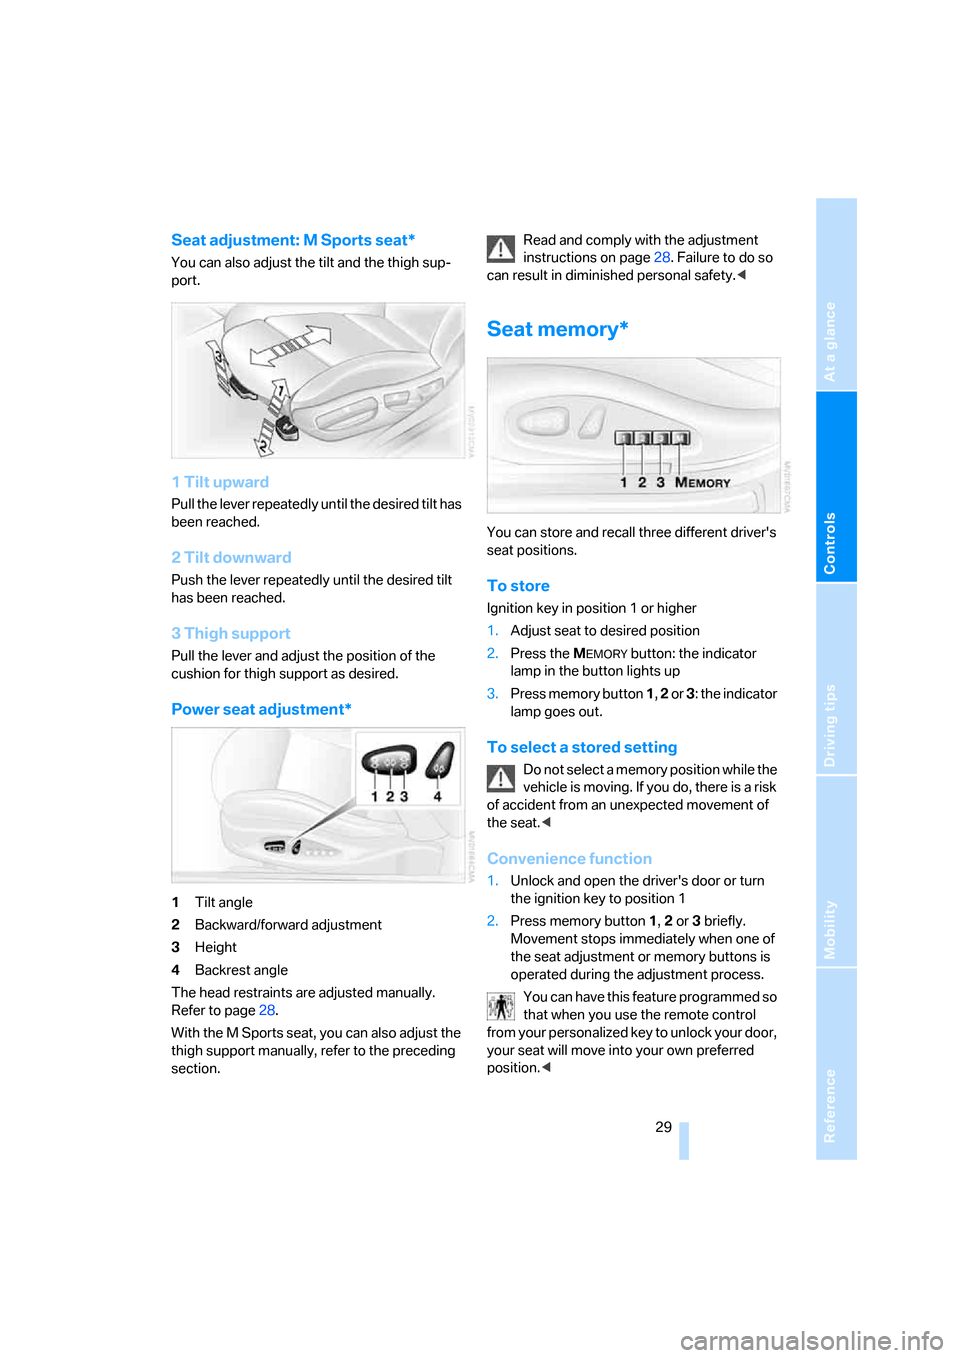
Power seat adjustment*
1Tilt angle
2Backward/forward adjustment
3Height
4Backrest angle
The head restraints are adjusted manually.
Refer to page28.
With the M Sports seat, you can also adjust the
thigh support manually, refer to the preceding
section.Read and comply with the adjustment
instructions on page28. Failure to do so
can result in diminished personal safety.<
Seat memory*
You can store and recall three different driver's
seat positions.
To store
Ignition key in position 1 or higher
1.Adjust seat to desired position
2.Press the M
EMORY button: the indicator
lamp in the button lights up
3.Press memory button 1, 2 or 3: the indicator
lamp goes out.
To select a stored setting
Do not select a memory position while the
vehicle is moving. If you do, there is a risk
of accident from an unexpected movement of
the seat.<
Convenience function
1.Unlock and open the driver's door or turn
the ignition key to position 1
2.Press memory button 1, 2 or 3 briefly.
Movement stops immediately when one of
the seat adjustment or memory buttons is
operated during the adjustment process.
You can have this feature programmed so
that when you use the remote control
from your personalized key to unlock your door,
your seat will move into your own preferred
position.<
Page 32 of 120

Adjustments
30
Safety function
1.Close the driver's door and turn the ignition
key to position 0 or 2
2.Press and hold the desired memory button
1, 2 or 3 until the adjustment process is
completed.
If you press the M
EMORY button accidentally:
Press the button again; the indicator lamp goes
out.
Before activating the programmed
adjustment feature, ensure that the space
behind the driver's seat is empty and unob-
structed. If you fail to do so, objects behind the
seat could be damaged, should the seat move
backward.<
Seat heating*
The seat cushion and backrest can be heated
with the ignition key in position 2.
You can call up different heating modes by
repeatedly pressing the buttons.
The seat heating can also be switched off from
the higher heating modes:
Press the button and hold it slightly longer.
Safety belts
Comply with the instructions on page27,
or the occupants' personal safety will be
diminished.<
Make sure every occupant fastens his or her
safety belt. As supplemental restraint devices,
the airbags are designed to enhance the effec-
tiveness of the safety belts, and not to replace
them.
To fasten
Make sure you hear the lock engage in the belt
buckle.
To unlock
1.Press the red button in the belt buckle
2.Hold the belt
3.Guide the belt back into its reel.
The upper belt attachment point is suitable for
all body sizes, provided that the person is sitting
correctly, refer to page28.
Safety belt reminder
The indicator lamp flashes or lights up.
A signal also sounds. Check if the
safety belts have been properly fas-
tened.
The safety belt reminder is operational above a
speed of approx. 5 mph / 8 km/h. The reminder
can also occur if objects are on the passenger
seat.
Damaged safety belts
If the safety belts are damaged or
stretched in an accident: have the entire
belt system, including the tensioning mecha-
nisms, replaced at your BMW center. Have the
belt anchorage points inspected for damage at
the same time. Failure to observe this precau-
tion may prevent the safety belts from effec-
tively providing optimal protection when
needed.<
Page 36 of 120

Transporting children safely
34
Passenger airbags lamp
The center console contains one of the indica-
tor lamps shown in the illustration.
The system checks that the airbag system is
functioning properly when the ignition key is
turned, and the indicator lamp in the central
console lights up for several seconds.
>The indicator lamp lights up continuously
when the passenger airbags are deacti-
vated
>If the passenger airbags are activated, it
goes out after several seconds
The passenger airbags are deactivated
when the key switch is in the ON position
and the passenger seat is unoccupied. The
indicator lamp is not lit.<
At all times, occupants should sit com-
fortably upright and be properly
restrained: infants and small children in appro-
priate child-restraint systems; larger children
and adults using the safety belts. Please note
that the word Airbag imprinted on the door trim
panel indicates the airbag's location.<
Seating position for children
This is the correct way a larger child no longer
using a child-restraint system should sit wear-ing the safety belt, when the airbag system is
activated.
Installing child-restraint
systems
Before installing any child-restraint system or
child seat, read the following:
Never install a rear-facing child-restraint
system in the passenger seat of this vehi-
cle, unless the passenger airbags have been
turned off and the indicator lamp in the center
console indicates that the passenger airbags
are deactivated. For a child, not an infant, cer-
tain precautions should be taken. Position the
passenger seat as far back as possible and at
the lowest level. This important precaution is
intended to maximize the distance between the
airbags and the child. Younger children should
be secured in an appropriate forward-facing
child-restraint system that has first been prop-
erly secured. Older children should be tightly
secured with a safety belt, sitting with their back
against the vehicle seat back. Always ensure
that all occupants, of all ages, remain properly
and securely restrained at all times.<
Always follow the manufacturer's instruc-
tions concerning installation and use;
otherwise the system's protective function
could be impaired. After an accident, have all
parts of the affected safety belt system
inspected and/or replaced by your BMW cen-
ter.<
Commercially-available child-restraint systems
are designed to be secured with a lap belt or
with the lap belt portion of a combination lap/
shoulder belt. Improperly or inadequately
installed restraint systems can increase the risk
of injury to children. Always read and follow the
instructions that come with the system.
Page 39 of 120

Reference
At a glance
Controls
Driving tips
Mobility
37
>On the first attempt, engage the starter for
approx. 10 seconds
>Press the accelerator pedal halfway down.
Avoid frequent starting attempts in short
succession or repeated starting attempts
during which the engine does not start. Other-
wise, uncombusted or incompletely combusted
fuel will pose a risk of the catalytic converter
overheating and being damaged.<
Manual transmission
1.Engage the parking brake
2.Gearshift lever in idling position
3.Depress the clutch pedal.
If the clutch pedal is not depressed, the
engine cannot be started
4.Start the engine.
Automatic transmission
1.Depress footbrake
2.Place selector lever in position P or N
3.Start the engine.
Sequential manual gearbox SMG
1.Depress footbrake
2.Move selector lever to neutral position N
3.Start the engine.
If the engine does not start, re-engage the
position last selected, refer to the display
in the instrument cluster, and then engage posi-
tion N again.<
Switching off the engine
Do not remove the ignition key while the
vehicle is still moving. If you did so, the
steering lock would engage when the steering
wheel is turned.
When you leave the vehicle, always remove the
ignition key and engage the steering lock.
Apply the parking brake when parking on steep
gradients, as the vehicle could otherwise start
to roll.<
You can have an acoustic signal set as a
reminder that the ignition key is still in the ignition switch after the driver's door has been
opened.<
Manual transmission
1.Turn the ignition key to position 1 or 0
2.Engage first gear or reverse gear.
Automatic transmission
1.Place the selector lever in position P
2.Turn the ignition key to position 1 or 0.
Sequential manual gearbox SMG
1.Engage a drive position
2.Turn the ignition key to position 1 or 0. An
acoustic signal sounds if the engine is
switched off while position N is engaged.
Parking brake
The parking brake is designed primarily to pre-
vent the vehicle from rolling when parked. It
operates against the rear wheels.
The indicator lamp lights up. As the
vehicle drives off, an acoustic signal
also sounds. The parking brake has
been applied.
Indicator lamp for Canadian models.
To engage
The detent engages automatically and the indi-
cator lamp in the instrument cluster comes on
when the ignition key is in position 2.
Page 41 of 120

Reference
At a glance
Controls
Driving tips
Mobility
39
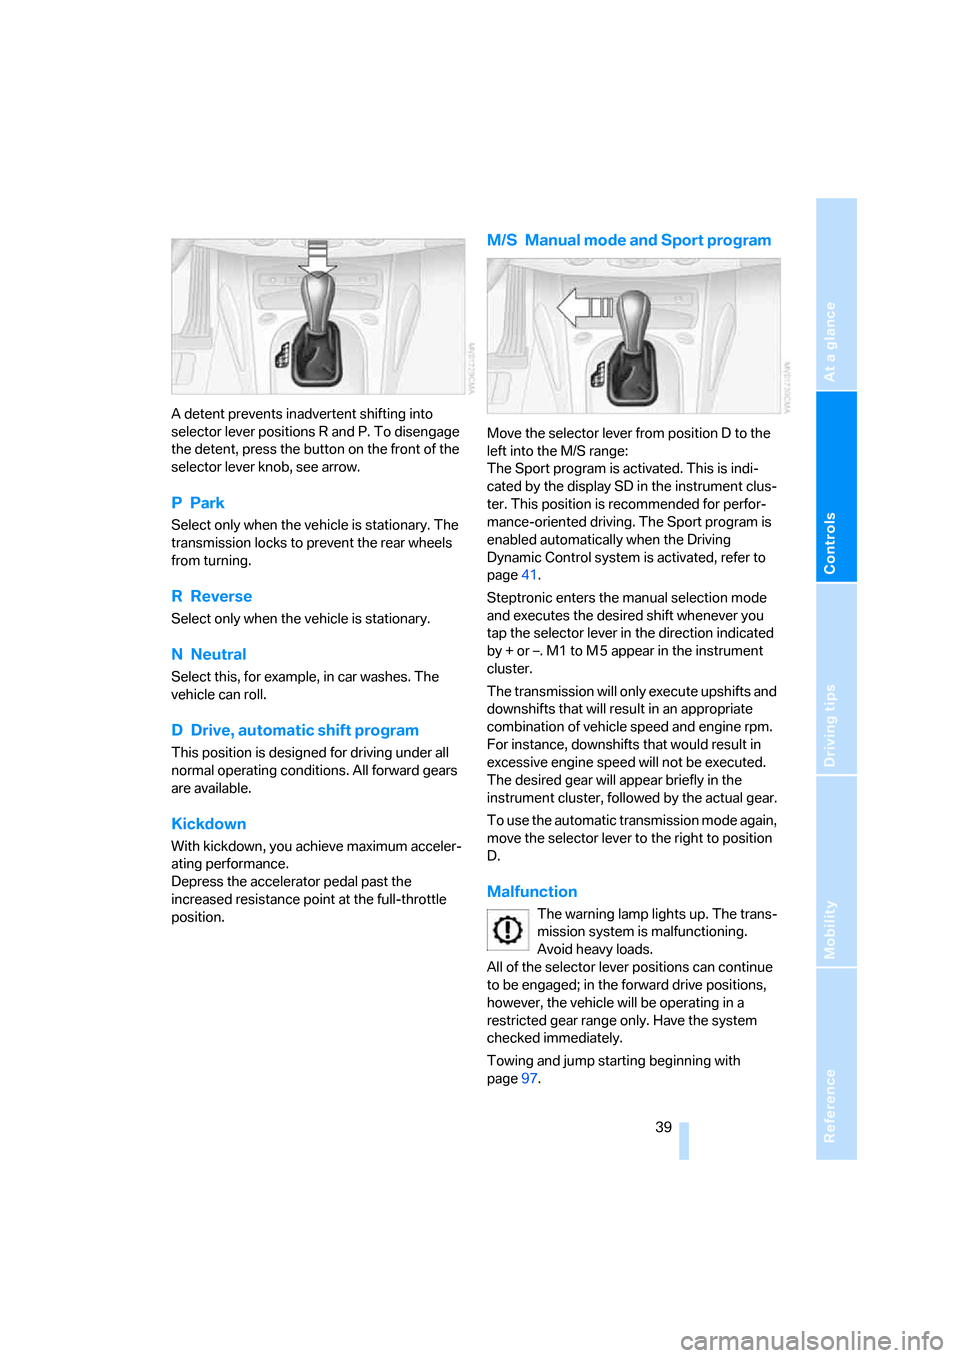
A detent prevents inadvertent shifting into
selector lever positions R and P. To disengage
the detent, press the button on the front of the
selector lever knob, see arrow.
PPark
Select only when the vehicle is stationary. The
transmission locks to prevent the rear wheels
from turning.
R Reverse
Select only when the vehicle is stationary.
NNeutral
Select this, for example, in car washes. The
vehicle can roll.
D Drive, automatic shift program
This position is designed for driving under all
normal operating conditions. All forward gears
are available.
Kickdown
With kickdown, you achieve maximum acceler-
ating performance.
Depress the accelerator pedal past the
increased resistance point at the full-throttle
position.
M/S Manual mode and Sport program
Move the selector lever from position D to the
left into the M/S range:
The Sport program is activated. This is indi-
cated by the display SD in the instrument clus-
ter. This position is recommended for perfor-
mance-oriented driving. The Sport program is
enabled automatically when the Driving
Dynamic Control system is activated, refer to
page41.
Steptronic enters the manual selection mode
and executes the desired shift whenever you
tap the selector lever in the direction indicated
by + or –. M1 to M 5 appear in the instrument
cluster.
The transmission will only execute upshifts and
downshifts that will result in an appropriate
combination of vehicle speed and engine rpm.
For instance, downshifts that would result in
excessive engine speed will not be executed.
The desired gear will appear briefly in the
instrument cluster, followed by the actual gear.
To use the automatic transmission mode again,
move the selector lever to the right to position
D.
Malfunction
The warning lamp lights up. The trans-
mission system is malfunctioning.
Avoid heavy loads.
All of the selector lever positions can continue
to be engaged; in the forward drive positions,
however, the vehicle will be operating in a
restricted gear range only. Have the system
checked immediately.
Towing and jump starting beginning with
page97.