Page 89 of 120

Reference
At a glance
Controls
Driving tips
Mobility
87
6.Return the dipstick to the guide tube,
inserting it as far as it will go.
As with fuel economy, oil consumption is
directly influenced by your driving style and
vehicle operating conditions.
The oil volume between the two marks on the
dipstick corresponds to approx. 1.1 quarts/
1 liter.
Do not fill beyond the upper mark on the
dipstick. Excess oil will damage the
engine.<
Adding engine oil
Do not add oil until the oil level has dropped
almost to the lower mark on the dipstick, refer to
page86.
Add oil within the next 30 miles/50 km,
otherwise the engine could be dam-
aged.<
Continuous exposure to used oil has
caused cancer in laboratory tests. For this
reason, thoroughly wash any areas of skin that
come into contact with oil using soap and water.
Always store oils, grease and similar materials
so that they are inaccessible to children. Com-
ply with warning labels and the information on
the containers.<
Comply with the applicable environmen-
tal laws regulating the disposal of used
oil.<
Oil change
Have your oil changed only by a BMW center or
a workshop that works according to BMW
requirements with the appropriately trained
personnel.
Approved engine oils
The quality of the engine oil is extremely impor-
tant for the function and life of an engine. Based
on extensive testing, BMW has approved cer-
tain grades of engine oil.
Use approved High Performance Synthetic Oil.
If you are unable to obtain an approved High
Performance Synthetic Oil, you may use small
volumes of other synthetic oils for topping up
between oil changes. Use only oils with the
specification API SH or higher.
Ask your BMW center for details concern-
ing the specific High Performance Syn-
thetic Oil or synthetic oils that have been
approved.<
You can also call BMW of North America toll-
free at 1-800-831-1117 or visit this website:
www.bmwusa.com to obtain this information.
BMW engines are designed to operate
without oil additives; the use of additives
could even lead to damage in some cases.<
Coolant
Warning lamp
The warning lamp lights up:
The coolant level is too low. Top up the
coolant as soon as possible.
Do not open the cooling system when the
engine is hot. If you do, escaping coolant
can cause burns.<
Coolant consists of water and coolant additives.
Not all commercially available additives are suit-
able for your BMW. Your BMW center knows
which additives are appropriate.
Use only approved additives, as the
engine could otherwise be damaged. The
additives are hazardous to health.<
Comply with the applicable environmen-
tal laws regulating the disposal of coolant
additives.<
Page 90 of 120

In the engine compartment
88
Checking the coolant level
1.The engine must be at ambient tempera-
ture
2.Open the cap of the expansion tank by turn-
ing it slightly counterclockwise to allow
accumulated pressure to escape, then
open completely
3.The coolant level is correct when the upper
end of the red float is at least even with the
upper edge of the filler neck but no more
than 3/4 in/2 cm above it, that is up to the
second mark on the float. Refer also to the
schematic diagram next to the filler neck
4.Slowly add coolant, if necessary, until the
correct level is reached; do not overfill
5.Turn the cap clockwise until it is tightly
closed
6.Have the cause for the coolant loss
removed as soon as possible.
Brake system
Malfunction
Brake fluid
The warning lamp lights up although
the parking brake is not engaged:
Stop the vehicle immediately.
The brake fluid level in the reservoir is too low.
At the same time, you may notice that brake
pedal travel is longer. Have the system checked
as soon as possible.
If you continue driving, extended pedal
travel may be necessary and braking dis-
tances may be significantly longer. Be sure to
adapt your driving style accordingly.
function in Canadian models.
Brake pads
The warning lamp lights up. The brake
pads have worn down to the minimum
safe limit. Have the brake pads
replaced as soon as possible.
For your own safety: use only brake pads
which BMW has approved for your spe-
cific vehicle model. BMW cannot evaluate non-
approved brake pads to determine if they are
suitable for use, and therefore cannot guaran-
tee the operating safety of the vehicle in the
event of their use.<
Page 91 of 120

Reference
At a glance
Controls
Driving tips
Mobility
89
Maintenance
The BMW Maintenance
System
The BMW Maintenance System helps maintain
the road safety and operating reliability of your
BMW.
Please keep in mind that regular maintenance is
not only necessary for the safety of your vehi-
cle, but also plays a significant role in maintain-
ing the resale value of your vehicle.
Service interval display
While conventional systems rely on distance
traveled alone to determine when a service is
due, the BMW Maintenance System has taken
the actual conditions under which the vehicle is
operated into consideration for years, because
miles can be traveled in many different ways:
From a maintenance point of view,
60,000 miles/100,000 km accumulated in
short-distance urban driving are not the same
as 60,000 miles/100,000 km accumulated at
moderate cruising speeds in long-distance
highway travel.
The BMW Maintenance System includes the
Engine Oil Service and Inspections I and II.
Determining the maintenance intervals based
on the actual loads on the vehicle covers every
kind of operating situation. Minimal use drivers,
who drive fewer than about 6,200 miles/
10,000 km per year, should nevertheless have
the oil changed at least every 2 years since
engine oil deteriorates over time, regardless of
use.
Service and Warranty Information
Booklet for US models, Warranty and
Service Guide Booklet for Canadian
models
For additional information on required mainte-
nance intervals and procedures, please refer to
the Service and Warranty Information Booklet
for US models, or the Warranty and Service
Guide Booklet for Canadian models.
Depending on operating conditions, it may be
advisable to have the body checked for damage
from rocks or gravel as a precaution against cor-
rosion.
BMW recommends that you have your
BMW center perform the maintenance
and repair.
Be sure that all maintenance work is recorded in
the Service and Warranty Information Booklet
for US models, Warranty and Service Guide
Booklet for Canadian models. These entries will
serve as proof that the vehicle has received reg-
ular maintenance.<
Page 92 of 120

Maintenance
90
OBD interface socket
The Onboard Diagnostic OBD interface socket
is located on the left of the driver's side under
the instrument panel and under a cover.
The cover has the letters OBD on it.
The purpose of the OBD system is to ensure
proper operation of the emission control sys-
tem for the vehicle's lifetime.
The system monitors emission-related compo-
nents and systems for deterioration and mal-
function.
If the Service engine soon indicator
lamp comes on either continuously or
intermittently, this indicates a fault in
the emission-related electronic systems.
Although the vehicle remains operational, you
should have the systems checked by your
BMW center at the earliest possible opportu-
nity.
The illuminated indicator informs you of the
need for service, not that you need to stop the
vehicle. However, the systems should be
checked by your BMW cente r a t t h e n e x t o p p o r -
tunity.
If the indicator blinks or flashes, this indicates a
high level of engine misfire. Reduce speed and
contact the nearest BMW center immediately.
Severe engine misfiring over even a short
period of time can seriously damage emission
control system components, especially the cat-
alytic converter.Indication of the above-described mal-
function in Canadian models.
If the gas cap is not on tight enough, the
OBD system can detect leaking vapor
and the indicator will light up. If the gas cap is
then tightened, the indicator will usually go out
after a short period of time.<
Event Data Recorders
Your vehicle may be equipped with one or more
sensing and diagnostic modules or a recording
device capable of recording or transmitting cer-
tain vehicle data or information. In addition, if
you have a Subscription Service Agreement for
the BMW Assist system, certain vehicle infor-
mation may be transmitted or recorded in order
to provide such services.
Care
Interesting facts about the care of your vehicle
are found in the Caring for your vehicle bro-
chure.
Page 93 of 120

Reference
At a glance
Controls
Driving tips
Mobility
91
Replacement procedures
Onboard tool kit
The onboard tool kit is stored in a tool pouch. It
is located in the luggage compartment beneath
the floor panel.
Windshield wiper blades
1.Swich off the ignition
2.Fold the wiper arm completely out from the
windshield
3.Place the wiper blade in a position at right
angles to the wiper arm
4.Press the locking spring
5.Fold the wiper blade down and unhook it
toward the windshield
6.Pull the wiper blade past the wiper arm
toward the top
7.Insert a new wiper blade and apply pressure
until you hear it engage.
Lamps and bulbs
The lamps and bulbs make essential contribu-
tions to the safety of your vehicle. Therefore,
comply fully with the following instructions dur-
ing bulb replacement. If you are not familiar with
the procedures, BMW recommends that you
have your BMW center carry out the work.
Do not touch the glass portion of a new
bulb with your bare hands since even
small amounts of impurities burn in to the sur-
face and reduce the service life of the bulb. Use
a clean cloth, paper napkin or a similar material,
or hold the bulb by its metallic base.<
A replacement bulb set is available from your
BMW center.
Before working on the electrical system,
switch off the electrical accessory you are
working on or disconnect the cable from the
negative terminal of the battery. Failure to
observe this precaution could result in short cir-
cuits.
To prevent injuries and damage, always comply
with any instructions provided by the bulb man-
ufacturer.<
Accessing the headlamps
Protective cover in the wheel well
To gain access to the headlamp covers, turn the
front wheels in the required direction.
Page 94 of 120

Replacement procedures
92 1.Open the caps with a suitable object, e.g. a
coin or screwdriver
2.Fold up the protective cover in the wheel
well.
Headlamp cover
1.Pull the wire clamp out straight
2.Pull the wire clamp past the catches, see
arrows, and fold it down
3.Flip the headlamp cover open and remove.
Reinstall the headlamp cover carefully. If
it is not on tight, the headlamp installation
could be damaged.<
Reinstall the headlamp cover in reverse order.
Low beams and high beams
Left side of engine compartment:
1Low beams
2High beams
H7 bulb, 55 watts
The H7 bulb is pressurized. Therefore,
wear safety glasses and protective
gloves. Failure to comply with these precau-
tions could result in physical injury if the bulb is
damaged.<
1.Turn the bulb holder to the left and pull out
2.Remove and replace the bulb
3.Install in the reverse order.
When cleaning the headlamps, please
observe the instructions in the Caring for
your vehicle brochure.<
Xenon lamps*
The service life of these bulbs is very long and
the probability of a failure is very low, provided
that they are not switched on and off an unusual
number of times. If one of these bulbs should
nevertheless fail, it is possible to continue driv-
ing with great caution using the fog lamps, pro-
vided traffic laws in your area do not prohibit
this.
Because of the extremely high voltages
involved, any work on the xenon lighting
system, including bulb-changing, should be
carried out by technically qualified personnel
only. Otherwise, there is a risk of fatal injury.<
Page 95 of 120

Reference
At a glance
Controls
Driving tips
Mobility
93
Front turn signal indicators
21 watt bulb
1.Insert a Phillips-head screwdriver from the
onboard toolkit into the appropriate open-
ing, arrows1
2.Turn the screwdriver to the left, arrows2
3.Use the Phillips-head screwdriver to pull
out the entire bulb holder
4.Replace the bulb
5.Install in the reverse order.
Side turn signal indicators
5 watt bulb
1.Turn the lamp to the left and remove
2.Apply gentle pressure to the bulb while
turning it to the left to remove
3.Install in the reverse order.
Rear lamps
Tail lamps1: 21/4 watt bulbs
Remaining bulbs: 21 watt
1Tail lamp/brake lamp, red
2Turn signal indicator, yellow
3Backup lamp, white
On the right-hand side of the luggage compart-
ment:
1.Remove the cover by turning the lock to the
right; refer to the detail in the illustration
2.Applying light pressure, turn the bulb to the
left. Remove and exchange the bulb
3.Reinstall the cover.
Center high-mount brake lamp
The LED strip is in the luggage compartment
lid.
Page 96 of 120

Replacement procedures
94 Please contact a BMW center in case of a mal-
function.
License plate lamps
5 watt bulb
1.Push out the lamp with a suitable object and
remove it
2.Replace the bulb.
Snap the lamp back into place.
Light-emitting diodes LEDs
Control elements, display units and other inte-
rior equipment in your vehicle use a light-emit-
ting diode behind a cover as a light source.
These light-emitting diodes are similar to con-
ventional lasers.
Do not remove the covers, and do not
look directly at the unfiltered light for sev-
eral hours. Otherwise, it can lead to retinal irrita-
tion of the eye.<
Changing a wheel
Run Flat tires
Your BMW is equipped with Run Flat tires.
Therefore, the wheel no longer has to be
changed immediately in the event of a loss in
inflation pressure.
Run Flat tires are labeled on the sidewall with a
circular symbol containing the letters RSC.
Refer to page82.
BMW recommends that you consult your BMW
center if you wish to replace the tires of your
B MW , o r change from summe r to winter tire s o r
vice versa.
Your BMW center knows how to work with Run Flat tires and is equipped with the necessary
special tools.
When mounting or replacing summer
tires with winter tires, or vice versa, use
only Run Flat tires since no spare wheel is avail-
able in the event of a flat.<
Jacking points
The jacking points are located at the positions
indicated in the illustration.
Your BMW center can provide you with a
suitable jack as an accessory.<
Vehicle battery
Maintenance
The battery is completely maintenance-free.
This means that the original electrolyte will nor-
mally last for the service life of the battery under
moderate climatic conditions. Your BMW cen-
ter will be happy to advise you if you have any
questions concerning the battery.
Indicator lamp
The indicator lamp lights up:
The battery is no longer being charged.
The alternator drive belt is defective or
there is a malfunction in the charging circuit of
the alternator. Please contact the nearest BMW
center.
If the drive belt is defective, pull over and
switch off the engine immediately to pre-
vent overheating and serious engine damage.
If the onboard supply voltage drops to a very
low level, increased steering effort may also be
necessary.<
 1
1 2
2 3
3 4
4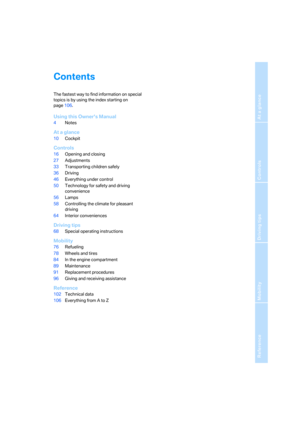 5
5 6
6 7
7 8
8 9
9 10
10 11
11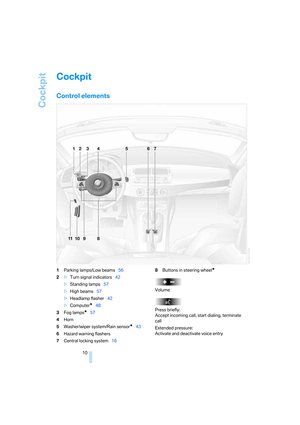 12
12 13
13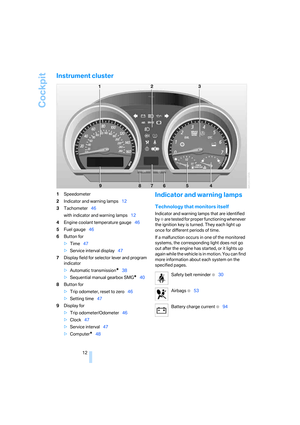 14
14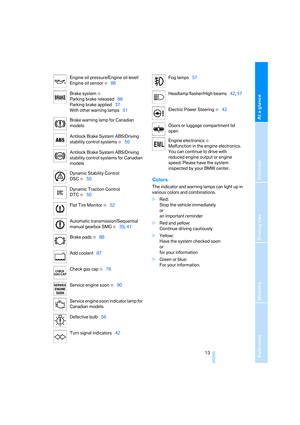 15
15 16
16 17
17 18
18 19
19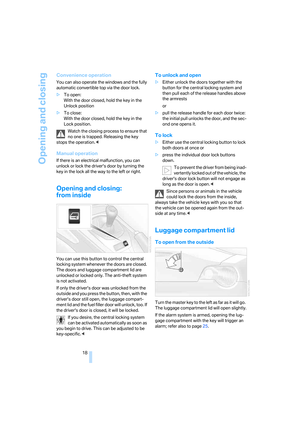 20
20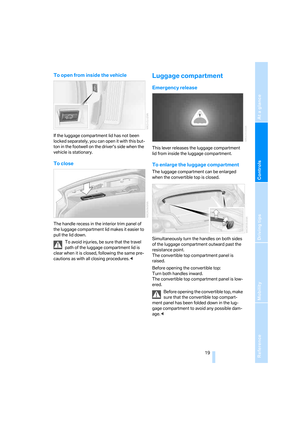 21
21 22
22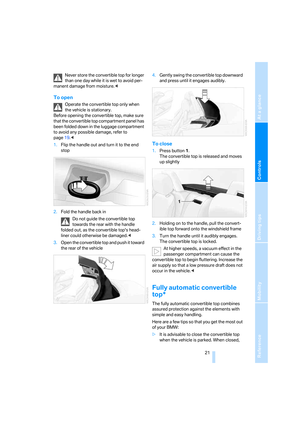 23
23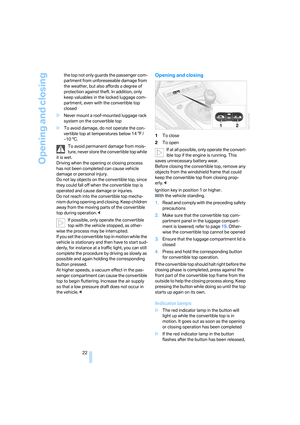 24
24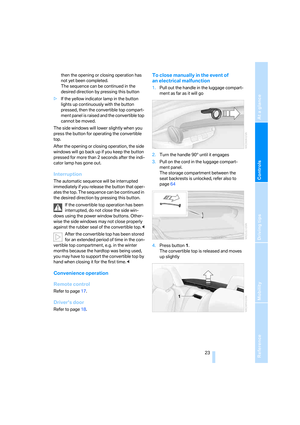 25
25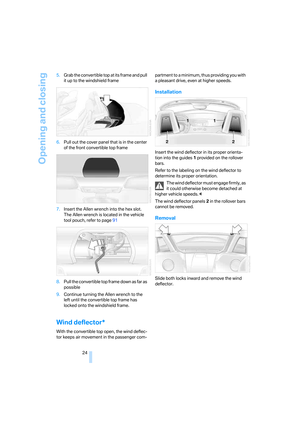 26
26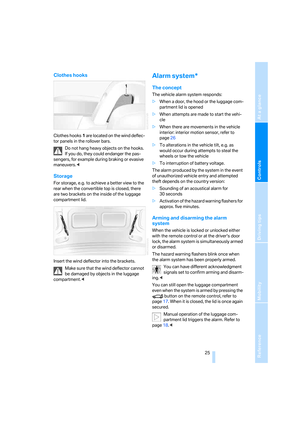 27
27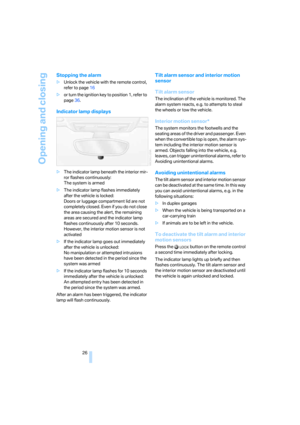 28
28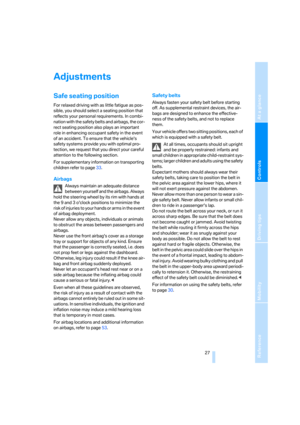 29
29 30
30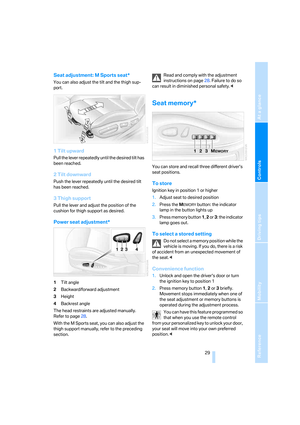 31
31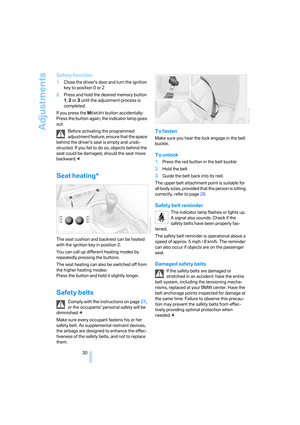 32
32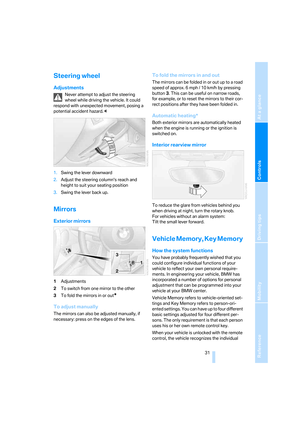 33
33 34
34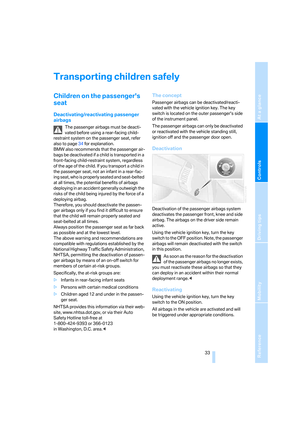 35
35 36
36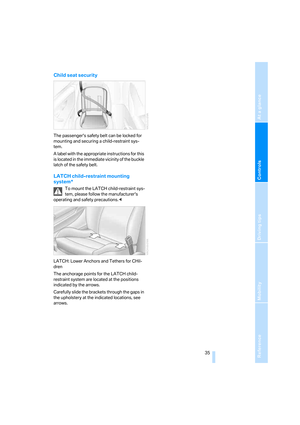 37
37 38
38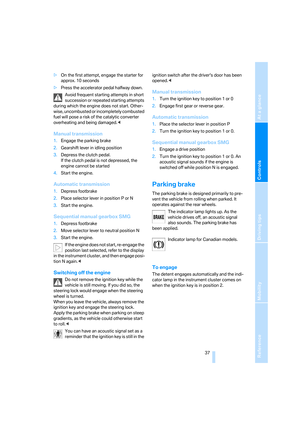 39
39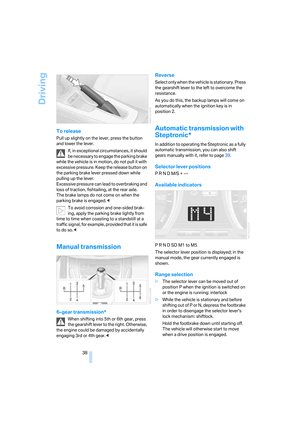 40
40 41
41 42
42 43
43 44
44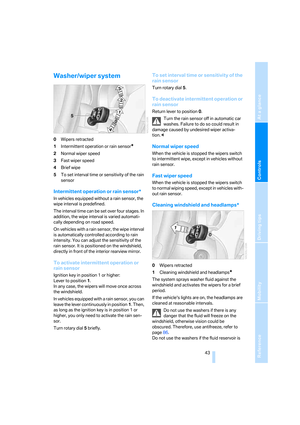 45
45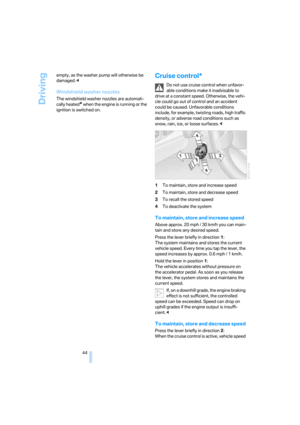 46
46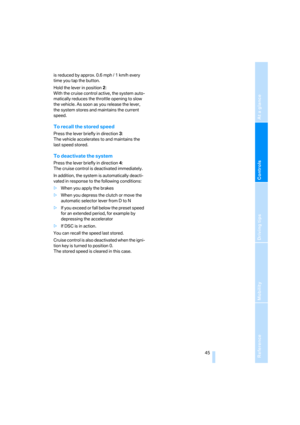 47
47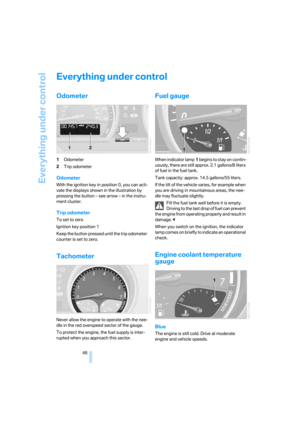 48
48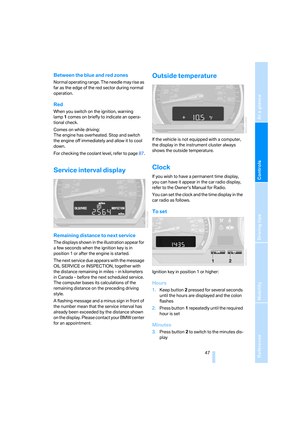 49
49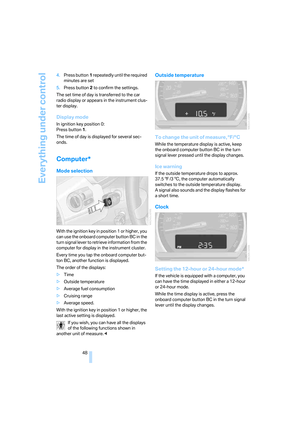 50
50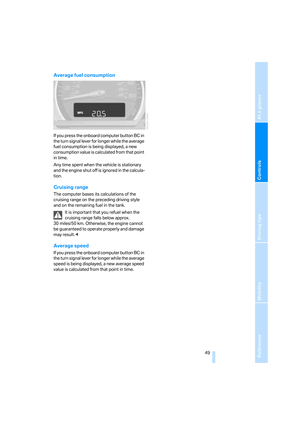 51
51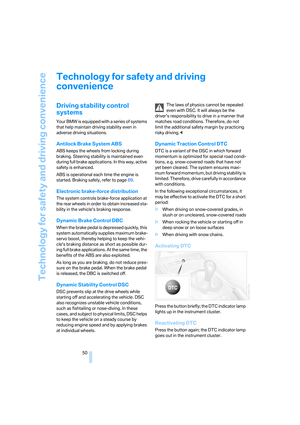 52
52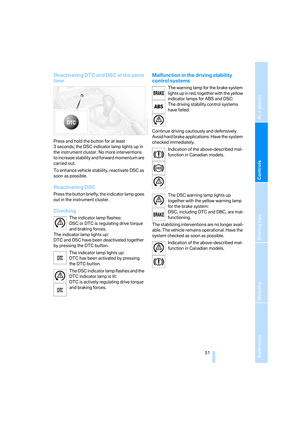 53
53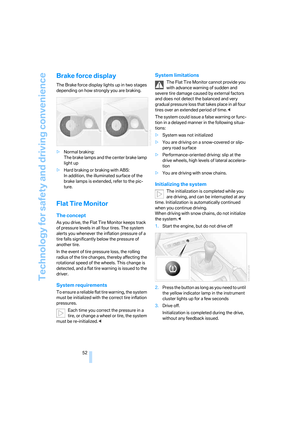 54
54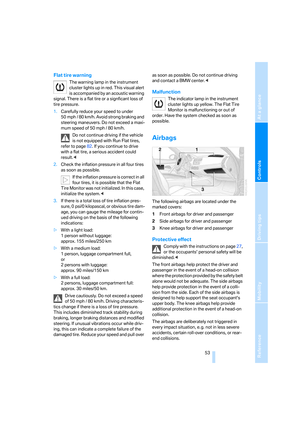 55
55 56
56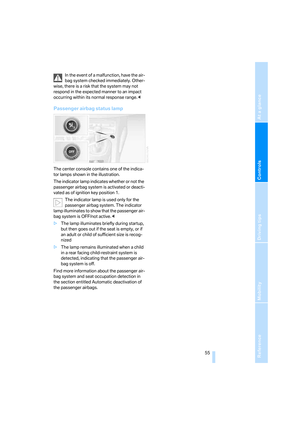 57
57 58
58 59
59 60
60 61
61 62
62 63
63 64
64 65
65 66
66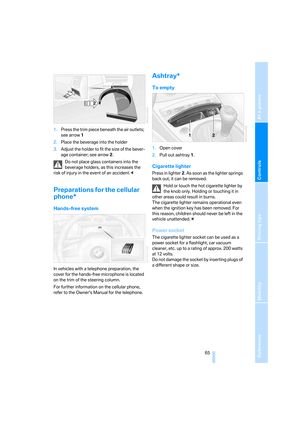 67
67 68
68 69
69 70
70 71
71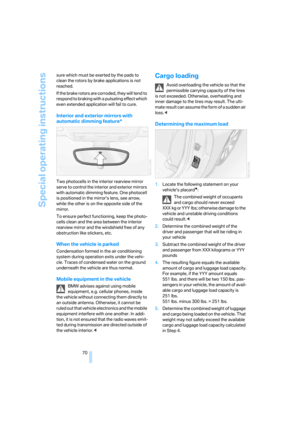 72
72 73
73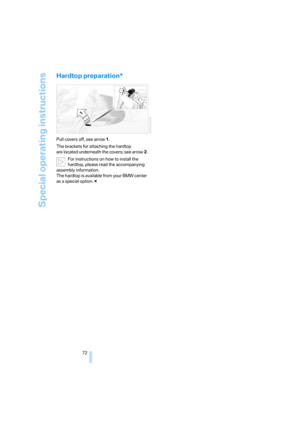 74
74 75
75 76
76 77
77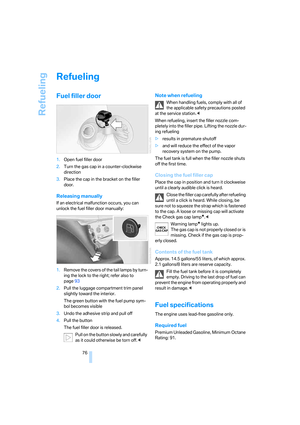 78
78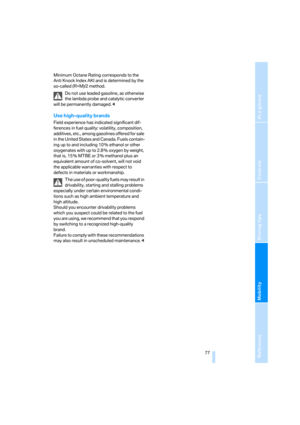 79
79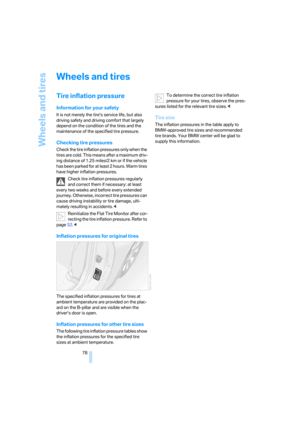 80
80 81
81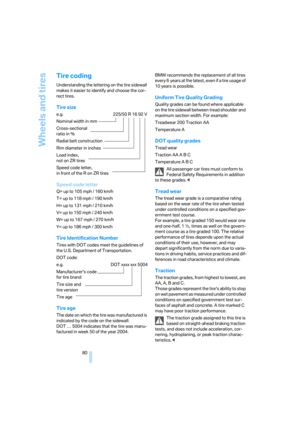 82
82 83
83 84
84 85
85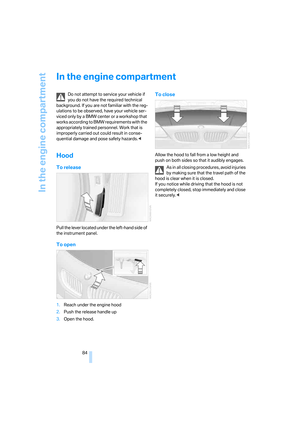 86
86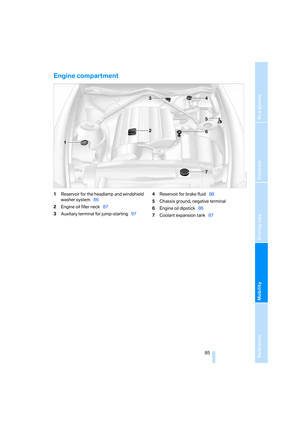 87
87 88
88 89
89 90
90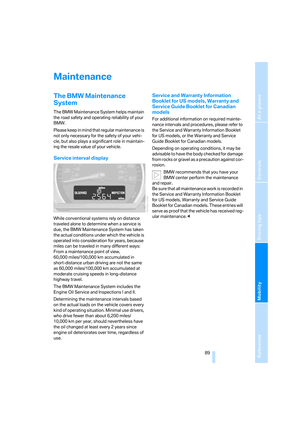 91
91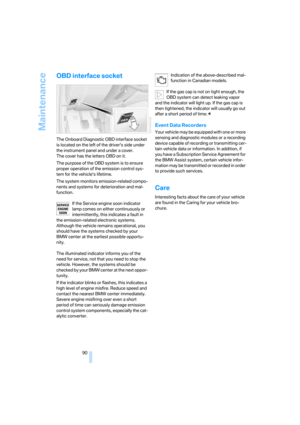 92
92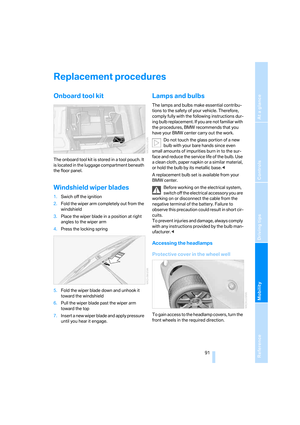 93
93 94
94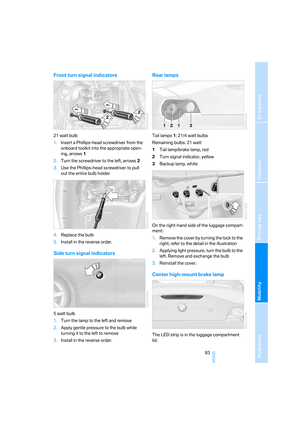 95
95 96
96 97
97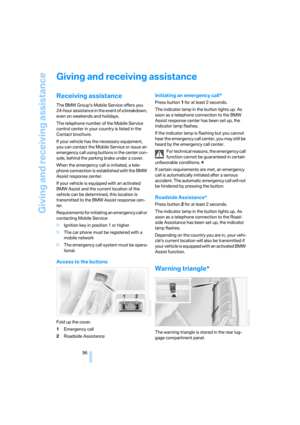 98
98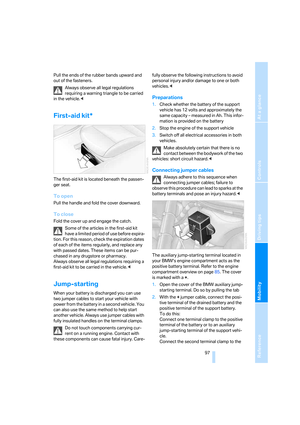 99
99 100
100 101
101 102
102 103
103 104
104 105
105 106
106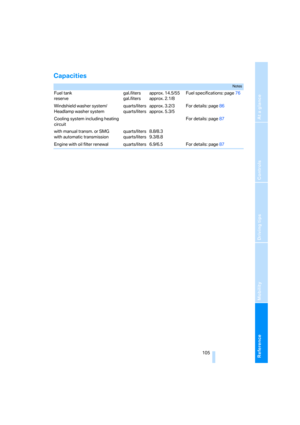 107
107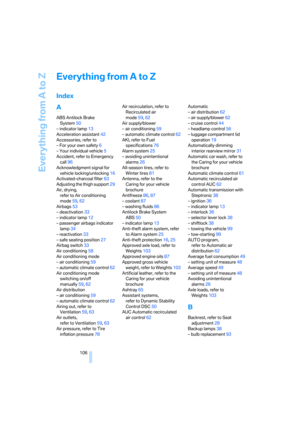 108
108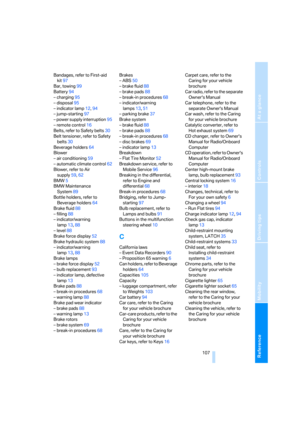 109
109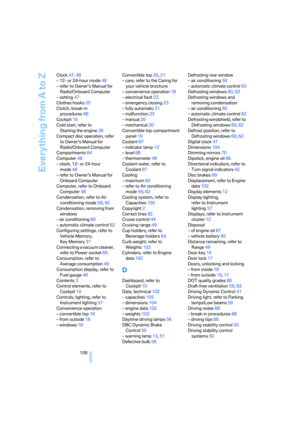 110
110 111
111 112
112 113
113 114
114 115
115 116
116 117
117 118
118 119
119