Page 57 of 126
A congenial climate
56
A congenial climate
Air conditioner
1Airflow directed toward the windshield and
side windows
2Airflow for the upper body57
3Front footwell ventilation57
4Air supply/blower57
5Outside air/recirculated-air mode57
6Temperature57
7Air distribution57
8Rear window defroster57
9Air conditioner57
Page 58 of 126

Reference
At a glance
Controls
Driving tips
Mobility
57
Air supply/blower
You can select blower speeds 1
to 4. The heating and ventilation
become more and more effective
as the air supply settings are
increased. In position 0, the blower
and heater are switched off. The air supply is
blocked in position 0.
Temperature
To increase the temperature of the
interior, turn to the right.
Air distribution
You can direct air to flow onto the
windows , toward the upper
body and into the footwell .
All intermediate settings are possi-
ble. In the setting, there is a
slight flow of air onto the windows to keep them
free of condensation.
Rear window defroster
When the rear window defroster is
activated, the indicator lamp
comes on. The rear window
defroster switches off automatically.
You can have your vehicle programmed in
such a way that the rear window defroster
switches on automatically. It is then switched
on at outside temperatures of less than approx.
+397/+46 within 5 minutes of the engine
start.<
Air conditioner
The air is cooled and dehumidified
and warmed again as needed,
depending on the temperature set-
ting. Depending on the weather, the windshield
may fog over briefly when the engine is started.
You can reduce condensation forming on the
windows by switching on the air conditioner.Condensation forms in the air conditioner
system during operation, and then exits
under the vehicle. Traces of condensed water
under the vehicle are therefore normal.<
Outside air/recirculated-air mode
You can respond to unpleasant
odors outside the vehicle by tem-
porarily switching off the outside
air supply. The system then recirculates the air
currently within the vehicle.
If condensation starts to form on the
inside window surfaces during operation
in the recirculated-air mode, you should switch
it off while also increasing air supply as
required. The recirculated-air mode should not
be used over a sustained period of time, other-
wise the air quality inside the vehicle will deteri-
orate.<
Ventilation
The air vents for the upper body area can be
adjusted:
1Serrated dials
Serrated dials for opening and closing the
vent outlets through an infinitely-variable
range.
2Levers
Selector levers for airflow direction.
3Serrated dial
Use this serrated dial to adjust the amount
of cool air that is added to the airflow
emerging from the vent outlets for the
upper body.
Page 59 of 126
A congenial climate
58
Ventilation for cooling
Adjust the vents to direct the flow of cool air in
your direction, for instance, if the interior has
become too warm.
Draft-free ventilation
Set the vent outlets so that the air flows past
you and is not directed straight at you.
Microfilter
The built-in microfilter removes dust and pollen
from the incoming outside air. It is replaced
when maintenance is performed by your BMW
Sports Activity Vehicle Center. A substantial
reduction in air supply indicates that the filter
should be replaced before normal maintenance.
Defrosting windows and removing
condensation
1Rotary blower switch
Set the rotary switch for air supply at level 4.
2Rotary temperature switch
Turn completely to the right.
3Rotary switch for air distribution
Turn to position .
4Rear window defroster
Switch on to defrost the rear window.
Page 60 of 126
Reference
At a glance
Controls
Driving tips
Mobility
59
Automatic climate control*
1Airflow directed toward the windshield and
side windows
2Airflow for the upper body61
3Air to footwell61
4Individual air distribution60
5Temperature60
6Temperature display60
Air supply60
7Air supply/blower60
8Defrosting windows and removing
condensation60
9Rear window defroster61
10Air conditioner6011Outside air/AUC Automatic recirculated-air
control/recirculated-air mode60
12Automatic air distribution and supply60
Page 61 of 126

A congenial climate
60
A congenial climate
For almost all conditions, the AUTO pro-
gram 12 offers the optimal air distribution and
air volume. Select an interior temperature you
find pleasant.
The following section contains more detailed
information on the available setting options.
Your vehicle has been designed to auto-
matically select your personal climate-
control settings whenever you unlock the doors
using your individually programmed remote
control.<
Automatic air distribution and supply
The AUTO program adjusts the
airflow and distribution patterns for
you while also using your prese-
lected temperature setting as the basis for
adjusting the interior climate to adapt to exter-
nal influences: summer, winter.
The cooling is switched on automatically with
the AUTO program.
Individual air distribution
You can cancel the AUTO program
by selecting specific air distribu-
tion patterns for your personal
comfort, the automatic air supply
remains in operation. You can
direct air to flow onto the win-
dows , toward the upper body , and into
the footwell . You can reactivate the auto-
matic air distribution mode by selecting the
AUTO button.
Adjusting temperature
The figures in the display provide a
general indication of interior tem-
perature. When you start the vehi-
cle, the AUTO program ensures
that the selected temperature is
achieved as quickly as possible. It
then maintains this temperature, regardless of
the season.
Air supply/blower
You can vary the air supply by
pressing the upper or lower button.
This switches off the automatic
program for the air supply, and the
word AUTO goes out in the dis-
play. The automatic mode for air
distribution remains in operation as before. You
can reactivate the automatic air supply mode by
selecting the AUTO button.
If you press the lower button when at the lowest
blower speed, all displays go out: the blower,
heating and air conditioner are switched off.
The outside air supply is shut off. You can
restart the automatic climate control by press-
ing any of its buttons.
Defrosting windows and removing
condensation
This program quickly removes ice
and condensation from the wind-
shield and door windows.
Air conditioner
When the air conditioning is on,
the air is cooled, dehumidified,
and then reheated depending on
the temperature setting. Depending on the
weather, the windshield may fog over briefly
when the engine is started. The air conditioner
reduces the formation of condensation on the
windows.
The air conditioner can only operate when the
engine is running and is automatically switched
on with the AUTO program.
Condensation forms in the air conditioner
system during operation, and then exits
under the vehicle. Traces of condensed water
under the vehicle are therefore normal.<
Outside air/AUC Automatic
recirculated-air control/recirculated-
air mode
You can respond to unpleasant
odors or pollutants in the immedi-
ate environment by suspending
the supply of outside air. The system then recir-
Page 62 of 126

Reference
At a glance
Controls
Driving tips
Mobility
61
culates the air currently within the vehicle.
During AUC operation, a sensor detects pollut-
ants in the outside air and controls the shut-off
automatically.
Press the button repeatedly to run through the
following control sequence:
>Indicator lamps off: outside air flows into the
vehicle.
>Left indicator lamp on, AUC mode: the sys-
tem recognizes pollutants in the outside air
and blocks the flow of air when necessary.
The system then recirculates the air cur-
rently within the vehicle. Depending on the
air quality, the automatic system then
switches back and forth between outside air
supply and recirculation of the air within the
vehicle.
>Right-hand indicator lamp on: the outside
air supply into the vehicle is shut off contin-
uously. The system then recirculates the air
currently within the vehicle.
If condensation starts to form on the
inside window surfaces during operation
in the recirculated-air mode, you should switch
it off while also increasing air supply as
required. The recirculated-air mode should not
be used over a sustained period of time, other-
wise the air quality inside the vehicle will deteri-
orate.<
Rear window defroster
When the rear window defroster is
activated, the indicator lamp
comes on. The rear window
defroster switches off automatically.
You can have your vehicle set so that the
rear window defroster switches on auto-
matically. It is then switched on at outside tem-
peratures of less than approx. +397/+46
within 5 minutes of the engine start.<
Ventilation
The air vents for the upper body area can be
adjusted:
1Serrated dials
Serrated dials for opening and closing the
vent outlets through an infinitely-variable
range.
2Levers
Selector levers for airflow direction.
3Serrated dial
Use this serrated dial to adjust the amount
of cool air that is added to the airflow
emerging from the vent outlets for the
upper body.
Ventilation for cooling
Adjust the vents to direct the flow of cool air in
your direction, for instance, if the interior has
become too warm.
Draft-free ventilation
Set the vent outlets so that the air flows past
you and is not directed straight at you.
Microfilter/activated-charcoal filter*
The built-in microfilter removes dust and pollen
from the incoming air. The activated-charcoal
filter provides additional protection by filtering
gaseous pollutants from the outside air. This
combined filter is replaced when maintenance
is performed by your BMW Sports Activity Vehi-
cle Center. A substantial reduction in air supply
indicates that the filter should be replaced
before normal maintenance.
Page 63 of 126

Practical interior accessories
62
Practical interior accessories
Integrated universal remote
control*
The concept
The integrated universal remote control
replaces up to three different hand-held trans-
mitters for various items of radio-controlled
equipment such as door openers and house
alarm systems. The integrated universal remote
control recognizes and learns the transmitted
signal of each of the original hand-held trans-
mitters.
The signal of an original hand-held transmitter
can be programmed on one of the three mem-
ory buttons1. Once this is done, each of the
devices can be actuated with the appropriately
programmed memory button 1. The indicator
lamp 2 confirms transmission of the signal.
Should you sell your vehicle one day, be sure to
delete the stored programs beforehand for your
safety, refer to page63.
To prevent possible damage or injury,
before programming or using the inte-
grated universal remote control, always inspect
the immediate area to make certain that no peo-
ple, animals or objects are within the travel
range of the device. Also, comply with the
safety precautions of the original hand-held
transmitter.<
Checking compatibility
If you see this symbol on the packaging
or in the manual supplied with the orig-
inal hand-held transmitter, it is safe to
assume that it is compatible with the integrated
universal remote control.
If you have additional questions, please
consult your BMW Sports Activity Vehicle
Center or call 1-800-355-3515.
You can also visit these websites:
www.bmwusa.com or
www.homelink.com. HomeLink is a registered trademark owned by
Johnson Controls, Inc.<
Programming
1Memory buttons
2Indicator lamp
Fixed-code hand-held transmitters
1.Turn the ignition key to position 2.
2.For initial use:
Press both outer buttons 1 for approx.
20 seconds, maintaining pressure until the
indicator lamp2 starts to flash. The three
memory buttons1 are cleared.
3.Hold the original hand-held transmitter at a
distance of approx. 2 in/5 cm to 8 in/20 cm
from the memory buttons1.
The required distance between the
hand-held transmitter and memory
buttons1 depends on the relevant system
of the original hand-held transmitter used.<
4.Simultaneously press the transmit button
on the original hand-held transmitter and
the desired memory button 1 of the inte-
grated universal remote control. Initially, the
indicator lamp2 flashes slowly. Release
both buttons as soon as the indicator
lamp2 flashes rapidly. If the indicator
lamp2 does not flash rapidly after approx.
15 seconds, change the distance.
5.To program other original hand-held trans-
mitters, repeat steps 3 and 4.
Page 64 of 126

Reference
At a glance
Controls
Driving tips
Mobility
63
The corresponding memory button1 is now
programmed with the signal of the original
hand-held transmitter.
You can use the system when the engine is run-
ning or when the ignition is switched on.
If the system cannot be operated after
repeated programming, check whether
the original hand-held transmitter uses an alter-
nating-code system. To do so, either read the
instructions of the original hand-held transmit-
ter or press and hold down the programmed
memory button 1 of the integrated universal
remote control. If the indicator lamp 2 on the
integrated universal remote control flashes rap-
idly for a short time then lights up for approx.
2 seconds, this indicates that the original hand-
held transmitter uses an alternating-code sys-
tem. In the case of an alternating-code system,
program the memory buttons 1 as described at
the section on alternating-code transmitters.<
Alternating-code transmitters
Consult the operating instructions of the unit
you wish to set when programming the univer-
sal remote control. You will find information
there on the possibilities for synchronization.
When programming hand-held transmitters
that employ an alternating code, please follow
these additional instructions:
P r o g ra m m in g w i ll b e ea s i er w it h t h e a i d o f
a second person.<
1.Park your vehicle within the range of the
remote-controlled equipment.
2.Program the integrated universal remote
control as described above at Fixed-code
hand-held transmitters.
3.Locate the button at the receiver of the
equipment to be set, e.g. on the drive.
4.Press the button on the receiver of the
device you want to set up. After step 4, you
have approx. 30 seconds for step 5.
5.Press the programmed memory button1
of the integrated universal remote control
three times. The corresponding memory button1 is now
programmed with the signal of the original
hand-held transmitter.
If you have questions, please contact your
BMW Sports Activity Vehicle Center.<
Clearing memory buttons
Press both outer buttons 1 for approx. 20 sec-
onds until the indicator lamp2 starts to flash:
all of the memory buttons are cleared.
The memory of individual memory buttons 1
cannot be cleared.
Cup holders
Front
Depending on your optional equipment, the
center console contains either one or two cup
holders.
Passenger side*
The cup holder for the front passenger is
located beneath the air/heating vent.
1.Press the trim piece below the air/heating
vent, arrow.
2.Insert cup.
 1
1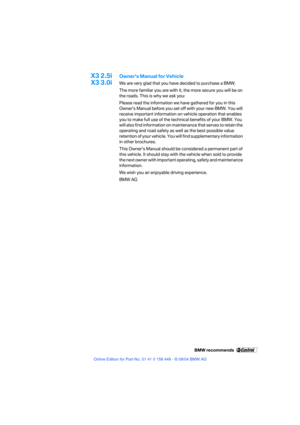 2
2 3
3 4
4 5
5 6
6 7
7 8
8 9
9 10
10 11
11 12
12 13
13 14
14 15
15 16
16 17
17 18
18 19
19 20
20 21
21 22
22 23
23 24
24 25
25 26
26 27
27 28
28 29
29 30
30 31
31 32
32 33
33 34
34 35
35 36
36 37
37 38
38 39
39 40
40 41
41 42
42 43
43 44
44 45
45 46
46 47
47 48
48 49
49 50
50 51
51 52
52 53
53 54
54 55
55 56
56 57
57 58
58 59
59 60
60 61
61 62
62 63
63 64
64 65
65 66
66 67
67 68
68 69
69 70
70 71
71 72
72 73
73 74
74 75
75 76
76 77
77 78
78 79
79 80
80 81
81 82
82 83
83 84
84 85
85 86
86 87
87 88
88 89
89 90
90 91
91 92
92 93
93 94
94 95
95 96
96 97
97 98
98 99
99 100
100 101
101 102
102 103
103 104
104 105
105 106
106 107
107 108
108 109
109 110
110 111
111 112
112 113
113 114
114 115
115 116
116 117
117 118
118 119
119 120
120 121
121 122
122 123
123 124
124 125
125

